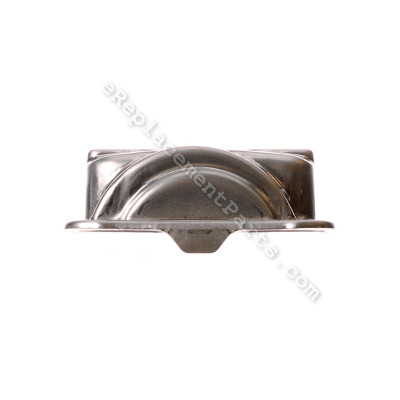
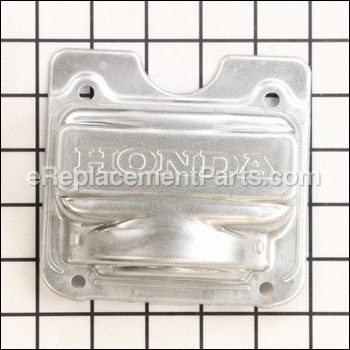


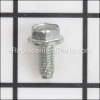
This genuine item is supplied directly from the original equipment manufacturer for use with Honda engines commonly installed on a variety of lawn and garden equipment. It is the main cover for the cylinder assembly. The part helps to protect the internal components from dust and other contaminants. If your cover is damaged or is missing, this will provide an identical replacement for the original component that was installed on a new unit. This high-quality head cover is made of durable metal and is sold individually. Note, the hardware to secure it is sold separately. You will need a wrench to perform this repair.
Head Cover 12310-Z8A-000
OEM part for: Honda, Briggs and Stratton, Toro
Part Number: 12310-Z8A-000
$36.75
In Stock
Jump To:
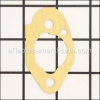
Frequently Purchased Together ?


Compatibility
This part will fit the following 305 machines
Briggs and Stratton
Honda
GC135 (Type VXP5)(VIN# GCAJ-1000001-9999999) Small Engine View Diagrams & Manuals
GC135 (Type WKT2)(VIN# GCAJ-1000001-9999999) Small Engine View Diagrams & Manuals
GC135 (Type WME2)(VIN# GCAJ-1000001-9999999) Small Engine View Diagrams & Manuals
GC160 (Type PHA)(VIN# GCAH-1000001-9999999) Small Engine View Diagrams & Manuals
GC160 (Type PXA)(VIN# GCAH-1000001-9999999) Small Engine View Diagrams & Manuals
GC160 (Type QBC)(VIN# GCAH-1000001-9999999) Small Engine View Diagrams & Manuals
GC160 (Type QHA)(VIN# GCAH-1000001-9999999) Small Engine View Diagrams & Manuals
GC160 (Type QHA1)(VIN# GCAH-1000001-9999999) Small Engine View Diagrams & Manuals
GC160 (Type QHA2)(VIN# GCAH-1000001-9999999) Small Engine View Diagrams & Manuals
GC160 (Type QHAJ)(VIN# GCAH-1000001-9999999) Small Engine View Diagrams & Manuals
GC160 (Type WKT2)(VIN# GCAH-1000001-9999999) Small Engine View Diagrams & Manuals
GC160 (Type WME2)(VIN# GCAH-1000001-9999999) Small Engine View Diagrams & Manuals
GC160A (Type DEAF)(VIN# GCAHA-8000001) Small Engine View Diagrams & Manuals
GC160A (Type DHAF)(VIN# GCAHA-1000001-3599749) Small Engine View Diagrams & Manuals
GC160A (Type MEA2)(VIN# GCAHA-8000001-9999999) Small Engine View Diagrams & Manuals
GC160A (Type MHA2)(VIN# GCAHA-1000001-3599749) Small Engine View Diagrams & Manuals
GC160A (Type PHA)(VIN# GCAHA-1000001-3599749) Small Engine View Diagrams & Manuals
GC160A (Type QBC)(VIN# GCAHA-1000001-3599749) Small Engine View Diagrams & Manuals
GC160A (Type QDE)(VIN# GCAHA-1000001-3599749) Small Engine View Diagrams & Manuals
GC160A (Type QEA)(VIN# GCAHA-8000001) Small Engine View Diagrams & Manuals
GC160A (Type QHA)(VIN# GCAHA-1000001-3599749) Small Engine View Diagrams & Manuals
GC160A (Type QHA1)(VIN# GCAHA-1000001-3599749) Small Engine View Diagrams & Manuals
GC160A (Type QHA2)(VIN# GCAHA-1000001-3599749) Small Engine View Diagrams & Manuals
GC160A (Type QHAF)(VIN# GCAHA-1000001-3599749) Small Engine View Diagrams & Manuals
GC160A (Type QHAJ)(VIN# GCAHA-1000001-3599749) Small Engine View Diagrams & Manuals
GC160A (Type VHA)(VIN# GCAHA-1000001-3599749) Small Engine View Diagrams & Manuals
GC160A (Type VXA)(VIN# GCAHA-1000001-3599749) Small Engine View Diagrams & Manuals
GC160LA (Type DHAF)(VIN# GCAHA-3599750-8000000) Small Engine View Diagrams & Manuals
GC160LA (Type MHA2)(VIN# GCAHA-3599750-8000000) Small Engine View Diagrams & Manuals
GC160LA (Type MHAB)(VIN# GCAHA-3599750-8000000) Small Engine View Diagrams & Manuals
GC160LA (Type QHA1)(VIN# GCAHA-3599750-8000000) Small Engine View Diagrams & Manuals
GC160LA (Type QHA2)(VIN# GCAHA-3599750-8000000) Small Engine View Diagrams & Manuals
GC160LA (Type QHAF)(VIN# GCAHA-3599750-8000000) Small Engine View Diagrams & Manuals
GC160LA (Type QHAJ)(VIN# GCAHA-3599750-8000000) Small Engine View Diagrams & Manuals
GC160LA (Type QHC)(VIN# GCAHA-3599750-8000000) Small Engine View Diagrams & Manuals
GC160LA (Type VHA)(VIN# GCAHA-3599750-8000000) Small Engine View Diagrams & Manuals
GC160LA (Type VXA)(VIN# GCAHA-3599750-8000000) Small Engine View Diagrams & Manuals
GC160LE (Type VXA)(VIN# GCABE-1000001) Small Engine View Diagrams & Manuals
GC190A (Type DHAF)(VIN# GCAAA-1000001) Small Engine View Diagrams & Manuals
GC190A (Type MEA2)(VIN# GCAAA-8000001-9999999) Small Engine View Diagrams & Manuals
GC190A (Type QEAF)(VIN# GCAAA-8000001-9999999) Small Engine View Diagrams & Manuals
GC190A (Type QHA)(VIN# GCAAA-1000001-7999999) Small Engine View Diagrams & Manuals
GC190A (Type QHA1)(VIN# GCAAA-1000001-7999999) Small Engine View Diagrams & Manuals
GC190A (Type QHA2)(VIN# GCAAA-1000001-7999999) Small Engine View Diagrams & Manuals
GC190A (Type QHAD)(VIN# GCAAA-1000001) Small Engine View Diagrams & Manuals
GC190A (Type QHAF)(VIN# GCAAA-1000001-1496156) Small Engine View Diagrams & Manuals
GC190A (Type VBA)(VIN# GCAAA-1000001-7999999) Small Engine View Diagrams & Manuals
GC190A (Type VXA)(VIN# GCAAA-1000001) Small Engine View Diagrams & Manuals
GC190LA (Type MHA2)(VIN# GCAAA-1496157-8000000) Small Engine View Diagrams & Manuals
GC190LA (Type QHAF)(VIN# GCAAA-1496157-8000000) Small Engine View Diagrams & Manuals
GCV135 (Type A1A)(VIN# GJAF-1000001-9999999) Small Engine View Diagrams & Manuals
GCV135 (Type A1D)(VIN# GJAF-1000001-1011083) Small Engine View Diagrams & Manuals
GCV135 (Type A2A)(VIN# GJAF-1000001-9999999) Small Engine View Diagrams & Manuals
GCV135 (Type A2D)(VIN# GJAF-1000001-1000165) Small Engine View Diagrams & Manuals
GCV135 (Type A2R)(VIN# GJAF-1000001-9999999) Small Engine View Diagrams & Manuals
GCV135 (Type N7E2)(VIN# GJAF-1000001-9999999) Small Engine View Diagrams & Manuals
GCV135A (Type N1A)(VIN# GJAFA-1000001-9999999) Small Engine View Diagrams & Manuals
GCV135A (Type N5A)(VIN# GJAFA-1000001-9999999) Small Engine View Diagrams & Manuals
GCV160 (Type A1A)(VIN# GJAE-1000001-9999999) Small Engine View Diagrams & Manuals
GCV160 (Type A2A)(VIN# GJAE-1000001-9999999) Small Engine View Diagrams & Manuals
GCV160 (Type A2R)(VIN# GJAE-1000001-9999999) Small Engine View Diagrams & Manuals
GC135 (Type PHA)(VIN# GCAJ-1000001-9999999) Small Engine View Diagrams & Manuals
GC135 (Type PXA)(VIN# GCAJ-1000001-9999999) Small Engine View Diagrams & Manuals
GC135 (Type QHA)(VIN# GCAJ-1000001-9999999) Small Engine View Diagrams & Manuals
GC135 (Type QHA1)(VIN# GCAJ-1000001-9999999) Small Engine View Diagrams & Manuals
GC135 (Type QHA2)(VIN# GCAJ-1000001-9999999) Small Engine View Diagrams & Manuals
GC135 (Type VHA)(VIN# GCAJ-1000001-9999999) Small Engine View Diagrams & Manuals
GC135 (Type VXA)(VIN# GCAJ-1000001-9999999) Small Engine View Diagrams & Manuals
GCV160 (Type N7A1)(VIN# GJAE-1000001-9999999) Small Engine View Diagrams & Manuals
GCV160A (Type A1A)(VIN# GJAEA-1000001-5386302) Small Engine View Diagrams & Manuals
GCV160A (Type A1AE)(VIN# GJAEA-1000001) Small Engine View Diagrams & Manuals
GCV160A (Type A1AF)(VIN# GJAEA-1000001-5386302) Small Engine View Diagrams & Manuals
GCV160A (Type A1AS)(VIN# GJAEA-1000001) Small Engine View Diagrams & Manuals
GCV160A (Type A2A)(VIN# GJAEA-1000001-6699999) Small Engine View Diagrams & Manuals
GCV160A (Type A2R)(VIN# GJAEA-1000001-5386302) Small Engine View Diagrams & Manuals
GCV160A (Type A3A)(VIN# GJAEA-1000001-6699999) Small Engine View Diagrams & Manuals
GCV160A (Type BHH)(VIN# GJAEA-1000001-5386302) Small Engine View Diagrams & Manuals
GCV160A (Type E1A2)(VIN# GJAEA-8000001-8018819) Small Engine View Diagrams & Manuals
GCV160A (Type R3A1)(VIN# GJAEA-8000001-8018819) Small Engine View Diagrams & Manuals
GCV160A (Type RTL1)(VIN# GJAEA-1000001) Small Engine View Diagrams & Manuals
GCV160A (Type S1A)(VIN# GJAEA-1000001-5386302) Small Engine View Diagrams & Manuals
GCV160A (Type S1A1)(VIN# GJAEA-1000001-6699999) Small Engine View Diagrams & Manuals
GCV160A (Type S1M)(VIN# GJAEA-1000001-5386302) Small Engine View Diagrams & Manuals
GCV160A (Type S3A)(VIN# GJAEA-1000001-5386302) Small Engine View Diagrams & Manuals
GCV160A (Type S3A2)(VIN# GJAEA-1000001) Small Engine View Diagrams & Manuals
GCV160A (Type S3H)(VIN# GJAEA-1000001-5386302) Small Engine View Diagrams & Manuals
GCV160A (Type STA1)(VIN# GJAEA-1000001-6699999) Small Engine View Diagrams & Manuals
GCV160A (Type STL1)(VIN# GJAEA-1000001) Small Engine View Diagrams & Manuals
GCV160LA (Type A1A)(VIN# GJAEA-5386303) Small Engine View Diagrams & Manuals
GCV160A (Type E5A4)(VIN# GJAEA-8000001-8018819) Small Engine View Diagrams & Manuals
GCV160A (Type EHHB)(VIN# GJAEA-8000001-8018819) Small Engine View Diagrams & Manuals
GCV160A (Type N1A)(VIN# GJAEA-1000001-5386302) Small Engine View Diagrams & Manuals
GCV160A (Type N1AF)(VIN# GJAEA-1000001-5386302) Small Engine View Diagrams & Manuals
GCV160A (Type N5A)(VIN# GJAEA-1000001) Small Engine View Diagrams & Manuals
GCV160A (Type N5AF)(VIN# GJAEA-1000001-5386302) Small Engine View Diagrams & Manuals
GCV160A (Type N5MF)(VIN# GJAEA-1000001-5386302) Small Engine View Diagrams & Manuals
GCV160A (Type N5R)(VIN# GJAEA-1000001-5386302) Small Engine View Diagrams & Manuals
GCV160A (Type N7A1)(VIN# GJAEA-1000001-5386302) Small Engine View Diagrams & Manuals
GCV160A (Type NBL1)(VIN# GJAEA-1000001) Small Engine View Diagrams & Manuals
GCV160A (Type R1A)(VIN# GJAEA-8000001-8018819) Small Engine View Diagrams & Manuals
GCV160LA (Type A1AF)(VIN# GJAEA-5386303) Small Engine View Diagrams & Manuals
GCV160LA (Type A2R)(VIN# GJAEA-5386303) Small Engine View Diagrams & Manuals
GCV160LA (Type BHH)(VIN# GJAEA-5386303) Small Engine View Diagrams & Manuals
GCV160LA (Type E1A2)(VIN# GJAEA-8018820) Small Engine View Diagrams & Manuals
GCV160LA (Type N1A)(VIN# GJAEA-5386303) Small Engine View Diagrams & Manuals
GCV160LA (Type N1AF)(VIN# GJAEA-5386303) Small Engine View Diagrams & Manuals
GCV160LA (Type N5AF)(VIN# GJAEA-5386303) Small Engine View Diagrams & Manuals
GCV160LA (Type N5MF)(VIN# GJAEA-5386303) Small Engine View Diagrams & Manuals
GC160 (Type VHA)(VIN# GCAH-1000001-9999999) Small Engine View Diagrams & Manuals
GC160 (Type VXA)(VIN# GCAH-1000001-9999999) Small Engine View Diagrams & Manuals
GC160A (Type QEA2)(VIN# GCAHA-8000001-9999999) Small Engine View Diagrams & Manuals
GC160A (Type QEAF)(VIN# GCAHA-8000001-9999999) Small Engine View Diagrams & Manuals
GC160LA (Type QBC)(VIN# GCAHA-3599750-8000000) Small Engine View Diagrams & Manuals
GC160LA (Type QDE)(VIN# GCAHA-3599750-8000000) Small Engine View Diagrams & Manuals
GC160LA (Type QHA)(VIN# GCAHA-3599750-8000000) Small Engine View Diagrams & Manuals
GC190A (Type MHA2)(VIN# GCAAA-1000001-1496156) Small Engine View Diagrams & Manuals
GC190A (Type QEA)(VIN# GCAAA-8000001-9999999) Small Engine View Diagrams & Manuals
GC190A (Type QEA2)(VIN# GCAAA-8000001-9999999) Small Engine View Diagrams & Manuals
GCV160 (Type N1)(VIN# GJAE-1000001-9999999) Small Engine View Diagrams & Manuals
GCV160 (Type N2)(VIN# GJAE-1000001-9999999) Small Engine View Diagrams & Manuals
GCV160A (Type E1A4)(VIN# GJAEA-8000001-8018819) Small Engine View Diagrams & Manuals
GCV160A (Type E1G7)(VIN# GJAEA-8000001-8018819) Small Engine View Diagrams & Manuals
GCV160A (Type R3A)(VIN# GJAEA-8000001-8018819) Small Engine View Diagrams & Manuals
GCV160LA (Type N5R)(VIN# GJAEA-5386303) Small Engine View Diagrams & Manuals
GCV160LA (Type N7A1)(VIN# GJAEA-5386303) Small Engine View Diagrams & Manuals
GCV160LA (Type N7S1)(VIN# GJAEA-5386303) Small Engine View Diagrams & Manuals
GCV160LA (Type R3A)(VIN# GJAEA-8018820) Small Engine View Diagrams & Manuals
GCV160LA (Type S1A)(VIN# GJAEA-5386303) Small Engine View Diagrams & Manuals
GCV160LA (Type S1M)(VIN# GJAEA-5386303) Small Engine View Diagrams & Manuals
GCV160LA (Type S3A)(VIN# GJAEA-5386303) Small Engine View Diagrams & Manuals
GCV160LA (Type S3H)(VIN# GJAEA-5386303) Small Engine View Diagrams & Manuals
GCV160LA0 (Type A2R)(VIN# GJARA-1000001) Small Engine View Diagrams & Manuals
GCV160LA0 (Type A1A)(VIN# GJARA-1000001) Small Engine View Diagrams & Manuals
GCV160LA0 (Type BHH)(VIN# GJARA-1000001) Small Engine View Diagrams & Manuals
GCV160LA0 (Type A1AF)(VIN# GJARA-1000001) Small Engine View Diagrams & Manuals
GCV160LA0 (Type E1A2)(VIN# GJARA-1000001) Small Engine View Diagrams & Manuals
GCV160LA0 (Type N1A)(VIN# GJARA-1000001) Small Engine View Diagrams & Manuals
GCV160LA0 (Type N1AF)(VIN# GJARA-1000001) Small Engine View Diagrams & Manuals
GCV160LA0 (Type N5AF)(VIN# GJARA-1000001) Small Engine View Diagrams & Manuals
GCV160LA0 (Type N5MF)(VIN# GJARA-1000001) Small Engine View Diagrams & Manuals
GCV160LA0 (Type N5R)(VIN# GJARA-1000001) Small Engine View Diagrams & Manuals
GCV160LA0 (Type N7A1)(VIN# GJARA-1000001) Small Engine View Diagrams & Manuals
GCV160LA0 (Type N7S1)(VIN# GJARA-1000001) Small Engine View Diagrams & Manuals
GCV160LA0 (Type R3A)(VIN# GJARA-1000001) Small Engine View Diagrams & Manuals
GCV160LA0 (Type S1A)(VIN# GJARA-1000001) Small Engine View Diagrams & Manuals
GCV160LA0 (Type S1M)(VIN# GJARA-1000001) Small Engine View Diagrams & Manuals
GCV160LA0 (Type S3A)(VIN# GJARA-1000001) Small Engine View Diagrams & Manuals
GCV160LA0 (Type S3H)(VIN# GJARA-1000001) Small Engine View Diagrams & Manuals
GCV160LE (Type A7H1)(VIN# GJAAE-1000001) Small Engine View Diagrams & Manuals
GCV160LA0 (Type S3T)(VIN# GJARA-1000001) Small Engine View Diagrams & Manuals
GCV160LE (Type N7A1)(VIN# GJAAE-1000001) Small Engine View Diagrams & Manuals
GCV160LA0 (Type SBT)(VIN# GJARA-1000001) Small Engine View Diagrams & Manuals
GCV190A (Type A1AE)(VIN# GJAAA-1000001) Small Engine View Diagrams & Manuals
GCV160LE (Type A2A9)(VIN# GJAAE-1000001) Small Engine View Diagrams & Manuals
GCV190A (Type A1AF)(VIN# GJAAA-1000001) Small Engine View Diagrams & Manuals
GCV190A (Type N1A)(VIN# GJAAA-1000001-1607128) Small Engine View Diagrams & Manuals
GCV160LE (Type A4A9)(VIN# GJAAE-1000001) Small Engine View Diagrams & Manuals
GCV190A (Type BHH)(VIN# GJAAA-1000001) Small Engine View Diagrams & Manuals
GCV190A (Type N1AF)(VIN# GJAAA-1000001) Small Engine View Diagrams & Manuals
GCV190A (Type E1A2)(VIN# GJAAA-8000001-9999999) Small Engine View Diagrams & Manuals
GCV190A (Type N5A)(VIN# GJAAA-1000001) Small Engine View Diagrams & Manuals
GCV190A (Type S3A)(VIN# GJAAA-1000001-1607128) Small Engine View Diagrams & Manuals
GCV190A (Type N5AF)(VIN# GJAAA-1000001-1607128) Small Engine View Diagrams & Manuals
GCV190LA (Type N1A)(VIN# GJAAA-1607129) Small Engine View Diagrams & Manuals
GCV190A (Type R1A)(VIN# GJAAA-8000001) Small Engine View Diagrams & Manuals
GCV190LA (Type N5AF)(VIN# GJAAA-1607129) Small Engine View Diagrams & Manuals
GCV190A (Type R3A)(VIN# GJAAA-8000001) Small Engine View Diagrams & Manuals
GCV190LA (Type N5AP)(VIN# GJAAA-1607129) Small Engine View Diagrams & Manuals
GCV190A (Type S1A)(VIN# GJAAA-1000001) Small Engine View Diagrams & Manuals
GCV190LA (Type S3A)(VIN# GJAAA-1607129) Small Engine View Diagrams & Manuals
GCV160LA0 (Type N5RB)(VIN# GJARA-1000001) Small Engine View Diagrams & Manuals
HRB216 (Type HXA)(VIN# MAAA-1000001) Lawn Mower View Diagrams & Manuals
HRB216 (Type HXAA)(VIN# MAAA-1000001) Lawn Mower View Diagrams & Manuals
HRB216 (Type TDA)(VIN# MAAA-1000001) Lawn Mower View Diagrams & Manuals
HRB216 (Type TDAA)(VIN# MAAA-1000001) Lawn Mower View Diagrams & Manuals
HRB216 (Type TXA)(VIN# MAAA-1000001) Lawn Mower View Diagrams & Manuals
HRB216 (Type TXAA)(VIN# MAAA-1000001) Lawn Mower View Diagrams & Manuals
HRB217 (Type HXA)(VIN# MAEA-1000001) Lawn Mower View Diagrams & Manuals
HRB217 (Type TDA)(VIN# MAEA-1000001) Lawn Mower View Diagrams & Manuals
HRR216 (Type PDA)(VIN# MZCG-6000001 to MZCG-6152286) Lawn Mower View Diagrams & Manuals
HRR216 (Type S3DA)(VIN# MZCG-6000001 to MZCG-6157470) Lawn Mower View Diagrams & Manuals
HRR216 (Type SDA)(VIN# MZCG-6000001 to MZCG-6299999) Lawn Mower View Diagrams & Manuals
HRR216K2 (Type PDAA)(VIN# MZCG-6700001 to MZCG-7199999) Lawn Mower View Diagrams & Manuals
HRR216K2 (Type SDAA)(VIN# MZCG-6700001 to MZCG-7199999) Lawn Mower View Diagrams & Manuals
HRR216K2 (Type TDAA)(VIN# MZCG-6700001 to MZCG-7199999) Lawn Mower View Diagrams & Manuals
HRR216K2 (Type TKAA)(VIN# MZCG-6700001 to MZCG-7199999) Lawn Mower View Diagrams & Manuals
HRR216K3 (Type PDA)(VIN# MZCG-7200001 to MZCG-7599999) Lawn Mower View Diagrams & Manuals
HRR216K3 (Type TDA)(VIN# MZCG-7200001 to MZCG-7599999) Lawn Mower View Diagrams & Manuals
HRR216K3 (Type VXA)(VIN# MZCG-7200001 to MZCG-7599999) Lawn Mower View Diagrams & Manuals
HRR216K4 (Type PDA)(VIN# MZCG-7700001 to MZCG-7799999) Lawn Mower View Diagrams & Manuals
HRR216K4 (Type TDA)(VIN# MZCG-7700001 to MZCG-7799999) Lawn Mower View Diagrams & Manuals
HRR216K4 (Type VXA)(VIN# MZCG-7700001 to MZCG-7799999) Lawn Mower View Diagrams & Manuals
HRR216K5 (Type PDAA)(VIN# MZCG-7800001 to MZCG-7999999) Lawn Mower View Diagrams & Manuals
HRR216K5 (Type VKAA)(VIN# MZCG-7800001 to MZCG-7999999) Lawn Mower View Diagrams & Manuals
HRR216K5 (Type VXAA)(VIN# MZCG-7800001 to MZCG-7999999) Lawn Mower View Diagrams & Manuals
HRR216K6 (Type PDAA)(VIN# MZCG-8000001 to MZCG-8199999) Lawn Mower View Diagrams & Manuals
HRR216K6 (Type VKAA)(VIN# MZCG-8000001 to MZCG-8199999) Lawn Mower View Diagrams & Manuals
HRR216K6 (Type VXAA)(VIN# MZCG-8000001 to MZCG-8199999) Lawn Mower View Diagrams & Manuals
HRR216K7 (Type PDAA)(VIN# MZCG-8200001) Lawn Mower View Diagrams & Manuals
HRR216K7 (Type VKAA)(VIN# MZCG-8200001) Lawn Mower View Diagrams & Manuals
HRR216K7 (Type VXAA)(VIN# MZCG-8200001) Lawn Mower View Diagrams & Manuals
HRS216 (Type PDA)(VIN# MZBZ-6000001 to MZBZ-6067704) Lawn Mower View Diagrams & Manuals
HRS216 (Type SDA)(VIN# MZBZ-6000001 to MZBZ-6065864) Lawn Mower View Diagrams & Manuals
HRS216K1 (Type PDA)(VIN# MZBZ-6100001 to MZBZ-6299999) Lawn Mower View Diagrams & Manuals
HRS216K1 (Type PDAA)(VIN# MZBZ-6100001 to MZBZ-6199999) Lawn Mower View Diagrams & Manuals
HRS216K1 (Type SDA)(VIN# MZBZ-6100001 to MZBZ-6299999) Lawn Mower View Diagrams & Manuals
HRS216K1 (Type SDAA)(VIN# MZBZ-6100001 to MZBZ-6199999) Lawn Mower View Diagrams & Manuals
HRS216K2 (Type PDAA)(VIN# MZBZ-6300001 to MZBZ-6369999) Lawn Mower View Diagrams & Manuals
HRS216K2 (Type SDAA)(VIN# MZBZ-6300001 to MZBZ-6369999) Lawn Mower View Diagrams & Manuals
HRS216K3 (Type PDAA)(VIN# MZBZ-6370001 to MZBZ-6399999) Lawn Mower View Diagrams & Manuals
HRS216K3 (Type SDAA)(VIN# MZBZ-6370001 to MZBZ-6399999) Lawn Mower View Diagrams & Manuals
HRS216K4 (Type PDAA)(VIN# MZBZ-6400001) Lawn Mower View Diagrams & Manuals
HRS216K4 (Type SDAA)(VIN# MZBZ-6400001) Lawn Mower View Diagrams & Manuals
HRT216 (Type S3DA)(VIN# MZCG-6000001 to MZCG-6195898) Lawn Mower View Diagrams & Manuals
HRT216 (Type SDA)(VIN# MZCG-6000001 to MZCG-6195138) Lawn Mower View Diagrams & Manuals
HRT216K1 (Type PDA)(VIN# MZCG-6300001 to MZCG-6599999) Lawn Mower View Diagrams & Manuals
HRT216K1 (Type PDA/A)(VIN# MZCG-6600001 to MZCG-6699999) Lawn Mower View Diagrams & Manuals
HRT216K1 (Type PDAA)(VIN# MZCG-6300001 to MZCG-6599999) Lawn Mower View Diagrams & Manuals
HRT216K1 (Type PDAA/A)(VIN# MZCG-6600001 to MZCG-6699999) Lawn Mower View Diagrams & Manuals
HRT216K1 (Type S3DA)(VIN# MZCG-6300001 to MZCG-6599999) Lawn Mower View Diagrams & Manuals
HRT216K1 (Type S3DA/A)(VIN# MZCG-6600001 to MZCG-6699999) Lawn Mower View Diagrams & Manuals
HRT216K1 (Type SDA)(VIN# MZCG-6300001 to MZCG-6599999) Lawn Mower View Diagrams & Manuals
HRT216K1 (Type SDA/A)(VIN# MZCG-6600001 to MZCG-6699999) Lawn Mower View Diagrams & Manuals
HRT216K1 (Type SDAA)(VIN# MZCG-6300001 to MZCG-6599999) Lawn Mower View Diagrams & Manuals
HRT216K1 (Type SDAA/A)(VIN# MZCG-6600001 to MZCG-6699999) Lawn Mower View Diagrams & Manuals
HRT216K1 (Type TDAA)(VIN# MZCG-6300001 to MZCG-6599999) Lawn Mower View Diagrams & Manuals
HRT216K1 (Type TDAA/A)(VIN# MZCG-6600001 to MZCG-6699999) Lawn Mower View Diagrams & Manuals
HRT216K2 (Type TDAA)(VIN# MZCG-6700001 to MZCG-7199999) Lawn Mower View Diagrams & Manuals
HRX217 (Type HMA)(VIN# MAGA-1000001 to MAGA-1299999) Lawn Mower View Diagrams & Manuals
HRX217 (Type HXA)(VIN# MAGA-1000001 to MAGA-1299999) Lawn Mower View Diagrams & Manuals
HRX217 (Type TDA)(VIN# MAGA-1000001 to MAGA-1299999) Lawn Mower View Diagrams & Manuals
HRX217K1 (Type HMA)(VIN# MAGA-1400001 to MAGA-1499999) Lawn Mower View Diagrams & Manuals
HRX217K1 (Type HXA)(VIN# MAGA-1400001 to MAGA-1499999) Lawn Mower View Diagrams & Manuals
HRX217K1 (Type TDA)(VIN# MAGA-1400001 to MAGA-1499999) Lawn Mower View Diagrams & Manuals
HRX217K1 (Type VKAA)(VIN# MAGA-1400001 to MAGA-1499999) Lawn Mower View Diagrams & Manuals
HRX217K2 (Type HXAA)(VIN# MAGA-1500001) Lawn Mower View Diagrams & Manuals
HRX217K2 (Type VKAA)(VIN# MAGA-1500001) Lawn Mower View Diagrams & Manuals
HRZ216 (Type TDAA)(VIN# MAFA-1000001) Lawn Mower View Diagrams & Manuals
HS520 (Type A)(VIN# SZBG-6000001 to SZBG-6099999) Snowblower View Diagrams & Manuals
HS520 (Type AA)(VIN# SZBG-6000001 to SZBG-6699999) Snowblower View Diagrams & Manuals
HS520 (Type AS)(VIN# SZBG-6000001 to SZBG-6099999) Snowblower View Diagrams & Manuals
HS520 (Type ASA)(VIN# SZBG-6000001 to SZBG-6099999) Snowblower View Diagrams & Manuals
HS520K1 (Type ASA)(VIN# SZBG-6100001) Snowblower View Diagrams & Manuals
GCV190LA N5AV (GJAAA-1607129) Four-Stroke Gas Engine View Diagrams & Manuals
GCV160A (TYPE S3A)(Vin# GJAEA-1000001) General Purpose Engine View Diagrams & Manuals
GS160LA (Type QHAF)(VIN# GCABA-1000001-9999999) Engine View Diagrams & Manuals
GS190LA (Type QHAF)(VIN# GCACA-1000001-9999999) Engine View Diagrams & Manuals
GC160LA (Type PHA)(VIN# GCAHA-3599750-9999999) Engine View Diagrams & Manuals
GC160LA (Type QHG)(VIN# GCAHA-3599750-9999999) Engine View Diagrams & Manuals
GC190LA (Type QHGF)(VIN# GCAAA-1496157-9999999) Engine View Diagrams & Manuals
GC190LA (Type QTT)(VIN# GCAAA-1496157-9999999) Engine View Diagrams & Manuals
GC190LA (Type VBAF)(VIN# GCAAA-1496157-9999999) Engine View Diagrams & Manuals
GCV190LA (Type BHH)(VIN# GJAAA-1607129-9999999) Engine View Diagrams & Manuals
GCV190LA (Type G5AP)(VIN# GJAAA-1607129-9999999) Engine View Diagrams & Manuals
GCV190LA (Type G5B)(VIN# GJAAA-1607129-9999999) Engine View Diagrams & Manuals
GCV190LA (Type G5BR)(VIN# GJAAA-1607129-9999999) Engine View Diagrams & Manuals
GCV190LA (Type N5AV)(VIN# GJAAA-1607129-9999999) Engine View Diagrams & Manuals
GCV190LA (Type N5B)(VIN# GJAAA-1607129-9999999) Engine View Diagrams & Manuals
GCV190LA (Type N5BR)(VIN# GJAAA-1607129-9999999) Engine View Diagrams & Manuals
GCV190LA (Type N5RB)(VIN# GJAAA-1607129-9999999) Engine View Diagrams & Manuals
GCV190LA (Type S3C)(VIN# GJAAA-1607129-9999999) Engine View Diagrams & Manuals
GCV190LA (Type S3L)(VIN# GJAAA-1607129-9999999) Engine View Diagrams & Manuals
GCV190LA (Type SBA)(VIN# GJAAA-1607129-9999999) Engine View Diagrams & Manuals
GCV190LA (Type SBH)(VIN# GJAAA-1607129-9999999) Engine View Diagrams & Manuals
GCV190LA (Type SBL)(VIN# GJAAA-1607129-9999999) Engine View Diagrams & Manuals
GSV190LA (Type GBH)(VIN# GJACA-1035731-9999999) Engine View Diagrams & Manuals
GSV190LA (Type S3T)(VIN# GJACA-1035731-9999999) Engine View Diagrams & Manuals
GCV160A0 (Type S3DB)(VIN# GJAPA-1300001-9999999) Engine View Diagrams & Manuals
GCV160A0 (Type S3TE)(VIN# GJAPA-1000001-9999999) Engine View Diagrams & Manuals
FG400 (Type A1)(VIN# GCAJ-1000001-9999999) Tiller View Diagrams & Manuals
FG500 (Type A1)(VIN# GCAH-1000001-9999999) Tiller View Diagrams & Manuals
FG500 (Type A2)(VIN# GCAH-1000001-9999999) Tiller View Diagrams & Manuals
HS720 (Type AA)(VIN# GCAAA-1000001-9999999) Snow Blower View Diagrams & Manuals
HS720 (Type AMA)(VIN# GCAAA-1000001-9999999) Snow Blower View Diagrams & Manuals
HS720 (Type ASA)(VIN# GCAAA-1000001-9999999) Snow Blower View Diagrams & Manuals
HRS216K5 (Type PKAA)(VIN# GJARA-1000001-9999999) Lawn Mower View Diagrams & Manuals
HRS216K5 (Type SKAA)(VIN# GJARA-1000001-9999999) Lawn Mower View Diagrams & Manuals
HRX217K2 (Type HMAA)(VIN# GJAAA-1000001-9999999) Lawn Mower View Diagrams & Manuals
HRX217K4 (Type HYAA)(VIN# GJAAA-1000001-9999999) Lawn Mower View Diagrams & Manuals
HRX217K4 (Type HZAA)(VIN# GJAAA-1000001-9999999) Lawn Mower View Diagrams & Manuals
HRX217K4 (Type VKAA)(VIN# GJAAA-1000001-9999999) Lawn Mower View Diagrams & Manuals
HRX217K4 (Type VLAA)(VIN# GJAAA-1000001-9999999) Lawn Mower View Diagrams & Manuals
HRX217K5 (Type HYAA)(VIN# GJAAA-1000001-9999999) Lawn Mower View Diagrams & Manuals
HRX217K5 (Type HZAA)(VIN# GJAAA-1000001-9999999) Lawn Mower View Diagrams & Manuals
HRX217K5 (Type VKAA)(VIN# GJAAA-1000001-9999999) Lawn Mower View Diagrams & Manuals
HRX217K5 (Type VLAA)(VIN# GJAAA-1000001-9999999) Lawn Mower View Diagrams & Manuals
HRX217K5 (Type VYAA)(VIN# GJAAA-1000001-9999999) Lawn Mower View Diagrams & Manuals
HRR216K9 (Type PKAA)(VIN# GJARA-1000001-9999999) Lawn Mower View Diagrams & Manuals
HRR216K9 (Type VKAA)(VIN# GJARA-1000001-9999999) Lawn Mower View Diagrams & Manuals
HRR216K9 (Type VLAA)(VIN# GJAPA-1000001-9999999) Lawn Mower View Diagrams & Manuals
HRR216K9 (Type VYAA)(VIN# GJAPA-1000001-9999999) Lawn Mower View Diagrams & Manuals
WN20 (Type AX1)(VIN# GCAJ-1000001-9999999) Water Pump View Diagrams & Manuals
WN30 (Type AX1)(VIN# GCAH-1000001-9999999) Water Pump View Diagrams & Manuals
EB2800I (Type A)(VIN# GCAAA-1496157-9999999) Generator View Diagrams & Manuals
EG2800I (Type A)(VIN# GCAAA-1496157-9999999) Generator View Diagrams & Manuals
EN2000 (Type A)(VIN# GCAH-1000001-9999999) Generator View Diagrams & Manuals
EN2000 (Type AL)(VIN# GCAH-1000001-9999999) Generator View Diagrams & Manuals
EN2500 (Type A)(VIN# GCAH-1000001-9999999) Generator View Diagrams & Manuals
EN2500 (Type AL)(VIN# GCAH-1000001-9999999) Generator View Diagrams & Manuals
EN2500 (Type AL/A)(VIN# GCAHA-1000001-9999999) Generator View Diagrams & Manuals
EN2500 (Type AN)(VIN# GCAHA-1000001-9999999) Generator View Diagrams & Manuals
GCV135 (Type A1A)(VIN# GJAF-1000001-9999999) Small Engine View Diagrams & Manuals
Toro
20192 (290000001-290999999)(2009) Lawn Mower View Diagrams & Manuals
20194 (290000001-290999999)(2009) Lawn Mower View Diagrams & Manuals
Show More Compatible Models
This item works with the following types of products:
- Engine Parts
- Lawn Mower Parts
- Snowblower Parts
This part replaces obsolete part #: 12311-ZL8-D00 (Serial# (1000001-9999999)), 12310-Z0J-000 (Serial# (1212617-9999999)), 12311-ZL8-000 (Serial# (1000001-1468766)), 12310-Z8B-000, 12310-Z0J-000, 12311-ZL8-000, 12311-ZL8-D00
Customer Part Reviews ?
Average Rating (out of 5):
Click to filter by ratings:
5 stars
8
4 stars
0
3 stars
0
2 stars
0
1 stars
0
< PREV
- 1
Honda parts ordered.
Everything I ordered arrived on time and your website is easy to navigate.
Guest -
March 13, 2023
Verified Purchase
Perfect Fit
The part was original part at a great price. Speedy delivery
Guest -
July 5, 2022
Verified Purchase
Easy fix
Wasn’t sure why my lawnmower just died and wouldn’t restart. I didn’t realize that I dented the valve cover while mowing around a fire hydrant. Once I figured it out, I ordered a new one from ereplacementparts. Arrived fast and perfect condition as always. First place to check when you need a part.
Guest -
April 30, 2022
Verified Purchase
Easy repair
Was in great condition
Guest -
November 18, 2020
Verified Purchase
Arrived quickly, identical to original part, quick fix.
The parts arrived quickly and the quality was excellent. The head cover is not designed to use a pre-made gasket. This is true for the original part too.You will need to get a tube of “Permatex” and follow the directions on the tube. Be sure to use the high heat type. You put a line of permatex on the lip of the new head cover and let set per tube instructions. Works perfectly. Be sure to tighten the 4 screws evenly to insure the permatex is pressed down and seals evenly. Torque screws per instructions to insure the screws stay tight.
Charles -
August 4, 2020
Verified Purchase
Easy part and install
Ok original packing.
Guest -
June 22, 2020
Verified Purchase
Original Part
Ordered this part for my Honda engine pressure washer. Part arrived very quickly and fit perfectly. Installation was quick and easy.
Guest -
July 15, 2019
Verified Purchase
Quality and fit
Good quality and price delivered in timely manner.
James -
May 27, 2019
Verified Purchase
t
t
t -
t days ago
Verified Purchase
eReplacementParts Team
t
Questions & Answers ?
Our customer Service team is at the ready daily to answer your part and product questions.

Ask our Team
We have a dedicated staff with decades of collective experience in helping customers just like you purchase parts to repair their products.
Does this fit my product?Questions & Answers for Head Cover
No questions have been asked yet
Customer Repair Instructions ?
All our customer repair instructions are solicited directly from other customers just like you who have purchased and replaced this exact part.
Valve cover was leaking due to damage.
Gary - August 26, 2016
👍 4 of 5 people found this instruction helpful
Tool Type
Engine
Difficulty
Easy
Time
15-30 minutes
Tools Used
Screwdriver, Pliers
Parts Used
1. Unscrewed valve cover.
2. Used pliers to pull valve cover off which damaged.
3. Cleaned off all sealant from head portion that valve cover mounts on.
4. Put grey sealant on the new valve cover which was recommended by others. (There was no gasket.)
5. Installed new valve cover and hand tightened screws per instructions.
2. Used pliers to pull valve cover off which damaged.
3. Cleaned off all sealant from head portion that valve cover mounts on.
4. Put grey sealant on the new valve cover which was recommended by others. (There was no gasket.)
5. Installed new valve cover and hand tightened screws per instructions.
Did you find this story helpful?
Thanks for voting and helping fellow customers!
Rings wore out
Janet - June 16, 2016
👍 3 of 3 people found this instruction helpful
Tool Type
Lawn Mower
Difficulty
Medium
Time
1-2 hours
Tools Used
Screwdriver, Wrench Set, Nutdriver, Electrical screwdriver
1. Prep engine for work. (drain oil, remove trim, remove from mow deck, etc)
2. Remove valve cover
3. Open crankcase
4. Remove flywheel with puller (try to mark locations on timing belt)
5. Remove crankshaft and piston (lose markings on timing belt)
6. Remove valve rockers and Springs then valves
7. Order new parts and wait for them to come
8. Install new valves and Springs and rockers (using online diagrams for exact part locations)
9. Install new rings on piston.
10. Install piston using recently purchased ring compressor
11. Install crankshaft
12. Refer to Internet for timing (quite simple)
13. Reinstall flywheel
14. Put rest if motor back together as best I can.
15. Try to figure why choke isn't working like should, no luck
16. Put in oil and gasoline and celebrate when it fires up and runs.
Did you find this story helpful?
Thanks for voting and helping fellow customers!
My cover had a puncture hole so I needed to replace it.
Corey - May 2, 2017
👍 1 of 1 people found this instruction helpful
Tool Type
Lawn Mower
Difficulty
Easy
Time
30-60 minutes
Tools Used
Socket set
Parts Used
1. Drained what left of the oil.
2. Removed the old cover.
3. Applied a gasket maker compound.
4. Placed my new cover on.
5. Hand tightened the bolts but not fully.
6. Allowed gasket compound to dry for a bit.
7. Came back and tightened all the way for a good seal.
2. Removed the old cover.
3. Applied a gasket maker compound.
4. Placed my new cover on.
5. Hand tightened the bolts but not fully.
6. Allowed gasket compound to dry for a bit.
7. Came back and tightened all the way for a good seal.
Did you find this story helpful?
Thanks for voting and helping fellow customers!
Valve cover was leaking oil!
Zachary - July 23, 2016
👍 1 of 1 people found this instruction helpful
Tool Type
Lawn Mower
Difficulty
Easy
Time
15-30 minutes
Tools Used
Socket set, Wrench Set
Removed valve cover. Cleaned off old gasket material. Applied new gasket rtv and installed new valve cover
Did you find this story helpful?
Thanks for voting and helping fellow customers!
Valve cover bent during removal. Honda recommends replacement on this OHC emgine.
Charles - January 21, 2023
Tool Type
Engine
Difficulty
Easy
Time
30-60 minutes
Tools Used
Screwdriver, Pliers, Socket set, putty knife to clean Silicone
Parts Used
Removed 4 bolts on valve cover. It was glued on and was quite bent before I got it off! I checked the valve adjustment and put the new one on with fresh sealant. It was a perfect replacement part.
Did you find this story helpful?
Thanks for voting and helping fellow customers!
I somehow punched a small hole in the aluminum valve cover. So it was releasing minute oil smoke
James - July 11, 2022
Tool Type
Lawn Mower
Difficulty
Medium
Time
15-30 minutes
Tools Used
Screwdriver, Socket set
Parts Used
Took the 4 bolts out an thought I could just remove the cover. Wrong... it is sealed with liquid gasket material. So you will likely bend and make useless the one you're removing. For me it was no problem as I was replacing it anyway. Be sure to note the instructions for the gasket material. Mine said do not use for 24 hours to allow a full cure.
Did you find this story helpful?
Thanks for voting and helping fellow customers!
Valve cover was bent preventing the valves from working
Paul - July 28, 2021
Tool Type
Lawn Mower
Difficulty
Easy
Time
15-30 minutes
Tools Used
Socket set, form a gasket
Parts Used
removed. And replaced valve cover
Did you find this story helpful?
Thanks for voting and helping fellow customers!
Timing belt kept jumping off the pulley.
Brent - November 17, 2019
Tool Type
Engine
Difficulty
Easy
Time
Less than 15 minutes
Tools Used
Nutdriver
Parts Used
Removed the rocker arm cover.
Removed the rope starter assembly.
Move the flywheel to the magnets meet the magneto.
Move the cam sprocket so the timing marks line up.
Re-install the belt onto the cam sprocket.
Put the new rocker arm cover on. (Has a retainer to keep the belt from jumping.)
Re-install the rope starter assembly.
Log Splitter started on second pull.
Did you find this story helpful?
Thanks for voting and helping fellow customers!
OEM stands for Original Equipment Manufacturer and means the part you’re buying is sourced directly from the manufacturer who made your product. At eReplacementParts, we sell only genuine OEM parts, guaranteeing the part you’re purchasing is of better design and of higher quality than aftermarket parts.
Our product descriptions are a combination of data sourced directly from the manufacturers who made your product as well as content researched and curated by our content & customer service teams. This content is edited and reviewed internally before being made public to customers.
Our customer service team are at the ready daily to answer your part and product questions. We have a dedicated staff with decades of collective experience in helping customers just like you purchase parts to repair their products.
All our part reviews are solicited directly from other customers who have purchased this exact part. While we moderate these reviews for profanity, offensive language or personally identifiable information, these reviews are posted exactly as submitted and no alterations are made by our team.
All our customer repair instructions are solicited directly from other customers just like you who have purchased and replaced this exact part. While we moderate these reviews for profanity, offensive language or personally identifiable information, these reviews are posted exactly as submitted and no alterations are made by our team.
Based on data from past customer purchasing behaviors, these parts are most commonly purchased together along with the part you are viewing. These parts may be necessary or helpful to replace to complete your current repair.
All our installation videos are created and produced in collaboration with our in-house repair technician, Mark Sodja, who has helped millions of eReplacementParts customers over the last 13 years repair their products. Mark has years of experience in selling and repairing both commercial and residential products with a specialty in gas-powered equipment.
This data is collected from customers who submitted a repair instruction after replacing this exact part. Customers can rate how easy the repair was to complete and how long it took. We aggregate this data to provide a repair rating that allows customers to quickly determine the difficulty and time needed to perform their own repair.