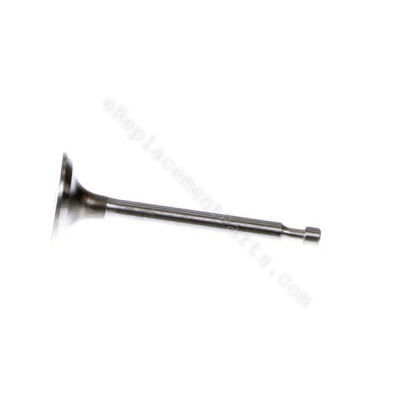


This is an authentic Honda replacement part that has been sourced from the original manufacturer to be used with small engines. The exhaust valve is one of two valves that provide compression within the cylinder. This item is used to allow burned gasses to exit the combustion chamber. The valve is priced as a single item.
Valve, Ex. (c8e) 14721-ZL8-000
OEM part for: Honda
Part Number: 14721-ZL8-000
$63.75
In Stock
Jump To:
Frequently Purchased Together ?


Compatibility
This Valve, Ex. (c8e) will fit the following 411 machines. Confirm this part works with your model, and view the detailed model diagrams and repair help we have to offer.
This item works with the following types of products:
- Engine Parts
This part replaces obsolete part #: 14721-Z8B-000 (Serial# (1000001-9999999)), 1472128B-000, 14721-Z8B-000
Questions & Answers ?
Our customer Service team is at the ready daily to answer your part and product questions.

Ask our Team
We have a dedicated staff with decades of collective experience in helping customers just like you purchase parts to repair their products.
Does this fit my product?Questions & Answers for Valve, Ex. (c8e)
No questions have been asked yet
Customer Repair Instructions ?
All our customer repair instructions are solicited directly from other customers just like you who have purchased and replaced this exact part.
Rings wore out
Janet - June 16, 2016
👍 1 of 1 people found this instruction helpful
Tool Type
Lawn Mower
Difficulty
Medium
Time
1-2 hours
Tools Used
Screwdriver, Wrench Set, Nutdriver, Electrical screwdriver
1. Prep engine for work. (drain oil, remove trim, remove from mow deck, etc)
2. Remove valve cover
3. Open crankcase
4. Remove flywheel with puller (try to mark locations on timing belt)
5. Remove crankshaft and piston (lose markings on timing belt)
6. Remove valve rockers and Springs then valves
7. Order new parts and wait for them to come
8. Install new valves and Springs and rockers (using online diagrams for exact part locations)
9. Install new rings on piston.
10. Install piston using recently purchased ring compressor
11. Install crankshaft
12. Refer to Internet for timing (quite simple)
13. Reinstall flywheel
14. Put rest if motor back together as best I can.
15. Try to figure why choke isn't working like should, no luck
16. Put in oil and gasoline and celebrate when it fires up and runs.
Did you find this story helpful?
Thanks for voting and helping fellow customers!
Exhaust valve bent
Charles - December 16, 2020
Tool Type
Engine
Difficulty
Easy
Time
1-2 hours
Tools Used
Screwdriver, Power Drill, Socket set, Wrench Set
Disassembled engine by splitting case. Removed rod cap, removed crankshaft and removed piston and rod. Removed and replaced bent exhaust valve. Replaced cam gear and belt and reassembled engine.
Did you find this story helpful?
Thanks for voting and helping fellow customers!
Bent crankshaft due to hitting very hard object
Angel - October 23, 2020
Tool Type
Lawn Mower
Difficulty
Hard
Time
More than 2 hours
Tools Used
Screwdriver, Pliers, Socket set, Wrench Set, 2 and 3 jaw pullers, low and high range torque wrenches
Parts Used
- Valve Rocker Arm - 14431-Z0J-000
- Valve Rocker Arm - 14441-Z0J-000
- O-ring - 6.8x1.9 - Arai - 91301-ZM0-V31
- Seal- Valve Stem - 12209-ZM0-003
- Spring- Valve - 14751-ZL8-000
- Valve, In. - 14711-ZL8-000
- Pulley, Camshaft - 14320-Z8D-000
- Belt, Timing (84hu6 G-200) - 14400-Z8B-003
- Valve, Ex. (c8e) - 14721-ZL8-000
- Cover, Head - 12311-Z8B-000
1. Took off broken blades, blade holder and drive belt pulley. This required a two jaw puller due to bend in shaft.
2. Open up crankcase. Many steps involved. Followed youtube videos. Detailed videos exist.
3. Take out piston. Found lots of black soot on piston, crankcase and valve seats. Apparently due to mistiming from running engine with bent crankshaft since this is a pretty new engine always running smooth before accident.
4. Use carburetor cleaner and lots of work to clean piston and case. Put in new valves and use grinding compound to clean valve seats and "break in" valves.
5. Install new crankshaft (also from ereplacement) and all new parts related to timing. The old ones looked fine but did not want to have to open up again in case there was some damage not visible.
6. Assemble everything. Again lots of steps. Take pictures when disassembling, label parts and use youtube videos. A mechanic friend lent me a puller and a torque wrench.
7. New blade holder and blades.
8. Pull starter cord. Starts right off. Runs very smooth. Cuts very well. Success but it is a major project for amateurs. I am retired thus have the time and love this Honda lawnmower. Kind of expensive because of all the new parts but still cheaper than a new Honda and I have only had it a couple of years. Now it's practically new.
Did you find this story helpful?
Thanks for voting and helping fellow customers!
valves
orlando - July 7, 2019
Tool Type
Engine
Difficulty
Medium
Time
1-2 hours
Tools Used
Screwdriver, Pliers, Power Drill, Socket set, Wrench Set, Nutdriver, hammer,pry bar
replaced valves and adjusted rockers
Did you find this story helpful?
Thanks for voting and helping fellow customers!
Broken valve
Douglas - May 14, 2019
Tool Type
Engine
Difficulty
Medium
Time
30-60 minutes
Tools Used
Screwdriver, Socket set, Wrench Set, None
Opened case
Lapped new valves
Replaced timing belt
Sealed case
Lapped new valves
Replaced timing belt
Sealed case
Did you find this story helpful?
Thanks for voting and helping fellow customers!
Exhaust valve broke at stem and broke piston.
Cory - May 13, 2018
Tool Type
Engine
Difficulty
Medium
Time
1-2 hours
Tools Used
Screwdriver, Pliers, Power Drill, Socket set, Wrench Set, Lapping tool , torque wrench , variety of pullers
Complete disassembled case. Removed broken parts. Complete inspection of internal parts. Did crank run out. Reassembled and torque all parts. Did not replace pto seal and should have. When I started the engine seal blew and oil drained everywhere. Need to replace seals and will be good after that.
Did you find this story helpful?
Thanks for voting and helping fellow customers!
OEM stands for Original Equipment Manufacturer and means the part you’re buying is sourced directly from the manufacturer who made your product. At eReplacementParts, we sell only genuine OEM parts, guaranteeing the part you’re purchasing is of better design and of higher quality than aftermarket parts.
Our product descriptions are a combination of data sourced directly from the manufacturers who made your product as well as content researched and curated by our content & customer service teams. This content is edited and reviewed internally before being made public to customers.
Our customer service team are at the ready daily to answer your part and product questions. We have a dedicated staff with decades of collective experience in helping customers just like you purchase parts to repair their products.
All our part reviews are solicited directly from other customers who have purchased this exact part. While we moderate these reviews for profanity, offensive language or personally identifiable information, these reviews are posted exactly as submitted and no alterations are made by our team.
All our customer repair instructions are solicited directly from other customers just like you who have purchased and replaced this exact part. While we moderate these reviews for profanity, offensive language or personally identifiable information, these reviews are posted exactly as submitted and no alterations are made by our team.
Based on data from past customer purchasing behaviors, these parts are most commonly purchased together along with the part you are viewing. These parts may be necessary or helpful to replace to complete your current repair.
All our installation videos are created and produced in collaboration with our in-house repair technician, Mark Sodja, who has helped millions of eReplacementParts customers over the last 13 years repair their products. Mark has years of experience in selling and repairing both commercial and residential products with a specialty in gas-powered equipment.
This data is collected from customers who submitted a repair instruction after replacing this exact part. Customers can rate how easy the repair was to complete and how long it took. We aggregate this data to provide a repair rating that allows customers to quickly determine the difficulty and time needed to perform their own repair.