


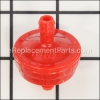
This is an original Craftsman part for use with Lawn Mowers. The carburetor primer bulb circulates fuel to the carburetor to provide quicker starting. The most common reasons for replacing the primer bulb are when the engine leaks gas or won’t start. This part is sold individually. The tools that you will need to replace the carburetor primer bulb is an 8mm socket or nut driver, small flat-head screwdriver and a Phillips-head screwdriver.
Primer-carburetor 694395
OEM part for: Briggs and Stratton, Toro, Lawn Boy, Craftsman
Part Number: 694395
$4.99
In Stock
Jump To:
Product Description ?
- Dimension: 7/8-inch.
- Classification: Part
- Weight: 0.01 lbs.
- Shipping: Ships Worldwide
Frequently Purchased Together ?


Compatibility
This Primer-carburetor will fit the following 10019 machines. Confirm this part works with your model, and view the detailed model diagrams and repair help we have to offer.
Briggs and Stratton
Toro
Lawn Boy
Craftsman
Show More Compatible ModelsThis item works with the following types of products:
- Engine Parts
- Generator Parts
- Lawn Mower Parts
This part replaces obsolete part #: 496115 (Used Before Code Date 99051300), 496115
Repair Videos ?
Watch the Repair Video for
Primer-carburetor

Articles:
|
Replacing primer bulbs in small engines is one of the most common types of tool repairs, and this article explains profe...
June 25, 2010
|

Customer Part Reviews ?
Average Rating (out of 5):
Click to filter by ratings:
5 stars
13
4 stars
1
3 stars
1
2 stars
0
1 stars
0
< PREV
- 1
- 2
Was going to take this lawnmower to the recycle bin...
After replacing the magneto and getting a carburetor gasket kit, this lawnmower refused to start. The only thing left was the primer bulb, what a thing to overlook! After replacement, the mower started with almost no effort, and ran perfectly afterward. Many thanks!
Guest -
1 days ago
Verified Purchase
Quality part that was easy to look up online and order
Got my wood spliter up and running.
Guest -
November 14, 2022
Verified Purchase
Easy repair
Good service
Guest -
November 17, 2021
Verified Purchase
Just what I needed
The part was just as described and priced very reasonable. I’ll definitely be back for more.
Guest -
May 25, 2021
Verified Purchase
Fast shipping, fit was spot on.
Fast shipping, fit was spot on.
Guest -
October 3, 2020
Verified Purchase
primer for fuel
came quick, and correct, like their web site
Rickie -
March 26, 2020
Verified Purchase
Repair parts
Good website performance, the right parts and prompt delivery. Just what you want!
Guest -
January 1, 2020
Verified Purchase
I'm pleased I could find this part!
I wondered why it took 6 or 7 pushes to start the mower. Found answer on line. Found you the same way. If it fits your business maybe a remove old and install new diagrams or some helpful words... One stop shopping!!!
Guest -
November 16, 2019
Verified Purchase
Great Service
This part was exactly what I needed to fix my mower!
Guest -
October 12, 2019
Verified Purchase
easy repair work great
everything is perfect
Jennifer -
June 18, 2019
Verified Purchase
Questions & Answers ?
Our customer Service team is at the ready daily to answer your part and product questions.

Ask our Team
We have a dedicated staff with decades of collective experience in helping customers just like you purchase parts to repair their products.
Does this fit my product?Questions & Answers for Primer-carburetor
No questions have been asked yet
Customer Repair Instructions ?
All our customer repair instructions are solicited directly from other customers just like you who have purchased and replaced this exact part.
Mice ate the rubber primer bulb
Rich - June 11, 2016
👍 9 of 12 people found this instruction helpful
Tool Type
Lawn Mower
Difficulty
Medium
Time
15-30 minutes
Tools Used
Screwdriver, Pliers
Parts Used
I used a screwdriver to help pop what was left of the old bulb and it's plastic retaining ring loose, then used a needle nose plier to pull it out. Used the same flat head screwdriver to push the new one into place.
Did you find this story helpful?
Thanks for voting and helping fellow customers!
Leaked gas out the primer
George - September 15, 2016
👍 4 of 4 people found this instruction helpful
Tool Type
Lawn Mower
Difficulty
Easy
Time
15-30 minutes
Tools Used
Socket set
Removed air cleaner assembly from carburetor
Replaced primer
Cleaned off old gasket
Replaced with new gasket, used a mix of graphite and oil as sealant
Installed new filter and housing
Added gas, no leaks, pumped primer and started engine.
Replaced primer
Cleaned off old gasket
Replaced with new gasket, used a mix of graphite and oil as sealant
Installed new filter and housing
Added gas, no leaks, pumped primer and started engine.
Did you find this story helpful?
Thanks for voting and helping fellow customers!
Pressure Washer engine carburetor flooding
Lane - March 18, 2017
👍 3 of 3 people found this instruction helpful
Tool Type
Engine
Difficulty
Easy
Time
15-30 minutes
Tools Used
Pliers, Nutdriver
1. removed air filter and cover.
2. removed primer base.
3. removed carburetor and gaskets
4. cleaned old gaskets from engine.
5. Installed new carburetor and gasket.
6. Installed new primer base, replaced because I wanted all new parts.
7. Installed new air filter and cover.
8. Primed and pulled rope, started on 2nd pull ran like new.
Did you find this story helpful?
Thanks for voting and helping fellow customers!
Hit a rock and bent the crankshaft
James - April 23, 2016
👍 5 of 7 people found this instruction helpful
Tool Type
Lawn Mower
Difficulty
Medium
Time
More than 2 hours
Tools Used
Screwdriver, Socket set, Wrench Set, wheel puller, Torque wrench
1. Remove motor from lawn mower.
2. Clean outside of motor.
3. Remove flywheel, carburetor, muffler, spark plug and all brackets.
4. Remove sump bolts and sump from motor.
5. Remove connecting rod bolts and rod cap.
6. move piston to top of cylinder.
7. Remove crankshaft.
8. Clean old oil from inside motor and crankcase.
9. Replace two each oil seals on motor housing and sump cover.
10. Lubricate all journals on new crankshaft and two oil seals and insert into motor.
11. Reconnect connecting rod and torque to 100 in. lbs.
12. Install camshaft aligning two marks on camshaft gear with one dot on crankshaft gear.
13. Install governor to line up with governor lever.
14. coat sump gasket with Permatex and install on sump surface.
15. Install sump and torque bolts to 90 in. lbs.
16. Install flywheel with key and torque nut to 55 ft. lbs.
17. Install spark coil with a gap of 0.007 to 0.009" between coil and flywheel.
18. Resemble carburetor, muffler, spark plug and all brackets.
19. Assemble motor into the mower base, tighten bolts and install the blade.
Note:
If you know your piston, cylinder and valves are Ok you do not have to remove the head or the valve cover. This saves a lot of time for the overhaul. This was the case for my motor and it is working great.
Did you find this story helpful?
Thanks for voting and helping fellow customers!
Primer bulb was worn out
Larry - July 13, 2018
👍 1 of 1 people found this instruction helpful
Tool Type
Lawn Mower
Difficulty
Easy
Time
Less than 15 minutes
Tools Used
Screwdriver, Needle Nose Pliers
Parts Used
1-Grasped old primer bulb and plastic retainer with needle nose pliers and extracted them
2-Installed new primer bulb and plastic retainer
2-Installed new primer bulb and plastic retainer
Did you find this story helpful?
Thanks for voting and helping fellow customers!
Clogged carburetor.
Russell - July 2, 2016
👍 1 of 1 people found this instruction helpful
Tool Type
Engine
Difficulty
Easy
Time
15-30 minutes
Tools Used
Socket set, Nutdriver, Carburetor cleaner
Took off the housing and air cleaner assembly. Disconnected the fuel lines and throttle cable. Took apart the carburetor and used carb cleaner to clean out the old gas. Put the carburetor back together, and reassembled the motor.
Did you find this story helpful?
Thanks for voting and helping fellow customers!
Old primer bulb sun rotted no life left
Charles - May 20, 2016
👍 1 of 1 people found this instruction helpful
Tool Type
Lawn Mower
Difficulty
Easy
Time
Less than 15 minutes
Tools Used
Screwdriver, Socket set
Parts Used
Remove air filter, clean filter. Remove three screws holding air filter housing to engine. remove housing. remove plastic retaining ring holding primer bulb replace with new parts. reassemble, prime, pull starter cord, mow grass. Smile
Did you find this story helpful?
Thanks for voting and helping fellow customers!
Bad gaskets and seat was leaking.
Glenn - July 22, 2022
Tool Type
Lawn Mower
Difficulty
Medium
Time
15-30 minutes
Tools Used
Screwdriver, Pliers, Socket set
1. Removed carburetor from mower
2. Removed and replaced the needle and seat
3. replaced gaskets
4. reinstalled carburetor
5. Started up mower. Works like a charm.
2. Removed and replaced the needle and seat
3. replaced gaskets
4. reinstalled carburetor
5. Started up mower. Works like a charm.
Did you find this story helpful?
Thanks for voting and helping fellow customers!
Primer bulb was cracked and torn. I could not not prime the carb.
Kenneth - July 20, 2022
Tool Type
Lawn Mower
Difficulty
Easy
Time
Less than 15 minutes
Tools Used
Screwdriver, Socket set
Removed the air cleaner housing which held the primer bulb using a 10mm socket. Used a screw driver to release the retainer clip from the breather housing which held in the primer bulb. pulled out the bulb and clip. Inspected the clip for chips and cracks to see if it needed replacement, it was in good condition. I then cleaned out the oriface for the bulb and lightly lubed it with a touch of oil. Pushed the primer bulb in place followed by the retainer clip. Put the air breather back on with the new carb gasket, carb side, new paper filter and then the prefilter. Tested the new primer bulb and the engine started on the second try. a clear success.
It was very simple and straight forward.
It was very simple and straight forward.
Did you find this story helpful?
Thanks for voting and helping fellow customers!
Carburetor had old gas clogging the fuel flow
Kevin - August 6, 2021
Tool Type
Engine
Difficulty
Medium
Time
30-60 minutes
Tools Used
Pliers, Socket set, Wrench Set, Nutdriver
Pulled, rebuild and reinstalled the carburetor.
Did you find this story helpful?
Thanks for voting and helping fellow customers!
Load More Install Stories
OEM stands for Original Equipment Manufacturer and means the part you’re buying is sourced directly from the manufacturer who made your product. At eReplacementParts, we sell only genuine OEM parts, guaranteeing the part you’re purchasing is of better design and of higher quality than aftermarket parts.
Our product descriptions are a combination of data sourced directly from the manufacturers who made your product as well as content researched and curated by our content & customer service teams. This content is edited and reviewed internally before being made public to customers.
Our customer service team are at the ready daily to answer your part and product questions. We have a dedicated staff with decades of collective experience in helping customers just like you purchase parts to repair their products.
All our part reviews are solicited directly from other customers who have purchased this exact part. While we moderate these reviews for profanity, offensive language or personally identifiable information, these reviews are posted exactly as submitted and no alterations are made by our team.
All our customer repair instructions are solicited directly from other customers just like you who have purchased and replaced this exact part. While we moderate these reviews for profanity, offensive language or personally identifiable information, these reviews are posted exactly as submitted and no alterations are made by our team.
Based on data from past customer purchasing behaviors, these parts are most commonly purchased together along with the part you are viewing. These parts may be necessary or helpful to replace to complete your current repair.
All our installation videos are created and produced in collaboration with our in-house repair technician, Mark Sodja, who has helped millions of eReplacementParts customers over the last 13 years repair their products. Mark has years of experience in selling and repairing both commercial and residential products with a specialty in gas-powered equipment.
This data is collected from customers who submitted a repair instruction after replacing this exact part. Customers can rate how easy the repair was to complete and how long it took. We aggregate this data to provide a repair rating that allows customers to quickly determine the difficulty and time needed to perform their own repair.