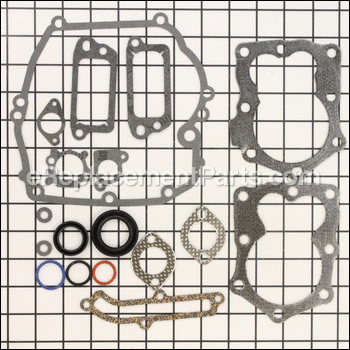
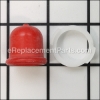
This is an authentic Briggs and Stratton part set that has been sourced from the original manufacturer, and it is intended to be used with small engines. It is recommended to replace the gaskets when servicing the engine to make sure the part connections fit and make proper seals. This gasket set includes all items that are photographed, and the set is only sold as a complete kit.
Gasket Set-engine 590508
OEM part for: Briggs and Stratton, Toro, Craftsman
Part Number: 590508
Jump To:
Frequently Purchased Together ?
Compatibility
This part will fit the following 6711 machines
Briggs and Stratton
Toro
Craftsman
This item works with the following types of products:
- Engine Parts
- Generator Parts
- Lawn Mower Parts
This part replaces obsolete part #: 794307, 497316
Customer Part Reviews ?
- 1
Questions & Answers ?
Our customer Service team is at the ready daily to answer your part and product questions.

Ask our Team
We have a dedicated staff with decades of collective experience in helping customers just like you purchase parts to repair their products.
Does this fit my product?Questions & Answers for Gasket Set-engine
Customer Repair Instructions ?
All our customer repair instructions are solicited directly from other customers just like you who have purchased and replaced this exact part.
Hit a rock and bent the crankshaft
Tool Type
Lawn Mower
Difficulty
Medium
Time
More than 2 hours
Tools Used
Screwdriver, Socket set, Wrench Set, wheel puller, Torque wrench
2. Clean outside of motor.
3. Remove flywheel, carburetor, muffler, spark plug and all brackets.
4. Remove sump bolts and sump from motor.
5. Remove connecting rod bolts and rod cap.
6. move piston to top of cylinder.
7. Remove crankshaft.
8. Clean old oil from inside motor and crankcase.
9. Replace two each oil seals on motor housing and sump cover.
10. Lubricate all journals on new crankshaft and two oil seals and insert into motor.
11. Reconnect connecting rod and torque to 100 in. lbs.
12. Install camshaft aligning two marks on camshaft gear with one dot on crankshaft gear.
13. Install governor to line up with governor lever.
14. coat sump gasket with Permatex and install on sump surface.
15. Install sump and torque bolts to 90 in. lbs.
16. Install flywheel with key and torque nut to 55 ft. lbs.
17. Install spark coil with a gap of 0.007 to 0.009" between coil and flywheel.
18. Resemble carburetor, muffler, spark plug and all brackets.
19. Assemble motor into the mower base, tighten bolts and install the blade.
Note:
If you know your piston, cylinder and valves are Ok you do not have to remove the head or the valve cover. This saves a lot of time for the overhaul. This was the case for my motor and it is working great.
Lawn mower was dumping oil.
Tool Type
Engine
Difficulty
Easy
Time
More than 2 hours
Tools Used
Screwdriver, Pliers, Socket set, Nutdriver
Parts Used
Burning oil, low power, hard starting
Tool Type
Lawn Mower
Difficulty
Medium
Time
More than 2 hours
Tools Used
Screwdriver, Pliers, Power Drill, Socket set, Wrench Set, Nutdriver, Adjustable Wrench
2. Disassembled engine - during disassembly the muffler bolts snapped, so both needed to be drilled out and then helicoiled
3. Using bore gauge, measured three points in piston bore for size and roundness - determined that standard ring set fell within measured limits based on Briggs & Stratton technical information available on the internet
4. Broke glaze in piston bore and removed small ridge at the very top of the bore
5. Lapped valves to seats and measured tappet to valve clearance and adjusted clearance by grinding valve stem to achieve clearance suggested by Briggs & Stratton technical information
6. Installed rings onto piston and measured crankshaft ODs
7. Installed crankshaft and piston
8. Completed engine assembly using new gasket set
9. Rebuilt carburetor and installed
10. Completed engine assembly and installed engine onto lawn mower base
The important items to keep in mind:
- all parts must be cleaned thoroughly to include bolts
- all critical IDs and ODs must be measured and determined to be within limits
- all gasket surfaces must be cleaned of old gasket material
- even though it is important to follow torque specifications, following a cross hatch method of tightening bolts without a torque wrench can be done - it just takes an educated touch
- there are great exploded views of assemblies all over the internet, so there is no need to worry if you can get the parts back together
Replaced all gaskets
Tool Type
Lawn Mower
Difficulty
Expert
Time
More than 2 hours
Tools Used
Screwdriver, Pliers, Socket set, Wrench Set, Two jaw puller
Parts Used
OEM stands for Original Equipment Manufacturer and means the part you’re buying is sourced directly from the manufacturer who made your product. At eReplacementParts, we sell only genuine OEM parts, guaranteeing the part you’re purchasing is of better design and of higher quality than aftermarket parts.
Our product descriptions are a combination of data sourced directly from the manufacturers who made your product as well as content researched and curated by our content & customer service teams. This content is edited and reviewed internally before being made public to customers.
Our customer service team are at the ready daily to answer your part and product questions. We have a dedicated staff with decades of collective experience in helping customers just like you purchase parts to repair their products.
All our part reviews are solicited directly from other customers who have purchased this exact part. While we moderate these reviews for profanity, offensive language or personally identifiable information, these reviews are posted exactly as submitted and no alterations are made by our team.
All our customer repair instructions are solicited directly from other customers just like you who have purchased and replaced this exact part. While we moderate these reviews for profanity, offensive language or personally identifiable information, these reviews are posted exactly as submitted and no alterations are made by our team.
Based on data from past customer purchasing behaviors, these parts are most commonly purchased together along with the part you are viewing. These parts may be necessary or helpful to replace to complete your current repair.
All our installation videos are created and produced in collaboration with our in-house repair technician, Mark Sodja, who has helped millions of eReplacementParts customers over the last 13 years repair their products. Mark has years of experience in selling and repairing both commercial and residential products with a specialty in gas-powered equipment.
This data is collected from customers who submitted a repair instruction after replacing this exact part. Customers can rate how easy the repair was to complete and how long it took. We aggregate this data to provide a repair rating that allows customers to quickly determine the difficulty and time needed to perform their own repair.

