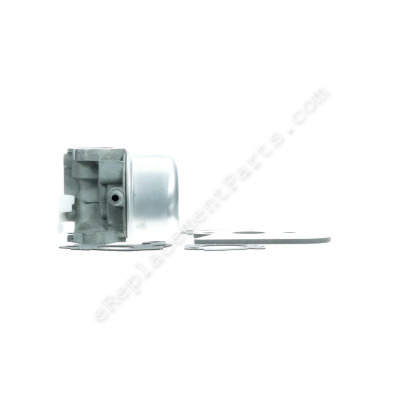
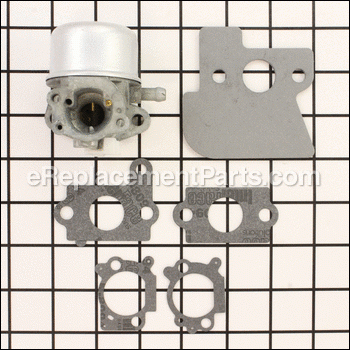
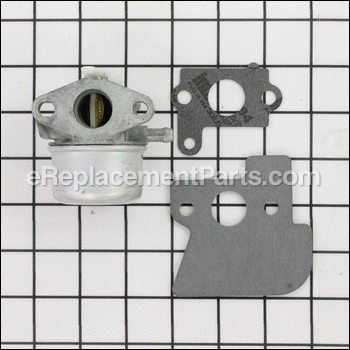
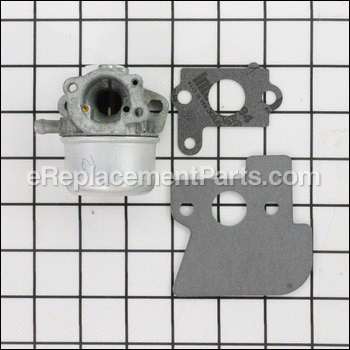


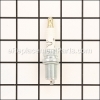
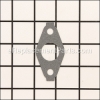
This carburetor is an authentic OEM replacement part made for use on Briggs and Stratton engines. It is an essential part of an internal combustion engine designed to mix gas and air before sending combustible mixture in the engine. This kit includes a metal body carburetor and five (5) composite material gaskets.
To replace this carburetor you would need a screwdriver.
• Remove the cover
• Disconnect throttle cable
• Remove the old carburetor and gaskets
• Install the new carburetor with gaskets
• Connect throttle cable
• Re-assemble and test the unit
Carburetor 790120
OEM part for: Briggs and Stratton, Toro
Part Number: 790120
$53.95
In Stock
Jump To:
Product Description ?
- Classification: Part
- Weight: 0.64 lbs.
- Shipping: Ships Worldwide
Frequently Purchased Together ?


Compatibility
This part will fit the following 1059 machines
Briggs and Stratton
12A600 Series (0100-0112) Engine View Diagrams & Manuals
12B600 Series (0100-0104) Engine View Diagrams & Manuals
12C600 Series (0100-0118) Engine View Diagrams & Manuals
12D600 Series (0015-0119) Engine View Diagrams & Manuals
11A602-0100-E1 Engine View Diagrams & Manuals
11A602-0111-E1 Engine View Diagrams & Manuals
11A602-0113-E1 Engine View Diagrams & Manuals
11A602-0114-E1 Engine View Diagrams & Manuals
11A602-0115-E1 Engine View Diagrams & Manuals
11A602-0125-E1 Engine View Diagrams & Manuals
11A602-0147-E1 Engine View Diagrams & Manuals
11A602-0150-E1 Engine View Diagrams & Manuals
11A602-0151-E1 Engine View Diagrams & Manuals
11A602-0152-E1 Engine View Diagrams & Manuals
11A602-0169-E1 Engine View Diagrams & Manuals
11A602-0170-E1 Engine View Diagrams & Manuals
11A682-0118-E1 Engine View Diagrams & Manuals
11A682-0119-E1 Engine View Diagrams & Manuals
11A687-0108-E1 Engine View Diagrams & Manuals
11C602-0100-E1 Engine View Diagrams & Manuals
11C602-0110-E1 Engine View Diagrams & Manuals
110602-0015-E1 Engine View Diagrams & Manuals
110602-0100-E1 Engine View Diagrams & Manuals
110602-0102-E1 Engine View Diagrams & Manuals
110602-0105-E1 Engine View Diagrams & Manuals
110602-0112-E1 Engine View Diagrams & Manuals
110602-0131-E1 Engine View Diagrams & Manuals
110602-0133-E1 Engine View Diagrams & Manuals
110602-0134-E1 Engine View Diagrams & Manuals
110602-0135-E1 Engine View Diagrams & Manuals
110602-0136-E1 Engine View Diagrams & Manuals
110682-0114-E1 Engine View Diagrams & Manuals
12E602-0135-E1 Engine View Diagrams & Manuals
12E602-0136-B1 Engine View Diagrams & Manuals
12E602-0136-E1 Engine View Diagrams & Manuals
111602-0100-E1 Engine View Diagrams & Manuals
111602-0101-E1 Engine View Diagrams & Manuals
111602-0105-E1 Engine View Diagrams & Manuals
111602-0136-E1 Engine View Diagrams & Manuals
111602-0137-E1 Engine View Diagrams & Manuals
111602-0139-E1 Engine View Diagrams & Manuals
111602-0141-E1 Engine View Diagrams & Manuals
111602-0145-E1 Engine View Diagrams & Manuals
111602-0146-E1 Engine View Diagrams & Manuals
111602-0149-E1 Engine View Diagrams & Manuals
111602-0150-E1 Engine View Diagrams & Manuals
111602-0151-E1 Engine View Diagrams & Manuals
111602-0156-E1 Engine View Diagrams & Manuals
111602-0157-E1 Engine View Diagrams & Manuals
111602-0159-E1 Engine View Diagrams & Manuals
111602-0162-E1 Engine View Diagrams & Manuals
111602-0168-E1 Engine View Diagrams & Manuals
111602-0169-E1 Engine View Diagrams & Manuals
111602-0172-E1 Engine View Diagrams & Manuals
111602-0174-E1 Engine View Diagrams & Manuals
111602-0175-E1 Engine View Diagrams & Manuals
111602-0176-E1 Engine View Diagrams & Manuals
111607-0158-E1 Engine View Diagrams & Manuals
111682-0135-E1 Engine View Diagrams & Manuals
111682-0138-E1 Engine View Diagrams & Manuals
111682-0140-E1 Engine View Diagrams & Manuals
111682-0142-E1 Engine View Diagrams & Manuals
111682-0143-E1 Engine View Diagrams & Manuals
111682-0144-E1 Engine View Diagrams & Manuals
111682-0147-E1 Engine View Diagrams & Manuals
111682-0148-E1 Engine View Diagrams & Manuals
111682-0152-E1 Engine View Diagrams & Manuals
111682-0155-E1 Engine View Diagrams & Manuals
111682-0163-E1 Engine View Diagrams & Manuals
111682-0164-E1 Engine View Diagrams & Manuals
111682-0165-E1 Engine View Diagrams & Manuals
111682-0170-E1 Engine View Diagrams & Manuals
111687-0166-E1 Engine View Diagrams & Manuals
111687-0171-E1 Engine View Diagrams & Manuals
120602-0111-E1 Engine View Diagrams & Manuals
120602-0119-B1 Engine View Diagrams & Manuals
120602-0119-E1 Engine View Diagrams & Manuals
120602-0120-E1 Engine View Diagrams & Manuals
120602-0121-E1 Engine View Diagrams & Manuals
120602-0129-E1 Engine View Diagrams & Manuals
120602-0131-E1 Engine View Diagrams & Manuals
120602-0137-E1 Engine View Diagrams & Manuals
120602-0138-E1 Engine View Diagrams & Manuals
120602-0143-E1 Engine View Diagrams & Manuals
120602-0146-E1 Engine View Diagrams & Manuals
120602-0146-E2 Engine View Diagrams & Manuals
120602-0153-E1 Engine View Diagrams & Manuals
120602-0164-E1 Engine View Diagrams & Manuals
120602-0195-E1 Engine View Diagrams & Manuals
120602-0200-E1 Engine View Diagrams & Manuals
120607-0128-E1 Engine View Diagrams & Manuals
120607-0139-E1 Engine View Diagrams & Manuals
120607-0154-E1 Engine View Diagrams & Manuals
120609-0112-E1 Engine View Diagrams & Manuals
120682-0130-E1 Engine View Diagrams & Manuals
120682-0142-E1 Engine View Diagrams & Manuals
121602-0015-A1 Engine View Diagrams & Manuals
121602-0015-B1 Engine View Diagrams & Manuals
121602-0015-E1 Engine View Diagrams & Manuals
121602-0019-E1 Engine View Diagrams & Manuals
121602-0021-B1 Engine View Diagrams & Manuals
121602-0021-E1 Engine View Diagrams & Manuals
121602-0022-B1 Engine View Diagrams & Manuals
121602-0022-E1 Engine View Diagrams & Manuals
121602-0025-B1 Engine View Diagrams & Manuals
121602-0025-E1 Engine View Diagrams & Manuals
121602-0026-E1 Engine View Diagrams & Manuals
121602-0058-E1 Engine View Diagrams & Manuals
121602-0100-B1 Engine View Diagrams & Manuals
121602-0100-E1 Engine View Diagrams & Manuals
121602-0101-B1 Engine View Diagrams & Manuals
121602-0101-E1 Engine View Diagrams & Manuals
121602-0112-B1 Engine View Diagrams & Manuals
121602-0112-B2 Engine View Diagrams & Manuals
121602-0112-E1 Engine View Diagrams & Manuals
121602-0112-E2 Engine View Diagrams & Manuals
121602-0115-01 Engine View Diagrams & Manuals
121602-0117-01 Engine View Diagrams & Manuals
121602-0118-E1 Engine View Diagrams & Manuals
121602-0120-E1 Engine View Diagrams & Manuals
121602-0121-E1 Engine View Diagrams & Manuals
121602-0126-E1 Engine View Diagrams & Manuals
121602-0127-B1 Engine View Diagrams & Manuals
121602-0127-E1 Engine View Diagrams & Manuals
121602-0128-B1 Engine View Diagrams & Manuals
121602-0128-E1 Engine View Diagrams & Manuals
121602-0130-B1 Engine View Diagrams & Manuals
121602-0135-01 Engine View Diagrams & Manuals
121602-0137-E1 Engine View Diagrams & Manuals
121602-0137-E2 Engine View Diagrams & Manuals
121602-0143-E1 Engine View Diagrams & Manuals
121602-0143-E2 Engine View Diagrams & Manuals
121602-0154-01 Engine View Diagrams & Manuals
121602-0155-E1 Engine View Diagrams & Manuals
121602-0155-E2 Engine View Diagrams & Manuals
121602-0163-01 Engine View Diagrams & Manuals
121602-0165-E1 Engine View Diagrams & Manuals
121602-0166-E1 Engine View Diagrams & Manuals
121602-0166-E2 Engine View Diagrams & Manuals
121602-0167-E1 Engine View Diagrams & Manuals
121602-0168-A1 Engine View Diagrams & Manuals
121602-0169-E1 Engine View Diagrams & Manuals
121602-0171-E1 Engine View Diagrams & Manuals
121602-0172-E1 Engine View Diagrams & Manuals
121602-0173-E1 Engine View Diagrams & Manuals
121602-0174-E1 Engine View Diagrams & Manuals
121602-0175-E1 Engine View Diagrams & Manuals
121602-0182-E1 Engine View Diagrams & Manuals
121602-0184-E1 Engine View Diagrams & Manuals
121602-0185-E1 Engine View Diagrams & Manuals
121602-0186-E1 Engine View Diagrams & Manuals
121602-0187-E1 Engine View Diagrams & Manuals
121602-0190-E1 Engine View Diagrams & Manuals
121602-0190-E2 Engine View Diagrams & Manuals
121602-0193-E1 Engine View Diagrams & Manuals
121602-0195-E1 Engine View Diagrams & Manuals
121602-0203-E1 Engine View Diagrams & Manuals
121602-0208-E1 Engine View Diagrams & Manuals
121602-0210-E1 Engine View Diagrams & Manuals
121602-0215-E1 Engine View Diagrams & Manuals
121602-0216-E1 Engine View Diagrams & Manuals
121602-0217-E1 Engine View Diagrams & Manuals
121602-0219-E1 Engine View Diagrams & Manuals
121602-0221-B1 Engine View Diagrams & Manuals
121602-0221-E1 Engine View Diagrams & Manuals
121602-0223-E1 Engine View Diagrams & Manuals
121602-0224-E1 Engine View Diagrams & Manuals
121602-0228-E1 Engine View Diagrams & Manuals
121602-0232-E1 Engine View Diagrams & Manuals
121602-0234-E1 Engine View Diagrams & Manuals
121602-0240-E1 Engine View Diagrams & Manuals
121602-0242-E1 Engine View Diagrams & Manuals
121602-0245-E1 Engine View Diagrams & Manuals
121602-0250-E1 Engine View Diagrams & Manuals
121602-0252-E1 Engine View Diagrams & Manuals
121602-0253-E1 Engine View Diagrams & Manuals
121602-0256-E1 Engine View Diagrams & Manuals
121602-0258-E1 Engine View Diagrams & Manuals
121602-0263-E1 Engine View Diagrams & Manuals
121602-0266-E1 Engine View Diagrams & Manuals
121602-0269-E1 Engine View Diagrams & Manuals
121602-0271-B1 Engine View Diagrams & Manuals
121602-0271-E1 Engine View Diagrams & Manuals
121602-0272-B1 Engine View Diagrams & Manuals
121602-0272-E1 Engine View Diagrams & Manuals
121602-0279-E1 Engine View Diagrams & Manuals
121602-0279-E2 Engine View Diagrams & Manuals
121602-0280-E1 Engine View Diagrams & Manuals
121602-0281-E1 Engine View Diagrams & Manuals
121602-0286-E1 Engine View Diagrams & Manuals
121602-0289-E1 Engine View Diagrams & Manuals
121602-0291-E1 Engine View Diagrams & Manuals
121602-0297-E1 Engine View Diagrams & Manuals
121602-0306-B1 Engine View Diagrams & Manuals
121602-0306-E1 Engine View Diagrams & Manuals
121602-0307-E1 Engine View Diagrams & Manuals
121602-0308-E1 Engine View Diagrams & Manuals
121602-0315-E1 Engine View Diagrams & Manuals
121602-0316-B1 Engine View Diagrams & Manuals
121602-0316-E1 Engine View Diagrams & Manuals
121602-0319-B1 Engine View Diagrams & Manuals
121602-0319-E1 Engine View Diagrams & Manuals
121602-0320-E1 Engine View Diagrams & Manuals
121602-0321-E1 Engine View Diagrams & Manuals
121602-0322-B1 Engine View Diagrams & Manuals
121602-0322-B2 Engine View Diagrams & Manuals
121602-0322-E1 Engine View Diagrams & Manuals
121602-0322-E2 Engine View Diagrams & Manuals
121602-0331-B1 Engine View Diagrams & Manuals
121602-0331-E1 Engine View Diagrams & Manuals
121602-0332-E1 Engine View Diagrams & Manuals
121602-0335-E1 Engine View Diagrams & Manuals
121602-0336-E1 Engine View Diagrams & Manuals
121602-0338-E1 Engine View Diagrams & Manuals
121602-0339-E1 Engine View Diagrams & Manuals
121602-0344-E1 Engine View Diagrams & Manuals
121602-0346-B1 Engine View Diagrams & Manuals
121602-0346-E1 Engine View Diagrams & Manuals
121602-0349-E1 Engine View Diagrams & Manuals
121602-0354-E1 Engine View Diagrams & Manuals
121602-0355-B1 Engine View Diagrams & Manuals
121602-0355-E1 Engine View Diagrams & Manuals
121602-0357-E1 Engine View Diagrams & Manuals
121602-0358-B2 Engine View Diagrams & Manuals
121602-0358-E1 Engine View Diagrams & Manuals
121602-0358-E2 Engine View Diagrams & Manuals
121602-0359-B1 Engine View Diagrams & Manuals
121602-0359-E1 Engine View Diagrams & Manuals
121602-0360-E1 Engine View Diagrams & Manuals
121602-0370-B1 Engine View Diagrams & Manuals
121602-0370-B2 Engine View Diagrams & Manuals
121602-0370-E1 Engine View Diagrams & Manuals
121602-0370-E2 Engine View Diagrams & Manuals
121602-0374-B2 Engine View Diagrams & Manuals
121602-0374-E1 Engine View Diagrams & Manuals
121602-0374-E2 Engine View Diagrams & Manuals
121602-0376-E1 Engine View Diagrams & Manuals
121602-0377-E1 Engine View Diagrams & Manuals
121602-0384-E1 Engine View Diagrams & Manuals
121602-0385-B1 Engine View Diagrams & Manuals
121602-0385-E1 Engine View Diagrams & Manuals
121602-0387-B1 Engine View Diagrams & Manuals
121602-0387-E1 Engine View Diagrams & Manuals
121602-0388-B1 Engine View Diagrams & Manuals
121602-0388-E1 Engine View Diagrams & Manuals
121602-0390-B1 Engine View Diagrams & Manuals
121602-0390-E1 Engine View Diagrams & Manuals
121602-0392-B1 Engine View Diagrams & Manuals
121602-0392-E1 Engine View Diagrams & Manuals
121602-0397-B1 Engine View Diagrams & Manuals
121602-0467-B1 Engine View Diagrams & Manuals
121602-0467-E1 Engine View Diagrams & Manuals
121602-0490-B1 Engine View Diagrams & Manuals
121602-0505-B1 Engine View Diagrams & Manuals
121602-0505-E1 Engine View Diagrams & Manuals
121602-0515-B1 Engine View Diagrams & Manuals
121602-0515-E1 Engine View Diagrams & Manuals
121602-0521-B1 Engine View Diagrams & Manuals
121602-0521-E1 Engine View Diagrams & Manuals
121602-0522-B1 Engine View Diagrams & Manuals
121602-0522-E1 Engine View Diagrams & Manuals
121602-0525-B1 Engine View Diagrams & Manuals
121602-0525-E1 Engine View Diagrams & Manuals
121602-0526-B1 Engine View Diagrams & Manuals
121602-0526-E1 Engine View Diagrams & Manuals
121602-0527-B1 Engine View Diagrams & Manuals
121602-0527-E1 Engine View Diagrams & Manuals
121602-0528-B1 Engine View Diagrams & Manuals
121602-0528-B2 Engine View Diagrams & Manuals
121602-0528-E1 Engine View Diagrams & Manuals
121602-0528-E2 Engine View Diagrams & Manuals
121602-0529-B1 Engine View Diagrams & Manuals
121602-0529-B2 Engine View Diagrams & Manuals
121602-0529-E1 Engine View Diagrams & Manuals
121602-0529-E2 Engine View Diagrams & Manuals
121602-0530-B1 Engine View Diagrams & Manuals
121602-0555-B1 Engine View Diagrams & Manuals
121602-0615-B1 Engine View Diagrams & Manuals
121602-0615-E1 Engine View Diagrams & Manuals
121602-0621-B1 Engine View Diagrams & Manuals
121602-0621-E1 Engine View Diagrams & Manuals
121602-0622-B1 Engine View Diagrams & Manuals
121602-0622-E1 Engine View Diagrams & Manuals
121602-0625-B1 Engine View Diagrams & Manuals
121602-0625-E1 Engine View Diagrams & Manuals
121602-0626-E1 Engine View Diagrams & Manuals
121602-0665-B1 Engine View Diagrams & Manuals
121602-0665-E1 Engine View Diagrams & Manuals
121602-0668-B1 Engine View Diagrams & Manuals
121606-0340-E1 Engine View Diagrams & Manuals
121607-0018-E1 Engine View Diagrams & Manuals
121607-0023-E1 Engine View Diagrams & Manuals
121607-0060-B1 Engine View Diagrams & Manuals
121607-0060-E1 Engine View Diagrams & Manuals
121607-0061-B1 Engine View Diagrams & Manuals
121607-0061-E1 Engine View Diagrams & Manuals
121607-0105-A1 Engine View Diagrams & Manuals
121607-0119-E1 Engine View Diagrams & Manuals
121607-0129-B1 Engine View Diagrams & Manuals
121607-0129-E1 Engine View Diagrams & Manuals
121607-0134-E1 Engine View Diagrams & Manuals
121607-0136-01 Engine View Diagrams & Manuals
121607-0191-E1 Engine View Diagrams & Manuals
121607-0191-E2 Engine View Diagrams & Manuals
121607-0192-E1 Engine View Diagrams & Manuals
121607-0209-E1 Engine View Diagrams & Manuals
121607-0212-E1 Engine View Diagrams & Manuals
121607-0213-E1 Engine View Diagrams & Manuals
121607-0218-E1 Engine View Diagrams & Manuals
121607-0238-E1 Engine View Diagrams & Manuals
121607-0254-E1 Engine View Diagrams & Manuals
121607-0260-E1 Engine View Diagrams & Manuals
121607-0261-B1 Engine View Diagrams & Manuals
121607-0261-E1 Engine View Diagrams & Manuals
121607-0264-E1 Engine View Diagrams & Manuals
121607-0273-B1 Engine View Diagrams & Manuals
121607-0273-E1 Engine View Diagrams & Manuals
121607-0283-E1 Engine View Diagrams & Manuals
121607-0292-B2 Engine View Diagrams & Manuals
121607-0292-E1 Engine View Diagrams & Manuals
121607-0292-E2 Engine View Diagrams & Manuals
121607-0302-B1 Engine View Diagrams & Manuals
121607-0302-E1 Engine View Diagrams & Manuals
121607-0305-E1 Engine View Diagrams & Manuals
121607-0330-E1 Engine View Diagrams & Manuals
121607-0333-E1 Engine View Diagrams & Manuals
121607-0334-B1 Engine View Diagrams & Manuals
121607-0334-E1 Engine View Diagrams & Manuals
121607-0363-E1 Engine View Diagrams & Manuals
121607-0365-E1 Engine View Diagrams & Manuals
121607-0382-B1 Engine View Diagrams & Manuals
121607-0382-E1 Engine View Diagrams & Manuals
121607-0560-B1 Engine View Diagrams & Manuals
121607-0560-E1 Engine View Diagrams & Manuals
121607-0561-B1 Engine View Diagrams & Manuals
121607-0561-E1 Engine View Diagrams & Manuals
121607-0562-B1 Engine View Diagrams & Manuals
121607-0562-E1 Engine View Diagrams & Manuals
121607-0660-B1 Engine View Diagrams & Manuals
121607-0660-B2 Engine View Diagrams & Manuals
121607-0660-E1 Engine View Diagrams & Manuals
121607-0660-E2 Engine View Diagrams & Manuals
121607-0662-B1 Engine View Diagrams & Manuals
121607-0662-E1 Engine View Diagrams & Manuals
121609-0288-E1 Engine View Diagrams & Manuals
121609-0288-E2 Engine View Diagrams & Manuals
121609-0295-E1 Engine View Diagrams & Manuals
121609-0323-E1 Engine View Diagrams & Manuals
121609-0325-E1 Engine View Diagrams & Manuals
121609-0329-E1 Engine View Diagrams & Manuals
121609-0345-E1 Engine View Diagrams & Manuals
121609-0347-B1 Engine View Diagrams & Manuals
121609-0347-B2 Engine View Diagrams & Manuals
121609-0347-E1 Engine View Diagrams & Manuals
121609-0347-E2 Engine View Diagrams & Manuals
121612-0020-E1 Engine View Diagrams & Manuals
121612-0230-E1 Engine View Diagrams & Manuals
121612-0246-E1 Engine View Diagrams & Manuals
121612-0545-B1 Engine View Diagrams & Manuals
121612-0545-E1 Engine View Diagrams & Manuals
121672-0270-B1 Engine View Diagrams & Manuals
121672-0270-E1 Engine View Diagrams & Manuals
121682-0050-B1 Engine View Diagrams & Manuals
121682-0050-E1 Engine View Diagrams & Manuals
121682-0051-E1 Engine View Diagrams & Manuals
121682-0122-E1 Engine View Diagrams & Manuals
121682-0123-E1 Engine View Diagrams & Manuals
121682-0133-B2 Engine View Diagrams & Manuals
121682-0133-E1 Engine View Diagrams & Manuals
121682-0133-E2 Engine View Diagrams & Manuals
121682-0150-01 Engine View Diagrams & Manuals
121682-0153-01 Engine View Diagrams & Manuals
121682-0158-E1 Engine View Diagrams & Manuals
121682-0204-E1 Engine View Diagrams & Manuals
121682-0205-E1 Engine View Diagrams & Manuals
121682-0225-E1 Engine View Diagrams & Manuals
121682-0226-E1 Engine View Diagrams & Manuals
121682-0236-E1 Engine View Diagrams & Manuals
121682-0241-E1 Engine View Diagrams & Manuals
121682-0244-E1 Engine View Diagrams & Manuals
121682-0249-E1 Engine View Diagrams & Manuals
121682-0251-B1 Engine View Diagrams & Manuals
121682-0251-E1 Engine View Diagrams & Manuals
121682-0255-E1 Engine View Diagrams & Manuals
121682-0257-E1 Engine View Diagrams & Manuals
121682-0328-E1 Engine View Diagrams & Manuals
121682-0371-B1 Engine View Diagrams & Manuals
121682-0371-E1 Engine View Diagrams & Manuals
121682-0375-B1 Engine View Diagrams & Manuals
121682-0375-B2 Engine View Diagrams & Manuals
121682-0375-E1 Engine View Diagrams & Manuals
121682-0375-E2 Engine View Diagrams & Manuals
121682-0550-E1 Engine View Diagrams & Manuals
121682-0551-B1 Engine View Diagrams & Manuals
121682-0551-E1 Engine View Diagrams & Manuals
12H602-0111-B1 Engine View Diagrams & Manuals
12H602-0111-E1 Engine View Diagrams & Manuals
12H602-0113-B1 Engine View Diagrams & Manuals
12H602-0113-E1 Engine View Diagrams & Manuals
12H602-0308-B1 Engine View Diagrams & Manuals
12H602-0308-E1 Engine View Diagrams & Manuals
12H602-0334-B1 Engine View Diagrams & Manuals
12H602-0334-E1 Engine View Diagrams & Manuals
12H602-0342-B1 Engine View Diagrams & Manuals
12H602-0342-E1 Engine View Diagrams & Manuals
12H602-0486-B1 Engine View Diagrams & Manuals
12H602-0486-E1 Engine View Diagrams & Manuals
12H602-0491-E1 Engine View Diagrams & Manuals
12H602-0492-B1 Engine View Diagrams & Manuals
12H602-0492-E1 Engine View Diagrams & Manuals
12H602-0544-B1 Engine View Diagrams & Manuals
12H602-0544-E1 Engine View Diagrams & Manuals
12H602-0545-B1 Engine View Diagrams & Manuals
12H602-0545-E1 Engine View Diagrams & Manuals
12H602-0614-B1 Engine View Diagrams & Manuals
12H672-0005-B1 Engine View Diagrams & Manuals
12H672-0005-E1 Engine View Diagrams & Manuals
12H672-0110-B1 Engine View Diagrams & Manuals
12H672-0110-E1 Engine View Diagrams & Manuals
122602-0111-B1 Engine View Diagrams & Manuals
122602-0111-E1 Engine View Diagrams & Manuals
122602-0113-B1 Engine View Diagrams & Manuals
122602-0113-E1 Engine View Diagrams & Manuals
122602-0120-B1 Engine View Diagrams & Manuals
122602-0120-E1 Engine View Diagrams & Manuals
122602-0133-B1 Engine View Diagrams & Manuals
122602-0133-E1 Engine View Diagrams & Manuals
122602-0139-E1 Engine View Diagrams & Manuals
122602-0139-E2 Engine View Diagrams & Manuals
122602-0150-E1 Engine View Diagrams & Manuals
122602-0167-E1 Engine View Diagrams & Manuals
122602-0172-E1 Engine View Diagrams & Manuals
122602-0181-E1 Engine View Diagrams & Manuals
122602-0190-E1 Engine View Diagrams & Manuals
122602-0193-B1 Engine View Diagrams & Manuals
122602-0193-E1 Engine View Diagrams & Manuals
122602-0194-B1 Engine View Diagrams & Manuals
122602-0194-E1 Engine View Diagrams & Manuals
122602-0195-B1 Engine View Diagrams & Manuals
122602-0195-E1 Engine View Diagrams & Manuals
122602-0203-B1 Engine View Diagrams & Manuals
122602-0203-E1 Engine View Diagrams & Manuals
122602-0206-B1 Engine View Diagrams & Manuals
122602-0206-E1 Engine View Diagrams & Manuals
122602-0207-B1 Engine View Diagrams & Manuals
122602-0468-B1 Engine View Diagrams & Manuals
122602-0468-E1 Engine View Diagrams & Manuals
122607-0116-B1 Engine View Diagrams & Manuals
122607-0116-E1 Engine View Diagrams & Manuals
122607-0118-B1 Engine View Diagrams & Manuals
122607-0118-E1 Engine View Diagrams & Manuals
122607-0132-B1 Engine View Diagrams & Manuals
122607-0132-E1 Engine View Diagrams & Manuals
122607-0208-B1 Engine View Diagrams & Manuals
122607-0210-B1 Engine View Diagrams & Manuals
122607-0210-E1 Engine View Diagrams & Manuals
122672-0020-B1 Engine View Diagrams & Manuals
122672-0020-E1 Engine View Diagrams & Manuals
122672-0021-E1 Engine View Diagrams & Manuals
122672-0100-E1 Engine View Diagrams & Manuals
122672-0105-B1 Engine View Diagrams & Manuals
122672-0105-E1 Engine View Diagrams & Manuals
122672-0107-E1 Engine View Diagrams & Manuals
122672-0110-E1 Engine View Diagrams & Manuals
122672-0128-B1 Engine View Diagrams & Manuals
122672-0128-E1 Engine View Diagrams & Manuals
122672-0130-E1 Engine View Diagrams & Manuals
122672-0131-B1 Engine View Diagrams & Manuals
122672-0131-E1 Engine View Diagrams & Manuals
122672-0134-B1 Engine View Diagrams & Manuals
122672-0134-E1 Engine View Diagrams & Manuals
122672-0138-E1 Engine View Diagrams & Manuals
122672-0140-B1 Engine View Diagrams & Manuals
122672-0140-E1 Engine View Diagrams & Manuals
122672-0142-B1 Engine View Diagrams & Manuals
122672-0142-E1 Engine View Diagrams & Manuals
122672-0143-E1 Engine View Diagrams & Manuals
122672-0144-E1 Engine View Diagrams & Manuals
122672-0145-E1 Engine View Diagrams & Manuals
122672-0148-E1 Engine View Diagrams & Manuals
122672-0149-B1 Engine View Diagrams & Manuals
122672-0149-E1 Engine View Diagrams & Manuals
122672-0151-E1 Engine View Diagrams & Manuals
122672-0152-E1 Engine View Diagrams & Manuals
122672-0153-E1 Engine View Diagrams & Manuals
122672-0155-E1 Engine View Diagrams & Manuals
122672-0156-B1 Engine View Diagrams & Manuals
122672-0156-E1 Engine View Diagrams & Manuals
122672-0159-B1 Engine View Diagrams & Manuals
122672-0159-E1 Engine View Diagrams & Manuals
122672-0161-E1 Engine View Diagrams & Manuals
122672-0165-E1 Engine View Diagrams & Manuals
122672-0166-E1 Engine View Diagrams & Manuals
122672-0168-E1 Engine View Diagrams & Manuals
122672-0170-B1 Engine View Diagrams & Manuals
122672-0170-E1 Engine View Diagrams & Manuals
122672-0174-E1 Engine View Diagrams & Manuals
122672-0175-E1 Engine View Diagrams & Manuals
122672-0178-E1 Engine View Diagrams & Manuals
122672-0180-B1 Engine View Diagrams & Manuals
122672-0180-E1 Engine View Diagrams & Manuals
122672-0182-E1 Engine View Diagrams & Manuals
122672-0184-E1 Engine View Diagrams & Manuals
122672-0186-E1 Engine View Diagrams & Manuals
122672-0189-E1 Engine View Diagrams & Manuals
122672-0192-B1 Engine View Diagrams & Manuals
122672-0192-E1 Engine View Diagrams & Manuals
122672-0204-E1 Engine View Diagrams & Manuals
122672-0205-B1 Engine View Diagrams & Manuals
122672-0205-E1 Engine View Diagrams & Manuals
122672-0211-E1 Engine View Diagrams & Manuals
122672-0214-E1 Engine View Diagrams & Manuals
122672-0215-E1 Engine View Diagrams & Manuals
122672-0217-B1 Engine View Diagrams & Manuals
122672-0217-E1 Engine View Diagrams & Manuals
122672-0218-B1 Engine View Diagrams & Manuals
122672-0218-E1 Engine View Diagrams & Manuals
122677-0135-B1 Engine View Diagrams & Manuals
122677-0135-E1 Engine View Diagrams & Manuals
122677-0154-E1 Engine View Diagrams & Manuals
122682-0163-E1 Engine View Diagrams & Manuals
122682-0216-E1 Engine View Diagrams & Manuals
12J602-0100-B1 Engine View Diagrams & Manuals
12J602-0100-E1 Engine View Diagrams & Manuals
12J602-0120-B1 Engine View Diagrams & Manuals
12J602-0120-E1 Engine View Diagrams & Manuals
12J602-0121-E1 Engine View Diagrams & Manuals
12J602-0123-B1 Engine View Diagrams & Manuals
12J602-0123-E1 Engine View Diagrams & Manuals
123602-0131-E1 Engine View Diagrams & Manuals
123602-0131-E2 Engine View Diagrams & Manuals
123602-0132-E1 Engine View Diagrams & Manuals
123602-0132-E2 Engine View Diagrams & Manuals
123602-0137-E1 Engine View Diagrams & Manuals
123602-0138-E1 Engine View Diagrams & Manuals
123602-0141-E1 Engine View Diagrams & Manuals
123602-0143-E1 Engine View Diagrams & Manuals
123602-0143-E2 Engine View Diagrams & Manuals
123602-0144-E1 Engine View Diagrams & Manuals
123602-0144-E2 Engine View Diagrams & Manuals
123602-0148-E1 Engine View Diagrams & Manuals
123602-0148-E4 Engine View Diagrams & Manuals
123602-0151-E1 Engine View Diagrams & Manuals
123602-0151-E2 Engine View Diagrams & Manuals
123602-0152-E1 Engine View Diagrams & Manuals
123602-0155-E1 Engine View Diagrams & Manuals
123602-0156-E1 Engine View Diagrams & Manuals
123602-0156-E2 Engine View Diagrams & Manuals
123607-0133-E1 Engine View Diagrams & Manuals
123607-0133-E2 Engine View Diagrams & Manuals
123607-0134-E1 Engine View Diagrams & Manuals
123607-0139-E1 Engine View Diagrams & Manuals
123607-0142-E1 Engine View Diagrams & Manuals
123607-0145-E1 Engine View Diagrams & Manuals
123607-0145-E2 Engine View Diagrams & Manuals
123607-0149-E1 Engine View Diagrams & Manuals
123607-0149-E2 Engine View Diagrams & Manuals
123607-0153-E1 Engine View Diagrams & Manuals
123607-0154-E1 Engine View Diagrams & Manuals
123607-0157-E1 Engine View Diagrams & Manuals
123607-0157-E2 Engine View Diagrams & Manuals
123672-0135-E1 Engine View Diagrams & Manuals
123672-0135-E2 Engine View Diagrams & Manuals
123672-0136-E1 Engine View Diagrams & Manuals
123672-0136-E2 Engine View Diagrams & Manuals
123672-0140-E1 Engine View Diagrams & Manuals
123672-0146-E1 Engine View Diagrams & Manuals
123672-0147-E1 Engine View Diagrams & Manuals
123672-0147-E2 Engine View Diagrams & Manuals
123672-0164-E1 Engine View Diagrams & Manuals
12K602-0100-B1 Engine View Diagrams & Manuals
12K602-0100-E1 Engine View Diagrams & Manuals
12K602-0105-B1 Engine View Diagrams & Manuals
12K602-0105-E1 Engine View Diagrams & Manuals
12K602-0110-E1 Engine View Diagrams & Manuals
12K602-0119-B1 Engine View Diagrams & Manuals
12K602-0119-E1 Engine View Diagrams & Manuals
12K602-0120-E1 Engine View Diagrams & Manuals
12K602-0563-B1 Engine View Diagrams & Manuals
12K607-0118-B1 Engine View Diagrams & Manuals
12K607-0118-E1 Engine View Diagrams & Manuals
12K682-0111-E1 Engine View Diagrams & Manuals
12K682-0112-B1 Engine View Diagrams & Manuals
12K682-0112-E1 Engine View Diagrams & Manuals
12K682-0115-B1 Engine View Diagrams & Manuals
12K682-0115-E1 Engine View Diagrams & Manuals
12K682-0116-B1 Engine View Diagrams & Manuals
12K682-0116-E1 Engine View Diagrams & Manuals
12K687-0113-E1 Engine View Diagrams & Manuals
12K687-0114-B1 Engine View Diagrams & Manuals
12K687-0114-E1 Engine View Diagrams & Manuals
12Q502-0011-B1 Engine View Diagrams & Manuals
12Q502-0015-B1 Engine View Diagrams & Manuals
12Q502-0015-E1 Engine View Diagrams & Manuals
12Q502-0021-B1 Engine View Diagrams & Manuals
12Q502-0025-B1 Engine View Diagrams & Manuals
12Q502-0105-B1 Engine View Diagrams & Manuals
12Q502-0111-B1 Engine View Diagrams & Manuals
12Q502-0111-E1 Engine View Diagrams & Manuals
12Q502-0116-B1 Engine View Diagrams & Manuals
12Q502-0116-E1 Engine View Diagrams & Manuals
12Q502-0126-B1 Engine View Diagrams & Manuals
12Q502-0127-B1 Engine View Diagrams & Manuals
12Q502-0129-B1 Engine View Diagrams & Manuals
12Q502-0131-B1 Engine View Diagrams & Manuals
12Q502-0133-B1 Engine View Diagrams & Manuals
12Q502-0135-B1 Engine View Diagrams & Manuals
12Q502-0136-B1 Engine View Diagrams & Manuals
12Q502-0138-B1 Engine View Diagrams & Manuals
12Q502-0145-B1 Engine View Diagrams & Manuals
12Q502-0146-B1 Engine View Diagrams & Manuals
12Q502-0147-B1 Engine View Diagrams & Manuals
12Q502-0149-B1 Engine View Diagrams & Manuals
12Q502-0150-B1 Engine View Diagrams & Manuals
12Q502-0152-B1 Engine View Diagrams & Manuals
12Q502-0153-B1 Engine View Diagrams & Manuals
12Q502-0154-B1 Engine View Diagrams & Manuals
12Q502-0158-B1 Engine View Diagrams & Manuals
12Q502-0162-B1 Engine View Diagrams & Manuals
12Q502-0163-B1 Engine View Diagrams & Manuals
12Q502-0164-B1 Engine View Diagrams & Manuals
12Q502-0167-B1 Engine View Diagrams & Manuals
12Q502-0168-B1 Engine View Diagrams & Manuals
12Q502-0169-B1 Engine View Diagrams & Manuals
12Q502-0170-B1 Engine View Diagrams & Manuals
12Q502-0171-B1 Engine View Diagrams & Manuals
12Q502-0172-B1 Engine View Diagrams & Manuals
12Q502-0173-B1 Engine View Diagrams & Manuals
12Q502-0181-B1 Engine View Diagrams & Manuals
12Q502-0193-B1 Engine View Diagrams & Manuals
12Q502-0194-B1 Engine View Diagrams & Manuals
12Q502-0195-B1 Engine View Diagrams & Manuals
12Q502-0198-B1 Engine View Diagrams & Manuals
12Q502-0199-B1 Engine View Diagrams & Manuals
12Q502-0200-01 Engine View Diagrams & Manuals
12Q502-0202-B1 Engine View Diagrams & Manuals
12Q502-0206-B1 Engine View Diagrams & Manuals
12Q502-0211-B1 Engine View Diagrams & Manuals
12Q502-0221-B1 Engine View Diagrams & Manuals
12Q502-0223-B1 Engine View Diagrams & Manuals
12Q502-0252-B1 Engine View Diagrams & Manuals
12Q502-0271-B1 Engine View Diagrams & Manuals
12Q502-0272-B1 Engine View Diagrams & Manuals
12Q502-0307-B1 Engine View Diagrams & Manuals
12Q502-0316-B1 Engine View Diagrams & Manuals
12Q502-0319-B1 Engine View Diagrams & Manuals
12Q502-0322-B1 Engine View Diagrams & Manuals
12Q502-0322-B2 Engine View Diagrams & Manuals
12Q502-0335-B1 Engine View Diagrams & Manuals
12Q502-0338-B1 Engine View Diagrams & Manuals
12Q502-0346-B1 Engine View Diagrams & Manuals
12Q502-0355-B1 Engine View Diagrams & Manuals
12Q502-0379-B1 Engine View Diagrams & Manuals
12Q502-0383-B1 Engine View Diagrams & Manuals
12Q502-0385-B1 Engine View Diagrams & Manuals
12Q502-0387-B1 Engine View Diagrams & Manuals
12Q502-0388-B1 Engine View Diagrams & Manuals
12Q502-0390-B1 Engine View Diagrams & Manuals
12Q502-0392-B1 Engine View Diagrams & Manuals
12Q502-0395-B1 Engine View Diagrams & Manuals
12Q502-0397-B1 Engine View Diagrams & Manuals
12Q502-0490-B1 Engine View Diagrams & Manuals
12Q502-0505-B1 Engine View Diagrams & Manuals
12Q502-0515-B1 Engine View Diagrams & Manuals
12Q502-0521-B1 Engine View Diagrams & Manuals
12Q502-0525-B1 Engine View Diagrams & Manuals
12Q502-0526-B1 Engine View Diagrams & Manuals
12Q502-0530-B1 Engine View Diagrams & Manuals
12Q502-0563-B1 Engine View Diagrams & Manuals
12Q502-0564-B1 Engine View Diagrams & Manuals
12Q502-0625-B1 Engine View Diagrams & Manuals
12Q502-0665-B1 Engine View Diagrams & Manuals
12Q502-0668-B1 Engine View Diagrams & Manuals
12Q502-0991-B1 Engine View Diagrams & Manuals
12Q502-1005-B1 Engine View Diagrams & Manuals
12Q505-0844-B1 Engine View Diagrams & Manuals
12Q505-0844-E1 Engine View Diagrams & Manuals
12Q505-0933-B1 Engine View Diagrams & Manuals
12Q505-3844-B1 Engine View Diagrams & Manuals
12Q507-0062-B1 Engine View Diagrams & Manuals
12Q507-0132-B1 Engine View Diagrams & Manuals
12Q507-0141-B1 Engine View Diagrams & Manuals
12Q507-0148-B1 Engine View Diagrams & Manuals
12Q507-0155-B1 Engine View Diagrams & Manuals
12Q507-0174-B1 Engine View Diagrams & Manuals
12Q507-0210-B1 Engine View Diagrams & Manuals
12Q507-0261-B1 Engine View Diagrams & Manuals
12Q507-0302-B1 Engine View Diagrams & Manuals
12Q507-0311-B1 Engine View Diagrams & Manuals
12Q507-0314-B1 Engine View Diagrams & Manuals
12Q507-0334-B1 Engine View Diagrams & Manuals
12Q507-0373-B1 Engine View Diagrams & Manuals
12Q507-0382-B1 Engine View Diagrams & Manuals
12Q507-0562-B1 Engine View Diagrams & Manuals
12Q507-0660-B2 Engine View Diagrams & Manuals
12Q507-0662-B1 Engine View Diagrams & Manuals
12Q507-1129-B1 Engine View Diagrams & Manuals
12Q572-0020-B1 Engine View Diagrams & Manuals
12Q572-0020-E1 Engine View Diagrams & Manuals
12Q572-0112-B1 Engine View Diagrams & Manuals
12Q572-0112-E1 Engine View Diagrams & Manuals
12Q572-0142-B1 Engine View Diagrams & Manuals
12Q572-0143-B1 Engine View Diagrams & Manuals
124602-0105-B1 Engine View Diagrams & Manuals
124602-0105-E1 Engine View Diagrams & Manuals
124602-0110-E1 Engine View Diagrams & Manuals
124602-0111-01 Engine View Diagrams & Manuals
124602-0113-01 Engine View Diagrams & Manuals
124602-0117-E1 Engine View Diagrams & Manuals
124602-0118-B1 Engine View Diagrams & Manuals
124602-0118-E1 Engine View Diagrams & Manuals
124602-0119-E1 Engine View Diagrams & Manuals
124602-0121-E1 Engine View Diagrams & Manuals
124602-0122-E1 Engine View Diagrams & Manuals
124602-0125-E1 Engine View Diagrams & Manuals
124672-0030-B1 Engine View Diagrams & Manuals
124672-0030-E1 Engine View Diagrams & Manuals
124672-0035-B1 Engine View Diagrams & Manuals
124672-0035-E1 Engine View Diagrams & Manuals
124672-0036-B1 Engine View Diagrams & Manuals
124672-0036-E1 Engine View Diagrams & Manuals
124672-0037-B1 Engine View Diagrams & Manuals
124672-0037-E1 Engine View Diagrams & Manuals
124682-0112-01 Engine View Diagrams & Manuals
124682-0114-01 Engine View Diagrams & Manuals
124682-0115-01 Engine View Diagrams & Manuals
124682-0120-E1 Engine View Diagrams & Manuals
124682-0127-B1 Engine View Diagrams & Manuals
124682-0127-E1 Engine View Diagrams & Manuals
12Q572-0149-B1 Engine View Diagrams & Manuals
12Q572-0156-B1 Engine View Diagrams & Manuals
12Q572-0159-B1 Engine View Diagrams & Manuals
12Q572-0177-B1 Engine View Diagrams & Manuals
12Q572-0180-B1 Engine View Diagrams & Manuals
12Q572-0205-B1 Engine View Diagrams & Manuals
12Q572-0207-B1 Engine View Diagrams & Manuals
12Q572-0217-B1 Engine View Diagrams & Manuals
12Q572-0218-B1 Engine View Diagrams & Manuals
12Q572-0224-01 Engine View Diagrams & Manuals
12Q577-0113-B1 Engine View Diagrams & Manuals
12Q577-0113-E1 Engine View Diagrams & Manuals
12Q677-0115-F1 Engine View Diagrams & Manuals
12R502-0105-B1 Engine View Diagrams & Manuals
12R502-0112-B1 Engine View Diagrams & Manuals
12R502-0112-E1 Engine View Diagrams & Manuals
12R502-0120-B1 Engine View Diagrams & Manuals
12R502-0123-B1 Engine View Diagrams & Manuals
12R502-0128-B1 Engine View Diagrams & Manuals
12R502-0129-B1 Engine View Diagrams & Manuals
12R502-0134-B1 Engine View Diagrams & Manuals
12R502-3837-B1 Engine View Diagrams & Manuals
12R505-0125-B1 Engine View Diagrams & Manuals
12R505-0130-B1 Engine View Diagrams & Manuals
12R512-0136-B1 Engine View Diagrams & Manuals
12R602-0115-F1 Engine View Diagrams & Manuals
12R602-0117-F1 Engine View Diagrams & Manuals
12R605-0110-F1 Engine View Diagrams & Manuals
12R605-0116-F1 Engine View Diagrams & Manuals
12S502-0005-B1 Engine View Diagrams & Manuals
12S502-0005-E1 Engine View Diagrams & Manuals
12S502-0015-B1 Engine View Diagrams & Manuals
12S502-0015-E1 Engine View Diagrams & Manuals
12S502-0021-B1 Engine View Diagrams & Manuals
12S502-0021-E1 Engine View Diagrams & Manuals
12S502-0025-B1 Engine View Diagrams & Manuals
12S502-0025-E1 Engine View Diagrams & Manuals
12S502-0111-B1 Engine View Diagrams & Manuals
12S502-0111-E1 Engine View Diagrams & Manuals
12S502-0112-B1 Engine View Diagrams & Manuals
12S502-0112-E1 Engine View Diagrams & Manuals
12S502-0114-B1 Engine View Diagrams & Manuals
12S502-0114-B2 Engine View Diagrams & Manuals
12S502-0114-B3 Engine View Diagrams & Manuals
12S502-0114-E1 Engine View Diagrams & Manuals
12S502-0116-B1 Engine View Diagrams & Manuals
12S502-0116-B2 Engine View Diagrams & Manuals
12S502-0116-E1 Engine View Diagrams & Manuals
12S502-0117-B1 Engine View Diagrams & Manuals
12S502-0122-B1 Engine View Diagrams & Manuals
12S502-0122-B2 Engine View Diagrams & Manuals
12S502-0122-B3 Engine View Diagrams & Manuals
12S502-0124-B1 Engine View Diagrams & Manuals
12S502-0125-B1 Engine View Diagrams & Manuals
12S502-0127-B1 Engine View Diagrams & Manuals
12S502-0128-B1 Engine View Diagrams & Manuals
12S502-0130-B1 Engine View Diagrams & Manuals
12S502-0620-B1 Engine View Diagrams & Manuals
12S502-0810-B1 Engine View Diagrams & Manuals
12S502-0810-E1 Engine View Diagrams & Manuals
12S502-0986-B1 Engine View Diagrams & Manuals
12S502-0990-B1 Engine View Diagrams & Manuals
12S502-0993-B1 Engine View Diagrams & Manuals
12S502-1031-B1 Engine View Diagrams & Manuals
12S502-1088-B1 Engine View Diagrams & Manuals
12S502-1102-B1 Engine View Diagrams & Manuals
12S502-3810-B1 Engine View Diagrams & Manuals
12S505-0856-B1 Engine View Diagrams & Manuals
12S505-0856-E1 Engine View Diagrams & Manuals
12S505-0948-B1 Engine View Diagrams & Manuals
12S505-1030-B1 Engine View Diagrams & Manuals
12S505-1035-B1 Engine View Diagrams & Manuals
12S505-1061-B1 Engine View Diagrams & Manuals
12S505-1101-B1 Engine View Diagrams & Manuals
12S505-1134-B1 Engine View Diagrams & Manuals
12S505-3856-B1 Engine View Diagrams & Manuals
12S507-0060-B1 Engine View Diagrams & Manuals
12S507-0060-E1 Engine View Diagrams & Manuals
12S507-0062-B1 Engine View Diagrams & Manuals
12S507-0062-E1 Engine View Diagrams & Manuals
12S507-0115-B1 Engine View Diagrams & Manuals
12S507-0115-E1 Engine View Diagrams & Manuals
12S512-0118-B1 Engine View Diagrams & Manuals
12S512-0118-B2 Engine View Diagrams & Manuals
12S512-0118-E1 Engine View Diagrams & Manuals
12S512-0118-E2 Engine View Diagrams & Manuals
12S512-0119-B1 Engine View Diagrams & Manuals
12S512-0119-B2 Engine View Diagrams & Manuals
12S512-0119-E1 Engine View Diagrams & Manuals
12S602-0015-F1 Engine View Diagrams & Manuals
12S602-0110-F1 Engine View Diagrams & Manuals
12S602-0111-F1 Engine View Diagrams & Manuals
12S602-0111-F2 Engine View Diagrams & Manuals
12S602-0111-F3 Engine View Diagrams & Manuals
12S602-0112-F1 Engine View Diagrams & Manuals
12S602-1104-F1 Engine View Diagrams & Manuals
12S605-0607-F1 Engine View Diagrams & Manuals
12S605-0976-F1 Engine View Diagrams & Manuals
12S612-0113-F1 Engine View Diagrams & Manuals
12S612-0114-F1 Engine View Diagrams & Manuals
12Z602-0100-E1 Engine View Diagrams & Manuals
127602-0100-B1 Engine View Diagrams & Manuals
127602-0100-E1 Engine View Diagrams & Manuals
127602-0247-B1 Engine View Diagrams & Manuals
127602-0247-E1 Engine View Diagrams & Manuals
127602-0287-B1 Engine View Diagrams & Manuals
127602-0287-E1 Engine View Diagrams & Manuals
127602-0331-B1 Engine View Diagrams & Manuals
127602-0331-B2 Engine View Diagrams & Manuals
127602-0331-E1 Engine View Diagrams & Manuals
127602-0331-E2 Engine View Diagrams & Manuals
127602-0370-B1 Engine View Diagrams & Manuals
127602-0370-E1 Engine View Diagrams & Manuals
127605-0406-B1 Engine View Diagrams & Manuals
127605-0406-E1 Engine View Diagrams & Manuals
127607-0249-E1 Engine View Diagrams & Manuals
127607-0369-B1 Engine View Diagrams & Manuals
127607-0369-E1 Engine View Diagrams & Manuals
127609-0325-E1 Engine View Diagrams & Manuals
125602-0100-B1 Engine View Diagrams & Manuals
125602-0100-E1 Engine View Diagrams & Manuals
125602-0105-B1 Engine View Diagrams & Manuals
125602-0105-E1 Engine View Diagrams & Manuals
125602-0112-01 Engine View Diagrams & Manuals
125602-0112-E1 Engine View Diagrams & Manuals
125602-0114-E1 Engine View Diagrams & Manuals
125602-0114-E2 Engine View Diagrams & Manuals
125602-0115-B1 Engine View Diagrams & Manuals
125602-0115-E1 Engine View Diagrams & Manuals
125602-0117-01 Engine View Diagrams & Manuals
125602-0119-B1 Engine View Diagrams & Manuals
125602-0119-E1 Engine View Diagrams & Manuals
125602-0121-B1 Engine View Diagrams & Manuals
125602-0121-E1 Engine View Diagrams & Manuals
125602-0122-B1 Engine View Diagrams & Manuals
125602-0122-E1 Engine View Diagrams & Manuals
125602-0123-E1 Engine View Diagrams & Manuals
125602-0124-E1 Engine View Diagrams & Manuals
125602-0126-E1 Engine View Diagrams & Manuals
125602-0127-B1 Engine View Diagrams & Manuals
125602-0127-E1 Engine View Diagrams & Manuals
125602-0129-B1 Engine View Diagrams & Manuals
125602-0129-E1 Engine View Diagrams & Manuals
125602-0133-01 Engine View Diagrams & Manuals
125602-0134-E1 Engine View Diagrams & Manuals
125602-0136-B1 Engine View Diagrams & Manuals
125602-0136-E1 Engine View Diagrams & Manuals
125602-0146-B1 Engine View Diagrams & Manuals
125602-0146-E1 Engine View Diagrams & Manuals
125602-0147-B1 Engine View Diagrams & Manuals
125602-0147-E1 Engine View Diagrams & Manuals
125602-0149-B1 Engine View Diagrams & Manuals
125602-0158-B1 Engine View Diagrams & Manuals
125602-0158-E1 Engine View Diagrams & Manuals
125602-0159-B1 Engine View Diagrams & Manuals
125602-0159-E1 Engine View Diagrams & Manuals
125602-0162-B1 Engine View Diagrams & Manuals
125602-0162-E1 Engine View Diagrams & Manuals
125602-0163-B1 Engine View Diagrams & Manuals
125602-0164-B1 Engine View Diagrams & Manuals
125607-0148-B1 Engine View Diagrams & Manuals
125672-0142-B1 Engine View Diagrams & Manuals
125672-0142-E1 Engine View Diagrams & Manuals
125672-0145-01 Engine View Diagrams & Manuals
125682-0118-01 Engine View Diagrams & Manuals
125682-0128-E1 Engine View Diagrams & Manuals
125682-0130-E1 Engine View Diagrams & Manuals
125682-0140-01 Engine View Diagrams & Manuals
125682-0144-E1 Engine View Diagrams & Manuals
125682-0157-01 Engine View Diagrams & Manuals
125682-0161-B1 Engine View Diagrams & Manuals
125682-0161-E1 Engine View Diagrams & Manuals
126602-0100-B1 Engine View Diagrams & Manuals
126602-0100-E1 Engine View Diagrams & Manuals
126602-0101-B1 Engine View Diagrams & Manuals
126602-0101-E1 Engine View Diagrams & Manuals
126602-0108-E1 Engine View Diagrams & Manuals
126602-0109-E1 Engine View Diagrams & Manuals
126602-0110-E1 Engine View Diagrams & Manuals
126602-0113-E1 Engine View Diagrams & Manuals
126602-0114-E1 Engine View Diagrams & Manuals
126602-0116-E1 Engine View Diagrams & Manuals
126602-0117-E1 Engine View Diagrams & Manuals
126602-0118-E1 Engine View Diagrams & Manuals
126602-0130-E1 Engine View Diagrams & Manuals
126602-0133-E1 Engine View Diagrams & Manuals
126602-0134-E1 Engine View Diagrams & Manuals
126602-0135-E1 Engine View Diagrams & Manuals
126602-0137-E1 Engine View Diagrams & Manuals
126602-0139-E1 Engine View Diagrams & Manuals
126602-0141-B1 Engine View Diagrams & Manuals
126602-0141-E1 Engine View Diagrams & Manuals
126602-0143-B1 Engine View Diagrams & Manuals
126602-0143-E1 Engine View Diagrams & Manuals
126602-0145-E1 Engine View Diagrams & Manuals
126602-0146-B1 Engine View Diagrams & Manuals
126602-0146-B2 Engine View Diagrams & Manuals
126602-0146-E1 Engine View Diagrams & Manuals
126602-0146-E2 Engine View Diagrams & Manuals
126602-0157-E1 Engine View Diagrams & Manuals
126602-0158-E1 Engine View Diagrams & Manuals
126602-0174-E1 Engine View Diagrams & Manuals
126602-0502-B1 Engine View Diagrams & Manuals
126602-0502-E1 Engine View Diagrams & Manuals
126606-0200-E1 Engine View Diagrams & Manuals
126606-0201-E1 Engine View Diagrams & Manuals
126607-0115-E1 Engine View Diagrams & Manuals
126607-0131-E1 Engine View Diagrams & Manuals
126607-0132-E1 Engine View Diagrams & Manuals
126607-0136-E1 Engine View Diagrams & Manuals
126607-0138-E1 Engine View Diagrams & Manuals
126607-0162-E1 Engine View Diagrams & Manuals
128602-0100-B1 Engine View Diagrams & Manuals
128602-0100-E1 Engine View Diagrams & Manuals
128602-0112-B1 Engine View Diagrams & Manuals
128602-0112-E1 Engine View Diagrams & Manuals
128602-0115-B1 Engine View Diagrams & Manuals
128602-0115-E1 Engine View Diagrams & Manuals
128602-0116-B1 Engine View Diagrams & Manuals
128602-0149-B1 Engine View Diagrams & Manuals
128602-0149-E1 Engine View Diagrams & Manuals
128602-0150-B1 Engine View Diagrams & Manuals
128602-0150-B2 Engine View Diagrams & Manuals
128602-0150-E1 Engine View Diagrams & Manuals
128602-0150-E2 Engine View Diagrams & Manuals
128602-0151-B1 Engine View Diagrams & Manuals
128602-0151-B2 Engine View Diagrams & Manuals
128602-0151-E1 Engine View Diagrams & Manuals
128602-0151-E2 Engine View Diagrams & Manuals
128602-0212-E1 Engine View Diagrams & Manuals
128602-0215-E1 Engine View Diagrams & Manuals
128602-0221-E1 Engine View Diagrams & Manuals
128602-0224-E1 Engine View Diagrams & Manuals
128602-0259-B2 Engine View Diagrams & Manuals
128602-0259-E1 Engine View Diagrams & Manuals
128602-0259-E2 Engine View Diagrams & Manuals
128602-0264-B2 Engine View Diagrams & Manuals
128602-0264-E1 Engine View Diagrams & Manuals
128602-0264-E2 Engine View Diagrams & Manuals
128602-0278-E1 Engine View Diagrams & Manuals
128602-0304-B1 Engine View Diagrams & Manuals
128602-0304-E1 Engine View Diagrams & Manuals
128602-0339-B1 Engine View Diagrams & Manuals
128602-0339-E1 Engine View Diagrams & Manuals
128602-0445-B1 Engine View Diagrams & Manuals
128602-0445-E1 Engine View Diagrams & Manuals
128602-0514-B1 Engine View Diagrams & Manuals
128602-0514-E1 Engine View Diagrams & Manuals
128602-0551-B1 Engine View Diagrams & Manuals
128602-0551-E1 Engine View Diagrams & Manuals
128602-0552-B1 Engine View Diagrams & Manuals
128602-0552-E1 Engine View Diagrams & Manuals
128602-0620-E1 Engine View Diagrams & Manuals
128602-0660-B1 Engine View Diagrams & Manuals
128602-0809-B1 Engine View Diagrams & Manuals
128602-0873-B1 Engine View Diagrams & Manuals
128602-0901-E1 Engine View Diagrams & Manuals
128602-0993-E1 Engine View Diagrams & Manuals
128602-1102-E1 Engine View Diagrams & Manuals
128605-0629-B1 Engine View Diagrams & Manuals
128605-0629-E1 Engine View Diagrams & Manuals
128605-0902-B1 Engine View Diagrams & Manuals
128607-0113-B1 Engine View Diagrams & Manuals
128607-0113-E1 Engine View Diagrams & Manuals
12A602-0100-B1 Engine View Diagrams & Manuals
12A602-0100-E1 Engine View Diagrams & Manuals
12A602-0105-B1 Engine View Diagrams & Manuals
12A602-0105-E1 Engine View Diagrams & Manuals
12A602-0112-B1 Engine View Diagrams & Manuals
12A602-0112-E1 Engine View Diagrams & Manuals
12B602-0100-E1 Engine View Diagrams & Manuals
12B602-0104-E1 Engine View Diagrams & Manuals
12C602-0100-B1 Engine View Diagrams & Manuals
12C602-0100-E1 Engine View Diagrams & Manuals
12C602-0112-E1 Engine View Diagrams & Manuals
12C602-0113-E1 Engine View Diagrams & Manuals
12C602-0115-E1 Engine View Diagrams & Manuals
12C602-0116-B1 Engine View Diagrams & Manuals
12C602-0116-E1 Engine View Diagrams & Manuals
12C602-0117-E1 Engine View Diagrams & Manuals
12C682-0110-B1 Engine View Diagrams & Manuals
12C682-0110-E1 Engine View Diagrams & Manuals
12C682-0111-01 Engine View Diagrams & Manuals
12C682-0114-01 Engine View Diagrams & Manuals
12C682-0118-B1 Engine View Diagrams & Manuals
12C682-0118-E1 Engine View Diagrams & Manuals
12D602-0015-B1 Engine View Diagrams & Manuals
12D602-0015-E1 Engine View Diagrams & Manuals
12D602-0100-B1 Engine View Diagrams & Manuals
12D602-0100-E1 Engine View Diagrams & Manuals
12D602-0109-E1 Engine View Diagrams & Manuals
12D602-0110-E1 Engine View Diagrams & Manuals
12D602-0111-E1 Engine View Diagrams & Manuals
12D602-0118-B1 Engine View Diagrams & Manuals
12D602-0119-E1 Engine View Diagrams & Manuals
12D602-0120-B1 Engine View Diagrams & Manuals
12D602-0121-B1 Engine View Diagrams & Manuals
12D607-0112-E1 Engine View Diagrams & Manuals
12D607-0114-E1 Engine View Diagrams & Manuals
12D672-0116-E1 Engine View Diagrams & Manuals
12D677-0115-B1 Engine View Diagrams & Manuals
12D677-0115-E1 Engine View Diagrams & Manuals
Toro
20011 (210000001-210999999)(2001) Lawn Mower View Diagrams & Manuals
20027 (9900001-9999999)(1999) Lawn Mower View Diagrams & Manuals
20027 (200000001-200999999)(2000) Lawn Mower View Diagrams & Manuals
20027 (210000001-210999999)(2001) Lawn Mower View Diagrams & Manuals
20038 (220000001-220999999)(2002) Lawn Mower View Diagrams & Manuals
20038 (230000001-230999999)(2003) Lawn Mower View Diagrams & Manuals
20038 (240000001-240999999)(2004) Lawn Mower View Diagrams & Manuals
20039 (220000001-220999999)(2002) Lawn Mower View Diagrams & Manuals
20039 (230000001-230999999)(2003) Lawn Mower View Diagrams & Manuals
20039 (240000001-240999999)(2004) Lawn Mower View Diagrams & Manuals
20794 (270000001-270999999)(2007) Lawn Mower View Diagrams & Manuals
20794 (280000001-280999999)(2008) Lawn Mower View Diagrams & Manuals
20794 (260000001-260999999)(2006) Lawn Mower View Diagrams & Manuals
20796 (270000001-270999999)(2007) Lawn Mower View Diagrams & Manuals
20796 (280000001-280999999)(2008) Lawn Mower View Diagrams & Manuals
20796 (260000001-260999999)(2006) Lawn Mower View Diagrams & Manuals
20783 (220000001-220999999)(2002) Lawn Mower View Diagrams & Manuals
20783 (230000001-230002003)(2003) Lawn Mower View Diagrams & Manuals
20783 (230002004-230999999)(2003) Lawn Mower View Diagrams & Manuals
20783 (250000001-250999999)(2005) Lawn Mower View Diagrams & Manuals
20784 (220000001-220999999)(2002) Lawn Mower View Diagrams & Manuals
20784 (250000001-250999999)(2005) Lawn Mower View Diagrams & Manuals
26634 (270000001-270999999)(2007) Lawn Mower View Diagrams & Manuals
26634 (280000001-280999999)(2008) Lawn Mower View Diagrams & Manuals
26634 (230000001-230999999)(2003) Lawn Mower View Diagrams & Manuals
26634 (240000001-240999999)(2004) Lawn Mower View Diagrams & Manuals
26634 (250000001-250999999)(2005) Lawn Mower View Diagrams & Manuals
26634 (260000001-260999999)(2006) Lawn Mower View Diagrams & Manuals
Show More Compatible Models
This item works with the following types of products:
- Engine Parts
- Lawn Mower Parts
This part replaces obsolete part #: 693909, 694202, 692648
Customer Part Reviews ?
Average Rating (out of 5):
Click to filter by ratings:
5 stars
2
4 stars
0
3 stars
0
2 stars
1
1 stars
0
< PREV
- 1
Costumer service
Prompt service. Worked great
Guest -
December 11, 2023
Verified Purchase
Runs like a top
Had a difficult time trying to locate the carburetor as the equipment it was for was older and the part had been discontinued. One phone call later with some super service provided by a GREAT representative, the part was ordered and a short time later it was installed and my problem was solved. Kudos!
Guest -
May 10, 2023
Verified Purchase
Spring missing
Fast delivery, but spring was missing, don't want to go through the hassle of returning
Guest -
July 30, 2020
Verified Purchase
t
t
t -
t days ago
Verified Purchase
eReplacementParts Team
t
Questions & Answers ?
Our customer Service team is at the ready daily to answer your part and product questions.

Ask our Team
We have a dedicated staff with decades of collective experience in helping customers just like you purchase parts to repair their products.
Does this fit my product?Questions & Answers for Carburetor
No questions have been asked yet
Customer Repair Instructions ?
All our customer repair instructions are solicited directly from other customers just like you who have purchased and replaced this exact part.
Carburetor was bad.
Elmer - September 18, 2017
👍 2 of 3 people found this instruction helpful
Tool Type
Engine
Difficulty
Easy
Time
Less than 15 minutes
Tools Used
Screwdriver, Socket set
Parts Used
1. Disconnected the lines.
2. Removed the old carburetor.
3. Secured the new one.
4. Reconnected the fuel lines.
2. Removed the old carburetor.
3. Secured the new one.
4. Reconnected the fuel lines.
Did you find this story helpful?
Thanks for voting and helping fellow customers!
The lawnmower did not stay running once it started
dennis - August 30, 2016
👍 1 of 1 people found this instruction helpful
Tool Type
Lawn Mower
Difficulty
Easy
Time
15-30 minutes
Tools Used
Pliers, Socket set, Nutdriver
Parts Used
Remove the air filter cover then the air filter. Empty the fuel tank or use hose clamp pliers to stop the flow of fuel. Remove the fuel hose from the carburetor. Remove the spring and linkage from the governor. Remove the bolts securing the carburetor to the engine. And remove the old carburetor. Then install the new carburetor in the reverse order.
Did you find this story helpful?
Thanks for voting and helping fellow customers!
Old carburetor gummed up and not working
Carl - August 23, 2023
Tool Type
Engine
Difficulty
Easy
Time
15-30 minutes
Tools Used
Pliers, Nutdriver
Parts Used
Removed motor cowling, air filter,fuel line and filter,and finally the carburetor. Installed new carburetor and replaced the fuel line and filter, air cleaner and cowling. Filled tank with new gas, primed carburetor, and started engine on second pull of rope. Job complete in less than 30 minutes.
Did you find this story helpful?
Thanks for voting and helping fellow customers!
Gas was bad. Sludged up carburetor . Tried to disassemble and cleaned it out zeveral times .would not stay running
David - April 4, 2021
Tool Type
Lawn Mower
Difficulty
Easy
Time
15-30 minutes
Tools Used
Screwdriver, Pliers, Nutdriver
Parts Used
Drained the fuel from the tank lRemoved the cover around the carburetor with a flat head screwdriver and saved the gasket. Removed the two bolts from the carburetor then removed the carburetor and the gasket at the engine and disconnected the linkage . It came with several gaskets and matche up the ones I removed and reversed the procedure. Added fresh gas and it started on the first pull.
Did you find this story helpful?
Thanks for voting and helping fellow customers!
Very difficult to start and ran rough with a loss of power.
Robert - November 27, 2020
Tool Type
Lawn Mower
Difficulty
Easy
Time
30-60 minutes
Tools Used
Pliers, Socket set, Nutdriver
Parts Used
1. Removed the fuel line, air cleaner assembly and disconnected cables.
2. Removed the old carb and cleaned contact surfaces.
Installed the new carb in reverse sequence with new gaskets (supplied).
3. Reattached cables, air cleaner assembly and reconnected the fuel line.
4. Gassed it up, pushed the primer.
Started on the first pull! Cut the grass.
2. Removed the old carb and cleaned contact surfaces.
Installed the new carb in reverse sequence with new gaskets (supplied).
3. Reattached cables, air cleaner assembly and reconnected the fuel line.
4. Gassed it up, pushed the primer.
Started on the first pull! Cut the grass.
Did you find this story helpful?
Thanks for voting and helping fellow customers!
Hard to start and stay started
Travis - May 28, 2020
Tool Type
Lawn Mower
Difficulty
Easy
Time
15-30 minutes
Tools Used
Pliers, Socket set
Parts Used
Removed air cleaner and drain fuel/blocked hose with plug. Remove carb and linkage and replace carb. Reinstall linkage. Hook up fuel hose, as do to pump primer and start. DONE 👍
Did you find this story helpful?
Thanks for voting and helping fellow customers!
Carb. had a blocked jet.
Bill - January 16, 2020
Tool Type
Lawn Mower
Difficulty
Easy
Time
Less than 15 minutes
Tools Used
Socket set, Wrench Set
Parts Used
Remove the carb.
Put on new carb.
Put on new carb.
Did you find this story helpful?
Thanks for voting and helping fellow customers!
Lawn mower did not start / rear tire was damaged
Charles - April 23, 2019
Tool Type
Lawn Mower
Difficulty
Medium
Time
1-2 hours
Tools Used
Socket set, Wrench Set, Convertible retaining ring pliers
Local lawn mower repair diagnosed the need to replace the carburetor and supplied the part number.
I placed the lawn mower on a table top which made working on the mower easier.
I removed the old carburetor and supporting attachments.
I installed the new carburetor and supporting attachments.
I removed the retaining snap rings and rear wheels.
I installed the new wheels and snap rings.
I placed the lawn mower on a table top which made working on the mower easier.
I removed the old carburetor and supporting attachments.
I installed the new carburetor and supporting attachments.
I removed the retaining snap rings and rear wheels.
I installed the new wheels and snap rings.
Did you find this story helpful?
Thanks for voting and helping fellow customers!
Miller trailblazer 250g with onan engine.
Shane - March 30, 2019
Tool Type
Engine
Difficulty
Medium
Time
More than 2 hours
Tools Used
Screwdriver, Pliers, Power Drill, Socket set, Wrench Set, Nutdriver
Parts Used
Engine would ran in idle and weld power decently without load, but would stutter under a weld load above 115 amps. Found the following issues:
Fuel filter was slow to fill, likely fuel pump.
Compression low on one cylinder, likely head gasket.
Someone used silicon sealer on intake, replacement of intake gaskets.
Removed heads, cleaned and prepared.
Removed intake, cleaned and prepared.
Replaced fuel pump, fuel filter, head gaskets, intake gaskets.
Checked spark plug gap, plugs were replaced by previous owner.
One issue found was carburetor wasn't getting enough fuel, adjusted floats.
Ran engine, ensure engine rpm was correct for idle and run speeds.
Polished slip rings and check voltage and resistance.
Checked voltage outputs for OCV and accessories 120/240 VAC.
Ensured 12 volt system had correct output.
Load test and weld test completed.
Fair easy and straight forward job, but I fix these all the time, usually it's the other end that has issues.
Did you find this story helpful?
Thanks for voting and helping fellow customers!
Would not start
Mark - February 8, 2018
Tool Type
Lawn Mower
Difficulty
Easy
Time
15-30 minutes
Tools Used
Socket set
Parts Used
Replaced old carburetor with new carb.
Once new carb was installed, the mower started right up. My Buddy was so happy to have his mower running again.
Once new carb was installed, the mower started right up. My Buddy was so happy to have his mower running again.
Did you find this story helpful?
Thanks for voting and helping fellow customers!
Load More Install Stories
OEM stands for Original Equipment Manufacturer and means the part you’re buying is sourced directly from the manufacturer who made your product. At eReplacementParts, we sell only genuine OEM parts, guaranteeing the part you’re purchasing is of better design and of higher quality than aftermarket parts.
Our product descriptions are a combination of data sourced directly from the manufacturers who made your product as well as content researched and curated by our content & customer service teams. This content is edited and reviewed internally before being made public to customers.
Our customer service team are at the ready daily to answer your part and product questions. We have a dedicated staff with decades of collective experience in helping customers just like you purchase parts to repair their products.
All our part reviews are solicited directly from other customers who have purchased this exact part. While we moderate these reviews for profanity, offensive language or personally identifiable information, these reviews are posted exactly as submitted and no alterations are made by our team.
All our customer repair instructions are solicited directly from other customers just like you who have purchased and replaced this exact part. While we moderate these reviews for profanity, offensive language or personally identifiable information, these reviews are posted exactly as submitted and no alterations are made by our team.
Based on data from past customer purchasing behaviors, these parts are most commonly purchased together along with the part you are viewing. These parts may be necessary or helpful to replace to complete your current repair.
All our installation videos are created and produced in collaboration with our in-house repair technician, Mark Sodja, who has helped millions of eReplacementParts customers over the last 13 years repair their products. Mark has years of experience in selling and repairing both commercial and residential products with a specialty in gas-powered equipment.
This data is collected from customers who submitted a repair instruction after replacing this exact part. Customers can rate how easy the repair was to complete and how long it took. We aggregate this data to provide a repair rating that allows customers to quickly determine the difficulty and time needed to perform their own repair.