
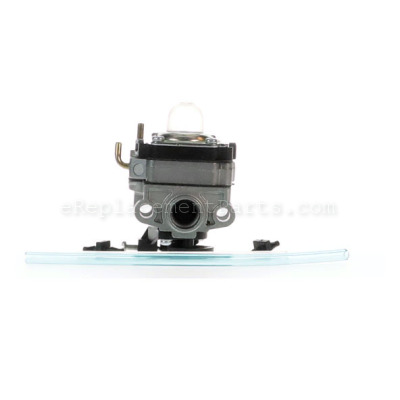


This is a genuine OEM sourced replacement part used on gas trimmers/edgers. The purpose of this part is to mix air and gas before the fuel mix goes to the engine.
If the engine won't start and the tank is full of fresh fuel, test the carburetor by removing the air filter and pouring about a teaspoon of fuel into the carburetor. Pull the starter rope. If the engine starts and then quickly dies, the carburetor is likely the problem.
This is a metal body carburetor, it is sold individually. This assembly includes fuel lines, primer bulb. You will need a screwdriver to perform this repair.
Carburetor W/prime 753-05251
OEM part for: Troy-Bilt, MTD, Cub Cadet
Part Number: 753-05251
$75.76
In Stock
Jump To:
Product Description ?
- Classification: Part
- Weight: 0.16 lbs.
- Shipping: Ships Worldwide
Frequently Purchased Together ?


Compatibility
This Carburetor W/prime will fit the following 30 machines. Confirm this part works with your model, and view the detailed model diagrams and repair help we have to offer.
Troy-Bilt
MTD
Cub Cadet
Show More Compatible ModelsThis item works with the following types of products:
- Edger Parts
- Trimmer Parts
Repair Videos ?
Watch the Repair Video for
Carburetor W/prime

Articles:
|
Replacing primer bulbs in small engines is one of the most common types of tool repairs, and this article explains profe...
June 25, 2010
|

|
Step-by-step instructions for removing and installing the carburetor on your Troy-Bilt trimmer....
July 30, 2018
|

Customer Part Reviews ?
Average Rating (out of 5):
Click to filter by ratings:
5 stars
10
4 stars
0
3 stars
1
2 stars
0
1 stars
0
< PREV
- 1
- 2
Great part, Great customer service.
I received the carburetor, installed it and it worked great. However the next day the primer bulb would not pop out. Seemed like a vacuum was holding it in.
I called Customer Service, and the woman was very helpful, she found the problem was very unique and wasn't in her troubleshooting guide. She sent out another one and provided me with a prepaid return label to return my defective one.
As easy as that.
Guest -
June 23, 2022
Verified Purchase
Carburetor with primer
Very easy to install. My Troy Bilt is working again!
Guest -
October 8, 2021
Verified Purchase
TROY BILT TB539E AND TB575SS REPLACEMENT PARTS
Site was excellent and easy to find the parts I needed to repair both units. The Diagrams along with how to videos were extremely helpful. I have recommended this site to my friends and colleague's
Guest -
June 24, 2021
Verified Purchase
Took 2 minutes to install started right up.
Part arrived quickly. just like original part
Guest -
August 5, 2020
Verified Purchase
Easy fix works great!
All good
Guest -
May 8, 2020
Verified Purchase
Carburetor
10 minutes to install and it started right up.
Made me a happy camper/gardner.
Guest -
September 24, 2019
Verified Purchase
Perfect fit
It would be better to provide new fuel lines and keep the line splicing connectors.
Guest -
September 6, 2019
Verified Purchase
Great product & Great service
The carburetor fit perfectly and was an identical match for the original part. This purchase turned a useless string trimmer into one that worked like new!
Guest -
June 18, 2019
Verified Purchase
Easy Repair!
Less than 5 minutes and my 12 year old string trimmer was running like a top again. Watched a quick repair video and the fix was so simple! I have the satisfaction of fixing it myself and saved over $200 in repairs!
Deborah -
June 15, 2019
Verified Purchase
Expectations exceeded
Arrived quickly-easy repair
Guest -
May 7, 2019
Verified Purchase
Questions & Answers ?
Our customer Service team is at the ready daily to answer your part and product questions.

Ask our Team
We have a dedicated staff with decades of collective experience in helping customers just like you purchase parts to repair their products.
Does this fit my product?Questions & Answers for Carburetor W/prime
No questions have been asked yet
Customer Repair Instructions ?
All our customer repair instructions are solicited directly from other customers just like you who have purchased and replaced this exact part.
Tiller was not running
david - December 2, 2015
👍 18 of 23 people found this instruction helpful
Tool Type
Cultivator
Difficulty
Easy
Time
30-60 minutes
Tools Used
Screwdriver, Pliers
Spark plug was good and getting spark. Fuel was clean with no trace of moisture. Tines were clear of vines and weeds. Good compression and full of oil. Spark shield was clean and clear. This left only a fuel problem. Replaced carb ( no kit available ) filled with new fuel and it started right up. Hope to get five more years of great service out of machine.
Did you find this story helpful?
Thanks for voting and helping fellow customers!
Carburetor was no good due to owner leaving crap fuel in tank.
William - March 27, 2017
👍 4 of 4 people found this instruction helpful
Tool Type
Cultivator
Difficulty
Easy
Time
15-30 minutes
Tools Used
Screwdriver
Parts Used
1. Removed engine cover, five screws.
2. Disconnected 2 fuel hoses.
3. Removed 2 screws from the side of the carburetor and removed carb gently from the gasket, I recommend changing the gasket.
4. Used super thin amount of blue gasket sealer to repair gasket and mount carb.
5. Mounted carb with 2 screws, put 2 hoses back on, put 5 screw for top cover, gas, primed until bulb filled up, pulled rope 5 times and it ran perfect. (GARDEN IS CULTIVATED AND PLANTED)
Thank You!
Did you find this story helpful?
Thanks for voting and helping fellow customers!
Would not idle or increase in RPMs
Richard - May 20, 2016
👍 8 of 12 people found this instruction helpful
Tool Type
Trimmer
Difficulty
Easy
Time
Less than 15 minutes
Tools Used
Screwdriver, Pliers
The repair was easy due to the parts matched exactly
Removed air cleaner
Removed screws that held the Carbuerator on
Removed fuel lines
Removed throttle cable assembly
Removed old gasket/ heat barrier
Replaced all parts cut fuel line used the supplied connectors
Put the trimmer back together
Primed the carb and it started within 3 pulls runs just like new
Did you find this story helpful?
Thanks for voting and helping fellow customers!
Ran at idle but died when throttle opened to full power
Laverne - September 17, 2016
👍 3 of 3 people found this instruction helpful
Tool Type
Cultivator
Difficulty
Easy
Time
15-30 minutes
Tools Used
Screwdriver, Pliers
Parts Used
1 Removed the Air Cleaner (AC) cover.
2 Removed AC
3 Removed fuel lines (in and return)
4 Removed two long screws thru carburetor
5 Removed carb, throttle cable
6 Removed o-ring that seals AC housing
7 unwrap New Carb
8 Place fuel line coupler in two fuel lines
9 Attach fuel line extensions provided in replacement kit to couplers
10 Reverse above order to install the New Carb Steps (6 to 1)
Did you find this story helpful?
Thanks for voting and helping fellow customers!
Primer bulb
Gerald - July 7, 2016
👍 2 of 2 people found this instruction helpful
Tool Type
Cultivator
Difficulty
Easy
Time
Less than 15 minutes
Tools Used
Screwdriver
Parts Used
1. Disconnected the lines from the old carburetor.
2. Removed old carburetor.
3. Attached the new carburetor.
4. Reattached the lines.
2. Removed old carburetor.
3. Attached the new carburetor.
4. Reattached the lines.
Did you find this story helpful?
Thanks for voting and helping fellow customers!
Carb severely gummed up
Frank - June 1, 2016
👍 2 of 2 people found this instruction helpful
Tool Type
Trimmer
Difficulty
Easy
Time
Less than 15 minutes
Tools Used
Screwdriver
Parts Used
Take the complete air cleaner off. Take the fuel lines and throttle off the old carb. Take out the the screws holding the old carb. Install the new carb. with the screws. Put the fuel lines back on and the throttle. Put the air cleaner back on.
Did you find this story helpful?
Thanks for voting and helping fellow customers!
Diaphragm in carb went bad
Theodore - June 13, 2016
👍 3 of 4 people found this instruction helpful
Tool Type
Edger
Difficulty
Medium
Time
30-60 minutes
Tools Used
Screwdriver, Wrench Set
Parts Used
Easy to replace carb, but I did trim the plastic flanges in the air filter housing to allow easier re-installation of two nuts. Also I locked the two nuts together to remove and re-install the air filter mounting screws.
Did you find this story helpful?
Thanks for voting and helping fellow customers!
Primer bulb torn and leaking
Bruce - May 24, 2016
👍 2 of 2 people found this instruction helpful
Tool Type
Cultivator
Difficulty
Easy
Time
Less than 15 minutes
Tools Used
Screwdriver, Pliers
Parts Used
Removed air filter. removed two fuel lines. Removed two mounting screws. removed carb and disconnected throttle cable. Reinstalled in reverse order.
Did you find this story helpful?
Thanks for voting and helping fellow customers!
Wouldn't stay running
Steven - May 31, 2017
👍 1 of 1 people found this instruction helpful
Tool Type
Trimmer
Difficulty
Easy
Time
Less than 15 minutes
Tools Used
Screwdriver
Parts Used
Super easy..... Removed two fuel lines and two screws. Removed bad carb. and replaced with new
Did you find this story helpful?
Thanks for voting and helping fellow customers!
Gov. ethanol in gasoline (4 stroke unit) had ruined the carburator replaced fuel system. Hard to start.
ALAB - March 5, 2017
👍 1 of 1 people found this instruction helpful
Tool Type
Cultivator
Difficulty
Easy
Time
1-2 hours
Tools Used
Screwdriver, Power Drill, Socket set
Troybuilt TB146 EC tiller - four stroke
1.) Removed the 4 - 5 top cover screws
2.) Removed the air breather cover, filter and filter grate, and assembly. See the spacers in the housing for the long bolts put them back, a big help to have.
3.) Removed the carburetor.
4.) Disconnected the throttle connection from the carburetor.
5.) Lift and discounted the throttle cable securement from the body of the motor, use two standard screwdrivers to push in on both sides of the holder, it just lifts off and out of the way.
6.) Remove the carburetor gasket, big cardboard piece. Remember to tuck in under the plastic housing when reinstalling
7.) Remove and reinstall the spark plug if needed, did they come pre-set, the carb too.
8.) Re-install in reverse.
9.) Change the oil while you are there. Do not overfill or it will run out of the air breather assembly.
10.) The power bit starter is great, all small engines should have one of these. A standard square bit, I bet would work too.
Did you find this story helpful?
Thanks for voting and helping fellow customers!
Load More Install Stories
OEM stands for Original Equipment Manufacturer and means the part you’re buying is sourced directly from the manufacturer who made your product. At eReplacementParts, we sell only genuine OEM parts, guaranteeing the part you’re purchasing is of better design and of higher quality than aftermarket parts.
Our product descriptions are a combination of data sourced directly from the manufacturers who made your product as well as content researched and curated by our content & customer service teams. This content is edited and reviewed internally before being made public to customers.
Our customer service team are at the ready daily to answer your part and product questions. We have a dedicated staff with decades of collective experience in helping customers just like you purchase parts to repair their products.
All our part reviews are solicited directly from other customers who have purchased this exact part. While we moderate these reviews for profanity, offensive language or personally identifiable information, these reviews are posted exactly as submitted and no alterations are made by our team.
All our customer repair instructions are solicited directly from other customers just like you who have purchased and replaced this exact part. While we moderate these reviews for profanity, offensive language or personally identifiable information, these reviews are posted exactly as submitted and no alterations are made by our team.
Based on data from past customer purchasing behaviors, these parts are most commonly purchased together along with the part you are viewing. These parts may be necessary or helpful to replace to complete your current repair.
All our installation videos are created and produced in collaboration with our in-house repair technician, Mark Sodja, who has helped millions of eReplacementParts customers over the last 13 years repair their products. Mark has years of experience in selling and repairing both commercial and residential products with a specialty in gas-powered equipment.
This data is collected from customers who submitted a repair instruction after replacing this exact part. Customers can rate how easy the repair was to complete and how long it took. We aggregate this data to provide a repair rating that allows customers to quickly determine the difficulty and time needed to perform their own repair.