eReplacementParts.com
877-346-4815
Black and Decker Parts

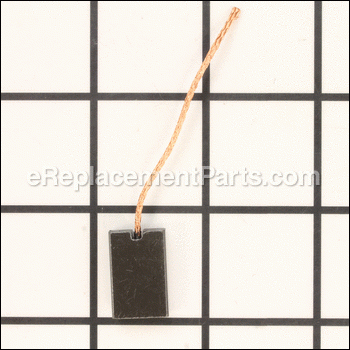
Shunted Carbon Brush 242273-00

OEM part for: DeWALT, Black and Decker

Part Number: 242273-00


Install
Videos!
Grid squares measure 1x1 inch
In Stock
Order within the next 6 hours and your part ships today!
Easy 15-30 minutes (34 rated repairs)?
OEM: Original Equipment Manufacturer ?
DeWALTBlack and Decker
Does this d-block d-md-none fit my product?

Product Description ?

Dewalt genuine replacement part, that is sold individually.
2 are needed for the tools listed below.
It is always best to replace both brushes, even if only one is worn.

Worn brushes frequently are the cause behind a motor running poorly.
Replacing brushes can fix a motor that’s operating intermittently.
New brushes can restore a motor’s electric braking.

Carbon brushes are one of the most commonly replaced power tool parts. This is because carbon brushes are wear items, meaning that through friction and use they will gradually wear away until they need replacing. Worn brushes are a common causes of intermittent motor function, reduced electric braking and reduced motor power. A worn-out brush will often be worn down near to the wire lead and can be cracked, pitted, or burned. When replacing carbon brushes, be sure to inspect your armature for burns, cracks, or other damage which can indicate larger motor problems.

  • Classification: Part
  • Weight: 0.01 lbs.
  • Also Known As: Shunted Motor Brush
  • Shipping: Ships Worldwide

Frequently Purchased Together ?

Compatibility

This part will fit the following 75 machines

Black and Decker

LM175 18" Electric Mower View Diagrams & Manuals
MM275 18" Electric Mulching Mower View Diagrams & Manuals
MM575 18" Electric LAWNHOG Mulching Mower View Diagrams & Manuals
MM675 Type 1 18" Electric "LAWNHOG&trade" Mulching Mower with Flip-Over Handle View Diagrams & Manuals
MM675 Type 2 18" Electric "LAWNHOG&trade" Mulching Mower with Flip-Over Handle View Diagrams & Manuals
MM875 Type 1 19" Electric LAWNHOG&trade Mulching Mower with Rear-Bag View Diagrams & Manuals
MM875 Type 2 19" Electric LAWNHOG&trade Mulching Mower with Rear-Bag View Diagrams & Manuals
37051 Type 1 19 Crafts Electric Mower View Diagrams & Manuals
37051 Type 2 19 Crafts Electric Mower View Diagrams & Manuals
8000 Type 2 18 Single Mower 115 Volt View Diagrams & Manuals
8000 Type 3 18 Single Mower 115 Volt View Diagrams & Manuals
8000 Type 4 18 Single Mower 115 Volt View Diagrams & Manuals
8000 Type 5 18 Single Mower 115 Volt View Diagrams & Manuals
8000 Type 6 18 Single Mower 115 Volt View Diagrams & Manuals
8000 Type 7 18 Single Mower 115 Volt View Diagrams & Manuals
8000 Type 8 18 Single Mower 115 Volt View Diagrams & Manuals
8000 Type 9 18 Single Mower 115 Volt View Diagrams & Manuals
8000 Type A 18 Single Mower 115 Volt View Diagrams & Manuals
8000 Type AA 18 Single Mower 115 Volt View Diagrams & Manuals
8008 Type 1 Deluxe 18 Lawn Mower View Diagrams & Manuals
8008 Type 2 Deluxe 18 Lawn Mower View Diagrams & Manuals
8008 Type 3 Deluxe 18 Lawn Mower View Diagrams & Manuals
8008 Type 4 Deluxe 18 Lawn Mower View Diagrams & Manuals
8008 Type 5 Deluxe 18 Lawn Mower View Diagrams & Manuals
8008 Type 6 Deluxe 18 Lawn Mower View Diagrams & Manuals
8010 Type 2 18 Deluxe Mower 115 Volt View Diagrams & Manuals
8010 Type 3 18 Deluxe Mower 115 Volt View Diagrams & Manuals
8018 Type 1 18 Flipover Handle Mower View Diagrams & Manuals
8019 Type 1 18 Lawn Mower Flipover Handle View Diagrams & Manuals
LM100 Type 1 Steel Deck Mower View Diagrams & Manuals
LM100 Type 2 Steel Deck Mower View Diagrams & Manuals
LM100 Type 3 Steel Deck Mower View Diagrams & Manuals
LM1820 Type 1 18 Electric Lawn Mower View Diagrams & Manuals
LM1900 Type 1 Electric Mower View Diagrams & Manuals
LM400 Type 1 18 Electric Mower View Diagrams & Manuals
M100 Type 1 18 Inch Mower View Diagrams & Manuals
M100 Type 2 18 Inch Mower View Diagrams & Manuals
M200 Type 1 Flip Over Handle Mower View Diagrams & Manuals
M200 Type 2 Flip Over Handle Mower View Diagrams & Manuals
M200 Type 3 Flip Over Handle Mower View Diagrams & Manuals
M200 Type 4 Flip Over Handle Mower View Diagrams & Manuals
M200 Type 5 Flip Over Handle Mower View Diagrams & Manuals
M200 Type 6 Flip Over Handle Mower View Diagrams & Manuals
M200 Type 7 Flip Over Handle Mower View Diagrams & Manuals
M300 Type 1 18 Deluxe Mower View Diagrams & Manuals
M300 Type 2 18 Deluxe Mower View Diagrams & Manuals
M400 Type 1 Electronic Mower View Diagrams & Manuals
M700 Type 1 Rear Bagging Mower View Diagrams & Manuals
M700 Type 2 Rear Bagging Mower View Diagrams & Manuals
MM450 Type 1 Mulch N Mow View Diagrams & Manuals
MM450 Type 2 Mulch N Mow View Diagrams & Manuals
MM525 Type 1 Corded Mulch Mower View Diagrams & Manuals
MM525 Type 2 Corded Mulch Mower View Diagrams & Manuals
MM525 Type 3 Corded Mulch Mower View Diagrams & Manuals
MM525 Type 4 Corded Mulch Mower View Diagrams & Manuals
MM550 Type 1 12 Amp Mulch Mower View Diagrams & Manuals
MM550 Type 3 12 Amp Mulch Mower View Diagrams & Manuals
MM550 Type 4 12 Amp Mulch Mower View Diagrams & Manuals
MM600S Type 2 18 Electric Mower View Diagrams & Manuals
MM600 Type 1 18 Inch 4 Horse Power Mulching Mower View Diagrams & Manuals
MM600 Type 2 18 Inch 4 Horse Power Mulching Mower View Diagrams & Manuals
MM850S Type 4 19 Electric Mower View Diagrams & Manuals
MM850 Type 1 19 Mulching Mower View Diagrams & Manuals
MM850 Type 2 19 Mulching Mower View Diagrams & Manuals
MM850 Type 3 19 Mulching Mower View Diagrams & Manuals
MM850 Type 4 19 Mulching Mower View Diagrams & Manuals
MM850 Type 5 19 Mulching Mower View Diagrams & Manuals
MM1800 Type 1 18 Inch Mulching Mower View Diagrams & Manuals
M2371B Type 2 18 Inch Mower View Diagrams & Manuals
MM875 Type 3 19 Mulching Mower View Diagrams & Manuals
LM175 (Type 1) 18-Inch 6.5a Mower Power Tool View Diagrams & Manuals
LM175 (Type 2) 18-Inch 6.5a Mower Power Tool View Diagrams & Manuals
MM1800 (Type 2) Diamond Core Drill Power Tool View Diagrams & Manuals
MM275 (Type 1) 18 Elect.Mower Power Tool View Diagrams & Manuals
MM575 (Type 1) 18 Elect.Mower Power Tool View Diagrams & Manuals
Show More Compatible Models
Don't see yours? Try searching our site for :

This item works with the following types of products:

  • Lawn Mower Parts

Repair Videos ?

Watch the Repair Video for Shunted Carbon Brush

Customer Part Reviews ?

5
Average Rating (out of 5):
21 Reviews
Click to filter by ratings:
5 stars
21
4 stars
0
3 stars
0
2 stars
0
1 stars
0
  • Highest Rating
  • Most Recent
< PREV
  • 1
  • 2
  • 3
NEXT >
  • The item is as described,worked perfectly
    The item is brand new as described
    Guest - June 17, 2023 Verified Purchase
    Easy repair. Part fit exactly. Quick ship.
    Easy repair. Part fit exactly. Quick ship. Saved my old corded lawn mower!
    Guest - June 4, 2023 Verified Purchase
    Replacing the two brushes on my electric mower was very simple
    The brushes were exact replacements and are working perfectly.
    Guest - May 29, 2023 Verified Purchase
    the vidio was excellent. It made the job easy.
    the shipping cost was pretty high for such a small part but it worked and that is what counts.
    Guest - March 24, 2023 Verified Purchase
    Lawn mower motor repair
    Arrived sooner than predicted; inexpensive and worked perfectly; repair instructions were easy to follow and do. Thanks.
    Guest - July 28, 2022 Verified Purchase
    factory parts for an old electric lawn mower motor
    This is my 3rd experience over several years getting replacement motor brushes. Always fast and easy to order and parts are always i stock. Good service!
    Guest - July 20, 2022 Verified Purchase
    Part arrived quickly in great shape
    The brushes seem good quality and were easy to install
    Susan - June 29, 2022 Verified Purchase
    Easy fix. Part worked.
    Simple little part the guide made it easy to order. Thanks.
    Guest - October 14, 2021 Verified Purchase
    Easy Peasy!
    Fast Flawless Fit & Fix! 25 year old mower still purring!
    Guest - August 11, 2021 Verified Purchase
    Shunted Carbon Brush
    The correct part arrived quickly. I'm back having fun mowing my lawn.
    Guest - June 18, 2021 Verified Purchase
    t
    t
    t - t days ago Verified Purchase
    eReplacementParts Team
    t

    Questions & Answers ?

    Our customer Service team is at the ready daily to answer your part and product questions.

    photo of team member
    Ask our Team

    We have a dedicated staff with decades of collective experience in helping customers just like you purchase parts to repair their products.

    Does this fit my product?

    Questions & Answers for Shunted Carbon Brush


    No questions have been asked yet

    Customer Repair Instructions ?

    All our customer repair instructions are solicited directly from other customers just like you who have purchased and replaced this exact part.

    Easy 15-30 minutes (34 rated repairs)?

    Electric lawn mower had intermittent power, had to bounce it up and down while squeezing trigger to get it to cut

    Matt - May 10, 2016
    👍 28 of 31 people found this instruction helpful
    Tool Type

    Lawn Mower

    Difficulty

    Easy

    Time

    15-30 minutes

    Tools Used

    , torx driver is preferred but was able to use flat head

    Black And Decker LM170, Removed plastic cover, all torx head screws but was able to use flat head. Entire top of electric lawn mower removed can access brushes, could see the worn brush, one side completely gone and spring no longer keeping tension, pushing brush against armature of motor, poor contact would spark intermittently. Removed torx that keeps brush assembly in place and then removed worn brush from spring loaded assy. Crimped new brush wire to where the old one connected and re install brush assy, cover and you are ready to mow!!! It took me a total of 20 minutes, but can probably replace a brush on this electric mower in 5-10 minutes next time, very easy, do not pay someone to fix this!!!
    Did you find this story helpful?
    Thanks for voting and helping fellow customers!

    Lawn mower stopped working altogether - as if the motor had burned out. I discovered that the carbon brushes were worn to the point of not making good contact with the commutator.

    Todd - April 21, 2016
    👍 11 of 12 people found this instruction helpful
    Tool Type

    Lawn Mower

    Difficulty

    Easy

    Time

    30-60 minutes

    Tools Used

    Screwdriver, Pliers, Crimping tool

    I removed the old brushes and rectifier, then installed the replacement rectifier using a silicone grease. I connected the new brushes using a crimping tool and new wire crimps, then re-assembled the mower. With $30 worth of repair parts, the mower has since been working like new, which saved us from having to buy a new mower.
    Did you find this story helpful?
    Thanks for voting and helping fellow customers!

    Electric motor ran sporadically, then not at all

    Anthony - December 20, 2016
    👍 4 of 4 people found this instruction helpful
    Tool Type

    Lawn Mower

    Difficulty

    Easy

    Time

    15-30 minutes

    Tools Used

    Screwdriver, Pliers

    1. Removed cowling of motor with Torx wrenches
    2. Removed brush assemblies with same, one by one so that I would have a model as to how to put them back together.
    3. Cut wire to brush, discarded old brushes
    4. Stripped the cut wires, connected to new brushes
    5. Put all the parts back
    Did you find this story helpful?
    Thanks for voting and helping fellow customers!

    Mower would not start. It would run if I held down the switch and turned the blade by hand. I used a wooden stick not my hand though.

    michael - May 7, 2016
    👍 4 of 4 people found this instruction helpful
    Tool Type

    Lawn Mower

    Difficulty

    Medium

    Time

    15-30 minutes

    Tools Used

    Screwdriver, wire crimpers

    Replaced the brushes and cleaned the motor commutator. I also dressed it with some emery paper to present a smoother surface for the new brushes. Put it back together and it works like a charm. Glad getting the parts was so easy. The illustrations are very good and helpful too.
    Did you find this story helpful?
    Thanks for voting and helping fellow customers!

    Brushes were worn on electric lawnmower so did not start when switch turned on

    JAMES - May 1, 2016
    👍 3 of 3 people found this instruction helpful
    Tool Type

    Lawn Mower

    Difficulty

    Medium

    Time

    15-30 minutes

    Tools Used

    Screwdriver, Pliers, soldergun

    Removed holder for old brushes and replaced with new, had to clip the wire on the old brush and had to solder wires together - old brush had a split ring to fasten wires together was not able to remove from old wire so cut off and trimmed the insulation from old wires and soldered brush wire.

    Did you find this story helpful?
    Thanks for voting and helping fellow customers!

    Brushes wore out!

    Richard - March 9, 2016
    👍 3 of 4 people found this instruction helpful
    Tool Type

    Lawn Mower

    Difficulty

    Easy

    Time

    15-30 minutes

    Tools Used

    Screwdriver, Pliers, Socket set, Adjustable Wrench

    Attach wires to existing.
    Did you find this story helpful?
    Thanks for voting and helping fellow customers!

    Brushes were worn out

    Narayana - March 27, 2017
    👍 1 of 1 people found this instruction helpful
    Tool Type

    Lawn Mower

    Difficulty

    Medium

    Time

    30-60 minutes

    Tools Used

    Screwdriver, Soldering iron

    1. Remove the cover using a screw driver
    2. Remove the brush assembly
    3. Unsolder solder the worn out brushes
    4. Solder the new brushes.
    5. Replace the brush assembly
    6. Replace the cover
    Did you find this story helpful?
    Thanks for voting and helping fellow customers!

    Electricity not getting to the commutator

    Edward - January 6, 2017
    👍 1 of 1 people found this instruction helpful
    Tool Type

    Lawn Mower

    Difficulty

    Easy

    Time

    15-30 minutes

    Tools Used

    Screwdriver, Pliers, Sandpaper

    Made sure mower not connected to electricity
    Removed cover,4 screws
    Removed brush holders, 1 screw each
    Cut off old brush
    Connected new brush wire to motor wires with butt splices
    Cleaned commutator with very fine sand paper
    Assembled brushes in holders and screwed holders into place
    Replaced cover.
    Connected lawnmower to electricity
    Motor worked like new
    Did you find this story helpful?
    Thanks for voting and helping fellow customers!

    The electric lawn mower either would not operate at all or would operate intermittently.

    Michael - August 28, 2016
    👍 1 of 1 people found this instruction helpful
    Tool Type

    Lawn Mower

    Difficulty

    Easy

    Time

    15-30 minutes

    Tools Used

    Screwdriver, Pliers

    1. Removed the several screws that attached the top cover of the lawn mower to its base
    2. Removed mower handle, then lifted off cover
    3. Removed worn electric motor brushes and replaced with new brushes (2) - always replace as a set of two.
    4. Performed steps 1 & 2 in reverse order
    5. Powered up mower - worked as good as new!
    Did you find this story helpful?
    Thanks for voting and helping fellow customers!

    Mower would not try to start

    Gilda - June 18, 2016
    👍 1 of 1 people found this instruction helpful
    Tool Type

    Lawn Mower

    Difficulty

    Medium

    Time

    15-30 minutes

    Tools Used

    Screwdriver, Pliers

    Changed the shunt bushing. Very easy to do saw your YouTube video on how to replace.
    By the way Ladies, I am 71 years old and if you can follow a recipe to be able to cook ,then you can follow a video about repairing a Lawn Mower.
    Did you find this story helpful?
    Thanks for voting and helping fellow customers!

    OEM stands for Original Equipment Manufacturer and means the part you’re buying is sourced directly from the manufacturer who made your product. At eReplacementParts, we sell only genuine OEM parts, guaranteeing the part you’re purchasing is of better design and of higher quality than aftermarket parts.

    Our product descriptions are a combination of data sourced directly from the manufacturers who made your product as well as content researched and curated by our content & customer service teams. This content is edited and reviewed internally before being made public to customers.

    Our customer service team are at the ready daily to answer your part and product questions. We have a dedicated staff with decades of collective experience in helping customers just like you purchase parts to repair their products.

    All our part reviews are solicited directly from other customers who have purchased this exact part. While we moderate these reviews for profanity, offensive language or personally identifiable information, these reviews are posted exactly as submitted and no alterations are made by our team.

    All our customer repair instructions are solicited directly from other customers just like you who have purchased and replaced this exact part. While we moderate these reviews for profanity, offensive language or personally identifiable information, these reviews are posted exactly as submitted and no alterations are made by our team.

    Based on data from past customer purchasing behaviors, these parts are most commonly purchased together along with the part you are viewing. These parts may be necessary or helpful to replace to complete your current repair.

    All our installation videos are created and produced in collaboration with our in-house repair technician, Mark Sodja, who has helped millions of eReplacementParts customers over the last 13 years repair their products. Mark has years of experience in selling and repairing both commercial and residential products with a specialty in gas-powered equipment.

    This data is collected from customers who submitted a repair instruction after replacing this exact part. Customers can rate how easy the repair was to complete and how long it took. We aggregate this data to provide a repair rating that allows customers to quickly determine the difficulty and time needed to perform their own repair.

    eReplacementParts.com
    7174 South 400 West
    Suite 5
    Midvale, UT 84047
    visa mastercard discover american express PayPal