
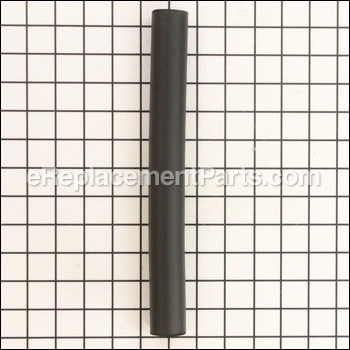
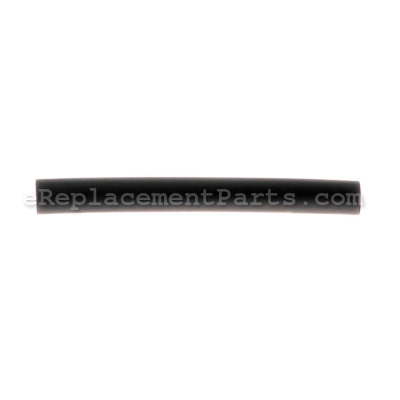


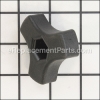
This is the handle grip for Black & Decker and Dewalt walk-behind push lawn mowers. It is supplied directly from original equipment manufacturer and it is sold individually. It is specially designed to provide solid stable grip on the upper handle of a mower for better control. This handle grip is made out of rubber material.
To replace this grip you will need a screwdriver.
Handle Grip 90566348
OEM part for: DeWALT, Black and Decker
Part Number: 90566348
$3.99
In Stock
Jump To:
Product Description ?
- Classification: Accessory
- Weight: 0.01 lbs.
- Shipping: Ships Worldwide
Frequently Purchased Together ?

Compatibility
This part will fit the following 54 machines
Black and Decker
CMM1200 Type 1 24V Cordless Mulching Mower View Diagrams & Manuals
CMM1200 Type 2 24V Cordless Mulching Mower View Diagrams & Manuals
MM675 Type 1 18" Electric "LAWNHOG&trade" Mulching Mower with Flip-Over Handle View Diagrams & Manuals
MM675 Type 2 18" Electric "LAWNHOG&trade" Mulching Mower with Flip-Over Handle View Diagrams & Manuals
MM875 Type 1 19" Electric LAWNHOG&trade Mulching Mower with Rear-Bag View Diagrams & Manuals
MM875 Type 2 19" Electric LAWNHOG&trade Mulching Mower with Rear-Bag View Diagrams & Manuals
37051 Type 1 19 Crafts Electric Mower View Diagrams & Manuals
37051 Type 2 19 Crafts Electric Mower View Diagrams & Manuals
37052 Type 1 19 Crafts Cordless Mower View Diagrams & Manuals
CM500 Type 1 18 Cordless Mower View Diagrams & Manuals
CM500 Type 2 18 Cordless Mower View Diagrams & Manuals
CM500 Type 3 18 Cordless Mower View Diagrams & Manuals
CM600 Type 1 Cordless Mower View Diagrams & Manuals
CM600 Type 2 Cordless Mower View Diagrams & Manuals
CMM1000 Type 1 19 Mulching Mower View Diagrams & Manuals
CMM1000 Type 2 19 Mulching Mower View Diagrams & Manuals
CMM1000 Type 2A 19 Mulching Mower View Diagrams & Manuals
CMM1000 Type 3 19 Mulching Mower View Diagrams & Manuals
CMM1000 Type 4 19 Mulching Mower View Diagrams & Manuals
CMM1000 Type 5 19 Mulching Mower View Diagrams & Manuals
CMM625 Type 1 Cordless Mulch Mower View Diagrams & Manuals
CMM625 Type 2 Cordless Mulch Mower View Diagrams & Manuals
CMM625 Type 3 Cordless Mulch Mower View Diagrams & Manuals
CMM625 Type 4 Cordless Mulch Mower View Diagrams & Manuals
CMM630 Type 1 18 High Wheel Cordless Mower View Diagrams & Manuals
CMM630 Type 2 18 High Wheel Cordless Mower View Diagrams & Manuals
CMM650 Type 1 Cordless Mulch Mower View Diagrams & Manuals
CMM650 Type 2 Cordless Mulch Mower View Diagrams & Manuals
CMM750 Type 1 Cordless Mulch Mower View Diagrams & Manuals
CMM750 Type 2 Cordless Mulch Mower View Diagrams & Manuals
CMM750 Type 3 Cordless Mulch Mower View Diagrams & Manuals
LM1820 Type 1 18 Electric Lawn Mower View Diagrams & Manuals
LM1900 Type 1 Electric Mower View Diagrams & Manuals
LM400 Type 1 18 Electric Mower View Diagrams & Manuals
M400 Type 1 Electronic Mower View Diagrams & Manuals
M700 Type 1 Rear Bagging Mower View Diagrams & Manuals
M700 Type 2 Rear Bagging Mower View Diagrams & Manuals
MM450 Type 1 Mulch N Mow View Diagrams & Manuals
MM450 Type 2 Mulch N Mow View Diagrams & Manuals
MM550 Type 1 12 Amp Mulch Mower View Diagrams & Manuals
MM550 Type 3 12 Amp Mulch Mower View Diagrams & Manuals
MM550 Type 4 12 Amp Mulch Mower View Diagrams & Manuals
MM600S Type 2 18 Electric Mower View Diagrams & Manuals
MM600 Type 2 18 Inch 4 Horse Power Mulching Mower View Diagrams & Manuals
MM850S Type 4 19 Electric Mower View Diagrams & Manuals
MM850 Type 1 19 Mulching Mower View Diagrams & Manuals
MM850 Type 2 19 Mulching Mower View Diagrams & Manuals
MM850 Type 3 19 Mulching Mower View Diagrams & Manuals
MM850 Type 4 19 Mulching Mower View Diagrams & Manuals
MM850 Type 5 19 Mulching Mower View Diagrams & Manuals
MM1800 Type 1 18 Inch Mulching Mower View Diagrams & Manuals
M2371B Type 2 18 Inch Mower View Diagrams & Manuals
MM875 Type 3 19 Mulching Mower View Diagrams & Manuals
MM1800 (Type 2) Diamond Core Drill Power Tool View Diagrams & Manuals
Show More Compatible Models
This item works with the following types of products:
- Lawn Mower Parts
This part replaces obsolete part #: 243804-00
Customer Part Reviews ?
Average Rating (out of 5):
Click to filter by ratings:
5 stars
1
4 stars
2
3 stars
0
2 stars
0
1 stars
0
< PREV
- 1
part for a neighbors mower
I gave my mower to a neighbor and found out that this same mower is no longer made. I bought as many parts for it as available and this was one of them. I suppose it works for them. Hadn't heard otherwise. No news is good news! Keep up the good work yourselves and your excellent customer service. Fast, resonable shipping too!
Guest -
June 8, 2023
Verified Purchase
Fairly easy repair.
Although not identical to the original, this part will work well. A little difficult to put in place, but practice makes perfect. Use some lubricant on the inside of the sleeve.
Guest -
June 4, 2021
Verified Purchase
Part fit great,
Good fit, not exactly the same size but it does the job just fine, thanks
Guest -
July 5, 2019
Verified Purchase
t
t
t -
t days ago
Verified Purchase
eReplacementParts Team
t
Questions & Answers ?
Our customer Service team is at the ready daily to answer your part and product questions.

Ask our Team
We have a dedicated staff with decades of collective experience in helping customers just like you purchase parts to repair their products.
Does this fit my product?Questions & Answers for Handle Grip
No questions have been asked yet
Customer Repair Instructions ?
All our customer repair instructions are solicited directly from other customers just like you who have purchased and replaced this exact part.
Handle grips were worn out and ripped, my fan had a broken blade and the blade retainer was worn out. The rear flap had also torn off the mower.
Alex - November 16, 2017
👍 3 of 3 people found this instruction helpful
Tool Type
Lawn Mower
Difficulty
Easy
Time
15-30 minutes
Tools Used
Screwdriver, Socket set
Removed the handle and removed the old grips. Sprayed the handle with soapy water and slid the grips in place. Then reattached the handle. Removed the cutting blade and replaced the fan and blade retainer. Removed the screws and brackets holding the rear wheels in place, pulled the rear wheels out of the way. Slid off the torn flap and slid the new flap in place. Returned the wheels to their original location and installed the screws and brackets to hold the wheels in place.
Did you find this story helpful?
Thanks for voting and helping fellow customers!
warn out handle grips
Mark - August 23, 2020
Tool Type
Lawn Mower
Difficulty
Easy
Time
Less than 15 minutes
Tools Used
Wrench Set
Parts Used
slipped the new ones on!
Did you find this story helpful?
Thanks for voting and helping fellow customers!
Worn handle grip.
Andrew - November 3, 2017
Tool Type
Lawn Mower
Difficulty
Easy
Time
Less than 15 minutes
Tools Used
Parts Used
Replaced with the new.
Did you find this story helpful?
Thanks for voting and helping fellow customers!
Worn-out handle/switch on electric lawnmower, so mower would not run.
Jeffrey - July 1, 2017
Tool Type
Lawn Mower
Difficulty
Medium
Time
30-60 minutes
Tools Used
Screwdriver, Pliers, Adjustable Wrench
Disassembled the handle and replaced worn parts. Also replaced the mulching blade. The old lock nut was on really tight. Had to use WD-40 and a pipe extender on the adjustable wrench in order to loosen the nut. Replaced knobs that had been lost over the years and cushioned handle grips that had ripped. Everything was pretty straightforward. Runs like new.
Did you find this story helpful?
Thanks for voting and helping fellow customers!
Flip handle was broken and one of the handle grips just wore out
Steven - May 18, 2017
Tool Type
Lawn Mower
Difficulty
Easy
Time
15-30 minutes
Tools Used
Screwdriver, Pliers
Parts Used
Took the handle apart and slid new grip on, something like wd-40 helps big time.
Flip handle is just a simple replacement, reassembly of the clamshell that houses it and reattaching the cable that allows you to flip the handle
Flip handle is just a simple replacement, reassembly of the clamshell that houses it and reattaching the cable that allows you to flip the handle
Did you find this story helpful?
Thanks for voting and helping fellow customers!
Rubber handle grip was torn
Michael - September 2, 2016
Tool Type
Lawn Mower
Difficulty
Medium
Time
Less than 15 minutes
Tools Used
, WD40
Parts Used
I used a lubricant to slide the grip onto the handle.
Did you find this story helpful?
Thanks for voting and helping fellow customers!
Handle on trimmer snapped off
Dawn - August 28, 2016
Tool Type
Grass Trimmer
Difficulty
Easy
Time
Less than 15 minutes
Tools Used
Parts Used
Removed the old handle part that was still on trimmer pole, snapped on new handle and tightened knob.
Did you find this story helpful?
Thanks for voting and helping fellow customers!
Power switch was broken, and handle grip was coming apart
Robert - August 29, 2016
Tool Type
Lawn Mower
Difficulty
Easy
Time
15-30 minutes
Tools Used
Screwdriver
1. Removed 5 screws from housing of off/on switch
2. Removed old switch and disconnected leads
3. Attached leads to new switch and set switch into place
4. Lined up housing of the power switch and reinstalled screws
5. Removed handle from mower deck
6. Cut off old foam grip
7. Slid new foam grip onto handle using generous amounts of soapy water
2. Removed old switch and disconnected leads
3. Attached leads to new switch and set switch into place
4. Lined up housing of the power switch and reinstalled screws
5. Removed handle from mower deck
6. Cut off old foam grip
7. Slid new foam grip onto handle using generous amounts of soapy water
Did you find this story helpful?
Thanks for voting and helping fellow customers!
General parts wearing out
Joseph - July 16, 2016
Tool Type
Lawn Mower
Difficulty
Medium
Time
15-30 minutes
Tools Used
Wrench Set, A drop of oil
1. Cut off what remained of the old handle grip.
2. Removed the power switch and flip switch from the upper handle
3. Removed the large plastic retaining nut from the handle eye bolts
4. Rubbed a bit of cooking oil over the metal handle
5. Slid the handle grips on
6. Reassembled the handle
7. Re-attached the power switch and flip switch
8. Removed the blade nut
9. Replaced the blade insulator, spacer and mulch blade.
10. Re-applied the blade nut
Did you find this story helpful?
Thanks for voting and helping fellow customers!
My old electric B&D lawnmower needed parts and pieces, but was functioning perfectly. I was able to order all of the parts easily at ereplacementparts.com,, they were shipped very quickly and all fit
S - May 17, 2016
Tool Type
Lawn Mower
Difficulty
Easy
Time
Less than 15 minutes
Tools Used
, No tools required
No tools were required for what I ordered, new grass bag, handle grips and handle attachment knob.
Did you find this story helpful?
Thanks for voting and helping fellow customers!
Load More Install Stories
OEM stands for Original Equipment Manufacturer and means the part you’re buying is sourced directly from the manufacturer who made your product. At eReplacementParts, we sell only genuine OEM parts, guaranteeing the part you’re purchasing is of better design and of higher quality than aftermarket parts.
Our product descriptions are a combination of data sourced directly from the manufacturers who made your product as well as content researched and curated by our content & customer service teams. This content is edited and reviewed internally before being made public to customers.
Our customer service team are at the ready daily to answer your part and product questions. We have a dedicated staff with decades of collective experience in helping customers just like you purchase parts to repair their products.
All our part reviews are solicited directly from other customers who have purchased this exact part. While we moderate these reviews for profanity, offensive language or personally identifiable information, these reviews are posted exactly as submitted and no alterations are made by our team.
All our customer repair instructions are solicited directly from other customers just like you who have purchased and replaced this exact part. While we moderate these reviews for profanity, offensive language or personally identifiable information, these reviews are posted exactly as submitted and no alterations are made by our team.
Based on data from past customer purchasing behaviors, these parts are most commonly purchased together along with the part you are viewing. These parts may be necessary or helpful to replace to complete your current repair.
All our installation videos are created and produced in collaboration with our in-house repair technician, Mark Sodja, who has helped millions of eReplacementParts customers over the last 13 years repair their products. Mark has years of experience in selling and repairing both commercial and residential products with a specialty in gas-powered equipment.
This data is collected from customers who submitted a repair instruction after replacing this exact part. Customers can rate how easy the repair was to complete and how long it took. We aggregate this data to provide a repair rating that allows customers to quickly determine the difficulty and time needed to perform their own repair.