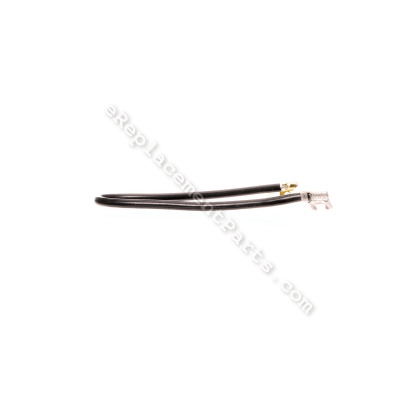
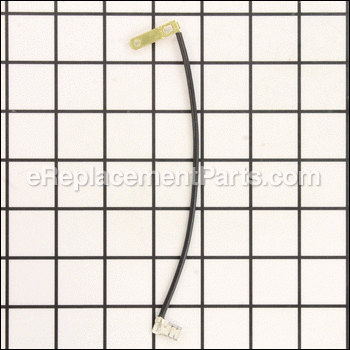


This genuine OEM lead wire is specially designed for use in electric mowers. It is encased in an insulating plastic sheath and connects the power source to the motor to allow the engine to run. If the lead wire is damaged, worn down, or experiencing poor connectivity, the lawn mower may not start, or it may run intermittently with low power output. To begin this repair, first ensure the mower is unplugged to avoid electrical shock. Remove the motor and switch housing to access the lead wire. Note how the wire connectors are routed or take a picture for the installation later. Carefully remove the lead wire and position the new wire in its place. Use your notes from earlier to connect the wire connectors to the appropriate terminals. Reassemble the mower in reverse order to complete your repair.
Wire,lead 242869-00
OEM part for: DeWALT, Black and Decker
Part Number: 242869-00
Jump To:
Frequently Purchased Together ?
Compatibility
This part will fit the following 22 machines
Black and Decker
This item works with the following types of products:
- Lawn Mower Parts
Customer Part Reviews ?
- 1
Questions & Answers ?
Our customer Service team is at the ready daily to answer your part and product questions.

Ask our Team
We have a dedicated staff with decades of collective experience in helping customers just like you purchase parts to repair their products.
Does this fit my product?Questions & Answers for Wire,lead
Customer Repair Instructions ?
All our customer repair instructions are solicited directly from other customers just like you who have purchased and replaced this exact part.
Burned out and melted lead wire, broken fan and melted housing cover
Tool Type
Lawn Mower
Difficulty
Easy
Time
15-30 minutes
Tools Used
Screwdriver, Socket set, Wire brush to remove caked on grass
2. Replaced all damaged parts - they just went right back where the old ones were
3. Very easy if you have a basic understanding of assembly and re-assembly
4. All parts worked well and fit perfectly
Mower would not try to start
Tool Type
Lawn Mower
Difficulty
Medium
Time
15-30 minutes
Tools Used
Screwdriver, Pliers
By the way Ladies, I am 71 years old and if you can follow a recipe to be able to cook ,then you can follow a video about repairing a Lawn Mower.
One plug lead was broken
Tool Type
Lawn Mower
Difficulty
Easy
Time
30-60 minutes
Tools Used
Screwdriver
Parts Used
Black and Decker electric lawn mower male power cord plug connector broke which required replacing entire wiring harness.
Tool Type
Lawn Mower
Difficulty
Easy
Time
30-60 minutes
Tools Used
Screwdriver, Pliers
Handle, switch broken
Tool Type
Lawn Mower
Difficulty
Medium
Time
30-60 minutes
Tools Used
Screwdriver, Pliers
2. Removed deck cover and handle from MM275 electric mower.
3. Replaced cable.
4. Placed plug lead and plug lead wire in appropriate side of switch housing.
5. Connected switch to cable being careful to note that wiring diagram lugs were not the same as those I had marked. This is important or mower will only short circuit.
6. Replaced handle and spring and assembled replacement switch housing.
7. Tested results. switch assembly works like new because, well, it is.
Contact leads were broken.
Tool Type
Lawn Mower
Difficulty
Easy
Time
Less than 15 minutes
Tools Used
Screwdriver
Parts Used
2. Replaced wire lead that was broken.
3. Replaced Housing with new housing.
4. Put all internal wires into new housing.
4. Put it all back together.
Mower plug bent (over years of use) and male ends broke, requiring a new wiring harness.
Tool Type
Lawn Mower
Difficulty
Medium
Time
More than 2 hours
Tools Used
Screwdriver, Pliers, powered screwdriver, WD-40 or a light oil.
Parts Used
Though the overall repair is simple, it is important to note the position of wires and to which terminal they connect. Carefully photograph items (while they are connected) so that you know the correct way to reconnect them. Except for the removal of the cable-plug wires, no further disassembly is required.
As soon as you have recorded the position of the wires (with a camera phone), you are ready remove the cable & plug from the mower. Be careful not to break wire terminals. A bit of WD-40 is suitable to ensure easy removal and reconnecting. Also, note the positions of the brushes and how the brush wires are placed.
Removing the old cable & plug: Disconnect the brushes from their housing and disconnect the wires from their terminals on the motor. You have to remove the brush housing and pull out the brushes, being careful not to lose the brush springs. Your photos of the assembly will come in handy here. Remove the wires from the ON / OFF switch. Unfasten the cable plug wire from mower and discard, if you choose. Then, replace the new brushes in their correct positions and reconnect new wires to motor terminals. Fasten the cable plug wire to the mower. Reattach the wires to the ON / OFF switch. Carefully position the male plug leads so they are not pushed into the housing the first time you attempt to use your rewired mower. Again, pictures of how the plug was originally placed will aid your reassembly.
Reconnecting the wires is fairly simple overall. You simply reverse the disassembly process. Although the project took me just over 2 hours, some of the time was spent cleaning the motor and studying the wiring positions and understanding where connections are made. The actual replacement of the wires themselves was pretty straightforward. The eReplacement cable & plug assembly was a carbon copy of the broken cable & plug.
Anyone with a few simple tool and patience can do this job.
Lead wire replacement
Tool Type
Lawn Mower
Difficulty
Easy
Time
15-30 minutes
Tools Used
Screwdriver, Pliers
Replace curved head screws and knobs where handle folds (existing ones were stripped)
The handle that turns on the mower, broke due to wear. One of the leads were also melted due to a previous incident.
Tool Type
Lawn Mower
Difficulty
Easy
Time
Less than 15 minutes
Tools Used
Screwdriver
OEM stands for Original Equipment Manufacturer and means the part you’re buying is sourced directly from the manufacturer who made your product. At eReplacementParts, we sell only genuine OEM parts, guaranteeing the part you’re purchasing is of better design and of higher quality than aftermarket parts.
Our product descriptions are a combination of data sourced directly from the manufacturers who made your product as well as content researched and curated by our content & customer service teams. This content is edited and reviewed internally before being made public to customers.
Our customer service team are at the ready daily to answer your part and product questions. We have a dedicated staff with decades of collective experience in helping customers just like you purchase parts to repair their products.
All our part reviews are solicited directly from other customers who have purchased this exact part. While we moderate these reviews for profanity, offensive language or personally identifiable information, these reviews are posted exactly as submitted and no alterations are made by our team.
All our customer repair instructions are solicited directly from other customers just like you who have purchased and replaced this exact part. While we moderate these reviews for profanity, offensive language or personally identifiable information, these reviews are posted exactly as submitted and no alterations are made by our team.
Based on data from past customer purchasing behaviors, these parts are most commonly purchased together along with the part you are viewing. These parts may be necessary or helpful to replace to complete your current repair.
All our installation videos are created and produced in collaboration with our in-house repair technician, Mark Sodja, who has helped millions of eReplacementParts customers over the last 13 years repair their products. Mark has years of experience in selling and repairing both commercial and residential products with a specialty in gas-powered equipment.
This data is collected from customers who submitted a repair instruction after replacing this exact part. Customers can rate how easy the repair was to complete and how long it took. We aggregate this data to provide a repair rating that allows customers to quickly determine the difficulty and time needed to perform their own repair.