
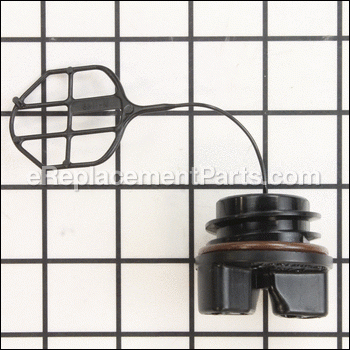
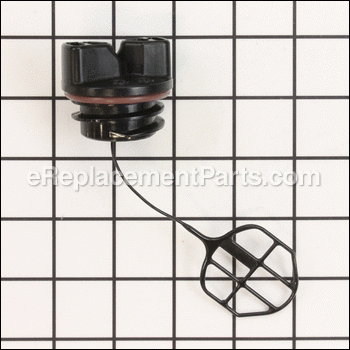
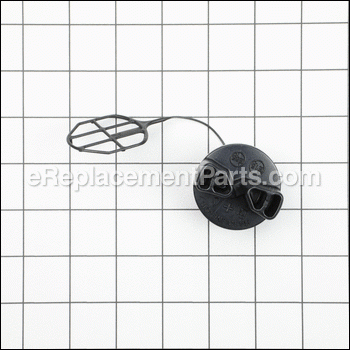

The 580940901 Fuel Cap Assembly is a genuine Poulan replacement part.
It purpose is to keep the fuel in the fuel tank.
It is removed from the fuel tank to refill the tank.
It includes a retainer that remains in the tank to keep the fuel cap from being lost or falling on the ground and getting dirt and debris on it and contaminating the tank.
It has an o-ring supplied with it to seal the cap.
After time this o-ring will wear and become brittle causing fuel to leak from the tank.
It will then have to be replaced.
Fuel Cap Assembly 580940901
OEM part for: Poulan, Craftsman, Husqvarna
Part Number: 580940901
$6.21
In Stock
Jump To:
Product Description ?
- Classification: Part
- Weight: 0.04 lbs.
- Shipping: Ships Worldwide
Frequently Purchased Together ?


Compatibility
This part will fit the following 345 machines
Poulan
1900 Gas Chain Saw View Diagrams & Manuals
1950 Type 1 Gas Chain Saw View Diagrams & Manuals
1950 Type 2 Gas Chain Saw View Diagrams & Manuals
1950 Type 3 Gas Chain Saw View Diagrams & Manuals
1950 Type 4 Gas Chain Saw View Diagrams & Manuals
1950 Type 5 Gas Chain Saw View Diagrams & Manuals
1950 Type 6 Gas Chain Saw View Diagrams & Manuals
1950 Type 7 Gas Chain Saw View Diagrams & Manuals
1950LE Type 1 Gas Chain Saw View Diagrams & Manuals
1950LE Type 2 Gas Chain Saw View Diagrams & Manuals
1975 Type 1 Gas Chain Saw View Diagrams & Manuals
1975 Type 2 Gas Chain Saw View Diagrams & Manuals
1975 Type 3 Gas Chain Saw View Diagrams & Manuals
1975 Type 4 Gas Chain Saw View Diagrams & Manuals
1975 Type 5 Gas Chain Saw View Diagrams & Manuals
1975 Type 6 Gas Chain Saw View Diagrams & Manuals
1975 Type 7 Gas Chain Saw View Diagrams & Manuals
1975LE Type 1 Gas Chain Saw View Diagrams & Manuals
1975LE Type 2 Gas Chain Saw View Diagrams & Manuals
2025 Gas Chain Saw View Diagrams & Manuals
2050 Type 1 Gas Chain Saw View Diagrams & Manuals
2050 Type 2 Gas Chain Saw View Diagrams & Manuals
2050 Type 3 Gas Chain Saw View Diagrams & Manuals
2050 Type 4 Gas Chain Saw View Diagrams & Manuals
2050 Type 5 Gas Chain Saw View Diagrams & Manuals
2050 Type 6 Gas Chain Saw View Diagrams & Manuals
2050 Type 7 Gas Chain Saw View Diagrams & Manuals
2055 Type 1 Gas Chain Saw View Diagrams & Manuals
2055 Type 2 Gas Chain Saw View Diagrams & Manuals
2055 Type 3 Gas Chain Saw View Diagrams & Manuals
2055 Type 4 Gas Chain Saw View Diagrams & Manuals
2055 Type 5 Gas Chain Saw View Diagrams & Manuals
2055 Type 6 Gas Chain Saw View Diagrams & Manuals
2055 Type 7 Gas Chain Saw View Diagrams & Manuals
2050LE Type 1 Gas Chain Saw View Diagrams & Manuals
2050LE Type 2 Gas Chain Saw View Diagrams & Manuals
2050WT Type 1 Gas Chain Saw View Diagrams & Manuals
2050WT Type 2 Gas Chain Saw View Diagrams & Manuals
2050WT Type 3 Gas Chain Saw View Diagrams & Manuals
2050WT Type 4 Gas Chain Saw View Diagrams & Manuals
2050WT Type 5 Gas Chain Saw View Diagrams & Manuals
2050WT Type 6 Gas Chain Saw View Diagrams & Manuals
2050WT Type 7 Gas Chain Saw View Diagrams & Manuals
2055LE Type 1 Gas Chain Saw View Diagrams & Manuals
2055LE Type 2 Gas Chain Saw View Diagrams & Manuals
2075 Type 1 Gas Chain Saw View Diagrams & Manuals
2075 Type 2 Gas Chain Saw View Diagrams & Manuals
2075 Type 3 Gas Chain Saw View Diagrams & Manuals
2075 Type 4 Gas Chain Saw View Diagrams & Manuals
2075 Type 5 Gas Chain Saw View Diagrams & Manuals
2075 LE Gas Chain Saw View Diagrams & Manuals
2075C Type 1 Gas Chain Saw View Diagrams & Manuals
2075C Type 2 Gas Chain Saw View Diagrams & Manuals
2075C Type 3 Gas Chain Saw View Diagrams & Manuals
2075C Type 4 Gas Chain Saw View Diagrams & Manuals
2075C Type 5 Gas Chain Saw View Diagrams & Manuals
2075OC Type 1 Gas Chain Saw View Diagrams & Manuals
2075OC Type 2 Gas Chain Saw View Diagrams & Manuals
2075OC Type 3 Gas Chain Saw View Diagrams & Manuals
2075OC Type 4 Gas Chain Saw View Diagrams & Manuals
2075OC Type 5 Gas Chain Saw View Diagrams & Manuals
2150 Type 1 Gas Chain Saw View Diagrams & Manuals
2150 Type 2 Gas Chain Saw View Diagrams & Manuals
2150 Type 3 Gas Chain Saw View Diagrams & Manuals
2150 Type 4 Gas Chain Saw View Diagrams & Manuals
2150 Type 5 Gas Chain Saw View Diagrams & Manuals
2150 Type 6 Gas Chain Saw View Diagrams & Manuals
2150 Type 7 Gas Chain Saw View Diagrams & Manuals
2150 Predator Type 1 Gas Chain Saw View Diagrams & Manuals
2150 Predator Type 2 Gas Chain Saw View Diagrams & Manuals
2150 Predator Type 3 Gas Chain Saw View Diagrams & Manuals
2150 Predator Type 4 Gas Chain Saw View Diagrams & Manuals
2150 Predator Type 5 Gas Chain Saw View Diagrams & Manuals
2150 Predator Type 6 Gas Chain Saw View Diagrams & Manuals
2150LE Type 1 Gas Chain Saw View Diagrams & Manuals
2150LE Type 2 Gas Chain Saw View Diagrams & Manuals
2150LE Predator Type 1 Gas Chain Saw View Diagrams & Manuals
2150LE Predator Type 2 Gas Chain Saw View Diagrams & Manuals
2155 Type 1 Gas Chain Saw View Diagrams & Manuals
2155 Type 2 Gas Chain Saw View Diagrams & Manuals
2155 Type 3 Gas Chain Saw View Diagrams & Manuals
2155 Type 4 Gas Chain Saw View Diagrams & Manuals
2155 Type 5 Gas Chain Saw View Diagrams & Manuals
2175 Type 1 Gas Chain Saw View Diagrams & Manuals
2175 Type 2 Gas Chain Saw View Diagrams & Manuals
2175 Type 3 Gas Chain Saw View Diagrams & Manuals
2175 Type 4 Gas Chain Saw View Diagrams & Manuals
2175 Type 5 Gas Chain Saw View Diagrams & Manuals
2175 Type 6 Gas Chain Saw View Diagrams & Manuals
2175 Type 7 Gas Chain Saw View Diagrams & Manuals
2175 Gas Chain Saw View Diagrams & Manuals
2250 Type 1 Gas Chain Saw View Diagrams & Manuals
2250 Type 2 Gas Chain Saw View Diagrams & Manuals
2250 Type 3 Gas Chain Saw View Diagrams & Manuals
2250 Type 4 Gas Chain Saw View Diagrams & Manuals
2250 Type 5 Gas Chain Saw View Diagrams & Manuals
2250 Type 6 Gas Chain Saw View Diagrams & Manuals
2250 Type 7 Gas Chain Saw View Diagrams & Manuals
2250LE Type 1 Gas Chain Saw View Diagrams & Manuals
2250LE Type 2 Gas Chain Saw View Diagrams & Manuals
2350 Gas Chain Saw View Diagrams & Manuals
2375 Type 1 Gas Chain Saw View Diagrams & Manuals
2375 Type 2 Gas Chain Saw View Diagrams & Manuals
2375 Type 3 Gas Chain Saw View Diagrams & Manuals
2375 Type 4 Gas Chain Saw View Diagrams & Manuals
2375 Type 5 Gas Chain Saw View Diagrams & Manuals
2375 Type 6 Gas Chain Saw View Diagrams & Manuals
2375 Type 7 Gas Chain Saw View Diagrams & Manuals
2375LE Type 1 Gas Chain Saw View Diagrams & Manuals
2375LE Type 2 Gas Chain Saw View Diagrams & Manuals
BH2160 Gas Chain Saw View Diagrams & Manuals
BH2160LE Gas Chain Saw View Diagrams & Manuals
P3314 Type 1 Gas Chain Saw View Diagrams & Manuals
P3314 Type 2 Gas Chain Saw View Diagrams & Manuals
P3314WS Type 1 Gas Chain Saw View Diagrams & Manuals
P3314WS Type 2 Gas Chain Saw View Diagrams & Manuals
P3314WSA Type 1 Gas Chain Saw View Diagrams & Manuals
P3314WSA Type 2 Gas Chain Saw View Diagrams & Manuals
P3416 Type 1 Gas Chain Saw View Diagrams & Manuals
P3416 Type 2 Gas Chain Saw View Diagrams & Manuals
P3516PR Type 1 Gas Chain Saw View Diagrams & Manuals
P3516PR Type 2 Gas Chain Saw View Diagrams & Manuals
P3818AV Type 1 Gas Chain Saw View Diagrams & Manuals
P3818AV Type 2 Gas Chain Saw View Diagrams & Manuals
P4018 Gas Chain Saw View Diagrams & Manuals
P4018AV Type 1 Gas Chain Saw View Diagrams & Manuals
P4018AV Type 2 Gas Chain Saw View Diagrams & Manuals
P4018AV-BH Type 1 Gas Chain Saw View Diagrams & Manuals
P4018AV-BH Type 2 Gas Chain Saw View Diagrams & Manuals
P4018WM Type 1 Gas Chain Saw View Diagrams & Manuals
P4018WM Type 2 Gas Chain Saw View Diagrams & Manuals
P4018WT Type 1 Gas Chain Saw View Diagrams & Manuals
P4018WT Type 2 Gas Chain Saw View Diagrams & Manuals
P4018WTL Gas Chain Saw View Diagrams & Manuals
PP3516 Type 2 Gas Chain Saw View Diagrams & Manuals
PP3816 Type 2 Gas Chain Saw View Diagrams & Manuals
PP3816AV Type 2 Gas Chain Saw View Diagrams & Manuals
PP4018 Type 2 Gas Chain Saw View Diagrams & Manuals
PP4218AV Type 2 Gas Chain Saw View Diagrams & Manuals
PP4218AVHD Type 2 Gas Chain Saw View Diagrams & Manuals
PP4218AVL Type 2 Gas Chain Saw View Diagrams & Manuals
PPB3416 Type 2 Gas Chain Saw View Diagrams & Manuals
PPB4018 Type 2 Gas Chain Saw View Diagrams & Manuals
S1970 Type 1 Gas Chain Saw View Diagrams & Manuals
S1970 Type 2 Gas Chain Saw View Diagrams & Manuals
SM4218AV Type 2 Gas Chain Saw View Diagrams & Manuals
2550T Gas Chain Saw View Diagrams & Manuals
2450 Type 1 Gas Chain Saw View Diagrams & Manuals
2450 Type 2 Gas Chain Saw View Diagrams & Manuals
2450 Type 3 Gas Chain Saw View Diagrams & Manuals
2450 Type 4 Gas Chain Saw View Diagrams & Manuals
2450 Type 5 Gas Chain Saw View Diagrams & Manuals
2450 Type 6 Gas Chain Saw View Diagrams & Manuals
2450 Type 7 Gas Chain Saw View Diagrams & Manuals
2550 Type 1 Gas Chain Saw View Diagrams & Manuals
2550 Type 2 Gas Chain Saw View Diagrams & Manuals
2550 Type 3 Gas Chain Saw View Diagrams & Manuals
2550 Type 4 Gas Chain Saw View Diagrams & Manuals
2550 Type 5 Gas Chain Saw View Diagrams & Manuals
2550 Type 6 Gas Chain Saw View Diagrams & Manuals
2550 Type 7 Gas Chain Saw View Diagrams & Manuals
2550LE Type 1 Gas Chain Saw View Diagrams & Manuals
2550LE Type 2 Gas Chain Saw View Diagrams & Manuals
2550SE Type 1 Gas Chain Saw View Diagrams & Manuals
2550SE Type 2 Gas Chain Saw View Diagrams & Manuals
2555FLW Gas Chain Saw View Diagrams & Manuals
SM4018 Gas Chainsaw View Diagrams & Manuals
PP210 Gas Chainsaw View Diagrams & Manuals
PP3516AVX Gas Chainsaw View Diagrams & Manuals
PP4218AVX Gas Chainsaw View Diagrams & Manuals
PP5020AV 2 Stroke Gas Chainsaw View Diagrams & Manuals
220le Gas Chainsaw View Diagrams & Manuals
260 Pro Chainsaw View Diagrams & Manuals
PP4218 (Type 1 ) Gas Saw View Diagrams & Manuals
PP4218 (Type 2) Gas Saw View Diagrams & Manuals
PP220 (Type 1) Gas Chain Saw View Diagrams & Manuals
PP220LE Pro Gas Saw View Diagrams & Manuals
PPB4218 Chain Saw View Diagrams & Manuals
222 Gas Chainsaw View Diagrams & Manuals
PP3416 (966063001) Gas Chainsaw View Diagrams & Manuals
P3816 Gas Chain Saw Type 1 View Diagrams & Manuals
PP3816AV Gas Saw Type 1 View Diagrams & Manuals
PP4218AV (Type 1) Gas Saw 4218AV-POULAN Pro View Diagrams & Manuals
PPB1838LE Chain Saw View Diagrams & Manuals
PP4818A Chain Saw View Diagrams & Manuals
262 Gas Chainsaw View Diagrams & Manuals
BH2660 Gas Chainsaw View Diagrams & Manuals
PP220 (Type 2) Gas Chainsaw View Diagrams & Manuals
PP220 (Type 3) Gas Chainsaw View Diagrams & Manuals
PP220 (Type 4) Gas Chainsaw View Diagrams & Manuals
PP220 (Type 5) Gas Chainsaw View Diagrams & Manuals
PP221 (Type 1) Gas Chainsaw View Diagrams & Manuals
PP221 (Type 2) Gas Chainsaw View Diagrams & Manuals
PP221 (Type 3) Gas Chainsaw View Diagrams & Manuals
PP221 (Type 4) Gas Chainsaw View Diagrams & Manuals
PP221LE (Type 1) Gas Chainsaw View Diagrams & Manuals
PP221LE (Type 2) Gas Chainsaw View Diagrams & Manuals
PP230 Gas Chainsaw View Diagrams & Manuals
PP260 (Type 1) Gas Chainsaw View Diagrams & Manuals
PP260 (Type 2) Gas Chainsaw View Diagrams & Manuals
PP260 (Type 3) Gas Chainsaw View Diagrams & Manuals
PP260 (Type 4) Gas Chainsaw View Diagrams & Manuals
PP260 (Type 5) Gas Chainsaw View Diagrams & Manuals
PP260 (Type 6) Gas Chainsaw View Diagrams & Manuals
PP260LE (Type 1) Gas Chainsaw View Diagrams & Manuals
PP260LE (Type 2) Gas Chainsaw View Diagrams & Manuals
PPB1634LE Gas Chainsaw View Diagrams & Manuals
PPB4218 (Type 1) Gas Chainsaw View Diagrams & Manuals
PPB4218 (Type 2) Gas Chainsaw View Diagrams & Manuals
SM4218AVX Gas Chainsaw View Diagrams & Manuals
SM4518AVX Gas Chainsaw View Diagrams & Manuals
Craftsman
358341950 Chainsaw View Diagrams & Manuals
358381700 Chainsaw View Diagrams & Manuals
944411363 Chainsaw View Diagrams & Manuals
358350982 Gas Chain Saw View Diagrams & Manuals
35835116 Chain Saw View Diagrams & Manuals
35835118 Chain Saw View Diagrams & Manuals
358351340 Gas Chainsaw View Diagrams & Manuals
Husqvarna
1950 (Type 1) (2007-08) Chain Saw View Diagrams & Manuals
1950 (Type 2) (2007-08) Chain Saw View Diagrams & Manuals
1950 (Type 3) (2007-08) Chain Saw View Diagrams & Manuals
1950 (Type 4) (2007-08) Chain Saw View Diagrams & Manuals
1950 (Type 5) (2007-08) Chain Saw View Diagrams & Manuals
1950 (Type 6) (2007-08) Chain Saw View Diagrams & Manuals
1950 (Type 7) (2007-08) Chain Saw View Diagrams & Manuals
1975 (Type 1) (2008-03) Le, Woodshark View Diagrams & Manuals
1975 (Type 2) (2008-03) Le, Woodshark View Diagrams & Manuals
2050 (Type 1) (2006-11) Le Chain Saw View Diagrams & Manuals
2050 (Type 2) (2006-11) Le Chain Saw View Diagrams & Manuals
2050 (Type 1) (2008-06) 2150, 2175, 2375 Chain Saw View Diagrams & Manuals
2050 (Type 2) (2008-06) 2150, 2175, 2375 Chain Saw View Diagrams & Manuals
2050 (Type 3) (2008-06) 2150, 2175, 2375 Chain Saw View Diagrams & Manuals
2050 (Type 4) (2008-06) 2150, 2175, 2375 Chain Saw View Diagrams & Manuals
2050 (Type 5) (2008-06) 2150, 2175, 2375 Chain Saw View Diagrams & Manuals
2050 (Type 6) (2008-06) 2150, 2175, 2375 Chain Saw View Diagrams & Manuals
2050 (Type 7) (2008-06) 2150, 2175, 2375 Chain Saw View Diagrams & Manuals
2055 (Type 1) (2008-03) Le Chain Saw View Diagrams & Manuals
2055 (Type 2) (2008-03) Le Chain Saw View Diagrams & Manuals
2055 (Type 1) (2008-03) Chain Saw View Diagrams & Manuals
2055 (Type 2) (2008-03) Chain Saw View Diagrams & Manuals
2055 (Type 3) (2008-03) Chain Saw View Diagrams & Manuals
2055 (Type 4) (2008-03) Chain Saw View Diagrams & Manuals
2055 (Type 5) (2008-03) Chain Saw View Diagrams & Manuals
2055 (Type 6) (2008-03) Chain Saw View Diagrams & Manuals
2055 (Type 7) (2008-03) Chain Saw View Diagrams & Manuals
2075 (Type 1) (2075C, 20750C) (2007-07) Chain Saw View Diagrams & Manuals
2075 (Type 2) (2075C, 20750C) (2007-07) Chain Saw View Diagrams & Manuals
2075 (Type 3) (2075C, 20750C) (2007-07) Chain Saw View Diagrams & Manuals
2075 (Type 4) (2075C, 20750C) (2007-07) Chain Saw View Diagrams & Manuals
2075 (Type 5) (2075C, 20750C) (2007-07) Chain Saw View Diagrams & Manuals
2150 (Type 1) (2008-03) Le, Predator Le View Diagrams & Manuals
2150 (Type 2) (2008-03) Le, Predator Le View Diagrams & Manuals
2150 (Type 1) (2006-11) Pr Chain Saw View Diagrams & Manuals
2150 (Type 2) (2006-11) Pr Chain Saw View Diagrams & Manuals
2150 (Type 3) (2006-11) Pr Chain Saw View Diagrams & Manuals
2150 (Type 4) (2006-11) Pr Chain Saw View Diagrams & Manuals
2150 (Type 5) (2006-11) Pr Chain Saw View Diagrams & Manuals
2150 (Type 6) (2006-11) Pr Chain Saw View Diagrams & Manuals
220 (Type 1) (2006-09) Chain Saw View Diagrams & Manuals
220 (Type 2) (2006-09) Chain Saw View Diagrams & Manuals
220 (Type 3) (2006-09) Chain Saw View Diagrams & Manuals
220 (Type 4) (2006-09) Chain Saw View Diagrams & Manuals
220 (Type 5) (2006-09) Chain Saw View Diagrams & Manuals
220LE (2006-11) Chain Saw View Diagrams & Manuals
221 (Type 1) (2006-11) Le Chain Saw View Diagrams & Manuals
221 (Type 2) (2006-11) Le Chain Saw View Diagrams & Manuals
222 (2008-03) Chain Saw View Diagrams & Manuals
2250 (Type 1) (2006-09) Le Chain Saw View Diagrams & Manuals
2250 (Type 2) (2006-09) Le Chain Saw View Diagrams & Manuals
2250 (Type 1) (2008-03) 2450, 2550 Chain Saw View Diagrams & Manuals
2250 (Type 2) (2008-03) 2450, 2550 Chain Saw View Diagrams & Manuals
2250 (Type 3) (2008-03) 2450, 2550 Chain Saw View Diagrams & Manuals
2250 (Type 4) (2008-03) 2450, 2550 Chain Saw View Diagrams & Manuals
2250 (Type 5) (2008-03) 2450, 2550 Chain Saw View Diagrams & Manuals
2250 (Type 6) (2008-03) 2450, 2550 Chain Saw View Diagrams & Manuals
2250 (Type 7) (2008-03) 2450, 2550 Chain Saw View Diagrams & Manuals
2375 (Type 1) (2008-03) Le Chain Saw View Diagrams & Manuals
2375 (Type 2) (2008-03) Le Chain Saw View Diagrams & Manuals
2550 (Type 1) (2008-03) Le Chain Saw View Diagrams & Manuals
2550 (Type 2) (2008-03) Le Chain Saw View Diagrams & Manuals
2550SE (Type 1) (2008-03) Silver Edition View Diagrams & Manuals
2550SE (Type 2) (2008-03) Silver Edition View Diagrams & Manuals
2550T (2006-09) Titanium View Diagrams & Manuals
260 (Type 1) (2007-03) Le Chain Saw View Diagrams & Manuals
260 (Type 2) (2007-03) Le Chain Saw View Diagrams & Manuals
260 (Type 1) (2008-03) Chain Saw View Diagrams & Manuals
260 (Type 2) (2008-03) Chain Saw View Diagrams & Manuals
260 (Type 3) (2008-03) Chain Saw View Diagrams & Manuals
260 (Type 4) (2008-03) Chain Saw View Diagrams & Manuals
260 (Type 5) (2008-03) Chain Saw View Diagrams & Manuals
260 (Type 6) (2008-03) Chain Saw View Diagrams & Manuals
2160 (2006-11) Bh Chain Saw View Diagrams & Manuals
2160 (2006-11) Bh Le View Diagrams & Manuals
BH2660 (2006-11) Chain Saw View Diagrams & Manuals
P3314 (Type 1) (2008-07) Chain Saw View Diagrams & Manuals
P3314 (Type 2) (2008-07) Chain Saw View Diagrams & Manuals
P3314 (Type 1) (2008-07) Ws Chain Saw View Diagrams & Manuals
P3314 (Type 2) (2008-07) Ws Chain Saw View Diagrams & Manuals
P3314 (Type 1) (2008-07) Wsa Chain Saw View Diagrams & Manuals
P3314 (Type 2) (2008-07) Wsa Chain Saw View Diagrams & Manuals
P3416 (Type 1) (2008-07) Chain Saw View Diagrams & Manuals
P3416 (Type 2) (2008-07) Chain Saw View Diagrams & Manuals
P3516PR (Type 1) (2008-07) Chain Saw View Diagrams & Manuals
P3516PR (Type 2) (2008-07) Chain Saw View Diagrams & Manuals
P3818AV (Type 1) (2008-07) Chain Saw View Diagrams & Manuals
P3818AV (Type 2) (2008-07) Chain Saw View Diagrams & Manuals
P4018 (Type 1) (2008-07) Wt Chain Saw View Diagrams & Manuals
P4018 (Type 2) (2008-07) Wt Chain Saw View Diagrams & Manuals
P4018AV (Type 1) (2008-07) Chain Saw View Diagrams & Manuals
P4018AV (Type 2) (2008-07) Chain Saw View Diagrams & Manuals
P4018AVBH (Type 1) (2008-07) Chain Saw View Diagrams & Manuals
P4018AVBH (Type 2) (2008-07) Chain Saw View Diagrams & Manuals
P4018WM (Type 1) (2008-07) Chain Saw View Diagrams & Manuals
P4018WM (Type 2) (2008-07) Chain Saw View Diagrams & Manuals
PP3516 (Type 1) (2006-12) Chain Saw View Diagrams & Manuals
PP3516 (Type 2) (2006-12) Chain Saw View Diagrams & Manuals
PP3816 (Type 1) (2006-07) Chain Saw View Diagrams & Manuals
PP3816 (Type 2) (2006-07) Chain Saw View Diagrams & Manuals
PP3816AV (Type 1) (2008-07) Chain Saw View Diagrams & Manuals
PP3816AV (Type 2) (2008-07) Chain Saw View Diagrams & Manuals
PP4018 (Type 1) (2006-06) Chain Saw View Diagrams & Manuals
PP4018 (Type 2) (2006-06) Chain Saw View Diagrams & Manuals
PP4218 (Type 1) (2006-07) Chain Saw View Diagrams & Manuals
PP4218 (Type 2) (2006-07) Chain Saw View Diagrams & Manuals
PP4218AV (Type 1) (2006-12) Chain Saw View Diagrams & Manuals
PP4218AV (Type 1) (2008-07) Chain Saw View Diagrams & Manuals
PP4218AV (Type 2) (2006-12) Chain Saw View Diagrams & Manuals
PP4218AV (Type 2) (2008-07) Chain Saw View Diagrams & Manuals
PP4218AV (Type 1) (952802031) (2008-07) Chain Saw View Diagrams & Manuals
PP4218AV (Type 2) (952802031) (2008-07) Chain Saw View Diagrams & Manuals
PP4218AVHD (Type 1) (2006-09) Chain Saw View Diagrams & Manuals
PP4218AVHD (Type 2) (2006-09) Chain Saw View Diagrams & Manuals
PPB1838LE (2008-03) Chain Saw View Diagrams & Manuals
PPB3416 (Type 1) (2008-07) Chain Saw View Diagrams & Manuals
PPB3416 (Type 2) (2008-07) Chain Saw View Diagrams & Manuals
PPB4018 (Type 1) (2006-12) Chain Saw View Diagrams & Manuals
PPB4018 (Type 2) (2006-12) Chain Saw View Diagrams & Manuals
PPB4218 (Type 1) (2008-07) Chain Saw View Diagrams & Manuals
PPB4218 (Type 2) (2008-07) Chain Saw View Diagrams & Manuals
S1970 (Type 1) (2006-06) Woodshark View Diagrams & Manuals
S1970 (Type 2) (2006-06) Woodshark View Diagrams & Manuals
SM4018 (2008-03) Chain Saw View Diagrams & Manuals
SM4218AV (Type 1) (2008-07) Chain Saw View Diagrams & Manuals
SM4218AV (Type 2) (2008-07) Chain Saw View Diagrams & Manuals
SM4218AVX (2008-09) Chain Saw View Diagrams & Manuals
Show More Compatible Models
This item works with the following types of products:
- Chain Saw Parts
- Saw Parts
This part replaces obsolete part #: 530-047192, 577858501, 530047192, 530047164
Repair Videos ?
Watch the Repair Video for
Fuel Cap Assembly

Articles:
|
Fuel cap cracked? Remove and install the fuel cap assembly on your Poulan chainsaw. Step-by-step instructions show you h...
November 17, 2016
|

Customer Part Reviews ?
Average Rating (out of 5):
Click to filter by ratings:
5 stars
30
4 stars
4
3 stars
1
2 stars
0
1 stars
0
< PREV
- 1
- 2
- 3
Simple fix
Not much to say, really. The part arrived relatively quickly, given the post-covid environment. It fit perfectly.
Guest -
June 27, 2022
Verified Purchase
Defiantly worked better than the old cap
Perfect fit
Guest -
October 26, 2021
Verified Purchase
Worked great
It was in great condition and fast delivery
Guest -
October 12, 2021
Verified Purchase
Ease of repair
Arrived on time and fit perfectly
Guest -
September 13, 2021
Verified Purchase
Correct parts
Received in timely manner
Guest -
May 18, 2021
Verified Purchase
new cap fixed gas leaking from chainsaw
Correct part for 14" poulan chainsaw which leaked gas out of the hole in the cap that must have failed to vent and not-vent when appropriate.
Guest -
April 28, 2021
Verified Purchase
Excellent service
Recieved parts in good condition and in really good time
Guest -
April 26, 2021
Verified Purchase
Great part
The was in a great condition, working good.
Gisela -
February 1, 2021
Verified Purchase
Gas cap for a Poulan Chainsaw
Great solution to my problem. Cap came put it on and no more need to use channel licks to get the gas cap off. Came fast and has made my day. THANK YOU !!!!!
iGlobal -
September 25, 2020
Verified Purchase
perfice fit
I like the thinner threds, the old one was a battle to get on and and off, thank you
Guest -
August 21, 2020
Verified Purchase
t
t
t -
t days ago
Verified Purchase
eReplacementParts Team
t
Questions & Answers ?
Our customer Service team is at the ready daily to answer your part and product questions.

Ask our Team
We have a dedicated staff with decades of collective experience in helping customers just like you purchase parts to repair their products.
Does this fit my product?Questions & Answers for Fuel Cap Assembly
This model has a type 1 and type 2. I need gas and oil caps. Not sure if they are identical and if type 1 or 2 make a difference?
Stephen
for model number 3314
asked on 2022-12-16
Hello Stephen, thank you for your question. The oil cap for Model P3314 is the same for types 1 and 2. We look forward to hearing from you.
eReplacementParts Team December 16, 2022
Fuel cap vent leaks fuel! I tried blowing it out but it still leaks!
John
for model number PP4218AVHD
asked on 2022-05-12
Hello John, Thank you for contacting us. This is normally an indication the cap will need to be replaced. We have researched the model you have provided and have found the part you are looking for is Part Number: 580940901. If you need help placing an order, customer service is open 7 days a week. Please feel free to give us a call. We look forward to hearing from you!
eReplacementParts Team May 12, 2022
Need a gas cap for this
Randy
for model number P3314ws
asked on 2022-05-10
Hello Randy, Thank you for contacting us. We have researched the model you have provided and have found the part you are looking for is Part Number: 580940901. If you need help placing an order, customer service is open 7 days a week. Please feel free to give us a call. We look forward to hearing from you!
eReplacementParts Team May 10, 2022
Looking for an O ring for the gas cap...description on gas cap assembly says o ring will become brittle and will need to be replaced. Do you sell just the o ring?Thanks.
Rick
for model number Poulan PP4218avx
asked on 2022-03-19
Hi Rick,
Thank you for your question. The o-ring is sold with the fuel cap assembly. The part number listed under your model number for the fuel cap assembly is 580940901. If you need help placing an order for it, customer service is open 7 days a week and anyone will be happy to assist you. Please feel free to give us a call. We look forward to hearing from you!
eReplacementParts Team March 19, 2022
Customer Repair Instructions ?
All our customer repair instructions are solicited directly from other customers just like you who have purchased and replaced this exact part.
Fuel cap was very hard to apply and leaked gas
Randall - June 21, 2016
👍 16 of 18 people found this instruction helpful
Tool Type
Chain Saw
Difficulty
Easy
Time
Less than 15 minutes
Tools Used
Pliers, None
Parts Used
Removed old fuel cap and replaced with new cap which installed very easy. No extra tools needed.
Did you find this story helpful?
Thanks for voting and helping fellow customers!
Old Primer Bulb was cracked and would not pump fuel into the carb
Rich - November 19, 2015
👍 10 of 11 people found this instruction helpful
Tool Type
Chain Saw
Difficulty
Easy
Time
15-30 minutes
Tools Used
Screwdriver, Pliers
- Removed top cover (to access carb area and allow side panel removal)
- Removed side cover where primer bulb is located
- Remove old snap in primer bulb (without disconnecting fuel lines)
- Cut and replace the 2 fuel lines one at a time (mine were hard and brittle from old fuel)
- The new bulb has 2 fuel ports, one is longer than the other which matched the old bulb.
- Installation instructions said to double check the direction of the fuel flow (the bulb sucks fuel through the carb, so the inlet side is connected to the carb and the outlet side goes back to the fuel tank).
- Snap the new bulb into place on the side panel
- Attach the side panel
- Attach the top panel
Did you find this story helpful?
Thanks for voting and helping fellow customers!
Refurbished model came with defective gas cap(no gasket/seal)
Robert - June 1, 2016
👍 4 of 4 people found this instruction helpful
Tool Type
Chain Saw
Difficulty
Easy
Time
Less than 15 minutes
Tools Used
, hand
Parts Used
Removed defective gas cap- installed new one...a no brainer
Did you find this story helpful?
Thanks for voting and helping fellow customers!
old cap would not screw on/off easily and finally started leaking after failed attempts to tighten
David - November 27, 2015
👍 4 of 5 people found this instruction helpful
Tool Type
Chain Saw
Difficulty
Easy
Time
Less than 15 minutes
Tools Used
, by hand
Parts Used
Remove from package and insert the plastic lanyard into the tank. Screw in place. New cap was a lot easier to tighten and sealed perfectly.
Did you find this story helpful?
Thanks for voting and helping fellow customers!
Saw would run and then stop. Would not allow air into the tank, but loosening the cap and it would run again for a short time
George - March 9, 2016
👍 3 of 4 people found this instruction helpful
Tool Type
Chain Saw
Difficulty
Easy
Time
Less than 15 minutes
Tools Used
, None
Parts Used
There is a vent in the fuel cap assembly that was plugged after being exposed to the fuel mixture. The new cap assembly allowed are to flow into the tank as gas mixture was drawn out. Replacement of the cap is easy and self explanatory.
Did you find this story helpful?
Thanks for voting and helping fellow customers!
gas cap leaked
stan - July 28, 2017
👍 1 of 1 people found this instruction helpful
Tool Type
Chain Saw
Difficulty
Easy
Time
Less than 15 minutes
Tools Used
Pliers, Tools not needed.
Parts Used
removed old cap & replaced with new.
Did you find this story helpful?
Thanks for voting and helping fellow customers!
Cracked purge bulb and fuel lines. leakage bar chain oil
Richard - May 10, 2016
👍 1 of 1 people found this instruction helpful
Tool Type
Chain Saw
Difficulty
Easy
Time
15-30 minutes
Tools Used
Screwdriver, Pliers, Power Drill, Socket set
I followed the installation instructions that were included with the purge bulb. Then just replaced the oil and fuel caps with the new ones.
Did you find this story helpful?
Thanks for voting and helping fellow customers!
Vent was plugged in fuel cap
JAMES - February 17, 2016
👍 2 of 3 people found this instruction helpful
Tool Type
Chain Saw
Difficulty
Easy
Time
Less than 15 minutes
Tools Used
, my left hand
Parts Used
Replace the cap like I did...old one screws off and new one screws on in its place
Did you find this story helpful?
Thanks for voting and helping fellow customers!
The fuel line had deteriorated and had to be replaced
Semih - June 13, 2018
Tool Type
Chain Saw
Difficulty
Hard
Time
15-30 minutes
Tools Used
Screwdriver, Pliers
Remove the cover on the chainsaw to access the fuel line area.
Remove the air filter to access the area.
Cleaned out the tank since there were pieces of fuel line floating around in the tank.
Had to fish the fuel line through the opening at the top of the tank and use long nose, bent tip needle nose pliers to pull it through. Had to cut the fuel line at an angle to make it go through the small opening in the tank.
After pulling the fuel line through the tank and inserting the fuel filter I had to pull the fuel line back in and then cut it to length and insert the other end into the fuel line tube outside the tank.
Install the covers back and the chain saw was operational after pulling the fuel line through the tank and inserting the fuel filter I had to pull the fuel line back in and then cut it to length and insert the other end into the fuel line tube outside the tank.
Installed all the covers back and the chain saw was operational.
Did you find this story helpful?
Thanks for voting and helping fellow customers!
Old and wore out
Robert - May 6, 2018
Tool Type
Chain Saw
Difficulty
Easy
Time
15-30 minutes
Tools Used
Screwdriver
Remove top and side cover remove old parts install new,
Did you find this story helpful?
Thanks for voting and helping fellow customers!
Load More Install Stories
OEM stands for Original Equipment Manufacturer and means the part you’re buying is sourced directly from the manufacturer who made your product. At eReplacementParts, we sell only genuine OEM parts, guaranteeing the part you’re purchasing is of better design and of higher quality than aftermarket parts.
Our product descriptions are a combination of data sourced directly from the manufacturers who made your product as well as content researched and curated by our content & customer service teams. This content is edited and reviewed internally before being made public to customers.
Our customer service team are at the ready daily to answer your part and product questions. We have a dedicated staff with decades of collective experience in helping customers just like you purchase parts to repair their products.
All our part reviews are solicited directly from other customers who have purchased this exact part. While we moderate these reviews for profanity, offensive language or personally identifiable information, these reviews are posted exactly as submitted and no alterations are made by our team.
All our customer repair instructions are solicited directly from other customers just like you who have purchased and replaced this exact part. While we moderate these reviews for profanity, offensive language or personally identifiable information, these reviews are posted exactly as submitted and no alterations are made by our team.
Based on data from past customer purchasing behaviors, these parts are most commonly purchased together along with the part you are viewing. These parts may be necessary or helpful to replace to complete your current repair.
All our installation videos are created and produced in collaboration with our in-house repair technician, Mark Sodja, who has helped millions of eReplacementParts customers over the last 13 years repair their products. Mark has years of experience in selling and repairing both commercial and residential products with a specialty in gas-powered equipment.
This data is collected from customers who submitted a repair instruction after replacing this exact part. Customers can rate how easy the repair was to complete and how long it took. We aggregate this data to provide a repair rating that allows customers to quickly determine the difficulty and time needed to perform their own repair.