


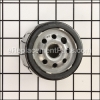
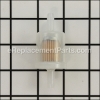
This pre cleaner filter is a high quality replacement part that is manufactured for use with Briggs and Stratton engines that are commonly installed on Toro lawn and garden equipment. It is used to provide a second layer of protection from dust and other contaminants. This durable felt pre cleaner is sold individually, please note the main pleated paper filter is sold separately.
Filter-pre Cleaner 697292
OEM part for: Briggs and Stratton, Toro
Part Number: 697292
$6.01
In Stock
Jump To:
Frequently Purchased Together ?


Compatibility
This Filter-pre Cleaner will fit the following 1196 machines. Confirm this part works with your model, and view the detailed model diagrams and repair help we have to offer.
This item works with the following types of products:
- Lawn Tractor Parts
- Engine Parts
This part replaces obsolete part #: 4212
Questions & Answers ?
Our customer Service team is at the ready daily to answer your part and product questions.

Ask our Team
We have a dedicated staff with decades of collective experience in helping customers just like you purchase parts to repair their products.
Does this fit my product?Questions & Answers for Filter-pre Cleaner
No questions have been asked yet
Customer Repair Instructions ?
All our customer repair instructions are solicited directly from other customers just like you who have purchased and replaced this exact part.
Starter pulley broke
Gary - December 31, 2021
Tool Type
Lawn Mower
Difficulty
Easy
Time
15-30 minutes
Tools Used
Screwdriver, Pliers, Socket set, Channel locks
1. Removed 4 bolts on starter assembly
2. Ground bolt on both sides to use channel lock to unscrew it. Striped flat head slot & hexed because it was on so tight
3. Pulled off old pulley, dropped in new spring into new pulley, installed 2 levers, installed plastic washer & bolt, spun the pulley counter clock wise, put a screwdriver in it to hold it, installed the rope, remove screwdriver, installed the handle
4. Installed starter assembly on top of engine & reinstalled the 4 bolts, pulled rope to test
Did you find this story helpful?
Thanks for voting and helping fellow customers!
My engine would idle normal and when throttle was applied would start to back fire and then the engine would stop.
James - February 10, 2021
Tool Type
Lawn Tractor
Difficulty
Easy
Time
15-30 minutes
Tools Used
Pliers, Socket set
Parts Used
1. Loosen the 4 engine cowling bolts that hold the plastic cowling (engine cover).
2. Use pliers to remove the fuel clamp on the fuel line and disconnect the fuel line and breather tube from the carburetor.
3. Use a ratchet and socket to remove the 2 bolts holding the carburetor onto the engine block. Then use care when removing the throttle and spring lines from the carburetor. (Take a picture of where the connections go on the carburetor to make it easy for putting them in the correct holes on the new carburetor.)
4. Disassemble the breather tubes from the old carburetor and reassemble them on the new carburetor.
5. Reassemble what was taken apart and you’re all set.
Did you find this story helpful?
Thanks for voting and helping fellow customers!
Airfilter completely deteriorated after log splitter was exposed to the elements for a few months
Anthony - January 31, 2020
Tool Type
Lawn Tractor
Difficulty
Easy
Time
Less than 15 minutes
Tools Used
, none needed
Exchanging the air filter and pre-cleaner took one minutes. Perfect fit.
Did you find this story helpful?
Thanks for voting and helping fellow customers!
Would not crank. Before intake push rod failure hard to start
Terry - July 20, 2016
Tool Type
Lawn Mower
Difficulty
Medium
Time
30-60 minutes
Tools Used
Socket set, Wrench Set, Feeler guage
Removed valve cover. Replaced push rod.
Did you find this story helpful?
Thanks for voting and helping fellow customers!
OEM stands for Original Equipment Manufacturer and means the part you’re buying is sourced directly from the manufacturer who made your product. At eReplacementParts, we sell only genuine OEM parts, guaranteeing the part you’re purchasing is of better design and of higher quality than aftermarket parts.
Our product descriptions are a combination of data sourced directly from the manufacturers who made your product as well as content researched and curated by our content & customer service teams. This content is edited and reviewed internally before being made public to customers.
Our customer service team are at the ready daily to answer your part and product questions. We have a dedicated staff with decades of collective experience in helping customers just like you purchase parts to repair their products.
All our part reviews are solicited directly from other customers who have purchased this exact part. While we moderate these reviews for profanity, offensive language or personally identifiable information, these reviews are posted exactly as submitted and no alterations are made by our team.
All our customer repair instructions are solicited directly from other customers just like you who have purchased and replaced this exact part. While we moderate these reviews for profanity, offensive language or personally identifiable information, these reviews are posted exactly as submitted and no alterations are made by our team.
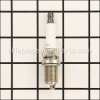
Based on data from past customer purchasing behaviors, these parts are most commonly purchased together along with the part you are viewing. These parts may be necessary or helpful to replace to complete your current repair.
All our installation videos are created and produced in collaboration with our in-house repair technician, Mark Sodja, who has helped millions of eReplacementParts customers over the last 13 years repair their products. Mark has years of experience in selling and repairing both commercial and residential products with a specialty in gas-powered equipment.
This data is collected from customers who submitted a repair instruction after replacing this exact part. Customers can rate how easy the repair was to complete and how long it took. We aggregate this data to provide a repair rating that allows customers to quickly determine the difficulty and time needed to perform their own repair.