Carburetor Gasket 900994004 - OEM Ryobi - eReplacementParts.com
eReplacementParts.com
877-346-4815
Ryobi Parts
Repair Parts Home
  
Lawn Equipment Parts
  
Ryobi Parts
  900994004 Carburetor Gasket

Carburetor Gasket 900994004

OEM part for: Ryobi, Homelite, Ridgid

Part Number: 900994004


Install
Videos!
Carburetor Gasket - 900994004:Ryobi 360 View
Carburetor Gasket - 900994004:RyobiCarburetor Gasket - 900994004:RyobiCarburetor Gasket - 900994004:Ryobi 360 View
Usually ships in 7 - 12 business days
Leaves our warehouse within
7 - 12 business days
Easy 30-60 minutes (19 rated repairs)?
OEM: Original Equipment Manufacturer ?
RyobiHomeliteRidgid
Does this fit my product?

Product Description ?

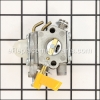
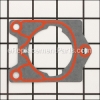
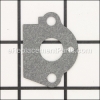
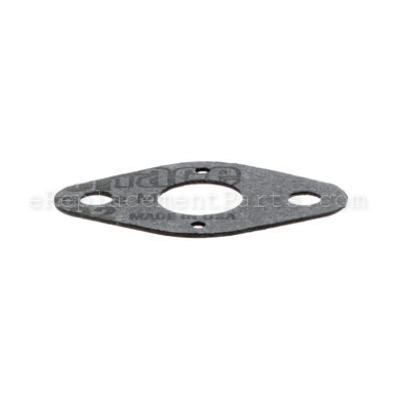
This is a genuine OEM replacement part, it is sold individually.
The purpose of the 900994004 Carburetor Gasket is to prevent an air leak, which would cause the engine to run poorly.

It is advised to replace these gaskets when replacing or repairing the carburetor.

  • Classification: Part
  • Weight: 0.01 lbs.
  • Also Known As: Carburetor Insulator, Insulator Gasket, Intake Gasket, Mounting Gasket
  • Shipping: Ships Worldwide

Compatibility

This Carburetor Gasket will fit the following 701 machines. Confirm this part works with your model, and view the detailed model diagrams and repair help we have to offer.

Ryobi

Homelite

Ridgid

Show More Compatible Models
Don't see yours? Try searching our site for :

This item works with the following types of products:

  • Trimmer Parts
  • Pruner Parts
  • Grass Trimmer Parts
  • Hedge Trimmer Parts
  • Blower Parts
  • Shaper Parts
  • Pump Parts

This part replaces obsolete part #: 98766, UP03916, 98766A

Customer Part Reviews ?

4.7
Average Rating (out of 5):
6 Reviews
Click to filter by ratings:
5 stars
5
4 stars
0
3 stars
1
2 stars
0
1 stars
0
  • Highest Rating
  • Most Recent
< PREV
  • 1
NEXT >
  • gasket
    perfect fit
    Guest - July 23, 2021 Verified Purchase
    worked as expected.
    Arrived quickly, the leaf blower works great now.
    Guest - September 11, 2019 Verified Purchase
    Me sirvio perfecto
    Recibi el articulo en perfectas condiciones
    Juan Manuel - September 2, 2019 Verified Purchase
    Parts for Ryobi
    I bought carburetor and gasket plus a cover for the line. Everything went on without a problem very happy with it the service and parts
    Guest - June 27, 2019 Verified Purchase
    worked as expected
    part was in new condition, fit correctly and sealed just like a gasket should
    Guest - May 27, 2019 Verified Purchase
    The gasket worked as designed.
    The gasket worked great.
    ROBERT - August 17, 2019 Verified Purchase

    Questions & Answers ?

    Our customer Service team is at the ready daily to answer your part and product questions.

    photo of team member
    Ask our Team

    We have a dedicated staff with decades of collective experience in helping customers just like you purchase parts to repair their products.

    Does this fit my product?

    Questions & Answers for Carburetor Gasket


    No questions have been asked yet

    Customer Repair Instructions ?

    All our customer repair instructions are solicited directly from other customers just like you who have purchased and replaced this exact part.

    Easy 30-60 minutes (19 rated repairs)?

    Replaced carburetor.

    Ray - January 31, 2016
    👍 4 of 5 people found this instruction helpful
    Tool Type

    Trimmer

    Difficulty

    Easy

    Time

    Less than 15 minutes

    Tools Used

    Socket set

    Remove air filter, remove fuel lines from carburetor. (Remember where the lines are connected) Remove old carburetor and gasket. Place new gasket and new carburetor on mounting bolts. Install the fuel lines, Then the air filter. Done.
    Did you find this story helpful?
    Thanks for voting and helping fellow customers!

    Trimmer wouldn't crank.

    David - July 26, 2017
    Tool Type

    Trimmer

    Difficulty

    Easy

    Time

    15-30 minutes

    Tools Used

    Pliers, Nutdriver

    1. Removed two nuts holding the old carburetor assembly including the old gasket.
    2. Put the new gasket on.
    3. Installed the new carb assembly on the two bolts and tightened the nuts.
    4. Reattached the two gas lines.
    5. Primed the bulb, and cranked the trimmer on about the fifth pull of the rope.
    Did you find this story helpful?
    Thanks for voting and helping fellow customers!

    Pruner was hard to start and would not stay running

    Jimmy - May 10, 2017
    1. Remove the carb cover.
    2. Removed the carb.
    3. Installed the new carb and the gaskets.
    4. Reinstalled the cover.
    5. Filled with gas.
    6. Started and adjusted idle.
    7. Ran like a champ - first time since I bought it and even had a shop fix it once and the fix didn't last a week.
    Did you find this story helpful?
    Thanks for voting and helping fellow customers!

    Gas leak

    John - April 30, 2017
    Tool Type

    Trimmer

    Difficulty

    Easy

    Time

    Less than 15 minutes

    Tools Used

    Screwdriver, Socket set

    1. Removed, plastic cover
    2. Took off carburetor
    3. Disconnected fuel line
    4. Put gasket and carb together
    5. Tighter nuts
    6. Reconnected fuel line
    7. Replaced plastic cover
    Note: need to put things back correctly to minimize time
    Did you find this story helpful?
    Thanks for voting and helping fellow customers!

    carburetor was broken

    Ben - February 6, 2017
    Tool Type

    Trimmer

    Difficulty

    Medium

    Time

    30-60 minutes

    Tools Used

    Screwdriver, Wrench Set, Nutdriver, torx driver

    1. Remove air filter
    2. Remove engine shroud
    3. Remove old carburetor
    4. Remove old gaskets
    5. Reinstall new gaskets
    6. Reinstall new carb.
    7. Reinstall engine shroud
    8. Reinstall air filter
    Did you find this story helpful?
    Thanks for voting and helping fellow customers!

    Ryobi string trimmer sat 18 mo. would not start

    Fred - June 28, 2016
    Tool Type

    Trimmer

    Difficulty

    Medium

    Time

    15-30 minutes

    Tools Used

    Socket set

    I always replace fuel lines and in tank filters on this type of unit before trying to start them if they have sat for more than a year. That done unit would still not start, $20 dollar price for a carburetor seemed worth a gamble. Started on 4th pull. Success
    Did you find this story helpful?
    Thanks for voting and helping fellow customers!

    Kept stalling

    robert - June 17, 2016
    Tool Type

    Trimmer

    Difficulty

    Medium

    Time

    15-30 minutes

    Tools Used

    Screwdriver

    Took plastic caps off carburetor adjustment screws, made slight adjustment with a screwdriver. Runs fine.
    Did you find this story helpful?
    Thanks for voting and helping fellow customers!

    No start

    Monty - June 20, 2016
    Tool Type

    Trimmer

    Difficulty

    Medium

    Time

    More than 2 hours

    Tools Used

    Screwdriver, Nutdriver, Carburetor dip tank

    1. Removed carb tore down
    2. Soaked in carburetor dip tank
    3. Cleaned out all orifices
    4. Re built carb carefully put together
    5. Spark plug was bad too.
    Did you find this story helpful?
    Thanks for voting and helping fellow customers!

    Sat for years and the Carb was gummed up

    Victor - June 14, 2016
    Remove the carburetor and clean it with Carb cleaner. Use compressed air and a small wire to clean out ports. Reassemble
    Did you find this story helpful?
    Thanks for voting and helping fellow customers!

    Leaking fuel, would not start

    Michael - July 20, 2018
    👍 0 of 1 people found this instruction helpful
    Tool Type

    Blower

    Difficulty

    Easy

    Time

    15-30 minutes

    Tools Used

    Screwdriver, Pliers, Nutdriver

    Removed gas tank, and carb. Cleaned carb, installed new tank and lines,reassembled. Started right up
    Did you find this story helpful?
    Thanks for voting and helping fellow customers!

    OEM stands for Original Equipment Manufacturer and means the part you’re buying is sourced directly from the manufacturer who made your product. At eReplacementParts, we sell only genuine OEM parts, guaranteeing the part you’re purchasing is of better design and of higher quality than aftermarket parts.

    Our product descriptions are a combination of data sourced directly from the manufacturers who made your product as well as content researched and curated by our content & customer service teams. This content is edited and reviewed internally before being made public to customers.

    Our customer service team are at the ready daily to answer your part and product questions. We have a dedicated staff with decades of collective experience in helping customers just like you purchase parts to repair their products.

    All our part reviews are solicited directly from other customers who have purchased this exact part. While we moderate these reviews for profanity, offensive language or personally identifiable information, these reviews are posted exactly as submitted and no alterations are made by our team.

    All our customer repair instructions are solicited directly from other customers just like you who have purchased and replaced this exact part. While we moderate these reviews for profanity, offensive language or personally identifiable information, these reviews are posted exactly as submitted and no alterations are made by our team.

    Based on data from past customer purchasing behaviors, these parts are most commonly purchased together along with the part you are viewing. These parts may be necessary or helpful to replace to complete your current repair.

    All our installation videos are created and produced in collaboration with our in-house repair technician, Mark Sodja, who has helped millions of eReplacementParts customers over the last 13 years repair their products. Mark has years of experience in selling and repairing both commercial and residential products with a specialty in gas-powered equipment.

    This data is collected from customers who submitted a repair instruction after replacing this exact part. Customers can rate how easy the repair was to complete and how long it took. We aggregate this data to provide a repair rating that allows customers to quickly determine the difficulty and time needed to perform their own repair.

    eReplacementParts.com
    7174 South 400 West
    Suite 5
    Midvale, UT 84047
    visa mastercard discover american express PayPal