
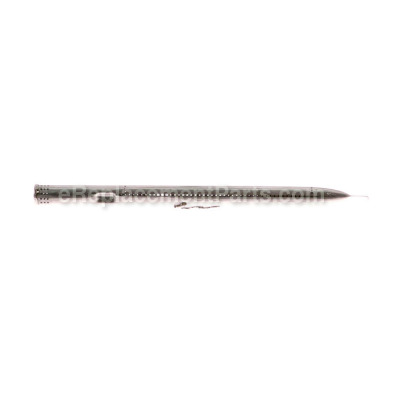


This is a genuine OEM sourced replacement part designed for use with Char-Broil grills. The position of openings on the burner help to create an even flame across the cooking area. Depending on model of your grill it may have three (3) or four (4) of these burners. It is made out of stainless steel and it is sold individually.
Stainless Steel Main Burner Tu G517-7300-W1
OEM part for: Char-Broil
Part Number: G517-7300-W1
$13.69
In Stock
Jump To:
Frequently Purchased Together ?


Compatibility
This part will fit the following 27 machines
Char-Broil
463250811 4-Burner Infrared Grill View Diagrams & Manuals
463224611 4-Burner Precisionflame Infrared Gas Grill View Diagrams & Manuals
463269411 Tru-Infrared IR Gas Grill With Flex Cart View Diagrams & Manuals
463269111 Tru-Infrared Black Porcelain Gas Grill View Diagrams & Manuals
463250511 RED 3-Burner Infrared Grill View Diagrams & Manuals
463250211 RED Infrared Urban Grill View Diagrams & Manuals
463250212 Tru-Infrared Gas Grill View Diagrams & Manuals
463250512 Tru-Infrared Gas Grill View Diagrams & Manuals
463251012 Tru-Infrared 4-Burner Gourmet Gas Grill View Diagrams & Manuals
463251413 Gourmet T-22D Tru-Infrared 2-Burner Gas Grill View Diagrams & Manuals
463251713 Gourmet 3-Burner Tru-Infrared T-36D Grill View Diagrams & Manuals
463251714 Gas BBQ View Diagrams & Manuals
463251914 Gas BBQ View Diagrams & Manuals
463251414 Gas BBQ View Diagrams & Manuals
463251913 Gas BBQ View Diagrams & Manuals
464224211 4-Burner Industrial Cart Gas Grill View Diagrams & Manuals
464224411 Concept Grill W/Steamer View Diagrams & Manuals
466224411 Bbq Grill W/Steamer View Diagrams & Manuals
466250211 Red Urban Grill View Diagrams & Manuals
466250212 Gourmet Grill View Diagrams & Manuals
466250512 Gourmet Bbq Grill View Diagrams & Manuals
466251413 Gourmet Bbq Grill View Diagrams & Manuals
466251713 Gourmet Bbq Grill View Diagrams & Manuals
466224611 4-Burner Precisionflame Infrared Gas Grill View Diagrams & Manuals
466250511 3-Burner Infrared Grill View Diagrams & Manuals
466251714 Infrared Dual Fuel Gourmet Lidded Sideburners View Diagrams & Manuals
466252314 Infrared Ng Gas Grill Gourmet Lidded Sideburn View Diagrams & Manuals
Show More Compatible Models
This item works with the following types of products:
Repair Videos ?

Articles:
|
Having trouble getting your grill to light up? A common cause of this issue is a defective ignition switch. We'll sho...
November 08, 2012
|

Customer Part Reviews ?
Average Rating (out of 5):
Click to filter by ratings:
5 stars
4
4 stars
0
3 stars
0
2 stars
0
1 stars
0
< PREV
- 1
Just what we needed
After trying to replace these parts from other sites and receiving the wrong sizes more than once I decided to order from eReplacement Parts. These parts fit our grill perfectly! We are now grilling again after 6 months. The parts came quickly. I don't have a single complaint. Thank you very much.
Guest -
April 27, 2022
Verified Purchase
Great quality, good price
Better selection and price than anywhere else.
Guest -
July 8, 2021
Verified Purchase
Very easy repair
The part is just like the original and went in very easily, as same for the drip pan. am very happy with the results.
Stephan -
June 12, 2020
Verified Purchase
Easy to replace
Burner tube arrived on time and perfect condition. Very easy to install.
Guest -
October 25, 2019
Verified Purchase
t
t
t -
t days ago
Verified Purchase
eReplacementParts Team
t
Questions & Answers ?
Our customer Service team is at the ready daily to answer your part and product questions.

Ask our Team
We have a dedicated staff with decades of collective experience in helping customers just like you purchase parts to repair their products.
Does this fit my product?Questions & Answers for Stainless Steel Main Burner Tu
No questions have been asked yet
Customer Repair Instructions ?
All our customer repair instructions are solicited directly from other customers just like you who have purchased and replaced this exact part.
Replaced main burners in Grill.
Tim - March 19, 2017
👍 3 of 4 people found this instruction helpful
Tool Type
Outdoor Grill
Difficulty
Easy
Time
Less than 15 minutes
Tools Used
Pliers
1. Pull pins.
2. Remove crossbar.
3. Lift up burner tube, remove igniter, pull tube out.
4. Put igniter on the new burner tube, insert tube into grill.
5. Put crossbar back.
6. Put securing pins that came with the tube at the end of the tube and crossbar.
2. Remove crossbar.
3. Lift up burner tube, remove igniter, pull tube out.
4. Put igniter on the new burner tube, insert tube into grill.
5. Put crossbar back.
6. Put securing pins that came with the tube at the end of the tube and crossbar.
Did you find this story helpful?
Thanks for voting and helping fellow customers!
Grill was not heating properly
george - July 13, 2017
👍 1 of 1 people found this instruction helpful
Tool Type
Outdoor Grill
Difficulty
Easy
Time
15-30 minutes
Tools Used
Screwdriver, Pliers
Removed grates,
Lifted heat box out of grill
Removed 4 clips that secured old burners in place. Hair pin clips were rusted and broke during this step. Used the pliers to pull them out .
Grabbed old burners by hand and pulled them out of gas line.
Inserted new burners, made sure they seated into gas line opening by checking the if new burners were positioned exactly like old burners.
Screwed in mid point retainer into new burner and installed hair pin clips.
Replaced burn box and grates.
Started grill.
Easy job.No issues. Parts fit perfectly.
Did you find this story helpful?
Thanks for voting and helping fellow customers!
Spark ignition and hole in trough.
Steve - April 25, 2017
👍 1 of 1 people found this instruction helpful
Tool Type
Outdoor Grill
Difficulty
Easy
Time
15-30 minutes
Tools Used
Pliers
Very easy, did not really need any tools. It needed a good cleaning first. After, I cleaned it up a little, the replacement parts installed easily. I tried a bunch of cleaners on the stainless finish. The cleaner "BARKEEPERS FRIEND" easily brought the stainless steel finish back to "like new" appearance.
Did you find this story helpful?
Thanks for voting and helping fellow customers!
Replacement of burners
Bill - June 13, 2016
👍 1 of 1 people found this instruction helpful
Tool Type
Outdoor Grill
Difficulty
Easy
Time
Less than 15 minutes
Tools Used
Pliers, None
Very simple repair. Remove 4 clips, take out 2 burner tubes, replace with new ones
Did you find this story helpful?
Thanks for voting and helping fellow customers!
Burners and trough were burned out
Kevin - March 11, 2016
👍 1 of 1 people found this instruction helpful
Tool Type
Outdoor Grill
Difficulty
Easy
Time
Less than 15 minutes
Tools Used
Pliers
Just take out the grates. Then the fire box trough lifts out. The burners have pins that just pull out. Remove the tubes. Reverse to install and fire it up.
Did you find this story helpful?
Thanks for voting and helping fellow customers!
Grill main burners were rusted beyond use.
Mark - May 5, 2021
Tool Type
Outdoor Grill
Difficulty
Easy
Time
15-30 minutes
Tools Used
Screwdriver, Pliers
Removed the old main burners and carryover tubes by removing the cotter pins holding them in place. Removed the igniters from each burner by gently prying them open and sliding them off the burners. Cleaned the entire burner area and replaced the main burners securing them with the new cotter pins and reinstalling the igniters on each burner. Also installed the flame carryover tubes on each burner tube with supplied cotter pins and screws.
Did you find this story helpful?
Thanks for voting and helping fellow customers!
It just need to be rebuilt
Steve - July 11, 2019
Tool Type
Outdoor Grill
Difficulty
Easy
Time
15-30 minutes
Tools Used
Screwdriver, Pliers
I got the parts from you guys and put themin
Did you find this story helpful?
Thanks for voting and helping fellow customers!
The igniter button on the front of the barbecue had broken off and was not working. Also my previous burners were very old and had cracked along the sides making a very uneven burn.
Spencer - May 21, 2017
Tool Type
Outdoor Grill
Difficulty
Easy
Time
15-30 minutes
Tools Used
Screwdriver, Pliers, Adjustable Wrench
I started with the burners. I took out the 4 pins that hold the burners on top of the barbecue. Then they very simply just pulled out. But attached to them both they each have a starter Spark. You can use pliers to just pinch off the clips that hold them or pull them off. It's best to use pliers to be careful and not break them. You will use them for the next burners that you put on. Then simply put in the new burners in the same slot the old burners came out of they fit perfectly so the gas lines fit right into them without any struggle or complexity. Clip the igniter igniter Spark.. on to the bottom of the burners. Then put the pins back in to hold the burners in place. Pretty much that's it it's simple turn on the gas it the spark igniter and or light the burners gas and it will go. Secondly I put in the igniter switch. It comes with the igniter switch which is taken off by one not in the back and the igniter switch wiring. Instructions came with it and they were very easy to follow. All you do is access the backside of the igniter switch. Mine I can access with my hand but used a screwdriver to take off a bottom panel. I wanted to be able to reach it easily. You unscrew the nut in the back and the switch comes right through. Side note before doing this take out the battery you will see a battery switch either on the side or back of your barbecue most likely check in manual for where it is located. Take out the wires from the old switch then just push the new igniter switch through the front of your barbecue put on the bolt make sure you slipped the new wires through the boat first or excuse me the nut. Screw them in to the front of the barbecue securely and then plug in the new wires. Put in a new battery and screw in the lid. It should start right up as did mine.
Did you find this story helpful?
Thanks for voting and helping fellow customers!
Rusted out parts
Douglas - April 27, 2017
Tool Type
Outdoor Grill
Difficulty
Medium
Time
1-2 hours
Tools Used
Screwdriver, Pliers
Dismantled part by part that had all but disintegrated. Then spent 45 minutes figuring out how to install. A sketch or installation hint would have saved 30 minutes. After that it was a snap to put back. Next time I would skip the electrode starters.
Did you find this story helpful?
Thanks for voting and helping fellow customers!
OEM stands for Original Equipment Manufacturer and means the part you’re buying is sourced directly from the manufacturer who made your product. At eReplacementParts, we sell only genuine OEM parts, guaranteeing the part you’re purchasing is of better design and of higher quality than aftermarket parts.
Our product descriptions are a combination of data sourced directly from the manufacturers who made your product as well as content researched and curated by our content & customer service teams. This content is edited and reviewed internally before being made public to customers.
Our customer service team are at the ready daily to answer your part and product questions. We have a dedicated staff with decades of collective experience in helping customers just like you purchase parts to repair their products.
All our part reviews are solicited directly from other customers who have purchased this exact part. While we moderate these reviews for profanity, offensive language or personally identifiable information, these reviews are posted exactly as submitted and no alterations are made by our team.
All our customer repair instructions are solicited directly from other customers just like you who have purchased and replaced this exact part. While we moderate these reviews for profanity, offensive language or personally identifiable information, these reviews are posted exactly as submitted and no alterations are made by our team.
Based on data from past customer purchasing behaviors, these parts are most commonly purchased together along with the part you are viewing. These parts may be necessary or helpful to replace to complete your current repair.
All our installation videos are created and produced in collaboration with our in-house repair technician, Mark Sodja, who has helped millions of eReplacementParts customers over the last 13 years repair their products. Mark has years of experience in selling and repairing both commercial and residential products with a specialty in gas-powered equipment.
This data is collected from customers who submitted a repair instruction after replacing this exact part. Customers can rate how easy the repair was to complete and how long it took. We aggregate this data to provide a repair rating that allows customers to quickly determine the difficulty and time needed to perform their own repair.