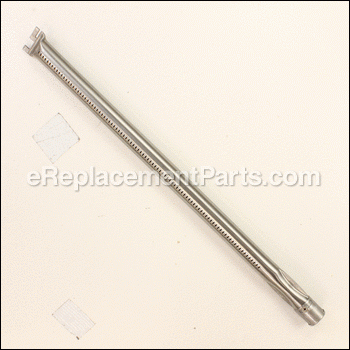

Genuine Manufacturer Approved Stainless steel burner tube used on some Weber Gas Grills. This part is Sold Individually. The burners are the part of the grill that the flame rises from. Depending on your grill you may have 3, 4, 6 or more of these.
Main Burner Tube 70306
OEM part for: Weber
Part Number: 70306
$55.85
In Stock
Jump To:
Frequently Purchased Together ?


Compatibility
This Main Burner Tube will fit the following 187 machines. Confirm this part works with your model, and view the detailed model diagrams and repair help we have to offer.
Weber
Show More Compatible ModelsThis item works with the following types of products:
Repair Videos ?

Articles:
|
Having trouble getting your grill to light up? A common cause of this issue is a defective ignition switch. We'll sho...
November 08, 2012
|

Customer Part Reviews ?
Average Rating (out of 5):
Click to filter by ratings:
5 stars
5
4 stars
0
3 stars
0
2 stars
0
1 stars
0
< PREV
- 1
Works like new!
Replaced burners, flavor bars and flavor bracket and we now have a BBQ that is like new! Big savings and very happy that we replaced parts instead of buying a new one like my husband wanted to do. He is very happy with it too.
Guest -
August 24, 2020
Verified Purchase
Easy repair
Burners and flavor is er bars
Guest -
May 18, 2020
Verified Purchase
Quality part and timely delivery.
Part fit perfectly and was delivered on time. Will use this service again.
Guest -
May 18, 2020
Verified Purchase
Easy repair. Perfect fit. Legit Weber parts. You can feel the difference in the weight and quality
Awesome
Guest -
March 26, 2020
Verified Purchase
burner tube weber gas grill
excellent packaging, well protected and undamaged.
Guest -
August 30, 2019
Verified Purchase
Questions & Answers ?
Our customer Service team is at the ready daily to answer your part and product questions.

Ask our Team
We have a dedicated staff with decades of collective experience in helping customers just like you purchase parts to repair their products.
Does this fit my product?Questions & Answers for Main Burner Tube
What is the length of the main burner tube
Ashley Wilson
for model number Summit e470
asked on 2022-10-24
Hello Ashley, Thank you for your inquiry. We show this main burner tube as 20-1/2 inches long. We hope this helps and if you need help placing an order for a part, customer service is open 7 days a week. Please feel free to give us a call. We look forward to hearing from you!
eReplacementParts Team October 24, 2022
Customer Repair Instructions ?
All our customer repair instructions are solicited directly from other customers just like you who have purchased and replaced this exact part.
Burners were corroded and the heat was uneven. Instructions to replace the came with the parts and it was pretty simple to replace them once I got the front panel and manifold off.
Mickey - March 5, 2017
👍 7 of 8 people found this instruction helpful
Tool Type
Outdoor Grill
Difficulty
Easy
Time
1-2 hours
Tools Used
Screwdriver, Wrench Set
Parts Used
Removed control knobs and front panel. Removed gas valves from manifold. Pulled old burners out through the space where the valves go. Reversed steps to complete repair.
Did you find this story helpful?
Thanks for voting and helping fellow customers!
Flavorizer bar and bracket was heavily rusted. Burner tubes worked but weren't performing well due to rust.
Tom - September 26, 2016
👍 2 of 2 people found this instruction helpful
Tool Type
Outdoor Grill
Difficulty
Easy
Time
Less than 15 minutes
Tools Used
Screwdriver, Wrench Set
Disconnect propane from grill and open all control valves
Removed grill grates and flavorizer bars.
Removed control knobs
Removed two screws to remove control knob panel to access manifold
Removed two screws securing manifold and moved manifold to access burner tubes.
Slid burner tubes out
Removed two screws securing the front and back flavorizer bar brackets and removed brackets
Replaced with new brackets and screws (included)
Inserted new burner tubes
Screw in manifold using old screws
Reconnect propane
Test all burners
Reinstall control knob panel using old screws
Install all control knobs
Install new flavorizer bars
Install existing grill grate
Did you find this story helpful?
Thanks for voting and helping fellow customers!
Flames too high, even on low. Burner tubes' holes rusty.
Bob - July 20, 2020
Tool Type
Outdoor Grill
Difficulty
Easy
Time
30-60 minutes
Tools Used
Pliers, Power Drill, Nutdriver
Parts Used
The instructions come with the main burner tube, so don't feel like you need to follow these instructions. You may note that these look familiar if you have read others' instructions...they're the same. I also replaced my light switch at the same time.
-Disconnect propane from grill and open all control valves.
-Removed grill grates and rusty flavorizer bars.
-Used a steel brush installed in a drill to clean my grates, then oiled and seasoned them.
-Removed control knobs.
-Removed two screws to remove control knob panel to access manifold.
-Unplug light switch wires from battery.
-Remove existing light switch, insert new light switch.
-Removed two screws securing manifold and moved manifold to access burner tubes.
-Slid burner tubes out.
-Inserted new burner tubes.
-Screw in manifold using old screws.
-Reconnect propane.
-Test all burners. (they worked great!)
-Reinstall control knob panel using old screws.
-Install all control knobs.
-Install new flavorizer bars.
-Install existing grill grate.
Did you find this story helpful?
Thanks for voting and helping fellow customers!
3 burners fit direct replacement 1 burner was older style short by 2 in used 1 of old burner s
paul - May 28, 2020
Tool Type
Outdoor Grill
Difficulty
Medium
Time
30-60 minutes
Tools Used
Screwdriver, Socket set, Nutdriver, wd 40
Parts Used
little tricky getting the front cover off weber 420 unbolt manifold on flex line so it moves off to the side now with the burners will slide out ,now grill has 3 blue flames works for a grill a customer gave me
Did you find this story helpful?
Thanks for voting and helping fellow customers!
Old age, parts worn and deteriorated
Michael - May 13, 2020
Tool Type
Outdoor Grill
Difficulty
Medium
Time
30-60 minutes
Tools Used
Screwdriver, Pliers, Nutdriver
Removed the grates, drip pans, and trap. Removed the old flavorizer bars and dials. Removed the two manifold cover screws, removed the cover. Removed the manifold bolt, and pulled the manifold away. Removed the old burner tubes. Cleaned the drip areas, installed new burner tubes, reinstalled manifold, manifold cover, dials, installed new flavorizer bars, reinstalled grates.
Tested burners. Worked like new.
Placed one side of grill on milk crate, pulled old casters, reinstalled new, and repeated process for other side.
Tested burners. Worked like new.
Placed one side of grill on milk crate, pulled old casters, reinstalled new, and repeated process for other side.
Did you find this story helpful?
Thanks for voting and helping fellow customers!
Grill would barely reach temperature
Robert - August 24, 2017
Tool Type
Outdoor Grill
Difficulty
Medium
Time
1-2 hours
Tools Used
Screwdriver, Pliers, Wrench Set, Adjustable Wrench
Parts Used
Removed the doors and front cover of my Weber Summit Grill. (The means and fashion for doing so can be found on the internet and on youtube. I replaced the 5 of my 8 burner tubes plus the searing station burner, also replaced the light switch which had melted in our Phoenix Az heat and replaced one of the magnet in the doors. Project took about an hour and a half and the grill now works like new. Very please with eReplacementParts.com I received what I ordered in a timely fashion and the instructions included with the material were very good and detailed.
Did you find this story helpful?
Thanks for voting and helping fellow customers!
This was a weber Summitt repair. The cook box and everything inside
Paul - February 28, 2022
👍 0 of 1 people found this instruction helpful
Tool Type
Outdoor Grill
Difficulty
Medium
Time
1-2 hours
Tools Used
Pliers, Socket set, Wrench Set
Removed all hardware in cook box, installed new cook box a and all parts inside.
A few problems but we worked them out
Only issue was wound up with 2 extra sets of flavor bar holders. The flavor bar holders were part of the cook box
A few problems but we worked them out
Only issue was wound up with 2 extra sets of flavor bar holders. The flavor bar holders were part of the cook box
Did you find this story helpful?
Thanks for voting and helping fellow customers!
Weber Summit s-470 grill was getting worn out. It is used a lot and some of the parts were getting old.
Thomas - July 17, 2019
👍 0 of 1 people found this instruction helpful
Tool Type
Outdoor Grill
Difficulty
Medium
Time
1-2 hours
Tools Used
Screwdriver, Wrench Set, Nutdriver
Also the LED sensor for the propane tank , and the control knob lights were not working. I ordered multiple Weber parts because I wasn't sure exactly what was wrong. Each part came with its own replacement instructions from Weber. Instructions were great. I had to remove the knobs and the front control panel to replace the burner tubes, wiring harness and LED sensor. It was all pretty easy with the detailed instructions with lots of pictures from Weber. I also replaced the battery pack housing. I spent about $200, but I pretty much have a brand new BBQ. I suspect it will be another 5+ years before I need to do any more work on this BBQ.
Did you find this story helpful?
Thanks for voting and helping fellow customers!
Bent handle, burner rusted, door magnets rusted.
Michael - May 6, 2016
👍 0 of 1 people found this instruction helpful
Tool Type
Outdoor Grill
Difficulty
Easy
Time
30-60 minutes
Tools Used
Screwdriver, Pliers, Wrench Set, Nutdriver, Adjustable Wrench, Needle nose pliers
Door magnets take some force to remove, make sure you work one side first and then the other. Take a look at the new magnet to see which side comes out first. Handle is a breeze, takes about 2 mins. to replace. Burner is a little more time consuming since your have to disassemble the grill a little.
Did you find this story helpful?
Thanks for voting and helping fellow customers!
OEM stands for Original Equipment Manufacturer and means the part you’re buying is sourced directly from the manufacturer who made your product. At eReplacementParts, we sell only genuine OEM parts, guaranteeing the part you’re purchasing is of better design and of higher quality than aftermarket parts.
Our product descriptions are a combination of data sourced directly from the manufacturers who made your product as well as content researched and curated by our content & customer service teams. This content is edited and reviewed internally before being made public to customers.
Our customer service team are at the ready daily to answer your part and product questions. We have a dedicated staff with decades of collective experience in helping customers just like you purchase parts to repair their products.
All our part reviews are solicited directly from other customers who have purchased this exact part. While we moderate these reviews for profanity, offensive language or personally identifiable information, these reviews are posted exactly as submitted and no alterations are made by our team.
All our customer repair instructions are solicited directly from other customers just like you who have purchased and replaced this exact part. While we moderate these reviews for profanity, offensive language or personally identifiable information, these reviews are posted exactly as submitted and no alterations are made by our team.
Based on data from past customer purchasing behaviors, these parts are most commonly purchased together along with the part you are viewing. These parts may be necessary or helpful to replace to complete your current repair.
All our installation videos are created and produced in collaboration with our in-house repair technician, Mark Sodja, who has helped millions of eReplacementParts customers over the last 13 years repair their products. Mark has years of experience in selling and repairing both commercial and residential products with a specialty in gas-powered equipment.
This data is collected from customers who submitted a repair instruction after replacing this exact part. Customers can rate how easy the repair was to complete and how long it took. We aggregate this data to provide a repair rating that allows customers to quickly determine the difficulty and time needed to perform their own repair.