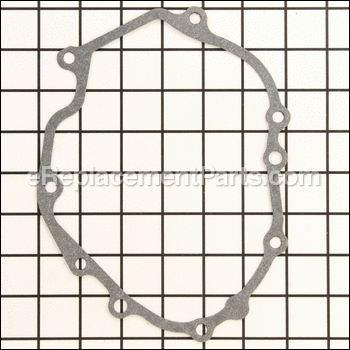

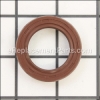
This is an authentic Kohler replacement part. The oil pan gasket is designed by the manufacturer for use in engines. This part is made of flexible plastic, and is used to seal the connection with the oil pan. You will require a wrench when replacing this part. This item is sold individually.
Gasket, Oil Pan 14 041 13-S
OEM part for: Kohler
Part Number: 14 041 13-S
$8.93
In Stock
Jump To:
Frequently Purchased Together ?
Compatibility
This part will fit the following 36 machines
Kohler
XT675 Engine View Diagrams & Manuals
XT675-2034 Toro (6.75 (9.2) Ft Lbs Gross View Diagrams & Manuals
XT675-2047 Viking (6.75 (9.2) Ft Lbs Gro View Diagrams & Manuals
XT149-0011 Engine View Diagrams & Manuals
XT149-0012 Engine View Diagrams & Manuals
XT149-0023 Engine View Diagrams & Manuals
XT149-0024 Engine View Diagrams & Manuals
XT149-0026 Engine View Diagrams & Manuals
XT149-0028 Engine View Diagrams & Manuals
XT149-0030 Engine View Diagrams & Manuals
XT149-0036 Engine View Diagrams & Manuals
XT149-0037 Engine View Diagrams & Manuals
XT149-0200 Engine View Diagrams & Manuals
XT149-0202 Engine View Diagrams & Manuals
XT149-0203 Engine View Diagrams & Manuals
XT149-0211 Engine View Diagrams & Manuals
XT149-0212 Engine View Diagrams & Manuals
XT149-0213 Engine View Diagrams & Manuals
XT149-0214 Engine View Diagrams & Manuals
XT149-0216 Engine View Diagrams & Manuals
XT149-0217 Engine View Diagrams & Manuals
XT149-0218 Engine View Diagrams & Manuals
XT149-0220 Engine View Diagrams & Manuals
XT149-0221 Engine View Diagrams & Manuals
XT149-0223 Engine View Diagrams & Manuals
XT149-0224 Engine View Diagrams & Manuals
XT149-0225 Engine View Diagrams & Manuals
XT149-0226 Engine View Diagrams & Manuals
XT149-0227 Engine View Diagrams & Manuals
XT149-0314 Engine View Diagrams & Manuals
XT149-0315 Engine View Diagrams & Manuals
XT149-0316 Engine View Diagrams & Manuals
XT149-0317 Engine View Diagrams & Manuals
XT149-0318 Engine View Diagrams & Manuals
XT149-3312 Engine View Diagrams & Manuals
XT149-3313 Engine View Diagrams & Manuals
Show More Compatible Models
This item works with the following types of products:
- Engine Parts
Customer Part Reviews ?
Questions & Answers ?
Our customer Service team is at the ready daily to answer your part and product questions.

Ask our Team
We have a dedicated staff with decades of collective experience in helping customers just like you purchase parts to repair their products.
Does this fit my product?Questions & Answers for Gasket, Oil Pan
No questions have been asked yet
Customer Repair Instructions ?
All our customer repair instructions are solicited directly from other customers just like you who have purchased and replaced this exact part.
Leaking oil around the oil pan gasket.
Bill - July 22, 2020
Tool Type
Lawn Mower
Difficulty
Medium
Time
1-2 hours
Tools Used
Socket set, Pry bar, hammer, putty knife/scraper, block of wood
Watched the YouTube video on replacing the gasket on a Kohler 149cc engine. Followed the steps as suggested. The only problem encountered was that the governor did NOT work after reassembly. Thinking I had omitted a step along the way, I reordered the seal and gasket, took the engine apart again and carefully followed the video reassembly steps. Same result. Unless you only need a minor part, I would NOT suggest taking a Kohler engine apart--a brand new one can be obtained for around $120. Used a wire tie to "hold" the governor at about 3000 RPM and it does run well w/o leaking.
Did you find this story helpful?
Thanks for voting and helping fellow customers!
Oil pan gasket leaked
Jim - April 12, 2020
Tool Type
Engine
Difficulty
Medium
Time
More than 2 hours
Tools Used
Screwdriver, Pliers, Socket set, Wrench Set, Torque wrench, rubber mallet, hammer
1. Drained oil and gasoline.
2. Removed engine from lawn mower (with some help from YouTube).
3. Removed oil seal.
4. Unbolted and removed oil pan.
5. Found factory had installed wrong gasket, removed, and cleaned surfaces.
6. Installed new gasket. Fit perfectly.
7. Installed oil pan and torqued bolts (again with help from YouTube).
8. Installed oil seal.
9. Installed engine onto mower.
10. Refilled with oil and gasoline.
11. Started engine and checked for leaks. Found none.
Did you find this story helpful?
Thanks for voting and helping fellow customers!
Oil leak
James - March 11, 2020
Tool Type
Engine
Difficulty
Medium
Time
30-60 minutes
Tools Used
Power Drill, Socket set, Wrench Set, Nutdriver
Parts Used
I watched a YouTube video, was exactly the same oil pan leak and gasket cracked in the same place.
Did you find this story helpful?
Thanks for voting and helping fellow customers!
Oil was leaking from the Oil Pan Gasket.
Phillip - March 10, 2019
Tool Type
Lawn Mower
Difficulty
Medium
Time
1-2 hours
Tools Used
Screwdriver, Socket set, Nutdriver, Torque Wrench
1. I disconnected the spark plug wire
2. I drained the Fuel from the gas tank.
3. I drained the remaining oil from the crankcase
4. I disconnected the cable from the engine
5. I removed the blade and the blade clutch (I used a wheel puller)
6. I removed the engine to bring it to a workspace.
7. I cleaned the shaft so that the pan could be pulled off past it.
8. Using an 8mm socket wrench I removed the 7 bolts holding the pan in place.
9. I pulled the pan off the bottom of the crankshaft.
10. I removed the old seal cleaned all of the mateing surfaces and installed a new gasket using gasket compound.
11. I hand tightened the pan bolts in a cross cross pattern and then torqued them to spec.
12. I oiled the new shaft seal and drove it into place.
13. I reinstalled the engine in the reverse order of removal.
14. I adjusted the cable for the drive belt and installed the new cable guide and training shield.
15. I put oil in the crankcase, fuel in the tank and tried to start the engine.
16. I pulled the starter rope 15 to 20 time and then remembered to put the spark plug cable back on .
17. I mowed my yard and parked the mower over paper towels. There were no leaks evident the next day.
Did you find this story helpful?
Thanks for voting and helping fellow customers!
Oil pan gasket was leaking and did some maintenance while it was down
Shannon - September 23, 2018
Tool Type
Lawn Mower
Difficulty
Easy
Time
30-60 minutes
Tools Used
Socket set, Wrench Set, Nutdriver, Impact driver
1. Took the engine off the mower deck
2. Remove the blade from the engine
3.Drain the oil from engine
4.Remove the oil pan and clean old gasket off
5.Change old oil seal out of pan
6.Put new gasket on pan and resemble it
7.Reinstall engine to mower deck
8.Install new blade
9.Install new air filter
10.Install new rope
2. Remove the blade from the engine
3.Drain the oil from engine
4.Remove the oil pan and clean old gasket off
5.Change old oil seal out of pan
6.Put new gasket on pan and resemble it
7.Reinstall engine to mower deck
8.Install new blade
9.Install new air filter
10.Install new rope
Did you find this story helpful?
Thanks for voting and helping fellow customers!
OEM stands for Original Equipment Manufacturer and means the part you’re buying is sourced directly from the manufacturer who made your product. At eReplacementParts, we sell only genuine OEM parts, guaranteeing the part you’re purchasing is of better design and of higher quality than aftermarket parts.
Our product descriptions are a combination of data sourced directly from the manufacturers who made your product as well as content researched and curated by our content & customer service teams. This content is edited and reviewed internally before being made public to customers.
Our customer service team are at the ready daily to answer your part and product questions. We have a dedicated staff with decades of collective experience in helping customers just like you purchase parts to repair their products.
All our part reviews are solicited directly from other customers who have purchased this exact part. While we moderate these reviews for profanity, offensive language or personally identifiable information, these reviews are posted exactly as submitted and no alterations are made by our team.
All our customer repair instructions are solicited directly from other customers just like you who have purchased and replaced this exact part. While we moderate these reviews for profanity, offensive language or personally identifiable information, these reviews are posted exactly as submitted and no alterations are made by our team.
Based on data from past customer purchasing behaviors, these parts are most commonly purchased together along with the part you are viewing. These parts may be necessary or helpful to replace to complete your current repair.
All our installation videos are created and produced in collaboration with our in-house repair technician, Mark Sodja, who has helped millions of eReplacementParts customers over the last 13 years repair their products. Mark has years of experience in selling and repairing both commercial and residential products with a specialty in gas-powered equipment.
This data is collected from customers who submitted a repair instruction after replacing this exact part. Customers can rate how easy the repair was to complete and how long it took. We aggregate this data to provide a repair rating that allows customers to quickly determine the difficulty and time needed to perform their own repair.