eReplacementParts.com
877-346-4814
Metabo Parts
Repair Parts Home
  
Power Tool Parts
  
Metabo Parts
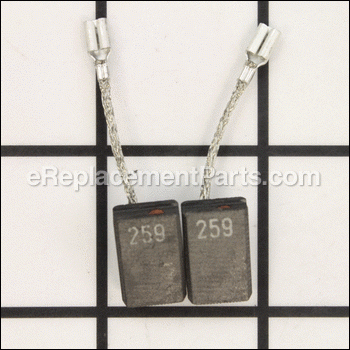
  316046900 Carbon Brush Set Cut-off

Carbon Brush Set Cut-off 316046900

OEM part for: Metabo

Part Number: 316046900


Install
Videos!
Carbon Brush Set Cut-off - 316046900:Metabo 360 View
Carbon Brush Set Cut-off - 316046900:MetaboCarbon Brush Set Cut-off - 316046900:MetaboCarbon Brush Set Cut-off - 316046900:MetaboCarbon Brush Set Cut-off - 316046900:Metabo 360 View
Usually ships in 7 - 12 business days
Leaves our warehouse within
7 - 12 business days
Easy 15-30 minutes (17 rated repairs)?
OEM: Original Equipment Manufacturer ?
Metabo
Does this d-block d-md-none fit my product?

Product Description ?

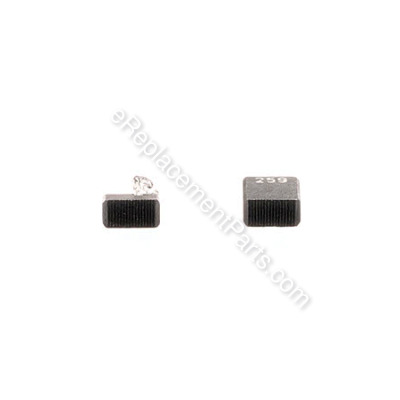
This is a genuine Metabo replacement part, it is sold as a set (2).

Worn brushes frequently are the cause behind a motor running poorly.
• Replacing brushes can fix a motor that’s operating intermittently.
• New brushes can restore a motor’s electric braking.


Carbon brushes are one of the most commonly replaced power tool parts. This is because carbon brushes are wear items, meaning that through friction and use they will gradually wear away until they need replacing. Worn brushes are a common causes of intermittent motor function, reduced electric braking and reduced motor power. A worn-out brush will often be worn down near to the wire lead and can be cracked, pitted, or burned. When replacing carbon brushes, be sure to inspect your armature for burns, cracks, or other damage which can indicate larger motor problems.

  • Classification: Part
  • Weight: 0.01 lbs.
  • Also Known As: Motor Brush Set
  • Shipping: Ships Worldwide

Frequently Purchased Together ?

Compatibility

This part will fit the following 21 machines

Metabo

W8-115 (00259420) 800W Angle Grinder View Diagrams & Manuals
W8-115Quick (00264420) 800W Angle Grinder View Diagrams & Manuals
W8-125 (00263420) 850W Angle Grinder View Diagrams & Manuals
W8-125Quick (00266420) 800W Angle Grinder View Diagrams & Manuals
W11-125Quick (00270420) 1100W Angle Grinder View Diagrams & Manuals
W11-150Quick (00271420) 1100W Angle Grinder View Diagrams & Manuals
WE9-125Quick (00269420) 950W Angle Grinder View Diagrams & Manuals
WE14-125Plus (00281420) 1400W Angle Grinder View Diagrams & Manuals
WE14-150Plus (00286420) 1400W Angle Grinder View Diagrams & Manuals
WE14-150Quick (00160420) 1400W Angle Grinder View Diagrams & Manuals
WP8-115 (600267420) 850W Angle Grinder View Diagrams & Manuals
WEP 14-150 QuickProtect (600290420) 1400 Watt Angle Grinder View Diagrams & Manuals
WE14-125VS (00292420) Electric Variable Speed Grinder View Diagrams & Manuals
WE 14-150 Quick (00160421) 1400W Angle Grinder View Diagrams & Manuals
GE 710 Plus 6.4 Amp Die Grinder View Diagrams & Manuals
WEPBA 14-150 QuickProtect (00322420) Angle Grinder View Diagrams & Manuals
GE 950 G Plus (00618420) Straight Grinder View Diagrams & Manuals
WEF 9-125 (13060420) Small Angle Grinder View Diagrams & Manuals
WEF 9-125 (21023420) Small Angle Grinder View Diagrams & Manuals
RS 14-125 (603824750) 120V Renovation Grinder View Diagrams & Manuals
GEP710 PLUS (600617420) Die Grinder View Diagrams & Manuals
Show More Compatible Models
Don't see yours? Try searching our site for :

This item works with the following types of products:

  • Grinder Parts

This part replaces obsolete part #: 316046800, 316041640

Customer Part Reviews ?

5
Average Rating (out of 5):
8 Reviews
Click to filter by ratings:
5 stars
8
4 stars
0
3 stars
0
2 stars
0
1 stars
0
  • Highest Rating
  • Most Recent
< PREV
  • 1
NEXT >
  • Prompt!
    Shipping was quick, part was exact and order confirmation with shipping updates were timely. Very user friendly. I will continue to use eReplacement.
    Guest - October 21, 2020 Verified Purchase
    optimistic results
    Unable to identify the old metabo serial or model number, I searched through all the thumbnail brush pictures on your site. I found 1 pic that had one of numbers that was on my brushes. I took a chance and ordered the set. They fit perfectly and the grinder runs like new.
    Guest - September 14, 2020 Verified Purchase
    Worked as expected
    Right part and arrived ahead of time.
    Guest - January 13, 2020 Verified Purchase
    Working again
    The price was great and ordering was easy(even with a P.O.).
    Guest - October 1, 2019 Verified Purchase
    great parts and arrived on time
    everything was good
    Guest - September 23, 2019 Verified Purchase
    Direct replacement. Fits as expected.
    As good as brand new!
    iGlobal - September 20, 2019 Verified Purchase
    Worked good
    Had to sand 1 brush slightly for smooth movement, not a big deal. Once reassembled grinder ran like new.
    Stan - June 17, 2019 Verified Purchase
    Perfect Fit
    The whole order was perfect and timely.
    Kenneth - June 7, 2019 Verified Purchase
    t
    t
    t - t days ago Verified Purchase
    eReplacementParts Team
    t

    Questions & Answers ?

    Our customer Service team is at the ready daily to answer your part and product questions.

    photo of team member
    Ask our Team

    We have a dedicated staff with decades of collective experience in helping customers just like you purchase parts to repair their products.

    Does this fit my product?

    Questions & Answers for Carbon Brush Set Cut-off


    No questions have been asked yet

    Customer Repair Instructions ?

    All our customer repair instructions are solicited directly from other customers just like you who have purchased and replaced this exact part.

    Easy 15-30 minutes (17 rated repairs)?

    Replaced brushes in 4 1/2" grinders

    Jeff - January 22, 2016
    👍 7 of 8 people found this instruction helpful
    Tool Type

    Grinder

    Difficulty

    Easy

    Time

    Less than 15 minutes

    Tools Used

    Screwdriver, Pliers

    Remove body screws, split grinder body, lift brush spring off of brushes, pull brushes out, disconnect brushes wire connector, reassemble in reverse order
    Did you find this story helpful?
    Thanks for voting and helping fellow customers!

    Damaged power cord

    Lee - September 13, 2016
    👍 3 of 3 people found this instruction helpful
    Tool Type

    Grinder

    Difficulty

    Medium

    Time

    30-60 minutes

    Tools Used

    Screwdriver, Pliers, Torx

    1. Disassemble case
    2. Replace brushes
    3. Solder wire ends on new power cord
    4. Test run
    5. Check for voltage "leakage" from tool body with multi-meter
    Did you find this story helpful?
    Thanks for voting and helping fellow customers!

    The brushes wore out

    James - July 8, 2016
    👍 2 of 2 people found this instruction helpful
    Tool Type

    Grinder

    Difficulty

    Easy

    Time

    Less than 15 minutes

    Tools Used

    Pliers

    Removed old brushes and replaced with new.
    Did you find this story helpful?
    Thanks for voting and helping fellow customers!

    Brushes worn out

    Francis - September 21, 2021
    Tool Type

    Grinder

    Difficulty

    Easy

    Time

    15-30 minutes

    Tools Used

    Screwdriver, Pick

    With grinder unplugged. Removed screws from rear case and removed case halves. Used small “l” shaped pick to unplug brushes. Used same pick to pull retainer springs from brushes and rested spring ends at one side of brush holders. Removed old brushes. Inserted new brushes in holders and put spring ends back on top of brushes. Plugged each brush back onto connectors. Reassembled and screwed rear case back together. Plugged grinder into receptacle and turned it on. Checked operation, OK.
    Did you find this story helpful?
    Thanks for voting and helping fellow customers!

    Brushes were wore out and cord was cut

    Lynn - February 14, 2019
    Tool Type

    Grinder

    Difficulty

    Easy

    Time

    15-30 minutes

    Tools Used

    Screwdriver, Pliers, Nutdriver, solder and iron

    1. removed switch housing with torx driver
    2. lifted brush spring with small screwdriver
    3. pulled brush out with a pair of needle nose pliers
    4. replaced brushes with new ones
    5. remove screws from switch and pull out cord
    6. strip cord to the correct length
    7. solder ends of cord
    8. replace cord
    9. replace switch cover
    Did you find this story helpful?
    Thanks for voting and helping fellow customers!

    switch was bad, needed brushes

    Les - January 24, 2019
    Tool Type

    Grinder

    Difficulty

    Medium

    Time

    15-30 minutes

    Tools Used

    Screwdriver, Pliers

    remover switch and replaced, changed out brushes, replaced bolt that holds blade when changing blades
    Did you find this story helpful?
    Thanks for voting and helping fellow customers!

    Switch failed and shaft lock button needed replacemnt. It fell off and was lost, so couldn't be put back on.

    Dean - January 2, 2019
    Tool Type

    Grinder

    Difficulty

    Easy

    Time

    15-30 minutes

    Tools Used

    , torx bit #20 and #25, needle nose plyers

    The tool housing is easily dismantled. Switch part is a simple plug in part with stab in electrical wire connections. I replaced the brushes as a preemptive measure. Pop the old ones out and pop the new ones in. Needle nose pliers are helpful.
    Did you find this story helpful?
    Thanks for voting and helping fellow customers!

    Power cord jacket starting to crack open.

    Tommaney - September 25, 2018
    Tool Type

    Grinder

    Difficulty

    Easy

    Time

    15-30 minutes

    Tools Used

    Pliers, Torx wrench, plier and wire stripper cripper.

    Took the covers off just the half on my grinder, blew out all the fine dust accumulation in the housing with air compressor and replace the power cord and brushes, now its is as good as new almost.
    Did you find this story helpful?
    Thanks for voting and helping fellow customers!

    Would not turn on anymore

    Roger - February 13, 2018
    Tool Type

    Grinder

    Difficulty

    Easy

    Time

    15-30 minutes

    Tools Used

    Screwdriver, Pliers, Torx bit/allen wrench

    Took grinder apart. keep track of your parts and screws. I took pictures since this was the first time for me. Found the switch was broken. Ordered new switch and decided to order brushes at the same time "just in case". That turned to be a good decision as once I saw the new brushes I realized that the old ones were just about done. The extra $6-7 bucks was well worth it.
    Installed the new parts and put the grinder back together. Turns on and runs perfectly!
    thanks eReplacementParts!

    RJ
    Did you find this story helpful?
    Thanks for voting and helping fellow customers!

    Brushes wore out

    Paul - August 30, 2017
    Tool Type

    Grinder

    Difficulty

    Easy

    Time

    15-30 minutes

    Tools Used

    Screwdriver, Power Drill, Socket set, Wrench Set

    1 Disassembled grinder
    2 Cleaned all parts
    3 Inspected all parts
    4 Lubed gears
    5 Replaced brushes
    6 Replaced all covers and tested
    Did you find this story helpful?
    Thanks for voting and helping fellow customers!

    OEM stands for Original Equipment Manufacturer and means the part you’re buying is sourced directly from the manufacturer who made your product. At eReplacementParts, we sell only genuine OEM parts, guaranteeing the part you’re purchasing is of better design and of higher quality than aftermarket parts.

    Our product descriptions are a combination of data sourced directly from the manufacturers who made your product as well as content researched and curated by our content & customer service teams. This content is edited and reviewed internally before being made public to customers.

    Our customer service team are at the ready daily to answer your part and product questions. We have a dedicated staff with decades of collective experience in helping customers just like you purchase parts to repair their products.

    All our part reviews are solicited directly from other customers who have purchased this exact part. While we moderate these reviews for profanity, offensive language or personally identifiable information, these reviews are posted exactly as submitted and no alterations are made by our team.

    All our customer repair instructions are solicited directly from other customers just like you who have purchased and replaced this exact part. While we moderate these reviews for profanity, offensive language or personally identifiable information, these reviews are posted exactly as submitted and no alterations are made by our team.

    Based on data from past customer purchasing behaviors, these parts are most commonly purchased together along with the part you are viewing. These parts may be necessary or helpful to replace to complete your current repair.

    All our installation videos are created and produced in collaboration with our in-house repair technician, Mark Sodja, who has helped millions of eReplacementParts customers over the last 13 years repair their products. Mark has years of experience in selling and repairing both commercial and residential products with a specialty in gas-powered equipment.

    This data is collected from customers who submitted a repair instruction after replacing this exact part. Customers can rate how easy the repair was to complete and how long it took. We aggregate this data to provide a repair rating that allows customers to quickly determine the difficulty and time needed to perform their own repair.

    eReplacementParts.com
    7174 South 400 West
    Suite 5
    Midvale, UT 84047
    visa mastercard discover american express PayPal