
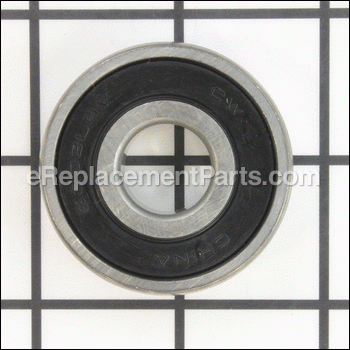
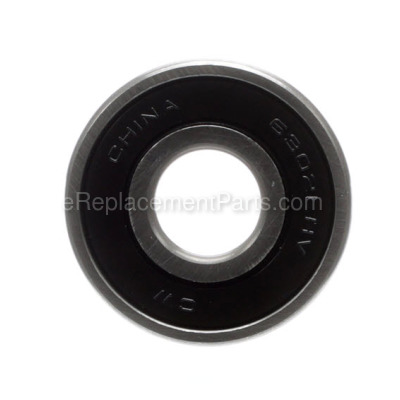


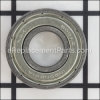
This Ball Bearing is sealed on both sides. It is a genuine DeWalt replacement part and is sold individually.
Ball Bearing N127530
OEM part for: DeWALT
Part Number: N127530
$11.93
In Stock
Jump To:
Product Description ?
- Classification: Part
- Weight: 0.12 lbs.
- Shipping: Ships Worldwide
Frequently Purchased Together ?


Compatibility
This part will fit the following 61 machines
DeWALT
DW706 Type 1 12 Dual Bevel Miter Saw View Diagrams & Manuals
DW708 Type 1 Crosscut Miter Saw View Diagrams & Manuals
DW708 Type 3 Crosscut Miter Saw View Diagrams & Manuals
DW708 Type 4 Crosscut Miter Saw View Diagrams & Manuals
DW716 Type 1 Miter Saw View Diagrams & Manuals
DW716 Type 2 Miter Saw View Diagrams & Manuals
DW718 Type 1 Miter Saw View Diagrams & Manuals
DW718 Type 2 Miter Saw View Diagrams & Manuals
DW717 10" Miter Saw View Diagrams & Manuals
DW716 Type 3 Miter Saw View Diagrams & Manuals
DW718 Type 3 Miter Saw View Diagrams & Manuals
DWS780 Type 1 12in Compound Miter Saw View Diagrams & Manuals
DW716 Type 4 12" Miter Saw View Diagrams & Manuals
DW716 Type 20 12" Miter Saw View Diagrams & Manuals
DWS782 (Type 20) 12" Double Bevel Sliding Compound Miter Saw View Diagrams & Manuals
DWS709 (Type 20) 12in Bevel Miter Saw View Diagrams & Manuals
DWS779 (Type 20) 12in Doubl Bevel Saw View Diagrams & Manuals
DW716XPS (Type 20) 12-In. Miter Saw View Diagrams & Manuals
DW708-B2 (Type 2) Mitre Saw Power Tool View Diagrams & Manuals
DW708-BR (Type 2) Mitre Saw Power Tool View Diagrams & Manuals
DW717-AR (Type 1) Mitre Saw Power Tool View Diagrams & Manuals
DW717-AR (Type 2) Mitre Saw Power Tool View Diagrams & Manuals
DW717-B2 (Type 2) Mitre Saw Power Tool View Diagrams & Manuals
DW717 (Type 1) Mitre Saw Power Tool View Diagrams & Manuals
DW718-AR (Type 1) Mitre Saw Power Tool View Diagrams & Manuals
DW718-AR (Type 2) Mitre Saw Power Tool View Diagrams & Manuals
DW718-AR (Type 3) Mitre Saw Power Tool View Diagrams & Manuals
DW718-AR (Type 4) Mitre Saw Power Tool View Diagrams & Manuals
DW718-B2 (Type 1) Mitre Saw Power Tool View Diagrams & Manuals
DW718-B2 (Type 2) Mitre Saw Power Tool View Diagrams & Manuals
DW718-B2 (Type 3) Mitre Saw Power Tool View Diagrams & Manuals
DW718-B2 (Type 4) Mitre Saw Power Tool View Diagrams & Manuals
DWS713-AR (Type 20) Mitre Saw Power Tool View Diagrams & Manuals
DWS713-B2 (Type 20) Mitre Saw Power Tool View Diagrams & Manuals
DWS713-B3 (Type 20) Mitre Saw Power Tool View Diagrams & Manuals
DWS713-BR (Type 20) Mitre Saw Power Tool View Diagrams & Manuals
DWS713 (Type 20) Mitre Saw Power Tool View Diagrams & Manuals
DWS715-AR (Type 20) Mitre Saw Power Tool View Diagrams & Manuals
DWS715-B2 (Type 20) Mitre Saw Power Tool View Diagrams & Manuals
DWS715-B3 (Type 20) Mitre Saw Power Tool View Diagrams & Manuals
DWS715-BR (Type 20) Mitre Saw Power Tool View Diagrams & Manuals
DWS715 (Type 20) Mitre Saw Power Tool View Diagrams & Manuals
DWS780-AR (Type 1) Mitre Saw Power Tool View Diagrams & Manuals
DWS780-AR (Type 20) Mitre Saw Power Tool View Diagrams & Manuals
DWS780-B2 (Type 1) Mitre Saw Power Tool View Diagrams & Manuals
DWS780-B2 (Type 20) Mitre Saw Power Tool View Diagrams & Manuals
DWS780 (Type 20) Mitre Saw Power Tool View Diagrams & Manuals
D25614K-AR (Type 1) 6kg 45mm Sds Max Combi Rotary Hammer Power Tool View Diagrams & Manuals
D25614K-B2 (Type 1) 6kg 45mm Sds Max Combi Rotary Hammer Power Tool View Diagrams & Manuals
D25614K-B2C (Type 1) 6kg 45mm Sds Max Combi Rotary Hammer Power Tool View Diagrams & Manuals
D25614K-B3 (Type 1) 6kg 45mm Sds Max Combi Rotary Hammer Power Tool View Diagrams & Manuals
D25614K-BR (Type 1) 6kg 45mm Sds Max Combi Rotary Hammer Power Tool View Diagrams & Manuals
DCH614B (Type 1) 60v Max 1-3/4 In. Sds Max Brushless Combination Rotary Hammer Power Tool View Diagrams & Manuals
DCH614X2 (Type 1) 60v Max 1-3/4 In. Sds Max Brushless Combination Rotary Hammer Power Tool View Diagrams & Manuals
D25614K (Type 1) 1-3/4 Sds Mx Cmb Ham Power Tool View Diagrams & Manuals
D25832K-AR (Type 1) Chipping Hammer Power Tool View Diagrams & Manuals
D25832K-B2 (Type 1) Chipping Hammer Power Tool View Diagrams & Manuals
D25832K-B2C (Type 1) Chipping Hammer Power Tool View Diagrams & Manuals
D25832K-B3 (Type 1) Chipping Hammer Power Tool View Diagrams & Manuals
D25832K-BR (Type 1) Chipping Hammer Power Tool View Diagrams & Manuals
D25832K (Type 1) Chipping Hammer Power Tool View Diagrams & Manuals
Show More Compatible Models
This item works with the following types of products:
- Miter Saw Parts
- Saw Parts
This part replaces obsolete part #: 605040-32, 330003-48
Customer Part Reviews ?
Average Rating (out of 5):
Click to filter by ratings:
5 stars
18
4 stars
1
3 stars
1
2 stars
0
1 stars
0
< PREV
- 1
- 2
Easy repair
Saved me from purchasing new saw
Guest -
March 22, 2024
Verified Purchase
718 dewalt Bearing.
Perfect order. !
Bearing worked perfect. Simple order, short return time. All worked out great ! 5 stars ! My next order is with tou. Thank you.!!!
Guest -
July 25, 2023
Verified Purchase
Good part.
Fit perfectly.
Guest -
July 24, 2023
Verified Purchase
look good
bought two different bearings that look very good. haven't installed them yet but I'm sure they'll be fine. decent price.
Guest -
May 14, 2023
Verified Purchase
The right part & fixed my problem
Part arrived on time and fit perfectly. Also, it would have been very difficult to replace this part without the video.
Guest -
October 18, 2022
Verified Purchase
Miter saw back in business!
Got the right parts needed to repair my 20 year old DeWalt miter saw. Arrived sooner than promised. Very pleased customer and will call on you again in the future.
Guest -
June 20, 2022
Verified Purchase
PURCHASE CAME AHEAD OF SCHEDULE.
WHILE TAKING SOME EFFORT TO INSTALL AS TIGHT-FITTING BEARINGS DO, IT SAVED MY SEVEN HUNDRED DOLLAR SAW.
robert -
April 18, 2022
Verified Purchase
part n127530 replacement
once I figured out the correct part I would need ( I struggled understanding your parts drawing), spending 20 bucks instead of 400(for a new saw) put a smile on my face. thanks
Guest -
April 12, 2022
Verified Purchase
the part fit like a glove
Part came fast and was perfect fit
Rich -
February 15, 2022
Verified Purchase
Armature shaft bearing replacement.
Dewalt 12” sliding compound miter saw. Couldn’t get any help from Dewalt but e-replacement gave me quick, easy access to parts diagrams and parts lists. Easy ordering process and fast delivery, very fair price. I’ve ordered lots of parts from e-replacement for lots of different tools. Easy, quick, and fair every time.
Guest -
February 3, 2022
Verified Purchase
t
t
t -
t days ago
Verified Purchase
eReplacementParts Team
t
Questions & Answers ?
Our customer Service team is at the ready daily to answer your part and product questions.

Ask our Team
We have a dedicated staff with decades of collective experience in helping customers just like you purchase parts to repair their products.
Does this fit my product?Questions & Answers for Ball Bearing
Do you have on stock this bearing size 1.65 OD , .59 ID. ?
Esteban
for model number Dewalt mitre saw
asked on 2023-03-30
Hi Esteban,
Thank you for your question. Before we can provide you with information on the ball bearing, we will need the model number from your miter saw. We will also need to know where the ball bearing is located in the miter saw. The model number will usually be found on a warning label with the model number in the upper left corner. If there is a type number listed for it, it will be found below the model number. If you could resubmit your question with this information, we would be happy to help you. We look forward to hearing from you!
eReplacementParts Team March 30, 2023
What is the dimensions on this part, because I don't have the model number on the DeWALT miter saw, but the bearing has this number 6302LB
Esteban
asked on 2023-03-27
Hello Esteban, Thank you for the question. This Bearing has a ID of 0.78" and a OD of 1.65". We hope this helps!
eReplacementParts Team March 27, 2023
Fit on my DWS709 12"( 305mm )DOUBLE BEVEL SLIDING COMPOUND MITER SAW
Juan
asked on 2023-03-07
Hello Juan, Thank you for your inquiry. We show this bearing is compatible with a DWS709 type 20. We hope this helps.
eReplacementParts Team March 07, 2023
Not sure of the type? But there is a date of 2014 stamped on it. Could you help me with the type
Scott
for model number Dws780
asked on 2022-10-03
Hello Scott, Thank you for the question. The type number is located on the sticker or tag the model number is printed on. We hope this solves your problem!
eReplacementParts Team October 03, 2022
Customer Repair Instructions ?
All our customer repair instructions are solicited directly from other customers just like you who have purchased and replaced this exact part.
Bad bearing (closest to output shaft) on main-shaft/motor arbor.
John - November 18, 2015
👍 35 of 37 people found this instruction helpful
Tool Type
Chop Saw
Difficulty
Medium
Time
30-60 minutes
Tools Used
Screwdriver, Power Drill, Dremel tool with cut-off wheel
Parts Used
Bearing on output side of motor seized (saw used daily in an industrial shop). Housing disassembly easy. Loosen commutator brushes (held in place with flat springs) before removing motor arbor. Not enough clearance between the fan, which is white plastic, and the bearing to get a gear/bearing-puller tool to get a bite on the bearing, so I cut the bearings (I replaced both output and butt-end) with a cut-off disc on a Dremel tool. Installed the new bearings and reassembled. Total time, less than an hour. Cutting the bearings was the hinkiest part of the job, so took the bulk of the time. When putting the metal cap back on the motor, pay attention to the correct orientation of the cap to the tension adjustment that it mates with on the arm frame. Before disassembling, make a mark on both parts so you will know which way it goes on when reassembling.
Did you find this story helpful?
Thanks for voting and helping fellow customers!
The bearing went bad and was making an awful racket
Andrew - October 31, 2016
👍 11 of 11 people found this instruction helpful
Tool Type
Miter Saw
Difficulty
Medium
Time
30-60 minutes
Tools Used
Screwdriver, Impact driver, sockets, hammer, vise
Parts Used
Removed the belt cover,
Removed the blade guard,
Removed the cover that hides the wires,
Removed whole motor assembly,
Removed the inner part of the motor with the bearing on it,
Clamped the bearing in the vise and tapped the motor/spindle through it,
Put wood on the vice clamps and clamped the motor/spindle,
Place the new bearing on the spindle and used an appropriate size socket to just get the inner race to tap the bearing into place,
Reassemble in reverse order.
You can adjust belt tension with the screw on the top towards the back of the motor.
Did you find this story helpful?
Thanks for voting and helping fellow customers!
Very rough sounding motor.
Eldon - March 26, 2016
👍 13 of 15 people found this instruction helpful
Tool Type
Miter Saw
Difficulty
Hard
Time
1-2 hours
Tools Used
Pliers, Impact driver, hex wrenchs, torx wrenchs, bearing puller.
Parts Used
Remove belt cover. Loosen torx screws that hold motor to housing. (6 or 8). Loosen hex screw on back side of motor. Slide motor forward to remove belt. Remove the screw that holds the pulley to the armature. (right hand thread). Remove the snap ring. Remove the end cap on the motor to remove the brushes. Remove the side cover next to the motor that hides the power cord (4 torx screws). Remove the 4 long torx screws that hold the motor housing to the frame. Remove housing and field by pulling toward you. Pull the armature out of frame. Pull off the bad bearing and press on the new bearing. Assemble in reverse order. Note: tighten the hex screw on the back side of motor to adjust the belt. Don't over tighten the belt or it will take out the new bearing.
Did you find this story helpful?
Thanks for voting and helping fellow customers!
Ruined bearing causing noise and lockup
Fran - March 22, 2016
👍 8 of 8 people found this instruction helpful
Tool Type
Miter Saw
Difficulty
Medium
Time
30-60 minutes
Tools Used
Screwdriver, Socket set, Wrench Set, bearing splitter
Parts Used
Followed YouTube video to remove old bearing. Required a lot of heat and penetrating oil. Once old bearing was off, reassembly was easy.
https://www.youtube.com/watch?v=zmHgrs9FUwk
https://www.youtube.com/watch?v=uH-uMGA2WWc
https://www.youtube.com/watch?v=zmHgrs9FUwk
https://www.youtube.com/watch?v=uH-uMGA2WWc
Did you find this story helpful?
Thanks for voting and helping fellow customers!
Customer destroyed bearing cutting bricks. Spun motor main bearing in casting.
Jim - November 29, 2017
👍 3 of 3 people found this instruction helpful
Tool Type
Miter Saw
Difficulty
Medium
Time
30-60 minutes
Tools Used
Screwdriver, Gear puller, torch, snap ring pliers, deadblow hammer, Torx
Remove what was left of belt housing.
Free electric cables.
Remove top of handle/trigger assembly.
Remove brushes and tail cover of armature.
Remove motor housing to free armature and clean all debris.
Use torch to expand belt pulley and remove from shaft.
Remove snap ring and use pullers to remove bearings from each end of armature.
Replace bearings on shaft, replace snap ring and heat pulley to reinstall.
Spray main bearing with mold release and wipe steel filled epoxy in spun bearing pocket of arm casting.
Reinstall motor *with armature* while checking for excess epoxy squeeze out.
Reinstall brushes, end cap and handle.
Reattach cables.
Loosen belt adjustment, install belt, and tension.
Install belt cover being careful it fits up correctly beneath handle.
Test for proper function.
Did you find this story helpful?
Thanks for voting and helping fellow customers!
Saw operation was very loud, and it was difficult to turn the blade when the machine was off.
Daniel - October 18, 2017
👍 2 of 2 people found this instruction helpful
Tool Type
Miter Saw
Difficulty
Hard
Time
More than 2 hours
Tools Used
Screwdriver, Pliers, Socket set, Wrench Set, Torx wrenches, pulley/gear puller
Remove the belt cover and motor cap.
Loosen the motor and belt tensioner and remove the belt.
Remove the motor using the 4 outside bolts not the six inside bolts.
Pull the winding assembly out
Using. pulley or gear puller, remove the belt pulley and large bearing. Note that there is about 1/16 inch clearance between the large bearing and the cooling fan.
Wire brush axle and install new bearing using a deep well socket or pipe that meets the bearing at the inner bushing. Hitting the bearing from the outside can damage it
Replace the pulley.
Repeat process for small bearing and reassemble the motor being careful not to damage the brushes when you reseat the winding assembly.
Did you find this story helpful?
Thanks for voting and helping fellow customers!
Bearing went bad on Dewalt chop saw
Jason - February 19, 2018
👍 1 of 1 people found this instruction helpful
Tool Type
Chop Saw
Difficulty
Medium
Time
30-60 minutes
Tools Used
Screwdriver, Pliers, Socket set, Snap Ring Pliers
Removed drive belt cover
Removed drive belt
Removed motor cover with armature
Removed armature from housing
Used bearing separator and press to remove drive pulley, then damaged bearing.
Inner race of bearing was very tight so we thinned it with a carbide burr and broke it off the shaft
Retaining screw for drive pulley was installed with Loctite, had to heat to soften Loctite and remove.
Only the large bearing was bad but I replaced both while apart
Reassembled in reverse order.
Helpful to have some experience
Did you find this story helpful?
Thanks for voting and helping fellow customers!
Kerf plate endured 10 yrs of use, saw slid off bench in vehicle cargo area which broke the handle, bearing noise from normal use signaled problems
Steve - February 3, 2018
👍 1 of 1 people found this instruction helpful
Tool Type
Miter Saw
Difficulty
Medium
Time
30-60 minutes
Tools Used
Screwdriver, Nutdriver
1) Kerf plate
2) Handle replacement, not a problem, just note where wires run.
3) Bearing replacement - ouch. Could have gone really well, however, the screw that held the belt pulley broke in the armature spindle. Recommend using a hand driver or ratchet rather than an impact driver because you'll likely figure out that heat or some sort of penetrating oil is required before you break off the pulley screw. The general steps of this repair are not difficult if you have a bearing puller and a press - provided you have more patience than I did.
Did you find this story helpful?
Thanks for voting and helping fellow customers!
Horrible noise and slight binding on engagement and slow down
Aaron - December 20, 2017
👍 1 of 1 people found this instruction helpful
Tool Type
Miter Saw
Difficulty
Easy
Time
30-60 minutes
Tools Used
Power Drill, Hammer, bearing splitter, 2 jaw puller, good vise
Remove side belt cover, remove pulley from motor arbor, remove miter from frame, remove arbor from motor, break outer bearing race in the vise, attach bearing splitter carefully between inner bearing race and plastic cooling fan, use puller to remove inner bearing race, with the proper size piece of DOM tubing or good socket gently press on new bearing, reassemble..
Did you find this story helpful?
Thanks for voting and helping fellow customers!
Loud grinding noise.
sky - December 3, 2017
👍 1 of 1 people found this instruction helpful
Tool Type
Chop Saw
Difficulty
Medium
Time
30-60 minutes
Tools Used
Screwdriver, Pliers, Oxy/acy torch, gear puller
1. Removed the plastic belt cover.
2. Loosened and removed the belt.
3. Removed the motor.
4. Removed the brushes.
5. Pulled out the armature.
6. Used a torch and a gear puller to remove the grooved pulley to access the bad bearing. 7. Replaced the bearing and reassembled.
2. Loosened and removed the belt.
3. Removed the motor.
4. Removed the brushes.
5. Pulled out the armature.
6. Used a torch and a gear puller to remove the grooved pulley to access the bad bearing. 7. Replaced the bearing and reassembled.
Did you find this story helpful?
Thanks for voting and helping fellow customers!
Load More Install Stories
OEM stands for Original Equipment Manufacturer and means the part you’re buying is sourced directly from the manufacturer who made your product. At eReplacementParts, we sell only genuine OEM parts, guaranteeing the part you’re purchasing is of better design and of higher quality than aftermarket parts.
Our product descriptions are a combination of data sourced directly from the manufacturers who made your product as well as content researched and curated by our content & customer service teams. This content is edited and reviewed internally before being made public to customers.
Our customer service team are at the ready daily to answer your part and product questions. We have a dedicated staff with decades of collective experience in helping customers just like you purchase parts to repair their products.
All our part reviews are solicited directly from other customers who have purchased this exact part. While we moderate these reviews for profanity, offensive language or personally identifiable information, these reviews are posted exactly as submitted and no alterations are made by our team.
All our customer repair instructions are solicited directly from other customers just like you who have purchased and replaced this exact part. While we moderate these reviews for profanity, offensive language or personally identifiable information, these reviews are posted exactly as submitted and no alterations are made by our team.
Based on data from past customer purchasing behaviors, these parts are most commonly purchased together along with the part you are viewing. These parts may be necessary or helpful to replace to complete your current repair.
All our installation videos are created and produced in collaboration with our in-house repair technician, Mark Sodja, who has helped millions of eReplacementParts customers over the last 13 years repair their products. Mark has years of experience in selling and repairing both commercial and residential products with a specialty in gas-powered equipment.
This data is collected from customers who submitted a repair instruction after replacing this exact part. Customers can rate how easy the repair was to complete and how long it took. We aggregate this data to provide a repair rating that allows customers to quickly determine the difficulty and time needed to perform their own repair.