eReplacementParts.com
877-346-4814
DeWALT Parts
Repair Parts Home
  
Power Tool Parts
  
DeWALT Parts
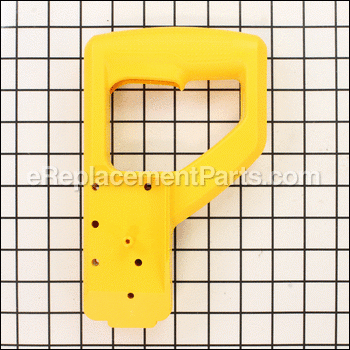
  394075-00 Handle Assembly

Handle Assembly 394075-00

OEM part for: DeWALT

Part Number: 394075-00


Install
Videos!
Handle Assembly - 394075-00:DeWALT 360 View
Handle Assembly - 394075-00:DeWALTHandle Assembly - 394075-00:DeWALTHandle Assembly - 394075-00:DeWALT 360 View
In Stock
Order within the next 5 hours and your part ships today!
Easy 15-30 minutes (9 rated repairs)?
OEM: Original Equipment Manufacturer ?
DeWALT
Does this d-block d-md-none fit my product?

Product Description ?

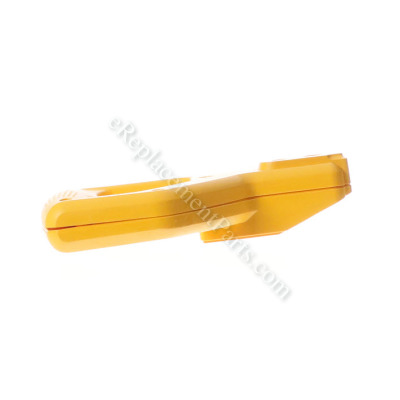
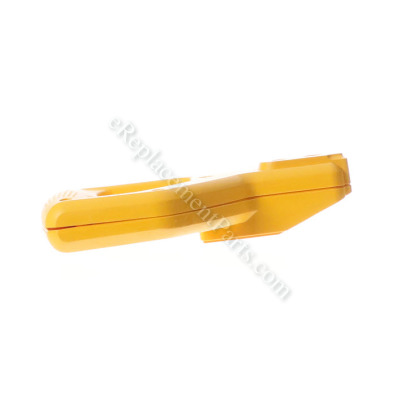
This operating handle assembly is an authentic Dewalt replacement part. It is specially manufactured for use on miter saws. It provides user with a stable grip of a saw allowing for safe operation. This is a yellow plastic handle that is sold individually. Please note, it does not include the hardware to secure it, screws that hold the handle to the frame are sold separately.

To complete this repair job you should only need a screwdriver.

• Make sure there is now power going to the equipment
• Remove screws that secure the old handle
• Remove old handle
• Secure the new handle using the screws

  • Classification: Part
  • Weight: 0.52 lbs.
  • Shipping: Ships Worldwide

Frequently Purchased Together ?

Compatibility

This part will fit the following 1 machine

DeWALT

DW706 Type 1 12 Dual Bevel Miter Saw View Diagrams & Manuals
Don't see yours? Try searching our site for :

This item works with the following types of products:

  • Miter Saw Parts
  • Saw Parts

Customer Part Reviews ?

5
Average Rating (out of 5):
9 Reviews
Click to filter by ratings:
5 stars
9
4 stars
0
3 stars
0
2 stars
0
1 stars
0
  • Highest Rating
  • Most Recent
< PREV
  • 1
NEXT >
  • saw handle
    The part was easy to locate in the parts list and it fit perfect. Thank you.
    Guest - June 20, 2022 Verified Purchase
    Exact replacement parr
    Shipment arrived promptly and in excellent condition. After installation my device operated as if it was brand new.
    Guest - April 22, 2022 Verified Purchase
    DeWalt handle assemby
    The handle was a perfect fit for my DW706 12" chop saw. It arrived just as described and in a reasonably quick time frame. Now I can put the big dog back to work. I will definitely use you again for replacement parts.
    Daniel - April 12, 2022 Verified Purchase
    Dewalt Miter Box Handle Replacement
    How Sweet It Is... To have my favorite tool back in business. 1 week delivery, perfect fit, 20 minute repair. Thank you, Thank you, Thank you!
    Guest - February 22, 2022 Verified Purchase
    Perfect fit
    This Orem OEM part was a perfect fit. The price was reasonable and the delivery was quick.
    Guest - February 16, 2022 Verified Purchase
    great place good sevice
    great place good sevice
    Guest - June 7, 2021 Verified Purchase
    Prompt service
    Arrived quickly, easy to install
    Pete - April 8, 2021 Verified Purchase
    Dewalt Repair
    Excellent and prompt service. Great communications
    Guest - April 27, 2020 Verified Purchase
    Works great.
    The part fit up perfectly and works like new
    Guest - December 2, 2019 Verified Purchase
    t
    t
    t - t days ago Verified Purchase
    eReplacementParts Team
    t

    Questions & Answers ?

    Our customer Service team is at the ready daily to answer your part and product questions.

    photo of team member
    Ask our Team

    We have a dedicated staff with decades of collective experience in helping customers just like you purchase parts to repair their products.

    Does this fit my product?

    Questions & Answers for Handle Assembly


    No questions have been asked yet

    Customer Repair Instructions ?

    All our customer repair instructions are solicited directly from other customers just like you who have purchased and replaced this exact part.

    Easy 15-30 minutes (9 rated repairs)?

    Handle broken

    Ronald - February 13, 2016
    👍 7 of 8 people found this instruction helpful
    Tool Type

    Miter Saw

    Difficulty

    Medium

    Time

    15-30 minutes

    Tools Used

    Power Drill

    Removed the screws that were connecting the handle to the saw. Then removed the internal parts of the old handle. And reversed the tear down procedure.
    Did you find this story helpful?
    Thanks for voting and helping fellow customers!

    Handle was broken off.

    Paul - November 1, 2017
    👍 1 of 1 people found this instruction helpful
    Tool Type

    Miter Saw

    Difficulty

    Easy

    Time

    15-30 minutes

    Tools Used

    Screwdriver, Torx bits

    Removed the mounting screws and replaced the handle assembly.
    Did you find this story helpful?
    Thanks for voting and helping fellow customers!

    Handle broke.

    TIMOTHY - February 24, 2023
    Tool Type

    Miter Saw

    Difficulty

    Medium

    Time

    30-60 minutes

    Tools Used

    Screwdriver, Nutdriver

    1. Removed old handle.
    2. Installed new handle.
    3. Tested machine.
    Did you find this story helpful?
    Thanks for voting and helping fellow customers!

    Broken handle

    Donald - September 28, 2022
    Tool Type

    Miter Saw

    Difficulty

    Easy

    Time

    15-30 minutes

    Tools Used

    Screwdriver, None

    Removed screws put new handle on Replaced screws
    Did you find this story helpful?
    Thanks for voting and helping fellow customers!

    Handle broke

    Bruce - November 26, 2020
    Tool Type

    Miter Saw

    Difficulty

    Easy

    Time

    15-30 minutes

    Tools Used

    Screwdriver

    Removed eight screws and cord and replaced cord and screws all done plugged it in and it worked,
    Did you find this story helpful?
    Thanks for voting and helping fellow customers!

    Handle was cracked

    Michael - October 17, 2018
    Tool Type

    Miter Saw

    Difficulty

    Easy

    Time

    15-30 minutes

    Tools Used

    , Torx drive

    Removed one torx screw from carry handle
    Removed all torx screws from existing broken control handle
    Removed cracked handle
    Removed wiring without disturbing wire layout
    Installed bottom half of handle assembly
    Placed wires back in track
    Installed top half of handle
    Reinstalled and secured all torx screws
    Reinstalled carry handle
    Did you find this story helpful?
    Thanks for voting and helping fellow customers!

    Replaced Brushes, power cord, and operating handle

    Cameron - July 30, 2018
    Tool Type

    Miter Saw

    Difficulty

    Easy

    Time

    1-2 hours

    Tools Used

    Screwdriver, Pliers

    First remove all screws on top of Operating Handle & Lifting Handle. Once the handles are able to be removed from the saw you will have access to the interior of the operating handle where you can find the trigger switch, etc. Next remove the brush inspection cap to access the brushes. There will be a small spring/tab that holds either brush in place. Move those to either side to allow for extraction of the brushes. I would also recommend taking this time to remove the commutator housing the rest of the way, and clean the carbon off from the previous brushes. This can be done with a little contact cleaner, or any other electrical engine safe cleaner, and 600 - 1000 grit sand paper. Replace the commutator housing, ensure the new brushes are installed, and making good contact with the commutator and replace the inspection cap. Finally, to replace the power cord, with the handle assembly still taken apart remove the terminals from the trigger switch with a screwdriver, and discard the previous incoming power cord. Strip the new cord so that copper is visible, and reattach a new set of terminals to the bare copper. Reattach to the trigger switch using the screw. Replace the pre-existing handle assembly with the new one and replace all screws. New brushes will spark in excess until worn, but make sure new brushes are seating properly, and making good contact with commutator for best performance.
    Did you find this story helpful?
    Thanks for voting and helping fellow customers!

    Saw fell off the stand.

    Ron - April 9, 2018
    Tool Type

    Miter Saw

    Difficulty

    Easy

    Time

    Less than 15 minutes

    Tools Used

    Screwdriver

    Removed the screws, removed the broken handle and reassembled.
    Did you find this story helpful?
    Thanks for voting and helping fellow customers!

    Kerf plate endured 10 yrs of use, saw slid off bench in vehicle cargo area which broke the handle, bearing noise from normal use signaled problems

    Steve - February 3, 2018
    Tool Type

    Miter Saw

    Difficulty

    Medium

    Time

    30-60 minutes

    Tools Used

    Screwdriver, Nutdriver

    1) Kerf plate
    2) Handle replacement, not a problem, just note where wires run.
    3) Bearing replacement - ouch. Could have gone really well, however, the screw that held the belt pulley broke in the armature spindle. Recommend using a hand driver or ratchet rather than an impact driver because you'll likely figure out that heat or some sort of penetrating oil is required before you break off the pulley screw. The general steps of this repair are not difficult if you have a bearing puller and a press - provided you have more patience than I did.

    Did you find this story helpful?
    Thanks for voting and helping fellow customers!

    OEM stands for Original Equipment Manufacturer and means the part you’re buying is sourced directly from the manufacturer who made your product. At eReplacementParts, we sell only genuine OEM parts, guaranteeing the part you’re purchasing is of better design and of higher quality than aftermarket parts.

    Our product descriptions are a combination of data sourced directly from the manufacturers who made your product as well as content researched and curated by our content & customer service teams. This content is edited and reviewed internally before being made public to customers.

    Our customer service team are at the ready daily to answer your part and product questions. We have a dedicated staff with decades of collective experience in helping customers just like you purchase parts to repair their products.

    All our part reviews are solicited directly from other customers who have purchased this exact part. While we moderate these reviews for profanity, offensive language or personally identifiable information, these reviews are posted exactly as submitted and no alterations are made by our team.

    All our customer repair instructions are solicited directly from other customers just like you who have purchased and replaced this exact part. While we moderate these reviews for profanity, offensive language or personally identifiable information, these reviews are posted exactly as submitted and no alterations are made by our team.

    Based on data from past customer purchasing behaviors, these parts are most commonly purchased together along with the part you are viewing. These parts may be necessary or helpful to replace to complete your current repair.

    All our installation videos are created and produced in collaboration with our in-house repair technician, Mark Sodja, who has helped millions of eReplacementParts customers over the last 13 years repair their products. Mark has years of experience in selling and repairing both commercial and residential products with a specialty in gas-powered equipment.

    This data is collected from customers who submitted a repair instruction after replacing this exact part. Customers can rate how easy the repair was to complete and how long it took. We aggregate this data to provide a repair rating that allows customers to quickly determine the difficulty and time needed to perform their own repair.

    eReplacementParts.com
    7174 South 400 West
    Suite 5
    Midvale, UT 84047
    visa mastercard discover american express PayPal