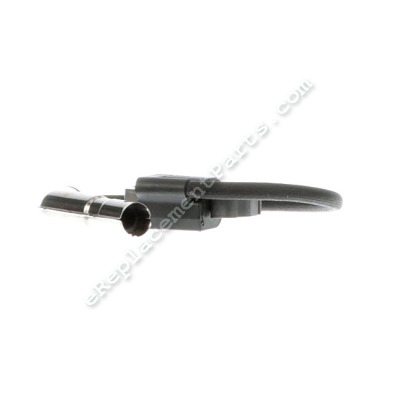


This armature magneto is an authentic manufacturer sourced replacement part. It is specially produced for use with Briggs and Stratton engines. The ignition module provides current for the ignition system by producing pulses of high voltage for the spark plugs. It is made out of metal with rubber cord insulation and it is sold individually. Please note, a spark plug boot is sold separately.
Please note replacing this module would differ based on your unit, however the basic steps would be the same. To complete this repair you will need screwdriver set.
• Remove the housing/covers from the unit
• Remove the spark plug
• Bind the cylinder
• Remove the air filter cover and side cover
• Remove the throttle cable from the carburetor
• Disconnect the wires
• Remove old ignition coil
• Install new ignition coil
• Reassemble and test the unit
Armature-magneto 595304
OEM part for: Briggs and Stratton
Part Number: 595304
Jump To:
Product Description ?
- Classification: Part
- Weight: 0.49 lbs.
- Shipping: Ships Worldwide
Frequently Purchased Together ?


Compatibility
This Armature-magneto will fit the following 3096 machines. Confirm this part works with your model, and view the detailed model diagrams and repair help we have to offer.
Briggs and Stratton
Show More Compatible ModelsThis item works with the following types of products:
- Engine Parts
This part replaces obsolete part #: 592841, 799650, 795315
Customer Part Reviews ?
- 1
Questions & Answers ?
Our customer Service team is at the ready daily to answer your part and product questions.

Ask our Team
We have a dedicated staff with decades of collective experience in helping customers just like you purchase parts to repair their products.
Does this fit my product?Questions & Answers for Armature-magneto
Customer Repair Instructions ?
All our customer repair instructions are solicited directly from other customers just like you who have purchased and replaced this exact part.
Stopped running, defective magneto
Tool Type
Lawn Tractor
Difficulty
Medium
Time
15-30 minutes
Tools Used
Wrench Set
Parts Used
Mower would run for 15 min then die......wait to cool down and it starts the cycle all over.
Tool Type
Engine
Difficulty
Easy
Time
30-60 minutes
Tools Used
Screwdriver, Socket set, on my BS a T40 torx bit
Parts Used
A rat chewed through the wires...
Tool Type
Lawn Tractor
Difficulty
Easy
Time
15-30 minutes
Tools Used
Screwdriver, Socket set
Engine running rough, spark plug boot gone, spark plug ceramic broken.
Tool Type
Lawn Tractor
Difficulty
Medium
Time
30-60 minutes
Tools Used
Socket set
2. Removed old armature magneto
3. Installed new magneto, set gap tolerance as per instructions
4. Using grease installed boot onto plug wire.
5. Removed old spark plug
6. Set gap on new spark plug and installed
7. Installed new plug wire and boot on spark plug
8. Reinstalled engine cover
Lawn tractor would not start, no spark at plug
Tool Type
Lawn Tractor
Difficulty
Easy
Time
15-30 minutes
Tools Used
Socket set, Wrench Set
Parts Used
2. Removed spark plug.
3. Connected spark plug to cable and placed on cylinder head for a ground path.
4. Cranked engine and observed no spark.
5. Removed shutoff wire from magneto and repeated (isolates any issues with other wiring), still no spark.
6. Install new magneto at farthest back position and snug the bolts.
7. Rotate flywheel until magnets align with magneto.
8. Place business card between magneto and flywheel.
9. Loosen magneto bolts and allow magnets to pull magneto to flywheel.
10. Tighten magneto bolts.
11. Remove card and rotate flywheel by hand to ensure there is no contact (will be very close)
12. Reinstall spark plug and connect wire.
13. Start and run for test, then reinstall engine covers.
I had ordered 5 coils from Sears. They just kept burning up yours have lasted very well.
Tool Type
Lawn Mower
Difficulty
Easy
Time
More than 2 hours
Tools Used
Power Drill, Socket set, Nutdriver
To the drive clutch. I am a mechanic, and can't see any way for this short harming the
coils. But the machine is functioning fine now.
Your parts service was faster and much cheaper than other part companies 👍 I give you a thumb up.
No spark from engine to plug
Tool Type
Engine
Difficulty
Easy
Time
Less than 15 minutes
Tools Used
Socket set, Nutdriver, Spark tester
Parts Used
2. Removed all top engine coverings.
3. Checked all wiring for disconnects or unintentional grounding. Figured ignition module.
4. Ordered part.
5. Replaced part following included instructions.
6. Replaced all engine covers.
Vrooom, done. ! Tighten module carefully it’s threaded into aluminum!!!
wouldn't start
Tool Type
Lawn Tractor
Difficulty
Medium
Time
30-60 minutes
Tools Used
Socket set, Nutdriver
Rats chewed wire from armature magneto to spark plug into
Tool Type
Lawn Tractor
Difficulty
Easy
Time
15-30 minutes
Tools Used
Socket set
Parts Used
2. Removed armature magneto
3. Install new armature magneto using included "paper" feeler gauge
4. Replace engine cover
Lawnmower would not run correctly. Missing cutting out.
Tool Type
Lawn Tractor
Difficulty
Easy
Time
15-30 minutes
Tools Used
Wrench Set, Feeler guages
Parts Used
2 unplugged spark plugs wire from plug.
3 disconnected fuel shutoff solenoid wire from armature.
4 installed new armature magneto using rachet wrench. Plugged in fuel solenoid to armature magneto.
5 using card sent with part I set the magneto gap. Tightened armature magneto down. Plugged in spark plug wire.
6 best part got on lawnmower turned key to start position. Motor fired up . I adjusted carburetor and idle speed mower is running great.
OEM stands for Original Equipment Manufacturer and means the part you’re buying is sourced directly from the manufacturer who made your product. At eReplacementParts, we sell only genuine OEM parts, guaranteeing the part you’re purchasing is of better design and of higher quality than aftermarket parts.
Our product descriptions are a combination of data sourced directly from the manufacturers who made your product as well as content researched and curated by our content & customer service teams. This content is edited and reviewed internally before being made public to customers.
Our customer service team are at the ready daily to answer your part and product questions. We have a dedicated staff with decades of collective experience in helping customers just like you purchase parts to repair their products.
All our part reviews are solicited directly from other customers who have purchased this exact part. While we moderate these reviews for profanity, offensive language or personally identifiable information, these reviews are posted exactly as submitted and no alterations are made by our team.
All our customer repair instructions are solicited directly from other customers just like you who have purchased and replaced this exact part. While we moderate these reviews for profanity, offensive language or personally identifiable information, these reviews are posted exactly as submitted and no alterations are made by our team.
Based on data from past customer purchasing behaviors, these parts are most commonly purchased together along with the part you are viewing. These parts may be necessary or helpful to replace to complete your current repair.
All our installation videos are created and produced in collaboration with our in-house repair technician, Mark Sodja, who has helped millions of eReplacementParts customers over the last 13 years repair their products. Mark has years of experience in selling and repairing both commercial and residential products with a specialty in gas-powered equipment.
This data is collected from customers who submitted a repair instruction after replacing this exact part. Customers can rate how easy the repair was to complete and how long it took. We aggregate this data to provide a repair rating that allows customers to quickly determine the difficulty and time needed to perform their own repair.