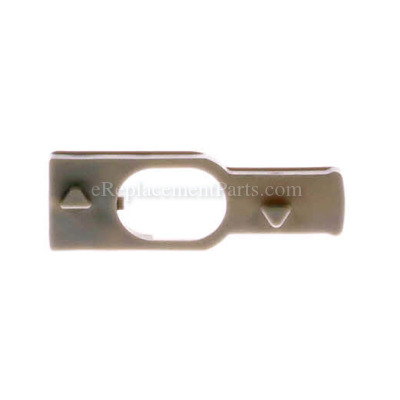
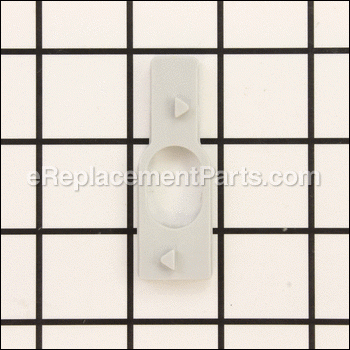


This is a genuine manufacturer approved replacement slider designed for use with Ryobi trimmers/edgers. This part work injunction with the spool and it uses centrifugal force to automatically release the cutting line from the spool. It is made out of plastic with metal and it is sold individually. To replace this part you will need a screwdriver.
Plastic Slider With Metal Inse 310920001
OEM part for: Homelite, Ryobi
Part Number: 310920001
$3.99
In Stock
Jump To:
Frequently Purchased Together ?


Compatibility
This part will fit the following 18 machines
Ryobi
RY40200 40 Volt String Trimmer View Diagrams & Manuals
RY24200 24 Volt String Trimmer View Diagrams & Manuals
P2005 String Trimmer/Edger View Diagrams & Manuals
P2006 18V String Trimmer/Edger View Diagrams & Manuals
P2200 18 Volt Hybrid String Trimmer View Diagrams & Manuals
P2006A P2006A 18 Volt String Trimmer/Edger View Diagrams & Manuals
P2008 (107268001) String Trimmer/Edger View Diagrams & Manuals
P2008 (107268001) Ryobi String Trimmer View Diagrams & Manuals
P20103 (107890024) Cordless String Trimmer View Diagrams & Manuals
RY40204 (107283001) String Trimmer View Diagrams & Manuals
P20010 (107491001) Cordless String Trimmer View Diagrams & Manuals
P2008VNM (107268101) Ryobi String Edger View Diagrams & Manuals
P20015VNM P20015vnm 18 Volt String Trimmer Mfg. No. 108654001 6-1-21 (Rev:02) View Diagrams & Manuals
P2008 P2008 String Trimmer Mfg. No. 107268001 6-23-20 (Rev:06) View Diagrams & Manuals
RY40204 Ry40204 String Trimmer Mfg. No. 107283012 5-13-20 (Rev:01) View Diagrams & Manuals
RY40204VNM Ry40204vnm String Trimmer Mfg. No. 107283112 5-13-20 (Rev:01) View Diagrams & Manuals
P20102VNM P20102vnm 18 Volt String Trimmer/Edger Mfg. No. 107482101 11-7-20 (Rev:02) View Diagrams & Manuals
P20103VNM P20103vnm 18 Volt String Trimmer/Edger Mfg. No. 107890101 2-23-21 (Rev:03) View Diagrams & Manuals
Show More Compatible Models
This item works with the following types of products:
- Trimmer Parts
- Edger Parts
Customer Part Reviews ?
Average Rating (out of 5):
Click to filter by ratings:
5 stars
5
4 stars
1
3 stars
0
2 stars
0
1 stars
0
< PREV
- 1
Exact fit
This was for a battery operated Ryobi weed wacker, which in the discribetion fits several weed wackers, I purchased this for an older neighbor to which the head fell off while they were using it, due to not putting it back together correctly, so she called me and said it wouldn't work and I noticed the piece was missing, they said to order it. when it came quickly I took it to them and they said that looks like the piece on the front porch. lol now we have a spare part. I was going to return it but the shipping cost me twice the amount of the price of the part. Completely satisfied with the part.
Guest -
July 6, 2020
Verified Purchase
Ryobi 40V string trimmer
This part plus a compression spring enabled me to return the string trimmer to a like-new condition.
Guest -
October 9, 2019
Verified Purchase
Repair parts for Ryobi weed whacker
I ordered all the parts that may have caused the problem. Turned out I got more than I needed but the prices were so reasonable I have no regret.
3 dimensional schematics might make ordering parts
( for somebody who doesn’t repair garden equipment professionally, like me) a little easier.
Guest -
September 26, 2019
Verified Purchase
Perfect fit
Worked perfect
Guest -
September 23, 2019
Verified Purchase
Easy repair. Worked great
Fixed the line feed just as expected. Thank you for having these parts.
Guest -
September 3, 2019
Verified Purchase
Plastic slider
It is too cold to use here, but I expect that it will work like to one I ordered previously.
Guest -
February 6, 2020
Verified Purchase
t
t
t -
t days ago
Verified Purchase
eReplacementParts Team
t
Questions & Answers ?
Our customer Service team is at the ready daily to answer your part and product questions.

Ask our Team
We have a dedicated staff with decades of collective experience in helping customers just like you purchase parts to repair their products.
Does this fit my product?Questions & Answers for Plastic Slider With Metal Inse
I have the Ryobi trimmer/edger. When I went to take off the slider I guess there was a spring too. I didn't see the spring. If I get a new slider does it come with a spring?
Judy
asked on 2022-05-11
Hi Judy,
Thank you for your question. The spring is sold separately. The part number listed under your model number for the spring is 679034001. If you need help placing an order for it, customer service is open 7 days a week and anyone will be happy to assist you. Please feel free to give us a call. We look forward to hearing from you!
eReplacementParts Team May 11, 2022
Where can I get the little metal plate the spring sets against inside the trimmer head?
Michael
for model number 2006a
asked on 2022-04-26
Hello Michael, Thank you for your inquiry. We have researched the model number you have provided and the metal insert is only available as part of the slider. We hope this helps and if you need help placing an order, customer service is open 7 days a week. Please feel free to give us a call. We look forward to hearing from you!
eReplacementParts Team April 26, 2022
Customer Repair Instructions ?
All our customer repair instructions are solicited directly from other customers just like you who have purchased and replaced this exact part.
Line would fly off spool
James - April 24, 2017
👍 4 of 4 people found this instruction helpful
Tool Type
Trimmer
Difficulty
Easy
Time
Less than 15 minutes
Tools Used
Screwdriver
Remove the spool
Then push the plastic slider in against the spring
Then lift up slider and remove it and spring.
Then put in new spring
Then install slider
Then push the plastic slider in against the spring
Then lift up slider and remove it and spring.
Then put in new spring
Then install slider
Did you find this story helpful?
Thanks for voting and helping fellow customers!
Trimmer line continually feed.
Angela - July 6, 2016
👍 3 of 4 people found this instruction helpful
Tool Type
Trimmer
Difficulty
Easy
Time
Less than 15 minutes
Tools Used
Screwdriver
Removed trimmer line cap
Removed trimmer line.
Put piece in.
Replaced trimmer line.
Replaced cap.
Removed trimmer line.
Put piece in.
Replaced trimmer line.
Replaced cap.
Did you find this story helpful?
Thanks for voting and helping fellow customers!
The parts were missing and might have fallen out. Replacing parts was easy, took about 10 minutes
Craig - May 16, 2016
👍 3 of 4 people found this instruction helpful
Tool Type
Trimmer
Difficulty
Easy
Time
Less than 15 minutes
Tools Used
Screwdriver
Place spring into imprinted hole. Begin to slide the plastic slider onto shaft until extended plastic slips into collar hole. Depress end of spring to fit in hole in inside of collar. Install string bobin and cap. Test if string works and feeds normally.
Did you find this story helpful?
Thanks for voting and helping fellow customers!
The weedeater part was missing
Jennifer - July 6, 2016
👍 1 of 1 people found this instruction helpful
Tool Type
Trimmer
Difficulty
Easy
Time
Less than 15 minutes
Tools Used
Parts Used
I only had to install the replacement part, and it worked like a charm. Thanks a million for having the part.
Did you find this story helpful?
Thanks for voting and helping fellow customers!
Would not feed line
Scott - June 28, 2016
👍 2 of 3 people found this instruction helpful
Tool Type
Trimmer
Difficulty
Medium
Time
Less than 15 minutes
Tools Used
Screwdriver, Nutdriver
Took off the three screws for guard, pried out the plastic slider. I then inserted the new spring into slider, then replaced the slider, and guard after cleaning both.
Did you find this story helpful?
Thanks for voting and helping fellow customers!
String would not advance
Arthur - April 24, 2016
👍 1 of 1 people found this instruction helpful
Tool Type
Trimmer
Difficulty
Easy
Time
Less than 15 minutes
Tools Used
Screwdriver, Pliers
Parts Used
After removing the string spool, I compressed the spring and removed it. Then I removed the plastic slider, and installed the slider and spring. Reinstalled the string spool and the cover. Much better.
Did you find this story helpful?
Thanks for voting and helping fellow customers!
Trimmer not feeding line
stanley - May 25, 2023
Tool Type
Trimmer
Difficulty
Medium
Time
30-60 minutes
Tools Used
Screwdriver
Took apart the head and replace the slider and spool base.
Did you find this story helpful?
Thanks for voting and helping fellow customers!
Spool base was broken
Mildred - September 29, 2022
Tool Type
Trimmer
Difficulty
Easy
Time
Less than 15 minutes
Tools Used
Screwdriver, Pliers
Put small screwdriver into hole to hold shaft,used pliers to remove old thread base,put new spoolbase on with hands,could not find anything to tell me how to remove old thread base,but luckily i have a jack of all trde daughter ,,Ryobi 18 volt weed trimmer
Did you find this story helpful?
Thanks for voting and helping fellow customers!
Line would not advance.
Norman - September 13, 2022
Tool Type
Trimmer
Difficulty
Easy
Time
Less than 15 minutes
Tools Used
Screwdriver
Removed the spool cap.
Removed the spool.
Pushed the plastic slider in as far as I could with my fingers then used a flat head screwdriver to pry up from underneath to release it.
Inserted new spring into the end of the new plastic slider.
Placed everything back in reverse order.
Done in less than 5 minutes
Removed the spool.
Pushed the plastic slider in as far as I could with my fingers then used a flat head screwdriver to pry up from underneath to release it.
Inserted new spring into the end of the new plastic slider.
Placed everything back in reverse order.
Done in less than 5 minutes
Did you find this story helpful?
Thanks for voting and helping fellow customers!
String would not automatically feed. Ryobi P2006 18V
Rhonda - August 7, 2022
Tool Type
Trimmer
Difficulty
Easy
Time
Less than 15 minutes
Tools Used
Screwdriver
1. Cleaned string trimmer.
2. Remove plastic cap and string spool.
3. Used flat head screwdriver to gently push and lift the plastic slider out of place.
4. Removed old spring and old plastic slider.
5. Placed new spring into end of new plastic slider.
6. Gently pushed parts into place.
7.Restrung line onto spool.
8.Thread string through spool hole.
9.Put spool into place.
10. Placed plastic cap back in place.
Did you find this story helpful?
Thanks for voting and helping fellow customers!
Load More Install Stories
OEM stands for Original Equipment Manufacturer and means the part you’re buying is sourced directly from the manufacturer who made your product. At eReplacementParts, we sell only genuine OEM parts, guaranteeing the part you’re purchasing is of better design and of higher quality than aftermarket parts.
Our product descriptions are a combination of data sourced directly from the manufacturers who made your product as well as content researched and curated by our content & customer service teams. This content is edited and reviewed internally before being made public to customers.
Our customer service team are at the ready daily to answer your part and product questions. We have a dedicated staff with decades of collective experience in helping customers just like you purchase parts to repair their products.
All our part reviews are solicited directly from other customers who have purchased this exact part. While we moderate these reviews for profanity, offensive language or personally identifiable information, these reviews are posted exactly as submitted and no alterations are made by our team.
All our customer repair instructions are solicited directly from other customers just like you who have purchased and replaced this exact part. While we moderate these reviews for profanity, offensive language or personally identifiable information, these reviews are posted exactly as submitted and no alterations are made by our team.
Based on data from past customer purchasing behaviors, these parts are most commonly purchased together along with the part you are viewing. These parts may be necessary or helpful to replace to complete your current repair.
All our installation videos are created and produced in collaboration with our in-house repair technician, Mark Sodja, who has helped millions of eReplacementParts customers over the last 13 years repair their products. Mark has years of experience in selling and repairing both commercial and residential products with a specialty in gas-powered equipment.
This data is collected from customers who submitted a repair instruction after replacing this exact part. Customers can rate how easy the repair was to complete and how long it took. We aggregate this data to provide a repair rating that allows customers to quickly determine the difficulty and time needed to perform their own repair.