eReplacementParts.com
877-346-4815
DeLonghi Parts
Repair Parts Home
  
Appliance Parts
  
DeLonghi Parts
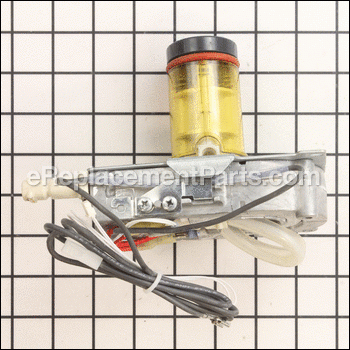
  7313213931 Generator Assembly

Generator Assembly 7313213931

OEM part for: DeLonghi

Part Number: 7313213931


Install
Videos!
Grid squares measure 1x1 inch
In Stock
Ships within 1 business day
Medium 1-2 hours (11 rated repairs)?
OEM: Original Equipment Manufacturer ?
DeLonghi
Does this d-block d-md-none fit my product?

Product Description ?

This generator assembly is an authentic OEM replacement part supplied by the manufacturer. It is commonly used in DeLonghi espresso/cappuccino maker. The generator should be replaced if there is visible leakage, inconsistent cup portioning, or if the coffee simply will not brew. This replacement requires a screwdriver, pliers, and and a nut driver. Replacing this part is a fairly intricate process that will take anywhere from 30-60 min.

  • Classification: Part
  • Weight: 2.14 lbs.
  • Shipping: Ships Worldwide

Frequently Purchased Together ?

Compatibility

This part will fit the following 13 machines

DeLonghi

ESAM3300.S Magnifica View Diagrams & Manuals
ESAM3300EX Magnifica View Diagrams & Manuals
ESAM3500.N Magnifica View Diagrams & Manuals
ESAM4400 Magnifica View Diagrams & Manuals
ESAM4500 Magnifica View Diagrams & Manuals
ESAM6600 Magnifica View Diagrams & Manuals
ESAM3500N (0132215019)(X0132215019) Magnifica Digital Espresso And Coffee Machine View Diagrams & Manuals
ESAM4400 (132214013) Coffee Maker View Diagrams & Manuals
ESAM4500 (132215030) Fully Automatic Bean To Cup Machine View Diagrams & Manuals
ESAM3300EXD Superautomatic Capachino System View Diagrams & Manuals
ESAM6600 (132215018) Digital Super-Automatic Espresso Machine View Diagrams & Manuals
ESAM3300EXHD Super Automatic Capachino System View Diagrams & Manuals
ESAM3300S Magnifica Automatic Espresso/Cappuccino View Diagrams & Manuals
Show More Compatible Models
Don't see yours? Try searching our site for :

This item works with the following types of products:

  • Coffee Maker Parts

This part replaces obsolete part #: 7332206900, 7332206800

Customer Part Reviews ?

4.8
Average Rating (out of 5):
4 Reviews
Click to filter by ratings:
5 stars
3
4 stars
1
3 stars
0
2 stars
0
1 stars
0
  • Highest Rating
  • Most Recent
< PREV
  • 1
NEXT >
  • Great part
    My wife is happy
    Guest - October 22, 2020 Verified Purchase
    Easy repair, perfect replacement part.
    Part shipped quick.
    Guest - October 8, 2019 Verified Purchase
    It was hard to find this part elsewhere.
    The part was in great condition and was exactly what I needed.
    Guest - October 1, 2019 Verified Purchase
    Solved my problem
    Works on ESAM3300 My symptoms were: drain pan filling up with water that was leaking from inside the machine; inconsistent shot volume; steam reduced to a damp whisper. I made two milk-based drinks a day for about 1-1/2 years when my machine started having serious problems. This part solved my problem, for now. I plan to buy a higher end "pro-sumer" espresso machine next year. Hopefully this part will get me there. I can't recommend a Delonghi machine, but I can recommend this part if yours breaks down. One of the little o-rings ripped when I was trying to fish it out of the old part. Luckily, there was another connection on the top of the generator that had one I could use since that part comes with the new generator. You will definitely need a small pick tool (watch the video on Youtube). Don't count on the o-rings coming out by themselves, and don't use the wrong tool to go after them! The hardest part of this repair is the little nuts and washers on the bottom. I used tape to hold them to my finger while tightening the long screws. I tried grease, but my hands are just too big to fit in the tight areas in the rear. To be honest, I might have a few "extra" washers that didn't make it back in. No worries, though, it works great now! :-) Oh, I would have given 5 stars had it not been for the 3-day delay between when the shipping label was created and when it was actually handed off to fedEx.
    J - June 1, 2021 Verified Purchase
    t
    t
    t - t days ago Verified Purchase
    eReplacementParts Team
    t

    Questions & Answers ?

    Our customer Service team is at the ready daily to answer your part and product questions.

    photo of team member
    Ask our Team

    We have a dedicated staff with decades of collective experience in helping customers just like you purchase parts to repair their products.

    Does this fit my product?

    Questions & Answers for Generator Assembly


    No questions have been asked yet

    Customer Repair Instructions ?

    All our customer repair instructions are solicited directly from other customers just like you who have purchased and replaced this exact part.

    Medium 1-2 hours (11 rated repairs)?

    Generator assembly leaking

    Steve - March 2, 2017
    👍 2 of 2 people found this instruction helpful
    Tool Type

    Coffee Maker

    Difficulty

    Medium

    Time

    1-2 hours

    Tools Used

    Screwdriver, Pliers, Wrench Set

    Removed the old generator assembly and replaced with the new one.

    The hardest part was loosening one of the bolts holding the generator assembly in place. I had to put a wrench on the nut at the underside and loosen it first. Otherwise I would have stripped the phillips headed nut.

    The top cover does not fit quite the same as before I took the unit apart, but it works reasonably well.
    Did you find this story helpful?
    Thanks for voting and helping fellow customers!

    My generator was leaking and corroded. Diffuser needed general maintenance. Entire machine needed a good cleaning and lube.

    Michael - December 25, 2016
    👍 2 of 2 people found this instruction helpful
    Tool Type

    Coffee Maker

    Difficulty

    Easy

    Time

    1-2 hours

    Tools Used

    Screwdriver, Pliers, Power Drill, Wrench Set, Drill bits

    I removed the screws for the panels, removed panels, tray, diffuser, water tank. Took note of all wire and hose locations. Removed 2 hoses from generator and wires from control board. Unscrewed 2 screws from the generator and the other 2 were too corroded to take out. Drilled the heads of the screws off and tapped them out. To replace the bad hardware, I used 8mm threaded rod, cut to length, and nuts. Reinstalled everything on reverse order and fired it up. Just like new again. Simple install. Would be about 30 minutes to repair if the hardware wasn't so corroded.
    Did you find this story helpful?
    Thanks for voting and helping fellow customers!

    Leaking

    Larry - January 2, 2017
    👍 1 of 1 people found this instruction helpful
    Tool Type

    Coffee Maker

    Difficulty

    Medium

    Time

    1-2 hours

    Tools Used

    Screwdriver, Pliers

    Used ereplacementparts online video step by step guide.
    https://www.youtube.com/watch?v=CpGAVvaZzEA
    Did you find this story helpful?
    Thanks for voting and helping fellow customers!

    Espresso maker not producing enough pressure

    Bill - December 21, 2015
    👍 1 of 1 people found this instruction helpful
    Tool Type

    Coffee Maker

    Difficulty

    Medium

    Time

    30-60 minutes

    Tools Used

    Screwdriver, Pliers, Nutdriver

    Followed video instructions on ereplacementparts.com site.
    Repair would have gone faster but I was moving pretty slow trying not to make mistakes.

    The link to the video is: http://www.ereplacementparts.com/article/14561/How_to_Replace_the_Generator_Pump_on_a_DeLonghi_Magnifica_Espresso_Machine.html
    Did you find this story helpful?
    Thanks for voting and helping fellow customers!

    Coffee maker wasn’t serving water

    William - February 10, 2023
    Tool Type

    Coffee Maker

    Difficulty

    Medium

    Time

    30-60 minutes

    Tools Used

    Screwdriver, Pliers

    Generator:
    1. Unplug machine, and remove side and rear panels
    2. Losses wire bundles and disconnect electrical connections to circuit board
    3. Loosen four mounting screws on top of generator. Secure nut and washer from below with fingers.
    4. Disconnect hard tube fluidic connections from back and bottom by pulling out securing pins with pliers. Take care to remove o-ring from within connector
    5. Pull rubber tube from side and remove old generator
    6. Replace with new generator, and reinstall connections in reverse order. Holding the washers and nuts from underneath while threading bolts requires care. A small amount of grease can be used to stick the washer and nut to your finger.
    7. Replace panels.
    Did you find this story helpful?
    Thanks for voting and helping fellow customers!

    The Delonghi 5400 machine started leaking water from the heater (generator)

    Randall - December 23, 2021
    Tool Type

    Coffee Maker

    Difficulty

    Medium

    Time

    More than 2 hours

    Tools Used

    Screwdriver, Pliers, Wrench Set

    I've had this machine for almost 10 years. 3 years ago it developed a leak. I looked at repairing it but the parts were not available at the time. We bought a new Delonghi (the 3300) and I kept the 5400 for parts as it looked like all the internal mechanical components were the same. We now purchased a cabin in the woods and wanted good coffee. These machines are pretty pricey these days so I decided to take a stab at repair again. Thanks to e-replacementparts I was able to get the parts I needed for a reasonable price. To get at the generator, first unplug the unit, then you need to remove all the outer housing panels (this should be obvious). Then the generator has 4 long machine screws holding it in place as well as 6 wires that need to be disconnected. Two are power, two are sensors and 2 are for a microswitch. I just followed the leads back to where they connected and took photos of where they plugged into so I could plug in the new generator. After unplugging the wires you'll need to remove the 4 long screws. A Phillips screwdriver and some needle nose players for the small nuts on the bottom. A couple of these nuts are hard to reach and you will need patience upon reassembly and nimble fingers. Once the screws are removed, there are two water connections to remove. they are held on by small metal clips. just pull the clip out with your pliers and the water line will come out. then remove the generator slowly. You will note a black rubber water (drain) connector on the underside of the unit opposite the side water connector. You will want to attach that one first upon putting in the new generator. Reassembly is as they say the opposite of removal. Some tips. Replace the o-rings on the two water lines (order them at the same time) or they will leak as I learned. Attach the black rubber drain line and the side water line before screwing the generator down. Once set in place put all the screws in loosely to get it lined up as it is a tight and precise fit. Get all of the screws tightened down - this is important as the generator is part of the coffee "press" and will be pushed up on when making coffee. After reassembly carefully put the water tank in (without the side panels on and start the machine and make a coffee or two. Use a flashlight to check for leaks around the generator. Be careful not to touch anything as the generator gets very very hot (it may smell a little hot at first use) and there are exposed electrical wires that pose a shock hazard. Once you confirm you have no leaks unplug again and put on the top and side panels. You are now good to go. Use this time to clean the unit thoroughly and lubricate the press o-rings with food grade lubricant. Good luck!
    Did you find this story helpful?
    Thanks for voting and helping fellow customers!

    Water heating generator was bad

    Ranjan - May 11, 2019
    Tool Type

    Coffee Maker

    Difficulty

    Hard

    Time

    More than 2 hours

    Tools Used

    Screwdriver, Pliers, Power Drill, Wrench Set, Adjustable Wrench

    Watched the video on ereplacement parts and followed the instructions. Took me some time to get old part out as the screws were coroded and getting the screws out from tiny spaces.
    Did you find this story helpful?
    Thanks for voting and helping fellow customers!

    Leaking Water, and Hot Water would not come out of water spigot

    Michael - March 2, 2019
    Tool Type

    Coffee Maker

    Difficulty

    Medium

    Time

    30-60 minutes

    Tools Used

    Screwdriver, Pliers, Nutdriver

    1. unplugged power.
    2. removed all plastic covers.
    3. disconnected wires, and water tubes from Generator Assm.
    4. removed (4) screws and nuts from Generator.
    5. pulled off Generator.
    6. replaced with new Generator.
    7. (2) forward nuts and screws were easy to install, (2) rear, NOT SO EASY.
    8. everything else reverse order.
    Did you find this story helpful?
    Thanks for voting and helping fellow customers!

    Leaking generator assembly

    Tib - December 10, 2018
    Tool Type

    Coffee Maker

    Difficulty

    Medium

    Time

    30-60 minutes

    Tools Used

    Screwdriver, Needle nose pliers

    Followed the website video. Instead of using Vaseline to help keep the nut and washer together as per the video, I fed some sewing thread through the hole on the top of the generator assembly and through the washer and nut at the bottom .I Held both ends of the thread to manoeuvre washer and nut to help keep them in place so I could get the nut threaded. Once the nut started to attach onto the bolt, I removed the sewing thread and tightened it all the way. The area was very space restrictive.
    Bought some extra o rings and sure enough foubf some minor leaks, replaced them with o rings I purchased. Sure glad I found this site.
    Did you find this story helpful?
    Thanks for voting and helping fellow customers!

    Generator was leaking. Lost compression.

    Mike - November 27, 2018
    Tool Type

    Coffee Maker

    Difficulty

    Easy

    Time

    30-60 minutes

    Tools Used

    Screwdriver, Pliers

    Referenced eReplacements YouTube instructional video.
    https://www.youtube.com/watch?v=CpGAVvaZzEA
    Did you find this story helpful?
    Thanks for voting and helping fellow customers!

    OEM stands for Original Equipment Manufacturer and means the part you’re buying is sourced directly from the manufacturer who made your product. At eReplacementParts, we sell only genuine OEM parts, guaranteeing the part you’re purchasing is of better design and of higher quality than aftermarket parts.

    Our product descriptions are a combination of data sourced directly from the manufacturers who made your product as well as content researched and curated by our content & customer service teams. This content is edited and reviewed internally before being made public to customers.

    Our customer service team are at the ready daily to answer your part and product questions. We have a dedicated staff with decades of collective experience in helping customers just like you purchase parts to repair their products.

    All our part reviews are solicited directly from other customers who have purchased this exact part. While we moderate these reviews for profanity, offensive language or personally identifiable information, these reviews are posted exactly as submitted and no alterations are made by our team.

    All our customer repair instructions are solicited directly from other customers just like you who have purchased and replaced this exact part. While we moderate these reviews for profanity, offensive language or personally identifiable information, these reviews are posted exactly as submitted and no alterations are made by our team.

    Based on data from past customer purchasing behaviors, these parts are most commonly purchased together along with the part you are viewing. These parts may be necessary or helpful to replace to complete your current repair.

    All our installation videos are created and produced in collaboration with our in-house repair technician, Mark Sodja, who has helped millions of eReplacementParts customers over the last 13 years repair their products. Mark has years of experience in selling and repairing both commercial and residential products with a specialty in gas-powered equipment.

    This data is collected from customers who submitted a repair instruction after replacing this exact part. Customers can rate how easy the repair was to complete and how long it took. We aggregate this data to provide a repair rating that allows customers to quickly determine the difficulty and time needed to perform their own repair.

    eReplacementParts.com
    7174 South 400 West
    Suite 5
    Midvale, UT 84047
    visa mastercard discover american express PayPal