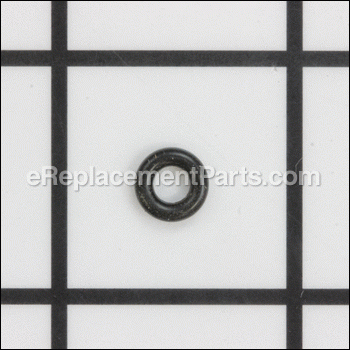
Genuine Delonghi replacement part, this item is sold individually.
This O-Ring is used as a seal to keep liquid from leaking between two connected parts.
Because of the heat that this part comes in contact with it does wear out often.
It is advised to have an extra one or two on hand.
O-ring D=3 5313217701
OEM part for: DeLonghi
Part Number: 5313217701
Jump To:
Product Description ?
- OD 5/16 Inch
- ID 3/16 Inch
- Classification: Part
- Weight: 0.01 lbs.
- Shipping: Ships Worldwide
Frequently Purchased Together ?
Compatibility
This O-ring D=3 will fit the following 107 machines. Confirm this part works with your model, and view the detailed model diagrams and repair help we have to offer.
DeLonghi
Show More Compatible ModelsThis item works with the following types of products:
- Espresso Parts
- Coffee Maker Parts
This part replaces obsolete part #: 5332199800, 5332154700, 536369
Customer Part Reviews ?
- 1
Questions & Answers ?
Our customer Service team is at the ready daily to answer your part and product questions.

Ask our Team
We have a dedicated staff with decades of collective experience in helping customers just like you purchase parts to repair their products.
Does this fit my product?Questions & Answers for O-ring D=3
Customer Repair Instructions ?
All our customer repair instructions are solicited directly from other customers just like you who have purchased and replaced this exact part.
Water was leaking from a variety of connection points within my DeLonghi Magnifica Super Automatic Espresso machine
Tool Type
Coffee Maker
Difficulty
Easy
Time
15-30 minutes
Tools Used
Screwdriver, Pliers
Parts Used
Leaking water from the heating element connection to water pump when machine is brewing
Tool Type
Coffee Maker
Difficulty
Medium
Time
Less than 15 minutes
Tools Used
Pliers
Parts Used
Once it's off however, I located the tube running from the water pump to the heating element, removed the alligator clip holding it in place, and carefully pulled the tube free from the connector. I had to fish the o ring out from the connector with a toothpick, but it was relatively easy. I then slipped the new o ring over the tube, re-inserted the tube very firmly into the connector, locked it in place with the alligator clip, and tested the machine for leaks. Once confident that the leaks were solved, I replaced the cover, steam knob, etc and screwed everything back into place.
Overall a very simple repair, just take your time and make sure to use common sense.
The Delonghi 5400 machine started leaking water from the heater (generator)
Tool Type
Coffee Maker
Difficulty
Medium
Time
More than 2 hours
Tools Used
Screwdriver, Pliers, Wrench Set
a water leak from the pump hoses
Tool Type
Coffee Maker
Difficulty
Medium
Time
30-60 minutes
Tools Used
Screwdriver, Pliers, Socket set
Parts Used
Hose leaked, old washer
Tool Type
Coffee Maker
Difficulty
Easy
Time
15-30 minutes
Tools Used
Screwdriver, Pliers
Took retaining clips off the hose
Applied silicone grease on the washer and replaced hose with new washers.
Very easy job.
leaks
Tool Type
Coffee Maker
Difficulty
Medium
Time
15-30 minutes
Tools Used
Screwdriver, Pliers, small pick for O-ring removal
Parts Used
2. Removed sides, back, and top panel.
3. Carefully make relief in wires, and water tubes
4. Remove 4 mounting screws and the generator assembly
5. Remove water connection to generator.
6. Remove and replace connector tail piece.
7. Reverse steps 5 through 1 in reverse order.
Leaking
Tool Type
Coffee Maker
Difficulty
Medium
Time
15-30 minutes
Tools Used
Screwdriver, Pliers, specialty screw driver
Parts Used
Leaking water
Tool Type
Coffee Maker
Difficulty
Easy
Time
15-30 minutes
Tools Used
Screwdriver
Parts Used
Coffee express start leak water
Tool Type
Coffee Maker
Difficulty
Hard
Time
30-60 minutes
Tools Used
Screwdriver, pick or small hook
2.using pick or small hook remove small spring washers from tube .
3.wiggle tube out from holders remove old rubber o-rings with pick or hook
4.install new o-rings on fed tub and reinstall new tub in holders reinstall spring washers on tube
5.reinstall all panels from coffee express .enjoy coffee .
Espresso machine leaking
Tool Type
Coffee Maker
Difficulty
Medium
Time
1-2 hours
Tools Used
Screwdriver, Pliers, None
Parts Used
Tried several combinations of gaskets and O rings and finally stopped the leak
OEM stands for Original Equipment Manufacturer and means the part you’re buying is sourced directly from the manufacturer who made your product. At eReplacementParts, we sell only genuine OEM parts, guaranteeing the part you’re purchasing is of better design and of higher quality than aftermarket parts.
Our product descriptions are a combination of data sourced directly from the manufacturers who made your product as well as content researched and curated by our content & customer service teams. This content is edited and reviewed internally before being made public to customers.
Our customer service team are at the ready daily to answer your part and product questions. We have a dedicated staff with decades of collective experience in helping customers just like you purchase parts to repair their products.
All our part reviews are solicited directly from other customers who have purchased this exact part. While we moderate these reviews for profanity, offensive language or personally identifiable information, these reviews are posted exactly as submitted and no alterations are made by our team.
All our customer repair instructions are solicited directly from other customers just like you who have purchased and replaced this exact part. While we moderate these reviews for profanity, offensive language or personally identifiable information, these reviews are posted exactly as submitted and no alterations are made by our team.
Based on data from past customer purchasing behaviors, these parts are most commonly purchased together along with the part you are viewing. These parts may be necessary or helpful to replace to complete your current repair.
All our installation videos are created and produced in collaboration with our in-house repair technician, Mark Sodja, who has helped millions of eReplacementParts customers over the last 13 years repair their products. Mark has years of experience in selling and repairing both commercial and residential products with a specialty in gas-powered equipment.
This data is collected from customers who submitted a repair instruction after replacing this exact part. Customers can rate how easy the repair was to complete and how long it took. We aggregate this data to provide a repair rating that allows customers to quickly determine the difficulty and time needed to perform their own repair.


