
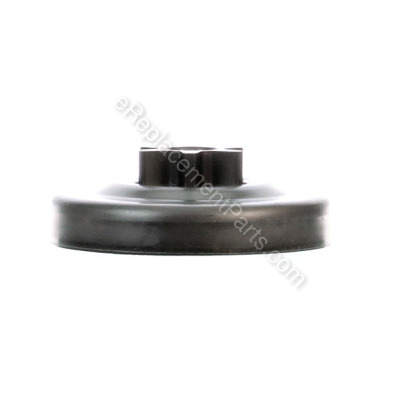


This item is a genuine Echo replacement part that has been sourced from the original manufacturer to be used chainsaws. The clutch drum is used to house the clutch and includes the sprocket. As the motor's RPM increases it causes the clutch to expand and rotate the clutch drum and sprocket causing the chain to rotate around the bar. This item is available as an individual replacement part.
Clutch Drum A556000401
OEM part for: Echo, Shindaiwa
Part Number: A556000401
$34.67
In Stock
Jump To:
Frequently Purchased Together ?


Compatibility
This part will fit the following 33 machines
Echo
CS-370 (09001001 - 09014532) Chainsaw View Diagrams & Manuals
CS-370 (09014533 - 09999999) Chainsaw View Diagrams & Manuals
CS-370 (10001001 - 10002200) Chainsaw View Diagrams & Manuals
CS-370 (10002001 - 10999999) Chainsaw View Diagrams & Manuals
CS-370 (C06212001001 - C06212999999) Chainsaw View Diagrams & Manuals
CS-370 (C08011001001 - C08011999999) Chainsaw View Diagrams & Manuals
CS-370 (C08911001001 - C08911999999) Chainsaw View Diagrams & Manuals
CS-370 (C09913001001 - C09913999999) Chainsaw View Diagrams & Manuals
CS-400 (C08111001001 - C08111999999) Chainsaw View Diagrams & Manuals
CS-400 (C09011001001 - C09011999999) Chainsaw View Diagrams & Manuals
CS-400 (C10013001001 - C10013999999) Chainsaw View Diagrams & Manuals
CS-400 (C09212001001 - C09212999999) Chainsaw View Diagrams & Manuals
CS-370F (C27512001001 - C27512999999) 36.3cc Easy-Starting Chain Saw View Diagrams & Manuals
CS-370F (C27611001001 - C27611999999) 36.3cc Easy-Starting Chain Saw View Diagrams & Manuals
CS-370F (C27713001001 - C27713999999) 36.3cc Easy-Starting Chain Saw View Diagrams & Manuals
CS-400F (C27812001001 - C27812999999) 40.2cc Easy-Starting Chain Saw View Diagrams & Manuals
CS-400F (C27911001001 - C27911999999) 40.2cc Easy-Starting Chain Saw View Diagrams & Manuals
CS-400F (C28013001001 - C28013999999) 40.2cc Easy-Starting Chain Saw View Diagrams & Manuals
CS-370 (09001001-09999999) Chainsaw Lawn Equipment View Diagrams & Manuals
CS-370 (10001001-10999999) Chainsaw Lawn Equipment View Diagrams & Manuals
CS-370 (C33514001001-C33514999999) Chainsaw Lawn Equipment View Diagrams & Manuals
CS-370 (C33714001001-C33714999999) Chainsaw Lawn Equipment View Diagrams & Manuals
CS-370 (C69515001001-C69515999999) Chainsaw Lawn Equipment View Diagrams & Manuals
CS-370F (C33614001001-C33614999999) Chainsaw Lawn Equipment View Diagrams & Manuals
CS-370F (C69615001001-C69615999999) Chainsaw Lawn Equipment View Diagrams & Manuals
CS-400 (C08111019801-C08111999999) Chainsaw Lawn Equipment View Diagrams & Manuals
CS-400 (C33714001001-C33714999999) Chainsaw Lawn Equipment View Diagrams & Manuals
CS-400 (C69715001001-C69715999999) Chainsaw Lawn Equipment View Diagrams & Manuals
CS-400F (C33814001001-C33814999999) Chainsaw Lawn Equipment View Diagrams & Manuals
CS-400F (C69815001001-C69815999999) Chainsaw Lawn Equipment View Diagrams & Manuals
Shindaiwa
402s (C37414001001-C37414999999) Gasoline Chainsaws View Diagrams & Manuals
402s (C37513001001-C37513999999) Gasoline Chainsaws View Diagrams & Manuals
402s (C69915001001-C69915999999) Gasoline Chainsaws View Diagrams & Manuals
Show More Compatible Models
This item works with the following types of products:
- Chain Saw Parts
- Saw Parts
This part replaces obsolete part #: A556000400
Repair Videos ?
Watch the Repair Video for
Clutch Drum

Customer Part Reviews ?
Average Rating (out of 5):
Click to filter by ratings:
5 stars
5
4 stars
1
3 stars
0
2 stars
0
1 stars
0
< PREV
- 1
Chain saw sprocket drum and tool to remove clutch
Tool to remove clutch worked great and sprocket drum fit perfectly.
Guest -
January 25, 2023
Verified Purchase
Part seems to be the right one
Arrived as expected. Seems to be the correct part. Haven't had the chance to finish the repair yet.
Guest -
December 22, 2021
Verified Purchase
Customer service was excellent. Service rep was knowledgeable and very helpful.
Part was received as scheduled and easy to replace. Videos were thorough and easy to understand.
Guest -
February 29, 2020
Verified Purchase
Easy repair
Good parts and I love tje equipment
Guest -
November 25, 2019
Verified Purchase
Great part, my chainsaw is working like new
The part fits perfectly
Jose -
November 19, 2019
Verified Purchase
Easy to install, price was great mail was a little slow
Worked fine
Guest -
September 12, 2019
Verified Purchase
t
t
t -
t days ago
Verified Purchase
eReplacementParts Team
t
Questions & Answers ?
Our customer Service team is at the ready daily to answer your part and product questions.

Ask our Team
We have a dedicated staff with decades of collective experience in helping customers just like you purchase parts to repair their products.
Does this fit my product?Questions & Answers for Clutch Drum
No questions have been asked yet
Customer Repair Instructions ?
All our customer repair instructions are solicited directly from other customers just like you who have purchased and replaced this exact part.
Replace clutch assembly
Alan - June 13, 2016
👍 7 of 11 people found this instruction helpful
Tool Type
Chain Saw
Difficulty
Medium
Time
30-60 minutes
Tools Used
Socket set, Hammer and punch
Remove the outer housing. Remove the chain bar and chain. Remove excess dirt and foreign material. Removing the old clutch assembly is the most difficult part because the clutch assembly has to be struck with a hammer and punch to remove from threaded shaft. The thread is a left hand. Once removed, clean the area and replace the clutch assembly. Reassemble the chain bar and housing.
Did you find this story helpful?
Thanks for voting and helping fellow customers!
Clutch sprocket was badly grooved
Bill - July 29, 2017
👍 3 of 4 people found this instruction helpful
Tool Type
Chain Saw
Difficulty
Easy
Time
Less than 15 minutes
Tools Used
Nutdriver
Removed bar & chain, removed clutch, with impact driver & clutch tool (left handed thread), installed new items. Now, it runs great
Did you find this story helpful?
Thanks for voting and helping fellow customers!
Oil pump stoped putting oil on chain and sprocket on clutch drum was wore out
Malcolm - September 24, 2016
👍 3 of 4 people found this instruction helpful
Tool Type
Chain Saw
Difficulty
Easy
Time
15-30 minutes
Tools Used
Screwdriver, Socket set, Wrench Set
Unscrewed clutch from motor shaft it had left hand threads
Remover clutch drum to get to oil pump
Replaced oil pump
Put clutch drum back on shaft
Screwed clutch back on motor shaft
Put on all covers back on
Ready to cut wood
Remover clutch drum to get to oil pump
Replaced oil pump
Put clutch drum back on shaft
Screwed clutch back on motor shaft
Put on all covers back on
Ready to cut wood
Did you find this story helpful?
Thanks for voting and helping fellow customers!
Chain was locking up and was raised up on the bar a bit close to the engine end.
michael - April 3, 2023
Tool Type
Chain Saw
Difficulty
Easy
Time
Less than 15 minutes
Tools Used
, Clutch Removal Tool
Replaced clutch drum
Did you find this story helpful?
Thanks for voting and helping fellow customers!
The sprocket on the clutch drum was worn down, causing the chain to become too tight.
Philip - July 15, 2022
Tool Type
Chain Saw
Difficulty
Medium
Time
30-60 minutes
Tools Used
Screwdriver, Socket set, Wrench Set, Echo specific clutch removal tool.
Removed the pull start cover, and held the starter nut with pliers. Use the clutch removal tool on the other side of the saw, turning counter clockwise to remove.
Did you find this story helpful?
Thanks for voting and helping fellow customers!
Clutch drum sprocket was worn out. Had grooves in it. I replaced the whole assembly as a precaution.
Roy - December 21, 2021
Tool Type
Chain Saw
Difficulty
Easy
Time
15-30 minutes
Tools Used
Screwdriver, Socket set, Or the chainsaw wrench that came with the saw.
Removed the spark plug
Insert a knoted piece of small rope into the spark plug hole. Leave a tail to remove this later. This is necessary to keep the cylinder from moving while removing the clutch assembly. The thread is a left hand thread.
Used a chisel and hammer to remove the old clutch assembly
This creates a quick jolt to loosen the assembly.
Remove the old clutch assembly.
Remove the knoted rope from the spark plug hole
Reinsert the spark plug
Install the new clutch assembly, (washer, bearing, clutch drum, washer, clutch assembly) on the crankshaft. Remember, it's a left hand thread.
Lightly tap it with a chisel to tighten it.
Install the bar and chain and crank the saw.
The clutch assembly will tighten as you use the saw.
Did you find this story helpful?
Thanks for voting and helping fellow customers!
clutch drum was strip
ricky - October 13, 2021
Tool Type
Saw
Difficulty
Medium
Time
30-60 minutes
Tools Used
Screwdriver, hammer
Parts Used
removed clutch drum and replaced with a new one.
Did you find this story helpful?
Thanks for voting and helping fellow customers!
clutch drum gear worn
ron - May 14, 2021
Tool Type
Chain Saw
Difficulty
Easy
Time
Less than 15 minutes
Tools Used
, made tool with chain saw bar and couple of bolts
Parts Used
made a clutch removal tool with chain saw bar
Did you find this story helpful?
Thanks for voting and helping fellow customers!
Auto oiler would not adjust to reduce oil out put to chain bar
John - April 18, 2021
Tool Type
Chain Saw
Difficulty
Easy
Time
30-60 minutes
Tools Used
Screwdriver, Wrench Set, home made tool to remove clutch
To replace Auto oiler you must remove the clutch and drum The chain sprocket showed ware so I replaced it also.To remove the clutch I made a clutch tool using a 2inch X3/4 inch 12 inches long piece of oak drilled 3. 1/4 holes matching the clutch installed drift pins in holes. to stop engine from turning over I inserted rope into the spark plug hole leaving rope hanging out so you can remove rope when job is complete the rope stops piston movement and allows you to turn clutch with out crank shaft movement. With clutch, drum and sprocket removed remove two screws from oiler and remove oil lines from ouler with out removing line from oil tank.Reverse order install new parts and the job is complete. They do make piston stop plug and a clutch tool you can order them through ereplacement parts when ordering your parts. Being a retired contractor with a full tool shop I Improvise when necessary. If you are a DIY guy buy the tools when placing your order and it will be an easy job.
Did you find this story helpful?
Thanks for voting and helping fellow customers!
Bearing Needle was bad. Clutch Drum was worn.
Michael - July 11, 2020
Tool Type
Chain Saw
Difficulty
Easy
Time
15-30 minutes
Tools Used
Screwdriver, Socket set, Battery powered Impact Wrench
1. Removed Cover to Clutch and removed chain and chain bar.
2. Used impact wrench and removal tool to loosen Clutch.
3 Removed Clutch and clutch drum
4. Replaced needle and clutch drum [greased bearing needle]
5 Re-installed Clutch and tightened with removal tool and impact wrench.
6. Re-installed bar and chain
7 re-installed cover and tightened chain with adjusting screw.
Easy fix with an impact wrench.
Did you find this story helpful?
Thanks for voting and helping fellow customers!
Load More Install Stories
OEM stands for Original Equipment Manufacturer and means the part you’re buying is sourced directly from the manufacturer who made your product. At eReplacementParts, we sell only genuine OEM parts, guaranteeing the part you’re purchasing is of better design and of higher quality than aftermarket parts.
Our product descriptions are a combination of data sourced directly from the manufacturers who made your product as well as content researched and curated by our content & customer service teams. This content is edited and reviewed internally before being made public to customers.
Our customer service team are at the ready daily to answer your part and product questions. We have a dedicated staff with decades of collective experience in helping customers just like you purchase parts to repair their products.
All our part reviews are solicited directly from other customers who have purchased this exact part. While we moderate these reviews for profanity, offensive language or personally identifiable information, these reviews are posted exactly as submitted and no alterations are made by our team.
All our customer repair instructions are solicited directly from other customers just like you who have purchased and replaced this exact part. While we moderate these reviews for profanity, offensive language or personally identifiable information, these reviews are posted exactly as submitted and no alterations are made by our team.
Based on data from past customer purchasing behaviors, these parts are most commonly purchased together along with the part you are viewing. These parts may be necessary or helpful to replace to complete your current repair.
All our installation videos are created and produced in collaboration with our in-house repair technician, Mark Sodja, who has helped millions of eReplacementParts customers over the last 13 years repair their products. Mark has years of experience in selling and repairing both commercial and residential products with a specialty in gas-powered equipment.
This data is collected from customers who submitted a repair instruction after replacing this exact part. Customers can rate how easy the repair was to complete and how long it took. We aggregate this data to provide a repair rating that allows customers to quickly determine the difficulty and time needed to perform their own repair.