
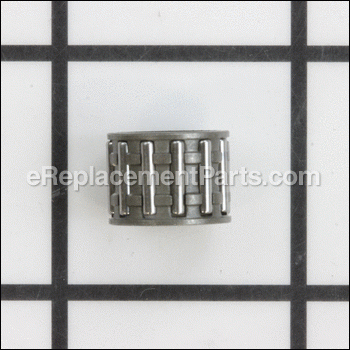
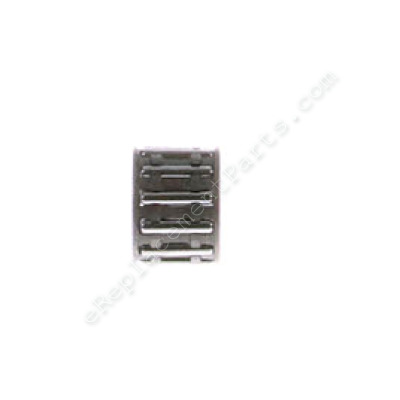


This is a genuine replacement part sourced directly from the original manufacturer for use with chainsaws made by Echo and Shindaiwa. The needle bearing goes between the clutch washer and the clutch drum. It will need to be replaced if it becomes broken. During the installation process, a screwdriver and a socket set may be required to replace this part. This item is available individually and is made out of metal.
Bearing, Needle 17501200831
OEM part for: Echo, Shindaiwa
Part Number: 17501200831
$14.90
In Stock
Jump To:
Frequently Purchased Together ?


Compatibility
This part will fit the following 41 machines
Shindaiwa
326T 326T Chainsaw View Diagrams & Manuals
Echo
CS-301 Chainsaw View Diagrams & Manuals
CS-330MX4 (C07213001001 - C07213999999) Chainsaw View Diagrams & Manuals
CS-330T (C04212001001 - C04212999999) Chainsaw View Diagrams & Manuals
CS-330MX4 (C07311001001 - C07311999999) Chainsaw View Diagrams & Manuals
CS-330T (C07711001001 - C07711999999) Chainsaw View Diagrams & Manuals
CS-330MX4 (C07411001001 - C07411999999) Chainsaw View Diagrams & Manuals
CS-330T (C08611001001 - C08611999999) Chainsaw View Diagrams & Manuals
CS-330T (09001001 - 09999999) Chainsaw View Diagrams & Manuals
CS-330T (C09613001001 - C09613999999) Chainsaw View Diagrams & Manuals
CS-330T (10001001 - 10999999) Chainsaw View Diagrams & Manuals
CS-360T (09001001 - 09020623) Chainsaw View Diagrams & Manuals
CS-360T (09020624 - 09999999) Chainsaw View Diagrams & Manuals
CS-360T (10001001 - 10002126) Chainsaw View Diagrams & Manuals
CS-360T (10002727 - 10999999) Chainsaw View Diagrams & Manuals
CS-360T (C04412001001 - C04412999999) Chainsaw View Diagrams & Manuals
CS-360T (C07811001001 - C07811999999) Chainsaw View Diagrams & Manuals
CS-360T (C08711001001 - C08711999999) Chainsaw View Diagrams & Manuals
CS-360T (C09713001001 - C09713999999) Chainsaw View Diagrams & Manuals
CS-370 (09001001 - 09014532) Chainsaw View Diagrams & Manuals
CS-370 (09014533 - 09999999) Chainsaw View Diagrams & Manuals
CS-370 (10001001 - 10002200) Chainsaw View Diagrams & Manuals
CS-370 (10002001 - 10999999) Chainsaw View Diagrams & Manuals
CS-370 (C06212001001 - C06212999999) Chainsaw View Diagrams & Manuals
CS-370 (C08011001001 - C08011999999) Chainsaw View Diagrams & Manuals
CS-370 (C08911001001 - C08911999999) Chainsaw View Diagrams & Manuals
CS-370 (C09913001001 - C09913999999) Chainsaw View Diagrams & Manuals
CS-400 (C08111001001 - C08111999999) Chainsaw View Diagrams & Manuals
CS-400 (C09011001001 - C09011999999) Chainsaw View Diagrams & Manuals
CS-400 (C10013001001 - C10013999999) Chainsaw View Diagrams & Manuals
CS-440 (08001001 - 08007504) Chainsaw View Diagrams & Manuals
CS-440 (08007505 - 08999999) Chainsaw View Diagrams & Manuals
CS-440 (C09112001001 - C09112999999) Chainsaw View Diagrams & Manuals
CS-4400 (Type 1E) (After S/N 101001) Chainsaw View Diagrams & Manuals
CS-400 (C09212001001 - C09212999999) Chainsaw View Diagrams & Manuals
CS-350TES Chainsaw View Diagrams & Manuals
CS-420ES (20001001-20999999) Chainsaw View Diagrams & Manuals
CS-360T (09001001-09999999) Chainsaw Lawn Equipment View Diagrams & Manuals
CS-360T (10001001-10999999) Chainsaw Lawn Equipment View Diagrams & Manuals
CS-440 (08001001-08999999) Chainsaw Lawn Equipment View Diagrams & Manuals
CS-4400 (1E)(101001-999999) Chainsaw Lawn Equipment View Diagrams & Manuals
Show More Compatible Models
This item works with the following types of products:
- Chain Saw Parts
- Saw Parts
Repair Videos ?
Watch the Repair Video for
Bearing, Needle

Articles:
|
Filthy Filters? This article will show you how to install a filter kit on an Echo SRM-225 trimmer....
May 27, 2015
|

Customer Part Reviews ?
Questions & Answers ?
Our customer Service team is at the ready daily to answer your part and product questions.

Ask our Team
We have a dedicated staff with decades of collective experience in helping customers just like you purchase parts to repair their products.
Does this fit my product?Questions & Answers for Bearing, Needle
No questions have been asked yet
Customer Repair Instructions ?
All our customer repair instructions are solicited directly from other customers just like you who have purchased and replaced this exact part.
Worn out clutch drum sprocket
jay - November 19, 2015
👍 1 of 1 people found this instruction helpful
Tool Type
Chain Saw
Difficulty
Medium
Time
30-60 minutes
Tools Used
Screwdriver, Socket set, I made a clutch removal tool with an old socket and a grinder
Removed spark plug and stuffed cord in spark plug hole to act as a piston stop . Made my own tool for removing clutch (would recommend purchasing a correct 3 pronged socket tool). Reverse threads. Simple to remove and replace. Of course the chain and bar will need to be removed first.
Did you find this story helpful?
Thanks for voting and helping fellow customers!
The sprocket on the clutch drum was worn down, causing the chain to become too tight.
Philip - July 15, 2022
Tool Type
Chain Saw
Difficulty
Medium
Time
30-60 minutes
Tools Used
Screwdriver, Socket set, Wrench Set, Echo specific clutch removal tool.
Removed the pull start cover, and held the starter nut with pliers. Use the clutch removal tool on the other side of the saw, turning counter clockwise to remove.
Did you find this story helpful?
Thanks for voting and helping fellow customers!
Clutch drum sprocket was worn out. Had grooves in it. I replaced the whole assembly as a precaution.
Roy - December 21, 2021
Tool Type
Chain Saw
Difficulty
Easy
Time
15-30 minutes
Tools Used
Screwdriver, Socket set, Or the chainsaw wrench that came with the saw.
Removed the spark plug
Insert a knoted piece of small rope into the spark plug hole. Leave a tail to remove this later. This is necessary to keep the cylinder from moving while removing the clutch assembly. The thread is a left hand thread.
Used a chisel and hammer to remove the old clutch assembly
This creates a quick jolt to loosen the assembly.
Remove the old clutch assembly.
Remove the knoted rope from the spark plug hole
Reinsert the spark plug
Install the new clutch assembly, (washer, bearing, clutch drum, washer, clutch assembly) on the crankshaft. Remember, it's a left hand thread.
Lightly tap it with a chisel to tighten it.
Install the bar and chain and crank the saw.
The clutch assembly will tighten as you use the saw.
Did you find this story helpful?
Thanks for voting and helping fellow customers!
clutch
john - September 21, 2020
Tool Type
Chain Saw
Difficulty
Easy
Time
15-30 minutes
Tools Used
Socket set
removed old clutch
Did you find this story helpful?
Thanks for voting and helping fellow customers!
Bearing Needle was bad. Clutch Drum was worn.
Michael - July 11, 2020
Tool Type
Chain Saw
Difficulty
Easy
Time
15-30 minutes
Tools Used
Screwdriver, Socket set, Battery powered Impact Wrench
1. Removed Cover to Clutch and removed chain and chain bar.
2. Used impact wrench and removal tool to loosen Clutch.
3 Removed Clutch and clutch drum
4. Replaced needle and clutch drum [greased bearing needle]
5 Re-installed Clutch and tightened with removal tool and impact wrench.
6. Re-installed bar and chain
7 re-installed cover and tightened chain with adjusting screw.
Easy fix with an impact wrench.
Did you find this story helpful?
Thanks for voting and helping fellow customers!
Chain would bind on sprocket
Raymond - December 27, 2019
Tool Type
Chain Saw
Difficulty
Easy
Time
15-30 minutes
Tools Used
, Hammer and punch
Removed clutch assembly, by turning the spring as a left-handed thread. The punch was placed on the shoulder of the “Y” piece of the spring assembly. Then all pieces were removed and replaced. There is a socket available that will fit the front of the spring assembly, and using an impact can remove the spring assembly.
Did you find this story helpful?
Thanks for voting and helping fellow customers!
No oil was reaching the bar on my Echo CS400 chainsaw.
Charles - December 11, 2017
Tool Type
Chain Saw
Difficulty
Medium
Time
15-30 minutes
Tools Used
Screwdriver, Wrench Set, Special clutch removal tool, rope
1. I knew the bar was not getting oil. I tried cleaning the filter and the line to the pump.
That did not work, so I knew there was something else wrong.
2. I watched a YouTube video and saw that the drive gear on the oil pump might be stripped.
3. To verify that the oil pump was bad, I ordered a special clutch removal tool (the oil pump is under the clutch) and took it apart before ordering parts. The clutch removal tool is a disk with three studs on it that turns the clutch to break it free. It takes a 3/4 wrench to turn.
4. You will need to remove the bar and chain. Then, remove the spark plug and stuff some rope in the cylinder to keep the piston from moving when you do this. Please leave enough that you can pull the rope out when you are done!
5. To remove the clutch, turn it clockwise, not counterclockwise like a regular nut.
6. Once the clutch is removed you will find some washers, the chain drive gear, a needle bearing and the beneath all this, the oil pump. All of this is shown on the e-replacement's excellent parts breakdown.
7. The oil pump is held in place by two screws. It was locked up, and its plastic gear was stripped. The gear cannot be replaced. You have to buy the whole pump.
8. I ordered the pump along with a small needle bearing that supports the chain drive gear, from e-replacements.
9. Always inspect all your parts while you have the chainsaw apart. It is a good time to replace the chain drive gear if it is chewed up. The little needle bearing is pretty delicate and I would always take this chance to replace it.
10. Putting the saw back together was the reverse of disassembly and took about five minutes. I greased the needle bearing thoroughly before putting it all together.
11. This repair worked like a charm. I now have oil on the bar and the saw is cutting like new.
Did you find this story helpful?
Thanks for voting and helping fellow customers!
The clutch drum has the chain drive cog attached to it and it was just wore out. I only replaced the bearing because, I was there.
Stephen - March 29, 2017
Tool Type
Chain Saw
Difficulty
Easy
Time
Less than 15 minutes
Tools Used
Screwdriver, Adjustable Wrench, A spanner wrench would have made it a bit easier.
It was pretty straight forward repair. I followed the directions from your guy on YouTube. He had all the good ideas.
Did you find this story helpful?
Thanks for voting and helping fellow customers!
OEM stands for Original Equipment Manufacturer and means the part you’re buying is sourced directly from the manufacturer who made your product. At eReplacementParts, we sell only genuine OEM parts, guaranteeing the part you’re purchasing is of better design and of higher quality than aftermarket parts.
Our product descriptions are a combination of data sourced directly from the manufacturers who made your product as well as content researched and curated by our content & customer service teams. This content is edited and reviewed internally before being made public to customers.
Our customer service team are at the ready daily to answer your part and product questions. We have a dedicated staff with decades of collective experience in helping customers just like you purchase parts to repair their products.
All our part reviews are solicited directly from other customers who have purchased this exact part. While we moderate these reviews for profanity, offensive language or personally identifiable information, these reviews are posted exactly as submitted and no alterations are made by our team.
All our customer repair instructions are solicited directly from other customers just like you who have purchased and replaced this exact part. While we moderate these reviews for profanity, offensive language or personally identifiable information, these reviews are posted exactly as submitted and no alterations are made by our team.
Based on data from past customer purchasing behaviors, these parts are most commonly purchased together along with the part you are viewing. These parts may be necessary or helpful to replace to complete your current repair.
All our installation videos are created and produced in collaboration with our in-house repair technician, Mark Sodja, who has helped millions of eReplacementParts customers over the last 13 years repair their products. Mark has years of experience in selling and repairing both commercial and residential products with a specialty in gas-powered equipment.
This data is collected from customers who submitted a repair instruction after replacing this exact part. Customers can rate how easy the repair was to complete and how long it took. We aggregate this data to provide a repair rating that allows customers to quickly determine the difficulty and time needed to perform their own repair.