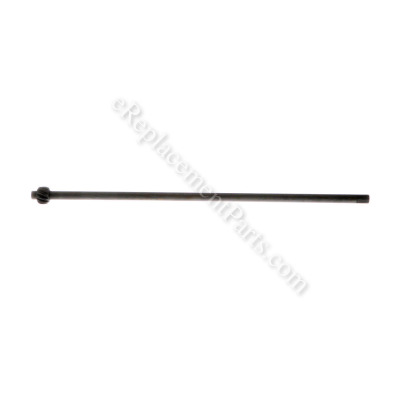
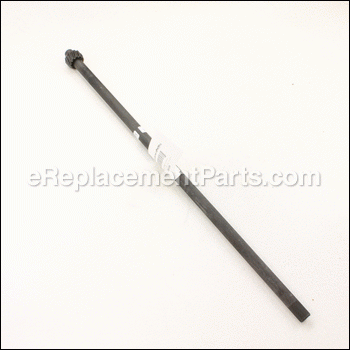


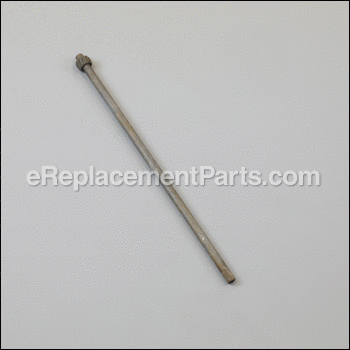

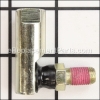
This steering shaft is an OEM direct from Craftsman. Compatible with lawn tractor engines, the heavy-duty, metal shaft is fitted between the steering wheel and the sector gear. This component allows the operator to move the tractor in the desired direction. The steering shaft is sold individually. A screwdriver, pliers, socket set and vice grips are often needed for the proper installation.
Shaft-strg 738-0919B
OEM part for: MTD, Craftsman, Murray, Yard Machines, Yard Man, Troy-Bilt
Part Number: 738-0919B
$59.75
In Stock
Jump To:
Frequently Purchased Together ?


Compatibility
This Shaft-strg will fit the following 252 machines. Confirm this part works with your model, and view the detailed model diagrams and repair help we have to offer.
Craftsman
Murray
Yard Machines
Yard Man
MTD
Troy-Bilt
Show More Compatible ModelsThis item works with the following types of products:
- Lawn Tractor Parts
This part replaces obsolete part #: 738-0919A
Customer Part Reviews ?
Average Rating (out of 5):
Click to filter by ratings:
5 stars
4
4 stars
0
3 stars
0
2 stars
0
1 stars
0
< PREV
- 1
Excellent service
Perfect fit
Guest -
October 9, 2023
Verified Purchase
Item fit perfect and was easy to install
This steering shaft was the perfect replacement item and is a good quality piece. Installed very easy and works as good as original
Guest -
May 1, 2023
Verified Purchase
Perfect replacement part!
Steering Shaft. Part# 738-0919B was the perfect replacement part. Not a simple job, but the repair was a success and well worth the effort.
Guest -
May 26, 2020
Verified Purchase
Steering shaft
Ordering was easy and received my part when they said I would. Part was an exact match. Am happy with my experience and will order from them again.
Guest -
March 22, 2020
Verified Purchase
Questions & Answers ?
Our customer Service team is at the ready daily to answer your part and product questions.

Ask our Team
We have a dedicated staff with decades of collective experience in helping customers just like you purchase parts to repair their products.
Does this fit my product?Questions & Answers for Shaft-strg
Does the bottom bushing and screw come with the steering shaft
Stewart
for model number 13AN77KG011 Troy bilt
asked on 2023-03-07
Hi Stewart,
Thank you for your question. These parts would be sold separately. The part number listed under your model number for the bolt is 710-1309. The part number listed for the steering shaft cap is 948-0389. The part number for the hex flange bearing is 741-04124. If you would like to place an order for these parts, please call our customer service line and anyone will be happy to assist you. We look forward to hearing from you!
eReplacementParts Team March 07, 2023
What's the easiest way to remove the screw on the end of the shaft??
Richard
for model number 247288812
asked on 2022-03-14
Hello Richard, Thank you for your inquiry. We have researched your model and found the following installation instructions for you. Confirm that the mower deck is at its lowest position and that the clutch
actuator lever is in the off position. Now remove the retaining pins securing
the support arms and detach the arms to release the mower deck from the frame. Next release the deck belt from the engine pulley and the belt guides. Detach the clutch cable from the retainer and you can now slide the deck out from under the frame. Now pull off the steering wheel cover and use a 3/4 inch socket to loosen and unthread the mounting nuts securing the steering wheel. Remove the nut and washer then pull off the wheel, you can use a mallet to help loosen the adapter, then pull the adapter off now lift up the hood and use a 3/8 inch socket wrench to help unthread the fuel tank mounting bolts. Once you have the bolts removed set the tank aside and use a floor jack to lift up the front end of the mower use pliers to remove the spring clip securing the steering shaft. Use a 9/16 inch socket wrench to loosen and unthread the steering support mounting bolts nad slide off the steering support and washer then remove the old shaft.
Insert the new shaft through the steering plate. then slide on the support and the washer, realign the support and replace the mounting bolts. Slide the shaft up through the bushing in the console and reinsert the spring clip to secure lower the front end of the mower. Reposition the fuel tank and secure it with the mounting bolts. Lower the hood and reposition the steering wheel adapter on the steering shaft. Align the steering wheel on the adapter then secure it with the nut and washer and snap on the steering wheel cover. Slide the mower deck back under the frame and secure the clutch cable in the retainer, then realign the belt on the engine pulley and the belt guides reposition the support arms and secure them using the washers where applicable and the retaining pins. Good luck with your repair.
eReplacementParts Team March 14, 2022
Customer Repair Instructions ?
All our customer repair instructions are solicited directly from other customers just like you who have purchased and replaced this exact part.
Steering gear at the bottom of steering shaft worn out. Steering wheel would not turn wheels.
dennis - August 2, 2017
👍 9 of 9 people found this instruction helpful
Tool Type
Lawn Tractor
Difficulty
Medium
Time
1-2 hours
Tools Used
Screwdriver, Pliers, Socket set, vicegrips
Parts Used
Would have been a easy fix but had trouble loosening the bolt at the bottom of the shaft. Something that tight should not have a screwdriver slot instead of a bolt head. Trying to loosen it rounded out right away. So I had to take the deck out from under the mower and take it loose with vice grips.took a bit of time to get it broke loose. I put it back with a bolt as it should have been designed.the rest was fairly easy.took the gas tank loose and removed the top part of the dash ,the bolts were on the inside is why I had to take the gas tank loose. Just a bolt holding the steering wheel on. Reversed procedure to put it back together. Easy job if they had a bolt at the bottom of the shaft instead of one with a screwdriver head on there. If it had a bolt head I wouldn't have had to take the deck off.
Did you find this story helpful?
Thanks for voting and helping fellow customers!
Steering shaft was worn and slipping.
Jon - February 18, 2019
👍 1 of 1 people found this instruction helpful
Tool Type
Lawn Tractor
Difficulty
Easy
Time
15-30 minutes
Tools Used
Screwdriver, Socket set
Parts Used
1 unbolted steering shaft
2 removed steering wheel and shaft .
3 installed steering shaft and steering wheel.
Total of 4 bolts.
2 removed steering wheel and shaft .
3 installed steering shaft and steering wheel.
Total of 4 bolts.
Did you find this story helpful?
Thanks for voting and helping fellow customers!
Steering shaft stripped
Ricky - April 7, 2021
Tool Type
Lawn Tractor
Difficulty
Medium
Time
30-60 minutes
Tools Used
Screwdriver, Pliers, Socket set, Wrench Set, Torx
1. Removed deck
2. Removed steering wheel assembly
3. Removed fuel tank
4. Removed old steering shaft
5. Completed all above steps in reverse order
2. Removed steering wheel assembly
3. Removed fuel tank
4. Removed old steering shaft
5. Completed all above steps in reverse order
Did you find this story helpful?
Thanks for voting and helping fellow customers!
Stripped the gears on the steering column
Jeff - June 12, 2020
Tool Type
Lawn Tractor
Difficulty
Hard
Time
1-2 hours
Tools Used
Screwdriver, Power Drill, Socket set, Wrench Set, impact wrench, impact screwdriver
Parts Used
Remove the Philips head screw on the bottom of the column (under the tractor) - Use an impact wrench with a Philips head driver. Its really stuck in there. Do not lose the washers, there are two, one in the engine compartment and one on the screw side. When replacing, use a hex bolt (instead of the screw) and reuse the washers.
remove the steering wheel.
remove the plate/bracket along with another plastic bracket that holds the tractors speed switch
contort the shaft out of the engine compartment and through the plate (not easy)
Reverse operations to replace.
remove the steering wheel.
remove the plate/bracket along with another plastic bracket that holds the tractors speed switch
contort the shaft out of the engine compartment and through the plate (not easy)
Reverse operations to replace.
Did you find this story helpful?
Thanks for voting and helping fellow customers!
OEM stands for Original Equipment Manufacturer and means the part you’re buying is sourced directly from the manufacturer who made your product. At eReplacementParts, we sell only genuine OEM parts, guaranteeing the part you’re purchasing is of better design and of higher quality than aftermarket parts.
Our product descriptions are a combination of data sourced directly from the manufacturers who made your product as well as content researched and curated by our content & customer service teams. This content is edited and reviewed internally before being made public to customers.
Our customer service team are at the ready daily to answer your part and product questions. We have a dedicated staff with decades of collective experience in helping customers just like you purchase parts to repair their products.
All our part reviews are solicited directly from other customers who have purchased this exact part. While we moderate these reviews for profanity, offensive language or personally identifiable information, these reviews are posted exactly as submitted and no alterations are made by our team.
All our customer repair instructions are solicited directly from other customers just like you who have purchased and replaced this exact part. While we moderate these reviews for profanity, offensive language or personally identifiable information, these reviews are posted exactly as submitted and no alterations are made by our team.
Based on data from past customer purchasing behaviors, these parts are most commonly purchased together along with the part you are viewing. These parts may be necessary or helpful to replace to complete your current repair.
All our installation videos are created and produced in collaboration with our in-house repair technician, Mark Sodja, who has helped millions of eReplacementParts customers over the last 13 years repair their products. Mark has years of experience in selling and repairing both commercial and residential products with a specialty in gas-powered equipment.
This data is collected from customers who submitted a repair instruction after replacing this exact part. Customers can rate how easy the repair was to complete and how long it took. We aggregate this data to provide a repair rating that allows customers to quickly determine the difficulty and time needed to perform their own repair.