Power Cord 1604460092 - OEM Bosch - eReplacementParts.com
eReplacementParts.com
877-346-4814
Bosch Parts
Repair Parts Home
  
Power Tool Parts
  
Bosch Parts
  1604460092 Power Cord

Power Cord 1604460092

OEM part for: Bosch

Part Number: 1604460092


Install
Videos!
Power Cord - 1604460092:Bosch 360 View
Power Cord - 1604460092:BoschPower Cord - 1604460092:BoschPower Cord - 1604460092:Bosch 360 View
In Stock
Order within the next 2 hours and your part ships today!
Easy 15-30 minutes (9 rated repairs)?
OEM: Original Equipment Manufacturer ?
Bosch
Does this fit my product?

Product Description ?

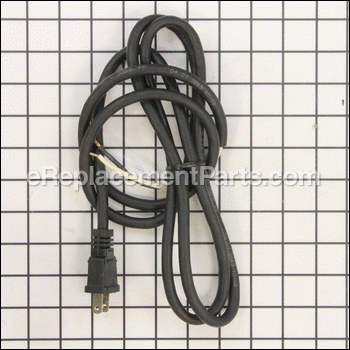
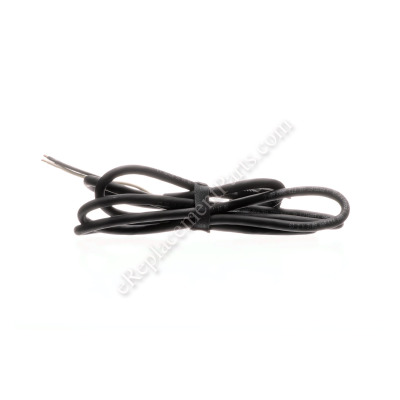
This is a genuine OEM sourced replacement part designed for use with Bosch power tools. It helps to supply power to the motor. It is made out of rubber with metal and it is sold individually. Please note the cord protector/grommet is sold separately.

  • Length: 6.5'
  • Gauge: 14
  • Wires: 2
  • Type: Bare Wire
  • 2 Prongs
  • 2 Wires
  • 14 Gauge
  • 6 1/2 Feet Long
  • Classification: Part
  • Weight: 0.60 lbs.
  • Shipping: Ships Worldwide

Frequently Purchased Together ?

Compatibility

This Power Cord will fit the following 133 machines. Confirm this part works with your model, and view the detailed model diagrams and repair help we have to offer.

Bosch

Show More Compatible Models
Don't see yours? Try searching our site for :

This item works with the following types of products:

  • Chop Saw Parts
  • Saw Parts
  • Grinder Parts
  • Polisher Parts
  • Rotary Hammer Parts
  • Drill Parts
  • Hammer Drill Parts
  • Demolition Hammer Parts
  • Impact Wrench Parts
  • Electric Drill Parts

This part replaces obsolete part #: 1604460198, 1604440004, 1604460133

Repair Videos ?

Articles:
This article contains tips and basic steps for replacing power cords for most types of power tools, machines, and other ...
September 18, 2009

Customer Part Reviews ?

5
Average Rating (out of 5):
3 Reviews
Click to filter by ratings:
5 stars
3
4 stars
0
3 stars
0
2 stars
0
1 stars
0
  • Highest Rating
  • Most Recent
< PREV
  • 1
NEXT >
  • Just right
    Needed a new it was the perfect fit
    Guest - August 11, 2023 Verified Purchase
    High Quality
    It was the right parts without having to fuss about. I'll definitely order from these folks again.
    William - April 5, 2022 Verified Purchase
    Good part
    Easy transaction Part as described Fast delivery
    Guest - November 20, 2020 Verified Purchase

    Questions & Answers ?

    Our customer Service team is at the ready daily to answer your part and product questions.

    photo of team member
    Ask our Team

    We have a dedicated staff with decades of collective experience in helping customers just like you purchase parts to repair their products.

    Does this fit my product?

    Questions & Answers for Power Cord


    No questions have been asked yet

    Customer Repair Instructions ?

    All our customer repair instructions are solicited directly from other customers just like you who have purchased and replaced this exact part.

    Easy 15-30 minutes (9 rated repairs)?

    Power cord was old and had insulation cracking.

    Daniel - August 14, 2017
    👍 1 of 1 people found this instruction helpful
    Tool Type

    Grinder

    Difficulty

    Easy

    Time

    15-30 minutes

    Tools Used

    Screwdriver

    1.Removed handle from grinder
    2.Removed screws to separate the two halves of the handle
    3.Removed cord retaining clamp and loosened electrical connections to remove old cord
    4.Made electrical connections with new cord and secured with retaining clamp
    5.Make sure the switch was properly in place and wire with cord protector
    6.Secured the two halves of the handle with screws
    7.Reattached handle to grinder body
    Did you find this story helpful?
    Thanks for voting and helping fellow customers!

    Not running.

    Albert - December 15, 2015
    👍 1 of 1 people found this instruction helpful
    Tool Type

    Demolition Hammer

    Difficulty

    Easy

    Time

    15-30 minutes

    Tools Used

    Screwdriver, Metric large Allen wrench 10 mm I believe.

    Always check cord and brushes first. in 5 of the last tools I repaired brushes were needed. The cord was broken at the strain relief. To replace the brushes I removed the motor housing, which exposed the brushes. Pull the springs back and rested them on the brush holder. Disconnected the old brushes and installed the new ones. For the cord. I removed the handle then unscrewed the cord clamp.Removed the cord leads from the switch, removed the cord relief, slid the cord relief on the new cord, then connected the cord leads to the switch.
    Did you find this story helpful?
    Thanks for voting and helping fellow customers!

    Blowing breaker when start.

    Randy - January 20, 2021
    Tool Type

    Grinder

    Difficulty

    Easy

    Time

    Less than 15 minutes

    Tools Used

    Screwdriver

    1.Removed screws in sides holding switch.
    2.Separate sides using flat bladed screwdriver.
    2.Unplug switch from main housing.
    3.Slide new grommet over new power cord.
    3.Attach new power cord to new switch with
    black and white wires in same position as
    old using phillips screwdriver.
    4.Attach switch to plate in main housing.
    5.Make sure grommet is inside housing, place
    switch in one side, place other side over
    switch and squeeze together, making sure
    there are no gaps.
    6.Replace screws in sides.
    Did you find this story helpful?
    Thanks for voting and helping fellow customers!

    Broke cord missing grommet

    miguel - August 24, 2020
    Tool Type

    Demolition Hammer

    Difficulty

    Easy

    Time

    Less than 15 minutes

    Tools Used

    Screwdriver

    Replace cord really easy
    Did you find this story helpful?
    Thanks for voting and helping fellow customers!

    Cord had internal break in conductor

    Jonathan - November 20, 2017
    Tool Type

    Demolition Hammer

    Difficulty

    Easy

    Time

    15-30 minutes

    Tools Used

    Screwdriver

    1) Opened case
    2) Removed old cord
    3) Installed new cord
    4) Closed case
    Did you find this story helpful?
    Thanks for voting and helping fellow customers!

    Power cord was damaged.

    Taylor - August 2, 2017
    Tool Type

    Demolition Hammer

    Difficulty

    Easy

    Time

    Less than 15 minutes

    Tools Used

    Screwdriver

    1. Remove ON/Off switch with flat head screwdriver.
    2. Remove the six screws holding the handle assembly to the main body.
    3. Remove old power cord, keeping in mind its orientation and where the wires connected.
    4. Install new cord protector and connect wire ends into their correct locations.
    5. Reattach handle assembly with the six screws.
    6. Place On/Off switch half-way in its location and snap the other end in.
    7. Verify that the machine functions properly.
    Did you find this story helpful?
    Thanks for voting and helping fellow customers!

    Bad cord.

    Brian - April 28, 2017
    Tool Type

    Rotary Hammer

    Difficulty

    Easy

    Time

    15-30 minutes

    Tools Used

    Screwdriver

    Took the housing apart. Disconnected the old power cord. Connected the new cord. Reassembled and tested.
    Did you find this story helpful?
    Thanks for voting and helping fellow customers!

    The governor (speed Control) went out...replaced governor, on-off switch and put a new cord on as will.

    David - March 10, 2017
    Tool Type

    Rotary Hammer

    Difficulty

    Easy

    Time

    15-30 minutes

    Tools Used

    Screwdriver, Pliers

    Remove the rear handle of the hammer
    Take a picture of where all of the parts are
    Make a wiring diagram
    Remove the cord wires from the switch, so you can use the cord grommet on the new cord
    Remove the the governor and switch
    Put the grommet on the new cord
    Install the cord onto the switch
    Install the governor
    Make sure all of the parts are in the correct spot
    Screw the rear handle back on

    Did you find this story helpful?
    Thanks for voting and helping fellow customers!

    Power cord and handle assembly

    Mike - July 19, 2016
    Tool Type

    Demolition Hammer

    Difficulty

    Easy

    Time

    30-60 minutes

    Tools Used

    Socket set, Nutdriver

    Remove the screws from the handle assembly and separate them. Take a picture of the location of the internal parts. And make a wiring diagram. Remove the cord clamp. Remove the cord wires from the switch. Transfer all the other parts into the the handle assembly. Install the cord and switch into the handle. Install the cord clamp. Attach the handle together and then to the hammer.
    Did you find this story helpful?
    Thanks for voting and helping fellow customers!

    OEM stands for Original Equipment Manufacturer and means the part you’re buying is sourced directly from the manufacturer who made your product. At eReplacementParts, we sell only genuine OEM parts, guaranteeing the part you’re purchasing is of better design and of higher quality than aftermarket parts.

    Our product descriptions are a combination of data sourced directly from the manufacturers who made your product as well as content researched and curated by our content & customer service teams. This content is edited and reviewed internally before being made public to customers.

    Our customer service team are at the ready daily to answer your part and product questions. We have a dedicated staff with decades of collective experience in helping customers just like you purchase parts to repair their products.

    All our part reviews are solicited directly from other customers who have purchased this exact part. While we moderate these reviews for profanity, offensive language or personally identifiable information, these reviews are posted exactly as submitted and no alterations are made by our team.

    All our customer repair instructions are solicited directly from other customers just like you who have purchased and replaced this exact part. While we moderate these reviews for profanity, offensive language or personally identifiable information, these reviews are posted exactly as submitted and no alterations are made by our team.

    Based on data from past customer purchasing behaviors, these parts are most commonly purchased together along with the part you are viewing. These parts may be necessary or helpful to replace to complete your current repair.

    All our installation videos are created and produced in collaboration with our in-house repair technician, Mark Sodja, who has helped millions of eReplacementParts customers over the last 13 years repair their products. Mark has years of experience in selling and repairing both commercial and residential products with a specialty in gas-powered equipment.

    This data is collected from customers who submitted a repair instruction after replacing this exact part. Customers can rate how easy the repair was to complete and how long it took. We aggregate this data to provide a repair rating that allows customers to quickly determine the difficulty and time needed to perform their own repair.

    eReplacementParts.com
    7174 South 400 West
    Suite 5
    Midvale, UT 84047
    visa mastercard discover american express PayPal