
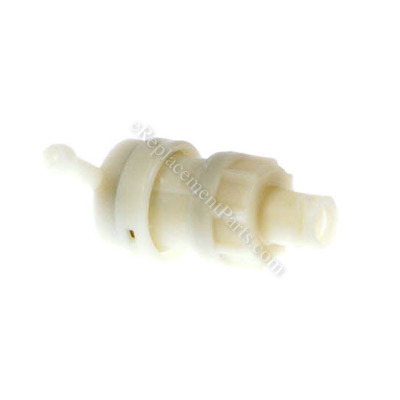


This is an original Delonghi part. This Valve is used in many models of Delonghi espresso makers. The Valve is made mostly of plastic and contains springs and gaskets. The Valve is designed to be a pressure relief in the event that the water cannot flow through correctly. This valve should be replaced if water is bypassed to the tank when under low pressure.
Tools needed:
• Screw driver
• Adjustable wrench
• Needle nosed pliers
Valve 7313260161
OEM part for: DeLonghi
Part Number: 7313260161
$8.32
In Stock
Jump To:
Product Description ?
- Classification: Part
- Weight: 0.01 lbs.
- Shipping: Ships Worldwide
Frequently Purchased Together ?


Compatibility
This part will fit the following 61 machines
DeLonghi
BAR12FU Espresso/Cappuccino Maker View Diagrams & Manuals
BAR32 Espresso/Cappuccino Maker View Diagrams & Manuals
BAR41 Espresso/Cappuccino Maker View Diagrams & Manuals
BAR42 Espresso/Cappuccino Maker View Diagrams & Manuals
BAR52 Espresso/Cappuccino Maker View Diagrams & Manuals
BCO264B Espresso/Cappuccino/Coffee Combo Cafe Nero View Diagrams & Manuals
ECO310BK Coffee Maker View Diagrams & Manuals
EC140B Espresso Maker Black View Diagrams & Manuals
EC155 Cappuccino Maker View Diagrams & Manuals
EC270 Coffee Maker View Diagrams & Manuals
EC460 Cappuccino Maker View Diagrams & Manuals
EC610 Espresso/Cap Maker View Diagrams & Manuals
EC700 Espresso Maker View Diagrams & Manuals
EC701 Espresso Maker View Diagrams & Manuals
EC702 Coffee Maker View Diagrams & Manuals
EC710 Espresso Maker View Diagrams & Manuals
EC730 Espresso Maker View Diagrams & Manuals
EC220CD Coffee Maker View Diagrams & Manuals
EC330 Coffee Maker View Diagrams & Manuals
EC610 (132154001) Espresso Pump View Diagrams & Manuals
ECO310BK Icona Pump Espresso Machine View Diagrams & Manuals
BAR12 (132103004) Espresso Pump View Diagrams & Manuals
EC270 (132103085) Espresso Pump View Diagrams & Manuals
ECP3630 Pump Espresso View Diagrams & Manuals
DES023 Kmix Espresso Maker 120v (Blue) View Diagrams & Manuals
EC685W Dedica Deluxe Manual Espresso Machine View Diagrams & Manuals
EC330 (132106032) Espresso Pump View Diagrams & Manuals
BAR41 (132151003) Retro Espresso/Cappuccino Maker View Diagrams & Manuals
ECO310W (0132106089) Icona Manual Espresso Machine View Diagrams & Manuals
BAR32 (132151022) Espresso Pump View Diagrams & Manuals
BCO430 Cappuccino Espresso And Coffee Maker View Diagrams & Manuals
BAR42 (132152004) Espresso Pump View Diagrams & Manuals
BAR18 (132103076) Espresso Pump View Diagrams & Manuals
DES029 (0Wes029006) Coffee Espresso Maker View Diagrams & Manuals
EC460 (132104080) Espresso Maker View Diagrams & Manuals
DES027 (0Wes027006) Coffee Espresso Maker View Diagrams & Manuals
EC155 Espresso Coffee Maker View Diagrams & Manuals
DES021 (0Wes021007) Coffee Espresso Maker View Diagrams & Manuals
DES028 (0Wes028006) Espresso Coffee Maker View Diagrams & Manuals
EC685BK Dedica Deluxe Manual Espresso Machine View Diagrams & Manuals
EC140BEXC (132103072) Espresso Coffee Maker View Diagrams & Manuals
ECP3220 Espresso Coffee Maker View Diagrams & Manuals
EC140B (132103058) Espresso Coffee Maker View Diagrams & Manuals
DES020S (0Wes020s06) Espresso Pump View Diagrams & Manuals
EC680R Dedica Manual Espresso Machine Red View Diagrams & Manuals
EC680BK Dedica Manual Espresso Machine Black View Diagrams & Manuals
EC701 (132154011) Espresso/Cappuccino Maker View Diagrams & Manuals
ECP3420 Manual Espresso Machine View Diagrams & Manuals
BCO264B (132552001) Cafe Nero Combo Coffee And Espresso Maker View Diagrams & Manuals
EC220CD (132151070) 15-Bar Pump Driven Espresso Maker View Diagrams & Manuals
BCO430BM Cappuccino Espresso And Coffee Maker View Diagrams & Manuals
EC685R Dedica Deluxe Manual Espresso Machine View Diagrams & Manuals
DES024 Espresso Maker - 120v - Black View Diagrams & Manuals
BAR51 (132150000) Espresso/Cappuccino Maker View Diagrams & Manuals
DES025 (0Wes025006) Coffee Maker View Diagrams & Manuals
EC702 (132154017) Espresso/Cappuccino Maker View Diagrams & Manuals
BCO432 (132510002) Family Espresso Machine View Diagrams & Manuals
EC680M Dedica Manual Espresso Machine View Diagrams & Manuals
DES020 (0Wes020006) Coffee Maker View Diagrams & Manuals
ECO310R (0132106088) Icona Manual Espresso Machine View Diagrams & Manuals
EC685M Dedica Deluxe Manual Espresso Machine View Diagrams & Manuals
Show More Compatible Models
This item works with the following types of products:
- Espresso Parts
- Coffee Maker Parts
This part replaces obsolete part #: 7313286129, 7332128100
Customer Part Reviews ?
Average Rating (out of 5):
Click to filter by ratings:
5 stars
5
4 stars
1
3 stars
0
2 stars
0
1 stars
0
< PREV
- 1
Quality replacement part
Fast shipping and exactly what I needed
Guest -
October 20, 2023
Verified Purchase
Anti drip valve
Correct part, fit perfect. Espresso machine working.
Efficient and fast service. Will definitely use you again. TY
Guest -
February 28, 2022
Verified Purchase
Fast delivery, part works beautifully
I had the part I needed within a couple of days even though I ordered it during a busy holiday weekend. The online repairs tips at eReplacement Parts was spot on. I installed the new anti-drip valve and voila, the espresso maker now works without leaking. Very happy with this purchase.
Guest -
January 17, 2022
Verified Purchase
Easy and efficient
The part was easy to find in the diagram of the machine. This diagram is an amazing feature. Super helpful. I got the Lars in less than a week. The whole experience was easy and efficient.
Jorge -
February 24, 2021
Verified Purchase
Easy repair, part fits perfectly.
Coffee machine is like new and works like new!
Guest -
January 9, 2020
Verified Purchase
Probla me ragla
iGlobal -
August 17, 2023
Verified Purchase
t
t
t -
t days ago
Verified Purchase
eReplacementParts Team
t
Questions & Answers ?
Our customer Service team is at the ready daily to answer your part and product questions.

Ask our Team
We have a dedicated staff with decades of collective experience in helping customers just like you purchase parts to repair their products.
Does this fit my product?Questions & Answers for Valve
No questions have been asked yet
Customer Repair Instructions ?
All our customer repair instructions are solicited directly from other customers just like you who have purchased and replaced this exact part.
Hot water was leaking back into the water reservoir.
Scott - September 19, 2016
👍 10 of 11 people found this instruction helpful
Tool Type
Coffee Maker
Difficulty
Easy
Time
15-30 minutes
Tools Used
Screwdriver
Parts Used
I removed the top cover of the coffee maker to gain access to the internal parts. There are two hoses attached to the valve that pull off. You have to remove a clip from the small hose going to the boiler first before the hose will come off. The valve unscrews from the output of the pump. I unscrewed the old valve, screwed in the new one and reattached the hoses. The water does not leak back into the reservoir anymore and the machine is very quiet now as I was getting gurgling sounds before. There are many youtube videos available for detailed instructions on how to disassemble the machine.
Did you find this story helpful?
Thanks for voting and helping fellow customers!
When trying making espresso water was leaking everywhere but where it was supposed to.
Lorenzo - October 30, 2016
👍 7 of 7 people found this instruction helpful
Tool Type
Coffee Maker
Difficulty
Easy
Time
Less than 15 minutes
Tools Used
Screwdriver
Open the machine up and try to run it, saw that water was spraying from the valve. Ordered a new valve the o rings and a spring (because I lost it on the disassembly) on the small hose that connects the valve to the boiler i replaced the 2 o rings and replaced the valve. Tried again the machine and everything was back to normal!:) now I have my espresso machine working like new and for under 10$, love it!
P.s the valve just need screw in, I used some pliers to tie it up (not too hard)
P.s the valve just need screw in, I used some pliers to tie it up (not too hard)
Did you find this story helpful?
Thanks for voting and helping fellow customers!
Check valve worn out and leaking.
greg - June 12, 2016
👍 4 of 4 people found this instruction helpful
Tool Type
Coffee Maker
Difficulty
Medium
Time
15-30 minutes
Tools Used
Screwdriver, Pliers
Parts Used
Getting the old valve off took a bit of effort, remove the old valve before ordering a new one in case you break something else like the pump. Reassemble and test with water before reattaching the lid. The valve inlet & outlet hose has tiny o-ring seals, be careful not to loose them or the retaining clips.
Did you find this story helpful?
Thanks for voting and helping fellow customers!
Blown gasket in coffeemaker valve
Leonardo - February 8, 2017
👍 3 of 3 people found this instruction helpful
Tool Type
Coffee Maker
Difficulty
Medium
Time
15-30 minutes
Tools Used
Screwdriver, Pliers, New cable-tie for one of the tubes
Parts Used
Open the machine by unscrewing the various screws and popping open the top section.
Remove the old valve:
1. Disconnected the 2 tubes from the broken valve (1 with metal clip, remove cable tie)
2. Pull tubes off of connectors
3. Unscrew the old valve from the pump connector
4. Pull the old part out of the machine and remove the O-ring from the screw-on portion
Insert the new valve:
1. Place O-ring from old valve into the correct place
2. Screw in the new valve to pump
3. Attach tubes to new valve (insert clip and new cable tie in appropriate locations)
Did you find this story helpful?
Thanks for voting and helping fellow customers!
Water pouring from inside the coffee maker
Yelena - March 13, 2019
👍 2 of 2 people found this instruction helpful
Tool Type
Coffee Maker
Difficulty
Medium
Time
1-2 hours
Tools Used
Screwdriver, Pliers, Wrench Set
Parts Used
1.Removed the cover (to remove the cover, unscrew the two top screws on the back; then turn the machine upside down, pull out the plastic coffee presser and unscrew the 3 screws located inside the 3 deep holes. Once done, turn the machine back up and remove the cover)
2. Pulled out the pin holding the shorter, thinner tube
3. Pulled the short tube out of the old valve
4. Pulled the other longer tube (delivering water from the water tank) out of the water tank, so I could unscrew the old valve
5. Unscrewed the old valve
6. Pulled the long tube off the old valve
7. Attached the long tube (removed in step #6) to the new valve
8. Placed an O-ring inside the new valve where the short tube will be inserted (re-used the old one as I purchased a wrong size)
9. Screwed the new valve in (with the long tube attached and the O-ring inserted)
9. Inserted the long tube back into the water tank
10. Inserted the short tube
11. Inserted the pin to secure the short tube (re-used the old one)
12. Plugged the machine in, turned it on and tested for leakage
13. Once confirmed there is no leakage, turned the machine off, unplugged it and placed the cover back on.
13. DONE
Did you find this story helpful?
Thanks for voting and helping fellow customers!
Leaking when under pressure and no water coming out
Christian - January 8, 2020
Tool Type
Coffee Maker
Difficulty
Easy
Time
Less than 15 minutes
Tools Used
Socket set, Security Allen key T15 long
Parts Used
Removed the water tank and unplugged the machine
Turned the coffee machine upside down to access the screws keeping the lid on
Removed the lid and turned the machine upright
The valve was broken (the thread) and was spraying water all over
Replaced the valve and reconnected the hoses after switching the gasket from the old valve to the new one.
Coffee machine runs like new.
Did you find this story helpful?
Thanks for voting and helping fellow customers!
Leaky espresso machine
Julia - August 9, 2019
Tool Type
Coffee Maker
Difficulty
Medium
Time
15-30 minutes
Tools Used
Pliers, Wide rubber band to protect the plastic from the pliers
Parts Used
I removed the old valve by putting a wide rubber band and then twisting it off with pliers.I then put in the new valve. A tube attached to the valve leaked after the change so I wrapped it in Teflon tape which corrected that problem. The hardest part was getting the top off the machine to get to the leaking parts. This was a $10 fix for a $200 machine, so it was well worth it!
Did you find this story helpful?
Thanks for voting and helping fellow customers!
Valve fell apart from age
JAY - March 27, 2019
Tool Type
Coffee Maker
Difficulty
Medium
Time
30-60 minutes
Tools Used
, special star type heads on screws, fabed up a custom driver
Parts Used
Opened it up and R&R valve,filter,pressure line,and seals
Did you find this story helpful?
Thanks for voting and helping fellow customers!
Valve on water pump cracked
Charles - December 26, 2018
Tool Type
Coffee Maker
Difficulty
Medium
Time
Less than 15 minutes
Tools Used
Screwdriver, Pliers, Adjustable Wrench, zip ties
Parts Used
1. Remove 2 screws under the top of the machine, near the head
2. Remove function knob
3. Remove 2 screws behind function knob
4. Slide top shot tray/front towards you, off the machine
5. Remove 2 screws holding the top casing on the machine, then remove the top casing
6. Pull clip out of the front of the valve
7. Cut the zip tie on the back hose on the valve or slide the hose off the valve
8. Unscrew the valve off the water pump
9. Repeat in reverse with the new valve, done
Did you find this story helpful?
Thanks for voting and helping fellow customers!
The valve which regulates espresso pressure split and leaked, resulting in no pressure for espresso and water coming out of the machine
Jesse - September 19, 2018
Tool Type
Coffee Maker
Difficulty
Medium
Time
15-30 minutes
Tools Used
Screwdriver, Pliers, Torx driver (T25?) modified for security torx w/center pin
Parts Used
1. Removed the two small Philips screws on the back and the three Torx fasteners underneath the upper portion of the unit which allow the top of the unit to be removed
2. Disconnected valve (removed clip which fastens output hose, disconnected input hose, rotated valve to unscrew from pump)
3. Reassembly really is pretty much the reverse of disassembly, though I did test it before putting the top back on, being very careful not to get near energized wiring.
2. Disconnected valve (removed clip which fastens output hose, disconnected input hose, rotated valve to unscrew from pump)
3. Reassembly really is pretty much the reverse of disassembly, though I did test it before putting the top back on, being very careful not to get near energized wiring.
Did you find this story helpful?
Thanks for voting and helping fellow customers!
Load More Install Stories
OEM stands for Original Equipment Manufacturer and means the part you’re buying is sourced directly from the manufacturer who made your product. At eReplacementParts, we sell only genuine OEM parts, guaranteeing the part you’re purchasing is of better design and of higher quality than aftermarket parts.
Our product descriptions are a combination of data sourced directly from the manufacturers who made your product as well as content researched and curated by our content & customer service teams. This content is edited and reviewed internally before being made public to customers.
Our customer service team are at the ready daily to answer your part and product questions. We have a dedicated staff with decades of collective experience in helping customers just like you purchase parts to repair their products.
All our part reviews are solicited directly from other customers who have purchased this exact part. While we moderate these reviews for profanity, offensive language or personally identifiable information, these reviews are posted exactly as submitted and no alterations are made by our team.
All our customer repair instructions are solicited directly from other customers just like you who have purchased and replaced this exact part. While we moderate these reviews for profanity, offensive language or personally identifiable information, these reviews are posted exactly as submitted and no alterations are made by our team.
Based on data from past customer purchasing behaviors, these parts are most commonly purchased together along with the part you are viewing. These parts may be necessary or helpful to replace to complete your current repair.
All our installation videos are created and produced in collaboration with our in-house repair technician, Mark Sodja, who has helped millions of eReplacementParts customers over the last 13 years repair their products. Mark has years of experience in selling and repairing both commercial and residential products with a specialty in gas-powered equipment.
This data is collected from customers who submitted a repair instruction after replacing this exact part. Customers can rate how easy the repair was to complete and how long it took. We aggregate this data to provide a repair rating that allows customers to quickly determine the difficulty and time needed to perform their own repair.