
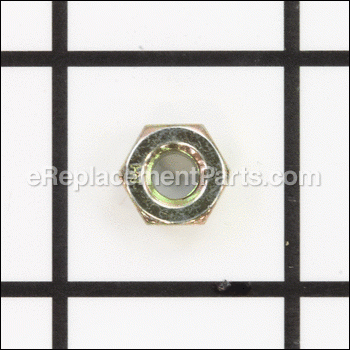


This is a Manufacturer Approved replacement nut for lawn and garden equipment. This item is Metal an is Sold Individually. A lock nut is a type of nut that resists loosening when properly threaded onto a bolt.
Lock Nut 3296-56
OEM part for: Toro, Lawn Boy
Part Number: 3296-56
$3.99
In Stock
Jump To:
Frequently Purchased Together ?


Compatibility
This Lock Nut will fit the following 2872 machines. Confirm this part works with your model, and view the detailed model diagrams and repair help we have to offer.
Toro
30524 (220000001-220999999) Mid-size Mower, Proline Pistol Grip Hydro 15 Hp W/ 36-in. Sd Mower, 2002
30524 (230000001-230999999) Mid-size Mower, Proline Pistol Grip Hydro 15 Hp W/ 36-in. Sd Mower, 2003
30526 (220000001-220999999) Mid-size Mower, Proline Pistol Grip Hydro 15 Hp W/ 48-in. Sd Mower, 2002
30526 (230000001-230999999) Mid-size Mower, Proline Pistol Grip Hydro 15 Hp W/ 48-in. Sd Mower, 2003
30527 (230000001-230999999) Mid-size Mower, Proline Pistol Grip Hydro 15 Hp W/ 36-in. Sd Mower, 2003
30528 (230000001-230999999) Mid-size Mower, Proline Pistol Grip Hydro 15 Hp W/ 48-in. Sd Mower, 2003
37775 (315000001-315999999)(2015) 37775, Power Max 724 Oe Snowthrower, 2015 (Sn 315000001-315999999)
38810 (313000001-313999999)(2013) 38810, Power Max 724 Oe Snowthrower, 2013 (Sn 313000001-313999999)
38816 (313000001-313999999)(2013) 38816, Power Max 726 Oe Snowthrower, 2013 (Sn 313000001-313999999)
38817 (316000001-316999999)(2016) 38817, Power Max 826 Oe Snowthrower, 2016 (Sn 316000001-316999999)
30524 (220000001-220999999)(2002) Proline Pistol Grip Hydro 15 Hp W/ 36-Inch Sd Mower Mid-Size Mower
30524 (230000001-230999999)(2003) Proline Pistol Grip Hydro 15 Hp W/ 36-Inch Sd Mower Mid-Size Mower
30526 (220000001-220999999)(2002) Proline Pistol Grip Hydro 15 Hp W/ 48-Inch Sd Mower Mid-Size Mower
30526 (230000001-230999999)(2003) Proline Pistol Grip Hydro 15 Hp W/ 48-Inch Sd Mower Mid-Size Mower
30527 (230000001-230999999)(2003) Proline Pistol Grip Hydro 15 Hp W/ 36-Inch Sd Mower Mid-Size Mower
30528 (230000001-230999999)(2003) Proline Pistol Grip Hydro 15 Hp W/ 48-Inch Sd Mower Mid-Size Mower
Lawn Boy
Show More Compatible ModelsThis item works with the following types of products:
- Snowblower Parts
- Lawn Mower Parts
- Lawn Tractor Parts
Customer Part Reviews ?
Average Rating (out of 5):
Click to filter by ratings:
5 stars
3
4 stars
0
3 stars
0
2 stars
0
1 stars
0
< PREV
- 1
Great service received on time and correct.
Received part as ordered and works well. Thanks
Guest -
March 1, 2022
Verified Purchase
Pleased
Pleased
Guest -
February 11, 2022
Verified Purchase
Parts for my Toro snow throer
Received all the parts and just in time for our first real snow fall
Guest -
December 22, 2020
Verified Purchase
Questions & Answers ?
Our customer Service team is at the ready daily to answer your part and product questions.

Ask our Team
We have a dedicated staff with decades of collective experience in helping customers just like you purchase parts to repair their products.
Does this fit my product?Questions & Answers for Lock Nut
No questions have been asked yet
Customer Repair Instructions ?
All our customer repair instructions are solicited directly from other customers just like you who have purchased and replaced this exact part.
Worn out blades
Scott - November 29, 2018
👍 1 of 1 people found this instruction helpful
Tool Type
Snowblower
Difficulty
Medium
Time
1-2 hours
Tools Used
Screwdriver, Wrench Set, Nutdriver
Took off blades
Replaced blades with new ones
Replaced blades with new ones
Did you find this story helpful?
Thanks for voting and helping fellow customers!
27 year old snowblower that needed a new impeller. Like new again (almost...)
Don - March 21, 2018
👍 1 of 1 people found this instruction helpful
Tool Type
Snowblower
Difficulty
Medium
Time
1-2 hours
Tools Used
Socket set, Wrench Set, Nutdriver
Pretty straight forward. Just took out the bolts and impeller, then put'em back in. I did need a 3rd hand to get 2 of the bolts back in on the 'passenger side'.
Did you find this story helpful?
Thanks for voting and helping fellow customers!
Rubber rotor blades were shot and so was front scraper so I replaced them both.
James - February 11, 2018
👍 1 of 1 people found this instruction helpful
Tool Type
Snowblower
Difficulty
Medium
Time
More than 2 hours
Tools Used
Screwdriver, Pliers, Power Drill, Socket set, Wrench Set, Allen wrench
One rotor at time, however after pulling first rotor did the scraper bar.
Did you find this story helpful?
Thanks for voting and helping fellow customers!
Bottom scrapper was worn.
Craig - January 24, 2018
👍 1 of 1 people found this instruction helpful
Tool Type
Snowblower
Difficulty
Easy
Time
15-30 minutes
Tools Used
Socket set
Parts Used
1. Removed as much gas as I can from tank
2. Tilted snow blower back on to handle to get to bolts. Easier if on a shop table!!!
3. Shot bolts to be removed with WD40 - let it sit awhile.
4. Using a 5/8" (I think) socket I took off old scrapper
5. Used a hammer to tap off the old scrapper.
6. The housing of snow blower was slightly bent from 23years of use, so I used a 3lb hammer to carefully straighten the housing.
7. Align hole in new scrapper with mounting holes on housing and tapped into place with hammer
8. Starting from one end I put bolts into place and slightly tightened until all 3 bolts were in place
9. Tightened all bolts once in place.
10. The exploded view showing the parts on your web page helps tremendously in figuring on how to approach the job.
Did you find this story helpful?
Thanks for voting and helping fellow customers!
scraper blade broke
Steven - February 25, 2020
Tool Type
Snowblower
Difficulty
Easy
Time
Less than 15 minutes
Tools Used
Pliers, torx
Parts Used
attach screws and self locking nuts
Did you find this story helpful?
Thanks for voting and helping fellow customers!
The blade and scraper were worn-out.
Linda - December 29, 2019
Tool Type
Snowblower
Difficulty
Medium
Time
15-30 minutes
Tools Used
Screwdriver, Pliers, Socket set, Wrench Set, Vice grips
Parts Used
Watched a video on how to change the blades. Followed the instructions on the video. Very informative. Don't forget to remove the spacers from the old blades and install on the new blades. I also used vice grips to clamp down the ends of the blades and hold the screw in position because you need 2 hands to align the nut and screw with a star driver.
Did you find this story helpful?
Thanks for voting and helping fellow customers!
The rubber on the blades was worn down
Boyd - November 19, 2019
Tool Type
Snowblower
Difficulty
Easy
Time
15-30 minutes
Tools Used
Screwdriver, Wrench Set, Cut off tool.
Removed all the screws on the first blade, pulled old rubber blade off the machine. Placed new rubber on machine and started all new screws. Came back and tightened all screws and started on the second blade ( same process ) then used a cutoff tool to cut through all the original screws on the scraper blade that was worn down below the head. Popped off old scraper and used new screws and locknuts to reinstall the new scraper. Job finished, it was really very easy using original replacement parts from ereplacementparts.com!
Did you find this story helpful?
Thanks for voting and helping fellow customers!
I replaced the blades, the old nuts did not hold. Lost 2 bolts.
Michael - March 31, 2019
Tool Type
Snowblower
Difficulty
Medium
Time
30-60 minutes
Tools Used
, Star driver, box end wrench
Parts Used
Replaced the 2 bolts and all 8 nuts. Seems ok now.
Thanks for the quick return!
Thanks for the quick return!
Did you find this story helpful?
Thanks for voting and helping fellow customers!
Screws loosened and lost
John - February 26, 2019
Tool Type
Snowblower
Difficulty
Easy
Time
Less than 15 minutes
Tools Used
Socket set
Parts Used
Added replacement parts
Did you find this story helpful?
Thanks for voting and helping fellow customers!
OEM stands for Original Equipment Manufacturer and means the part you’re buying is sourced directly from the manufacturer who made your product. At eReplacementParts, we sell only genuine OEM parts, guaranteeing the part you’re purchasing is of better design and of higher quality than aftermarket parts.
Our product descriptions are a combination of data sourced directly from the manufacturers who made your product as well as content researched and curated by our content & customer service teams. This content is edited and reviewed internally before being made public to customers.
Our customer service team are at the ready daily to answer your part and product questions. We have a dedicated staff with decades of collective experience in helping customers just like you purchase parts to repair their products.
All our part reviews are solicited directly from other customers who have purchased this exact part. While we moderate these reviews for profanity, offensive language or personally identifiable information, these reviews are posted exactly as submitted and no alterations are made by our team.
All our customer repair instructions are solicited directly from other customers just like you who have purchased and replaced this exact part. While we moderate these reviews for profanity, offensive language or personally identifiable information, these reviews are posted exactly as submitted and no alterations are made by our team.
Based on data from past customer purchasing behaviors, these parts are most commonly purchased together along with the part you are viewing. These parts may be necessary or helpful to replace to complete your current repair.
All our installation videos are created and produced in collaboration with our in-house repair technician, Mark Sodja, who has helped millions of eReplacementParts customers over the last 13 years repair their products. Mark has years of experience in selling and repairing both commercial and residential products with a specialty in gas-powered equipment.
This data is collected from customers who submitted a repair instruction after replacing this exact part. Customers can rate how easy the repair was to complete and how long it took. We aggregate this data to provide a repair rating that allows customers to quickly determine the difficulty and time needed to perform their own repair.