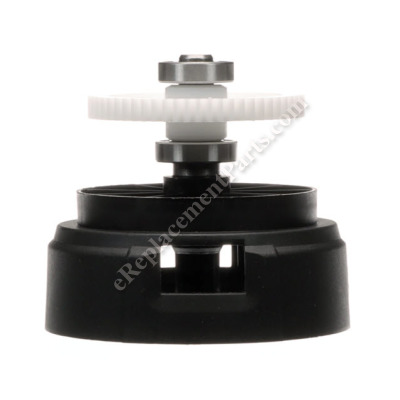
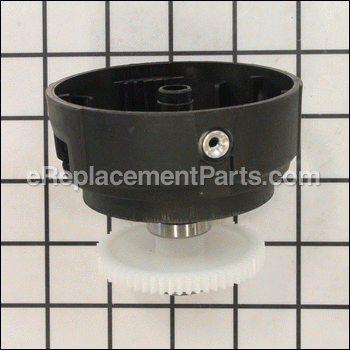
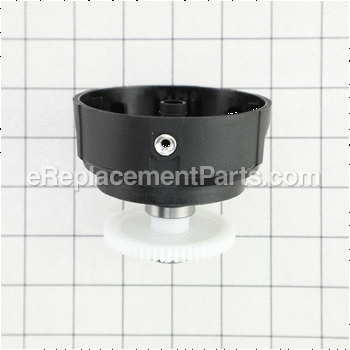


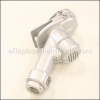
This is a Genuine OEM Sourced replacement part designed for Black and Decker String Trimmer. This item is used to secure and drive the Spool. It is made out of Plastic and Metal. Includes a Plastic Housing, Plastic Gear, Metal Bearing and Two (2) Metal Eyelets.
Gear Assembly N498091
OEM part for: Black and Decker, Craftsman
Part Number: N498091
$15.44
In Stock
Jump To:
Frequently Purchased Together ?


Compatibility
This part will fit the following 7 machines
Black and Decker
LST136 36V String Trimmer View Diagrams & Manuals
98020SE (Type 1) Lst136 - 40v String Trimm View Diagrams & Manuals
LST136B (Type 2) 40v Lith Str Trimmer View Diagrams & Manuals
LST140C (Type 1) 40v Lith String Trim View Diagrams & Manuals
LST136 (Type 1) Cordless String Trimmer Power Tool View Diagrams & Manuals
LST136 (Type 2) Cordless String Trimmer Power Tool View Diagrams & Manuals
Craftsman
90098020 Trimmer/edger View Diagrams & Manuals
Show More Compatible Models
This item works with the following types of products:
- Trimmer Parts
This part replaces obsolete part #: 90559541-03
Customer Part Reviews ?
Average Rating (out of 5):
Click to filter by ratings:
5 stars
51
4 stars
8
3 stars
0
2 stars
0
1 stars
2
< PREV
- 1
- 2
- 3
Part fit perfect
Site was easy to navigate an find the part I needed. Received in a timely manner in good condition
Guest -
October 25, 2023
Verified Purchase
Great
Arrived on time and fit in like the original
Guest -
October 23, 2023
Verified Purchase
OEM Parts For A GREAT Fit!
Parts Were As Described, Shipped Quickly, Reasonably Priced and Fit Perfectly.
A ZERO Hassle Solution Without Buying A New Trimmer.
Guest -
September 13, 2023
Verified Purchase
Exact fit
This unit went right in my weed whacked and worked wonderfully. Great product and value.
Guest -
August 30, 2023
Verified Purchase
Easy fix
Exactly what I needed.Works like new again.
Guest -
August 28, 2023
Verified Purchase
Black and Decker weed trimmer
Part arrived quickly no damage and fit perfectly
Guest -
August 14, 2023
Verified Purchase
Good fit
Part fit perfect. Good price.
Guest -
August 1, 2023
Verified Purchase
Just what was needed to bring new life to old weed eater
item as described
Guest -
July 10, 2023
Verified Purchase
Great product
Easy repair new parts work great.
Guest -
July 10, 2023
Verified Purchase
Replacement part
This was a good replacement part for a worn out bearing and the well worn down gear-teeth. My string trimmer works again.
Dennis -
May 6, 2023
Verified Purchase
t
t
t -
t days ago
Verified Purchase
eReplacementParts Team
t
Questions & Answers ?
Our customer Service team is at the ready daily to answer your part and product questions.

Ask our Team
We have a dedicated staff with decades of collective experience in helping customers just like you purchase parts to repair their products.
Does this fit my product?Questions & Answers for Gear Assembly
How do I remove the spool holder from main unit?
George
for model number LST140C type 1
asked on 2022-08-15
Hello George, Thank you for the question. Her is a link to a How to Video that may help with the repair. If you need help placing an order, customer service is open 7 days a week. Please feel free to give us a call. We look forward to hearing from you!
https://www.youtube.com/watch?v=73uNYK4L7LA
eReplacementParts Team August 15, 2022
Customer Repair Instructions ?
All our customer repair instructions are solicited directly from other customers just like you who have purchased and replaced this exact part.
String line would feed out constantly until it was all gone.
John - May 5, 2016
👍 22 of 25 people found this instruction helpful
Tool Type
Trimmer
Difficulty
Easy
Time
Less than 15 minutes
Tools Used
Pliers
Parts Used
I followed the advice on this page. The descriptions of problems made it easy to select the right parts. Rather than replace my trimmer, a $2.97 part saved the day. The website said that it was a common problem with this particular trimmer and recommended that I order a spare. I did. Very pleased start to finish.
Did you find this story helpful?
Thanks for voting and helping fellow customers!
Would no longer spin and spindle was very loose in housing.
Tim - March 8, 2017
👍 17 of 17 people found this instruction helpful
Tool Type
Grass Trimmer
Difficulty
Easy
Time
15-30 minutes
Tools Used
Screwdriver
Not sure that I needed both Motor Housing Assy and Gear and Spindle but I ordered both parts just in case. When I received the parts I compared mine to the new parts and found the gears were worn down so they were not touching the internal gear to make the spindle spin. I also found the plastic housing had melted somewhat where the spindle rested which caused it to be loose. I used both replacement parts and was glad I did, it now works like new. This was an easy replacement just remove screws change out parts and replace with the same screws.
Did you find this story helpful?
Thanks for voting and helping fellow customers!
Motor housing and spindle wore out because of grass built up around shaft
ann - April 9, 2017
👍 12 of 12 people found this instruction helpful
Tool Type
Grass Trimmer
Difficulty
Easy
Time
15-30 minutes
Tools Used
Screwdriver
1 Removed edger guide and safety shield
2 Removed screws in motor housing to split case
3 Removed motor and spindle assembly from old housing
4 Put motor and new spindle into new housing
5.Reassembled housing, safety shield, and edger guide
Note,,,,, be careful to route wires to avoid pinching them when assembling two halves of housing.
2 Removed screws in motor housing to split case
3 Removed motor and spindle assembly from old housing
4 Put motor and new spindle into new housing
5.Reassembled housing, safety shield, and edger guide
Note,,,,, be careful to route wires to avoid pinching them when assembling two halves of housing.
Did you find this story helpful?
Thanks for voting and helping fellow customers!
Long stringy weeds got pulled in and spun around the gear assembly. The housing melted. This is second time this happened.
jennifer - October 6, 2016
👍 9 of 10 people found this instruction helpful
Tool Type
Grass Trimmer
Difficulty
Medium
Time
30-60 minutes
Tools Used
Screwdriver, Pliers, Power Drill
Unscrewed all screws and opened housing. Unscrewed the screws holding the motor in place. Replaced the gear. Screwed the wires to the motor. Had to do this twice because the wires were not tucked in properly the first time. Make sure the handle is going the right way too. My only complaint is new screws were not supplied. Some of the old ones had stripped due to being stuck tight with crud. The price to replace these two parts is a no brainer compared to buying a new trimmer.
Did you find this story helpful?
Thanks for voting and helping fellow customers!
Trimmer head would not engage with motor drive gear
Harold - August 19, 2017
👍 7 of 7 people found this instruction helpful
Tool Type
Grass Trimmer
Difficulty
Easy
Time
15-30 minutes
Tools Used
Screwdriver, Pliers
Replaced both the motor housing assembly and the Gear and spindle assembly.
Did you find this story helpful?
Thanks for voting and helping fellow customers!
Over a period of time grass and vines had wrapped around the spindle shaft causing downward pressure between the spindle assembly and the gear housing. This pressure generated heat melting the plasti
Rex - September 17, 2018
👍 2 of 2 people found this instruction helpful
Tool Type
Grass Trimmer
Difficulty
Easy
Time
Less than 15 minutes
Tools Used
Screwdriver
1. Removed the damaged housing and spindle/gear assembly.
2. Installed the new housing and spindle/gear assembly.
3. Verified the tightness of all screws.
4. Performed about 30 minutes of weed eating to verify everything works fine.
Note: These parts appear to be OEM and therefore perfect replacement parts. I've now used my repaired weed eater/trimmer for several hours. I works like brand new. I have 6 power settings and only use it on the lowest setting (1). I have used it on setting 6 a couple of times but is just a waste of power and runs down the batter a lot quicker than setting 1. I can get about an hour out of the battery on setting 1 on normal grass, otherwise about 30 minutes if the grass/weeds and tough and super tough. Most importantly is making sure the long strands of grass and vines don't wrap around the spindle assembly - which is what eventually caused the failure of the original product. I was really amazed at the reasonable price of these parts given how expensive the electric weed trimmer is. I usually run the battery powered 40Volt weed trimmer for about 1 hour per week on average. I am pleased with the repairs using these parts and would do it again.
Did you find this story helpful?
Thanks for voting and helping fellow customers!
Motor housing worn out and gear stripped
JOSEPH - July 30, 2018
👍 1 of 1 people found this instruction helpful
Tool Type
Grass Trimmer
Difficulty
Easy
Time
15-30 minutes
Tools Used
Screwdriver
Removed old motor housing and stripped gear. Replaced with new housing and gear. Everything fit like OEM parts. No problems,very impressed .
Did you find this story helpful?
Thanks for voting and helping fellow customers!
head gears were worn out and head was loose
Joe - October 12, 2018
Tool Type
Grass Trimmer
Difficulty
Medium
Time
15-30 minutes
Tools Used
Screwdriver
Parts Used
Removed the battery
Removed the guard
Removed the metal piece in front of guard
Removed screws holding the head together
Separated head
Remove the old worn out geared mechanism
Put in new mechanism
Replace spring on latch controlling rotation of the head
Replace cover
Replace screws
Replace guard
Replace metal guard
Removed the guard
Removed the metal piece in front of guard
Removed screws holding the head together
Separated head
Remove the old worn out geared mechanism
Put in new mechanism
Replace spring on latch controlling rotation of the head
Replace cover
Replace screws
Replace guard
Replace metal guard
Did you find this story helpful?
Thanks for voting and helping fellow customers!
Trimmer stopped working due to worn gear.
Marcus - September 26, 2018
Tool Type
Grass Trimmer
Difficulty
Medium
Time
15-30 minutes
Tools Used
Screwdriver
1. Took trimmer motor housing apart
2. Transferred original motor to new motor housing
3. Transferred original rotation button to new motor housing
4. Installed new gear assembly
5. Reassembled motor housing assembly using original screws
2. Transferred original motor to new motor housing
3. Transferred original rotation button to new motor housing
4. Installed new gear assembly
5. Reassembled motor housing assembly using original screws
Did you find this story helpful?
Thanks for voting and helping fellow customers!
Gears were overloaded and worn smooth and out of alignment.
RONALD - August 22, 2018
Tool Type
Grass Trimmer
Difficulty
Easy
Time
15-30 minutes
Tools Used
Screwdriver
Opened the motor housing assembly...it was very obvious what needed to be replaced...ordered the parts.....they arrived in 4-5 business days....replaced and reassembled unit and fired that baby up! perfect!
Did you find this story helpful?
Thanks for voting and helping fellow customers!
Load More Install Stories
OEM stands for Original Equipment Manufacturer and means the part you’re buying is sourced directly from the manufacturer who made your product. At eReplacementParts, we sell only genuine OEM parts, guaranteeing the part you’re purchasing is of better design and of higher quality than aftermarket parts.
Our product descriptions are a combination of data sourced directly from the manufacturers who made your product as well as content researched and curated by our content & customer service teams. This content is edited and reviewed internally before being made public to customers.
Our customer service team are at the ready daily to answer your part and product questions. We have a dedicated staff with decades of collective experience in helping customers just like you purchase parts to repair their products.
All our part reviews are solicited directly from other customers who have purchased this exact part. While we moderate these reviews for profanity, offensive language or personally identifiable information, these reviews are posted exactly as submitted and no alterations are made by our team.
All our customer repair instructions are solicited directly from other customers just like you who have purchased and replaced this exact part. While we moderate these reviews for profanity, offensive language or personally identifiable information, these reviews are posted exactly as submitted and no alterations are made by our team.
Based on data from past customer purchasing behaviors, these parts are most commonly purchased together along with the part you are viewing. These parts may be necessary or helpful to replace to complete your current repair.
All our installation videos are created and produced in collaboration with our in-house repair technician, Mark Sodja, who has helped millions of eReplacementParts customers over the last 13 years repair their products. Mark has years of experience in selling and repairing both commercial and residential products with a specialty in gas-powered equipment.
This data is collected from customers who submitted a repair instruction after replacing this exact part. Customers can rate how easy the repair was to complete and how long it took. We aggregate this data to provide a repair rating that allows customers to quickly determine the difficulty and time needed to perform their own repair.