eReplacementParts.com
877-346-4814
Black and Decker Parts

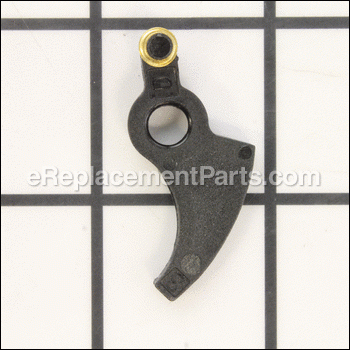
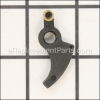
Lever Assembly 90567077

OEM part for: Black and Decker

Part Number: 90567077


Install
Videos!
Grid squares measure 1x1 inch
In Stock
Order within the next 2 hours and your part ships today!
Easy Less than 15 minutes (79 rated repairs)?
OEM: Original Equipment Manufacturer ?
Black and Decker
Does this d-block d-md-none fit my product?

Product Description ?

This is a genuine Black and Decker replacement part, it is sold individually.
The purpose of the 90567077 Lever Assembly, is to regulate the amount of line that is fed from the auto-feed spool.

This part has a tendency to wear out often.
It is advised to have an extra one on hand.

  • Classification: Part
  • Weight: 0.01 lbs.
  • Shipping: Ships Worldwide

Compatibility

This part will fit the following 17 machines

Black and Decker

NST2118 Type 1 18V String Trimmer View Diagrams & Manuals
LST220 Type 1 20V String Trimmer View Diagrams & Manuals
LST220FC-AR Type 1 20V String Trimmer View Diagrams & Manuals
LST220FC-B2C Type 1 20V String Trimmer View Diagrams & Manuals
LST220FC-B3 Type 1 20V String Trimmer View Diagrams & Manuals
LST220FC-BR Type 1 20V String Trimmer View Diagrams & Manuals
LST136 36V String Trimmer View Diagrams & Manuals
98020SE (Type 1) Lst136 - 40v String Trimm View Diagrams & Manuals
LST120 (Type 1) 20v String Trimmer View Diagrams & Manuals
LST136B (Type 2) 40v Lith Str Trimmer View Diagrams & Manuals
LST140C (Type 1) 40v Lith String Trim View Diagrams & Manuals
LST522 (Type 1) 20v 2 Speed Str Trim View Diagrams & Manuals
ST8600 (Type 1) 5.0 Amp String Trimm View Diagrams & Manuals
LST136 (Type 1) Cordless String Trimmer Power Tool View Diagrams & Manuals
LST136 (Type 2) Cordless String Trimmer Power Tool View Diagrams & Manuals
LST300 (Type 2) 20v Lithium String Trimme Power Tool View Diagrams & Manuals
LST522 (Type 2) 20v 2 Speed Str Trim Power Tool View Diagrams & Manuals
Show More Compatible Models
Don't see yours? Try searching our site for :

This item works with the following types of products:

  • Trimmer Parts

Customer Part Reviews ?

4.9
Average Rating (out of 5):
85 Reviews
Click to filter by ratings:
5 stars
77
4 stars
7
3 stars
0
2 stars
0
1 stars
1
  • Highest Rating
  • Most Recent
< PREV
  • 1
  • 2
  • 3
NEXT >
  • Amazing, I thought I would have to trash my weed eater. The part was easy to locate on the website, order the part and replacement was so easy
    The part arrived in a secure package, rapidly. Replacement was so easy
    Guest - 19 days ago Verified Purchase
    Great website
    I ordered this part to repair my weed eater and buying it here was easier than getting it from the manufacturer. Fast service and fit perfectly. Second time ordering from here and highly recommend them.
    Marshal - October 2, 2023 Verified Purchase
    Easy to replace
    Works perfect. Just wish this would be mentioned being replaced with a new spool.
    Guest - September 16, 2023 Verified Purchase
    Lever assembly
    Glad you had the part I needed but seems to me the part was small enough to put in a 65 cent envelope instead of high price shipping price that cost double the price of the part. I understand that's shipping business.
    Guest - August 14, 2023 Verified Purchase
    the right part, the right price, shipped quickly!!
    It was the right part and replaced easily
    Guest - July 28, 2023 Verified Purchase
    Great service thanks
    Our 14 year old weed trimmer is like new again for only $ 10 .00 😁
    Guest - July 26, 2023 Verified Purchase
    As expected timely and worked great
    Fixed the weed wacker
    Guest - July 14, 2023 Verified Purchase
    Work fine easy repair
    Perfect for what I needed it for now it's only the weed wacker last that long to use them all up
    Robert - June 30, 2023 Verified Purchase
    Trimmer works like new!!
    Exactly what we need! Trimmer works like new!! So easy to install!!
    Guest - June 5, 2023 Verified Purchase
    Perfect fit
    Weed wacker lever was easy to find on the website for my B & D 20V, great price, fast shipping and fits perfectly! Thank you
    Pamela - June 3, 2023 Verified Purchase
    t
    t
    t - t days ago Verified Purchase
    eReplacementParts Team
    t

    Questions & Answers ?

    Our customer Service team is at the ready daily to answer your part and product questions.

    photo of team member
    Ask our Team

    We have a dedicated staff with decades of collective experience in helping customers just like you purchase parts to repair their products.

    Does this fit my product?

    Questions & Answers for Lever Assembly


    will this part fit a black & decker trimmer/edger LST140?
    Nadine for model number Black decker LST140 asked on 2023-05-09
    Hi Nadine, Thank you for writing. Yes, this is the correct Lever for your model. Good luck with the repair!
    eReplacementParts Team May 09, 2023
    which one of these lever s part nos. 90567079 or 77 fits lst400 trimer.
    Kenneth asked on 2023-05-27
    Hello Kenneth, thank you for your question. The correct Lever is 90567076 for LST400 (Type 2). Good luck with this repair.
    eReplacementParts Team May 27, 2023
    What position does the lever assembly part go
    Hector for model number GH900 asked on 2023-04-08
    Hi Hector, Thank you for your question. We have included a link to one of our YouTube videos that you may reference on how to install the lever assembly, https://www.youtube.com/watch?v=1_P6Tf1KBAU&t=61s. The trimmer in the video may appear different from yours, but it will give you a general idea on how to install the part. We hope this helps with the repair!
    eReplacementParts Team April 08, 2023
    Would this lever assembly fix my model? Thank you in advance
    David for model number LST522 type 2 asked on 2022-10-10
    Hello David, Thank you for contacting us. We have researched the model you have provided and have found the part you are looking for is Part Number: 90567077. Thank you for your inquiry, good luck with this repair!
    eReplacementParts Team October 10, 2022
    Trimmer is missing stud and lever. Does the assembly come with both? Thanks
    Tom for model number st7000 asked on 2022-07-15
    Hello Tom, Thank you for contacting us. We have researched the model you have provided and have found the part you are looking for is Part Number: 598437-00 for the Lever and Stud. If you need help placing an order, customer service is open 7 days a week. Please feel free to give us a call. We look forward to hearing from you!
    eReplacementParts Team July 15, 2022
    I need the lever for this model.
    Jane for model number ST7700 type 3. asked on 2022-05-10
    Hello Jane, Thank you for contacting us. We have researched the model you have provided and have found the part you are looking for is Part Number:598437-00. If you need help placing an order, customer service is open 7 days a week. Please feel free to give us a call. We look forward to hearing from you!
    eReplacementParts Team May 10, 2022

    Customer Repair Instructions ?

    All our customer repair instructions are solicited directly from other customers just like you who have purchased and replaced this exact part.

    Easy Less than 15 minutes (79 rated repairs)?

    The problem was that the trimmer had no control regarding how much line fed out . It actually just kept on feeding out line until the spool was empty. The problem turned out to be a broken lever.

    Peter - March 27, 2016
    👍 131 of 136 people found this instruction helpful
    Tool Type

    Trimmer

    Difficulty

    Easy

    Time

    15-30 minutes

    Tools Used

    Pliers

    Remove cap and then remove the line spool ( as if you were replacing it ) . This gives you access to the lever which is no doubt broken . Note : There are clearly two kinds of levers .
    One type is black and has a hole on it which engages a stud at the bottom of the spool housing.
    Simply pull out the damaged black lever ( I used needle nose pliers to pull it off the stud) so as not to break off the stud . Then just install the new black lever in the exact same way the old one was . This you can accomplish with your fingers .
    The other type of lever is white and has the "stud" mounted on it and that tipe installs in to a hole at the bottom of the spool housing . Otherwise I would think that either kind is removed and replaced pretty much the same .
    Just be sure to get the correct "LEVER" .
    Did you find this story helpful?
    Thanks for voting and helping fellow customers!

    The line controller was broken.

    Arnold - January 2, 2016
    👍 36 of 39 people found this instruction helpful
    Tool Type

    Trimmer

    Difficulty

    Easy

    Time

    Less than 15 minutes

    Tools Used

    Pliers

    I found instructions for replacing it on ereplacements youtube and didn't have any trouble with it. All it took was a pair of pliers to take the broken one out and the new one just snapped right in. Trimmer works fine now.
    Did you find this story helpful?
    Thanks for voting and helping fellow customers!

    Would not feed string right.

    Max - April 29, 2016
    👍 10 of 10 people found this instruction helpful
    Tool Type

    Trimmer

    Difficulty

    Easy

    Time

    15-30 minutes

    Tools Used

    Pliers

    Remove the bottom cap, and spool. Then inside the spool cover you will see the lever that controls the cutting line. To replace it pull it out with a pair of pliers and then press it back on. Then replace all of the other parts in reverse. Very easy. Max W.
    Did you find this story helpful?
    Thanks for voting and helping fellow customers!

    Metal tip on self-release line brake broke

    Neil - April 2, 2016
    👍 12 of 14 people found this instruction helpful
    Tool Type

    Trimmer

    Difficulty

    Easy

    Time

    Less than 15 minutes

    Tools Used

    Pliers

    Use pliers or screwdriver to pry out the old lever.
    insert new one, metal tip facing outward from body, press into place.

    Easy 1 minute fix, part fit perfectly, machine functions normally again.
    Did you find this story helpful?
    Thanks for voting and helping fellow customers!

    Trimmer unwound the entire roll of string at once

    Michael - March 27, 2016
    👍 6 of 6 people found this instruction helpful
    Tool Type

    Trimmer

    Difficulty

    Easy

    Time

    Less than 15 minutes

    Tools Used

    Screwdriver

    Remove the cover that covers the string
    Remove string holder
    Pry off broken Lever Assembly (screw driver)
    Snap in new Lever Assembly
    Reinstall the string holder and feed string to outside of trimmer
    Snap in string holder cover
    Did you find this story helpful?
    Thanks for voting and helping fellow customers!

    Lever broke off weed eater

    nancy - April 28, 2017
    👍 2 of 2 people found this instruction helpful
    Tool Type

    Grass Trimmer

    Difficulty

    Easy

    Time

    Less than 15 minutes

    Tools Used

    Pliers

    Removed the bottom plate and the spool
    Removed the lever inside of the spool housing and pressed the new one in
    Then assembled the trimmer
    Did you find this story helpful?
    Thanks for voting and helping fellow customers!

    String would keep unwinding a

    ROBERT - June 14, 2016
    👍 2 of 2 people found this instruction helpful
    Tool Type

    Trimmer

    Difficulty

    Easy

    Time

    Less than 15 minutes

    Tools Used

    Screwdriver

    Push in tabs on the cover to remove the cover, spring, and spool. Removed the damaged lever and replaced with the new lever, then reassemble.
    Did you find this story helpful?
    Thanks for voting and helping fellow customers!

    Lever holding the string in broke

    Todd - September 6, 2017
    👍 1 of 1 people found this instruction helpful
    Tool Type

    Trimmer

    Difficulty

    Easy

    Time

    Less than 15 minutes

    Tools Used

    Screwdriver

    1. Removed the spool.
    2. Pulled out broken lever with screw driver.
    3. Replaced lever.
    4. Replaced spool. Took less than 2 min.
    Did you find this story helpful?
    Thanks for voting and helping fellow customers!

    Trimmer line would not advance.

    Carl - August 11, 2017
    👍 1 of 1 people found this instruction helpful
    Tool Type

    Trimmer

    Difficulty

    Easy

    Time

    Less than 15 minutes

    Tools Used

    Pliers

    Removed old trimmer line cover and removed line spool which allowed easy access to the line advance lever which I removed with needle nose pliers. New parts were way easy to install.
    Did you find this story helpful?
    Thanks for voting and helping fellow customers!

    Line advance lever was broken.

    T.R. - August 30, 2016
    👍 1 of 1 people found this instruction helpful
    Tool Type

    Trimmer

    Difficulty

    Easy

    Time

    15-30 minutes

    Tools Used

    Screwdriver

    Took out the old and put in the new.
    Did you find this story helpful?
    Thanks for voting and helping fellow customers!

    OEM stands for Original Equipment Manufacturer and means the part you’re buying is sourced directly from the manufacturer who made your product. At eReplacementParts, we sell only genuine OEM parts, guaranteeing the part you’re purchasing is of better design and of higher quality than aftermarket parts.

    Our product descriptions are a combination of data sourced directly from the manufacturers who made your product as well as content researched and curated by our content & customer service teams. This content is edited and reviewed internally before being made public to customers.

    Our customer service team are at the ready daily to answer your part and product questions. We have a dedicated staff with decades of collective experience in helping customers just like you purchase parts to repair their products.

    All our part reviews are solicited directly from other customers who have purchased this exact part. While we moderate these reviews for profanity, offensive language or personally identifiable information, these reviews are posted exactly as submitted and no alterations are made by our team.

    All our customer repair instructions are solicited directly from other customers just like you who have purchased and replaced this exact part. While we moderate these reviews for profanity, offensive language or personally identifiable information, these reviews are posted exactly as submitted and no alterations are made by our team.

    Based on data from past customer purchasing behaviors, these parts are most commonly purchased together along with the part you are viewing. These parts may be necessary or helpful to replace to complete your current repair.

    All our installation videos are created and produced in collaboration with our in-house repair technician, Mark Sodja, who has helped millions of eReplacementParts customers over the last 13 years repair their products. Mark has years of experience in selling and repairing both commercial and residential products with a specialty in gas-powered equipment.

    This data is collected from customers who submitted a repair instruction after replacing this exact part. Customers can rate how easy the repair was to complete and how long it took. We aggregate this data to provide a repair rating that allows customers to quickly determine the difficulty and time needed to perform their own repair.

    eReplacementParts.com
    7174 South 400 West
    Suite 5
    Midvale, UT 84047
    visa mastercard discover american express PayPal