

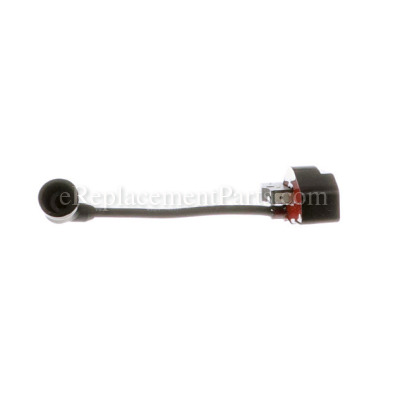


This is a genuine OEM sourced replacement module which is specially designed for use with Craftsman gas powered string trimmers and backpack blowers. The ignition module also known as armature-magneto provides the current for the ignition system by producing pulses of high voltage for the spark plugs. It is made of high-quality metal with a rubber insulated spark plug boot and it is sold individually.
Ignition Module 501092801
OEM part for: Poulan, Weed Eater, Craftsman, Husqvarna
Part Number: 501092801
$24.90
In Stock
Jump To:
Frequently Purchased Together ?


Compatibility
This part will fit the following 261 machines
Poulan
P3500 Gas Trimmer View Diagrams & Manuals
P4500 Gas Trimmer View Diagrams & Manuals
TE450CXL Type 1 Gas Trimmer View Diagrams & Manuals
TE450CXL Type 2 Gas Trimmer View Diagrams & Manuals
TE450CXL Type 3 Gas Trimmer View Diagrams & Manuals
TE450CXL Type 4 Gas Trimmer View Diagrams & Manuals
PP031 Gas Trimmer View Diagrams & Manuals
PP033 Gas Trimmer View Diagrams & Manuals
PP131 Gas Trimmer View Diagrams & Manuals
PP136E Type 1 Gas Trimmer View Diagrams & Manuals
PP136E Type 2 Gas Trimmer View Diagrams & Manuals
PP331 Gas Trimmer View Diagrams & Manuals
PPB100E Type 1 Gas Trimmer View Diagrams & Manuals
PPB100E Type 2 Gas Trimmer View Diagrams & Manuals
PPB150E Type 1 Gas Trimmer View Diagrams & Manuals
PPB150E Type 2 Gas Trimmer View Diagrams & Manuals
PPB200E Type 1 Gas Trimmer View Diagrams & Manuals
PPB200E Type 2 Gas Trimmer View Diagrams & Manuals
PPB250E Type 1 Gas Trimmer View Diagrams & Manuals
PPB250E Type 2 Gas Trimmer View Diagrams & Manuals
PPB300E Type 1 Gas Trimmer View Diagrams & Manuals
PPB300E Type 2 Gas Trimmer View Diagrams & Manuals
PPB32SST Type 1 Gas Trimmer View Diagrams & Manuals
PPB32SST Type 2 Gas Trimmer View Diagrams & Manuals
PPB350 Gas Trimmer View Diagrams & Manuals
GHT220LE (Type 1) Gas Hedge Trimmer View Diagrams & Manuals
GHT220LE (Type 2) Gas Hedge Trimmer View Diagrams & Manuals
BVM200VS (Type 1) Gas Blower View Diagrams & Manuals
BVM200VS (Type 2) Gas Blower View Diagrams & Manuals
BVM210VS (Type1) Pro Gas Blower View Diagrams & Manuals
BVM210VS (Type2) Pro Gas Blower View Diagrams & Manuals
BVM200C Gas Blower View Diagrams & Manuals
BVM200FE Gas Blower View Diagrams & Manuals
PPB430VS (Type1) Pro Leaf Blower View Diagrams & Manuals
PPB430VS (Type2) Pro Leaf Blower View Diagrams & Manuals
SM210VS (Type1) Pro Leaf Blower View Diagrams & Manuals
SM210VS (Type2) Pro Leaf Blower View Diagrams & Manuals
PP446ET (Type 1) Pruner View Diagrams & Manuals
PP446ET (Type 2) Pruner View Diagrams & Manuals
PP446ET (Type 3) Pruner View Diagrams & Manuals
PP446ET Pruner View Diagrams & Manuals
PP446E (1) Pruner View Diagrams & Manuals
PP446E (2) Pruner View Diagrams & Manuals
SM446E Pole Pruner View Diagrams & Manuals
PP46ET Trimmer View Diagrams & Manuals
SM705 (Type 2) Gas Trimmer View Diagrams & Manuals
P200C Gas Powered Blower View Diagrams & Manuals
PPB250E (Type 3) Gas Trimmer View Diagrams & Manuals
SM706 (Type 2) Gas Trimmer View Diagrams & Manuals
BVM210FA (2012-10) Blowers View Diagrams & Manuals
S31BC Trimmers And Edgers View Diagrams & Manuals
S31SST Trimmers And Edgers View Diagrams & Manuals
TE450CXL LE (Type 1) Trimmers And Edgers View Diagrams & Manuals
TE450CXL LE (Type 2) Trimmers And Edgers View Diagrams & Manuals
TE450CXL LE (Type 3) Trimmers And Edgers View Diagrams & Manuals
TE450CXL LE (Type 4) Trimmers And Edgers View Diagrams & Manuals
Weed Eater
BC2500LE Type 1 Gas Trimmer View Diagrams & Manuals
BC2500LE Type 2 Gas Trimmer View Diagrams & Manuals
BC2500LE Type 3 Gas Trimmer View Diagrams & Manuals
BC2500LE Type 4 Gas Trimmer View Diagrams & Manuals
MX550 Gas Trimmer View Diagrams & Manuals
MX557 Gas Trimmer View Diagrams & Manuals
TE400CXL Type 1 Gas Trimmer View Diagrams & Manuals
TE400CXL Type 2 Gas Trimmer View Diagrams & Manuals
TE400CXL Type 3 Gas Trimmer View Diagrams & Manuals
TE400CXL Type 4 Gas Trimmer View Diagrams & Manuals
TE400CXL Type 5 Gas Trimmer View Diagrams & Manuals
TE400LE Type 1 Gas Trimmer View Diagrams & Manuals
TE400LE Type 2 Gas Trimmer View Diagrams & Manuals
TE400LE Type 3 Gas Trimmer View Diagrams & Manuals
TE400LE Type 4 Gas Trimmer View Diagrams & Manuals
TE475 Gas Trimmer View Diagrams & Manuals
TE475Y Gas Trimmer View Diagrams & Manuals
TE500CXL Type 1 Gas Trimmer View Diagrams & Manuals
TE500CXL Type 2 Gas Trimmer View Diagrams & Manuals
TE500CXL Type 3 Gas Trimmer View Diagrams & Manuals
TE500CXL Type 4 Gas Trimmer View Diagrams & Manuals
XT300 Type 3 Gas Trimmer View Diagrams & Manuals
XT300 Type 4 Gas Trimmer View Diagrams & Manuals
XT400 Type 3 Gas Trimmer View Diagrams & Manuals
XT400 Type 4 Gas Trimmer View Diagrams & Manuals
XT600 Type 3 Gas Trimmer View Diagrams & Manuals
XT600 Type 4 Gas Trimmer View Diagrams & Manuals
XT600 Type 5 Gas Trimmer View Diagrams & Manuals
XT600 Type 6 Gas Trimmer View Diagrams & Manuals
XT700 Gas Trimmer View Diagrams & Manuals
FB25 Handheld Blower View Diagrams & Manuals
VS2000BV Handheld Blower View Diagrams & Manuals
PP258TPC (579218001)(2011-10) Pole Saw View Diagrams & Manuals
Craftsman
358794770 Gas Blower View Diagrams & Manuals
358794650 25Cc 210Mph / 450 Cfm Gas Blower View Diagrams & Manuals
358794600 25Cc 200 Mph / 430 Cfm Gas Blower View Diagrams & Manuals
358794780 Blower View Diagrams & Manuals
358794765 Blower View Diagrams & Manuals
358794774 Blower View Diagrams & Manuals
358794741 Blower View Diagrams & Manuals
358795580 26.2Cc Gas Brushwacker View Diagrams & Manuals
358795541 Trimmer View Diagrams & Manuals
358791070 Trimmer View Diagrams & Manuals
358795200 String Trimmer View Diagrams & Manuals
358794773 Blower View Diagrams & Manuals
358745190 Trimmer View Diagrams & Manuals
358794220 Trimmer View Diagrams & Manuals
358794221 Trimmer View Diagrams & Manuals
358794250 Trimmer View Diagrams & Manuals
358794251 Trimmer View Diagrams & Manuals
358795120 Trimmer View Diagrams & Manuals
358795121 Trimmer View Diagrams & Manuals
358795150 Trimmer View Diagrams & Manuals
358795160 Trimmer View Diagrams & Manuals
358795161 Trimmer View Diagrams & Manuals
358795180 Trimmer View Diagrams & Manuals
358796280 Trimmer View Diagrams & Manuals
944511460 Trimmer View Diagrams & Manuals
944511470 Trimmer View Diagrams & Manuals
358348320 Trimmer View Diagrams & Manuals
358348321 Trimmer View Diagrams & Manuals
358744380 Trimmer View Diagrams & Manuals
358745191 Trimmer View Diagrams & Manuals
358745500 Trimmer View Diagrams & Manuals
358745501 Trimmer View Diagrams & Manuals
358745530 Trimmer View Diagrams & Manuals
358745531 Trimmer View Diagrams & Manuals
358745540 Trimmer View Diagrams & Manuals
358745541 Trimmer View Diagrams & Manuals
358745570 Trimmer View Diagrams & Manuals
358745571 Trimmer View Diagrams & Manuals
358745650 Trimmer View Diagrams & Manuals
358745651 Trimmer View Diagrams & Manuals
358791031 Trimmer View Diagrams & Manuals
358791032 Trimmer View Diagrams & Manuals
358791040 Trimmer View Diagrams & Manuals
358791041 Trimmer View Diagrams & Manuals
358791042 Trimmer View Diagrams & Manuals
358791051 Trimmer View Diagrams & Manuals
358791060 Trimmer View Diagrams & Manuals
358791061 Trimmer View Diagrams & Manuals
358791071 Trimmer View Diagrams & Manuals
358791072 Trimmer View Diagrams & Manuals
35879142 Trimmer View Diagrams & Manuals
358791530 Trimmer View Diagrams & Manuals
358791540 Trimmer View Diagrams & Manuals
358791560 Trimmer View Diagrams & Manuals
358791570 Trimmer View Diagrams & Manuals
358791800 Trimmer View Diagrams & Manuals
358791801 Trimmer View Diagrams & Manuals
358791820 Trimmer View Diagrams & Manuals
358795122 Trimmer View Diagrams & Manuals
358795123 Trimmer View Diagrams & Manuals
358795500 Trimmer View Diagrams & Manuals
358795501 Trimmer View Diagrams & Manuals
358795530 Trimmer View Diagrams & Manuals
358795531 Trimmer View Diagrams & Manuals
358795540 Trimmer View Diagrams & Manuals
358795542 Trimmer View Diagrams & Manuals
358795543 Trimmer View Diagrams & Manuals
358795560 Trimmer View Diagrams & Manuals
358795570 Trimmer View Diagrams & Manuals
358795571 Trimmer View Diagrams & Manuals
358795810 Trimmer View Diagrams & Manuals
358795811 Trimmer View Diagrams & Manuals
358795820 Trimmer View Diagrams & Manuals
358795821 Trimmer View Diagrams & Manuals
358795822 Trimmer View Diagrams & Manuals
944511461 Trimmer View Diagrams & Manuals
944511462 Trimmer View Diagrams & Manuals
944511463 Trimmer View Diagrams & Manuals
944511464 Trimmer View Diagrams & Manuals
944511474 Trimmer View Diagrams & Manuals
944514460 Trimmer View Diagrams & Manuals
944515460 Trimmer View Diagrams & Manuals
944516561 Trimmer View Diagrams & Manuals
944516570 Trimmer View Diagrams & Manuals
944516571 Trimmer View Diagrams & Manuals
944516660 Trimmer View Diagrams & Manuals
944516661 Trimmer View Diagrams & Manuals
944516662 Trimmer View Diagrams & Manuals
358796330 Hedge Trimmer View Diagrams & Manuals
358796350 Hedge Trimmer View Diagrams & Manuals
358796351 Hedge Trimmer View Diagrams & Manuals
358796352 Hedge Trimmer View Diagrams & Manuals
358796360 Hedge Trimmer View Diagrams & Manuals
358796370 Hedge Trimmer View Diagrams & Manuals
944518250 Blower View Diagrams & Manuals
944518252 Blower View Diagrams & Manuals
358794700 Blower View Diagrams & Manuals
358794701 Blower View Diagrams & Manuals
358794702 Blower View Diagrams & Manuals
358794703 Blower View Diagrams & Manuals
358794704 Blower View Diagrams & Manuals
358794730 Blower View Diagrams & Manuals
358794731 Blower View Diagrams & Manuals
358794732 Blower View Diagrams & Manuals
358794733 Blower View Diagrams & Manuals
358794740 Blower View Diagrams & Manuals
358794742 Blower View Diagrams & Manuals
358794743 Blower View Diagrams & Manuals
358794744 Blower View Diagrams & Manuals
358794750 Blower View Diagrams & Manuals
358794751 Blower View Diagrams & Manuals
358794760 Blower View Diagrams & Manuals
358794761 Blower View Diagrams & Manuals
358794762 Blower View Diagrams & Manuals
358794763 Blower View Diagrams & Manuals
358794764 Blower View Diagrams & Manuals
358794771 Blower View Diagrams & Manuals
358794772 Blower View Diagrams & Manuals
358794775 Blower View Diagrams & Manuals
358794776 Blower View Diagrams & Manuals
358794781 Blower View Diagrams & Manuals
358.791032 2-Cycle Gasoline Weedwacker View Diagrams & Manuals
Husqvarna
BVM200VS (2009-03) Blower View Diagrams & Manuals
BVM200VS (545103471) (2009-03) Blower View Diagrams & Manuals
BVM210VS (2009-03) Blower View Diagrams & Manuals
GBV325 (2010-07) 952715704 Blower View Diagrams & Manuals
GBV345 (2010-05) Blower View Diagrams & Manuals
P325 (2010-04) Blower View Diagrams & Manuals
PPB430VS (2009-03) Blower View Diagrams & Manuals
SM210VS (2009-03) Blower View Diagrams & Manuals
FB25 (952711937) (2009-04) Handheld Trimmer View Diagrams & Manuals
MX550 (2009-03) Handheld Trimmer View Diagrams & Manuals
P3500 (2007-10) Handheld Trimmer View Diagrams & Manuals
P4500 (2009-04) Handheld Trimmer View Diagrams & Manuals
P4500F (2009-01) Handheld Trimmer View Diagrams & Manuals
PP025 (Type 2) (2008-12) Handheld Trimmer View Diagrams & Manuals
PP125 (Type 2) (2009-03) Handheld Trimmer View Diagrams & Manuals
PPB100E (Type 1) (2007-09) Handheld Trimmer View Diagrams & Manuals
PPB100E (Type 2) (2007-09) Handheld Trimmer View Diagrams & Manuals
PPB150E (Type 1) (2009-03) Handheld Trimmer View Diagrams & Manuals
PPB150E (Type 2) (2009-03) Handheld Trimmer View Diagrams & Manuals
PPB150E (Type 3) (2009-03) Handheld Trimmer View Diagrams & Manuals
PPB200 (2006-12) Handheld Trimmer View Diagrams & Manuals
PPB200E (Type 1) (2009-02) Handheld Trimmer View Diagrams & Manuals
PPB200E (Type 2) (2009-02) Handheld Trimmer View Diagrams & Manuals
PPB250E (Type 1) (2009-01) Handheld Trimmer View Diagrams & Manuals
PPB250E (Type 2) (2009-01) Handheld Trimmer View Diagrams & Manuals
PPB250E (Type 3) (2009-01) Handheld Trimmer View Diagrams & Manuals
PPB300E (Type 1) (2009-02) Handheld Trimmer View Diagrams & Manuals
PPB300E (Type 2) (2009-02) Handheld Trimmer View Diagrams & Manuals
PPB32SST (Type 1) (2009-05) Handheld Trimmer View Diagrams & Manuals
PPB32SST (Type 2) (2009-05) Handheld Trimmer View Diagrams & Manuals
SM706 (Type 2) (2008-12) Handheld Trimmer View Diagrams & Manuals
475 (2009-03) Te Handheld Trimmer View Diagrams & Manuals
475Y (2009-03) Te Handheld Trimmer View Diagrams & Manuals
TE400CXL (Type 1) (2007-07) Handheld Trimmer View Diagrams & Manuals
TE400CXL (Type 2) (2007-07) Handheld Trimmer View Diagrams & Manuals
TE400CXL (Type 3) (2007-07) Handheld Trimmer View Diagrams & Manuals
TE400CXL (Type 4) (2007-07) Handheld Trimmer View Diagrams & Manuals
TE400CXL (Type 5) (2007-07) Handheld Trimmer View Diagrams & Manuals
TE475 (952711797) (2009-03) Handheld Trimmer View Diagrams & Manuals
VS2000BV (952711922) (2009-04) Handheld Trimmer View Diagrams & Manuals
XT700 (2009-03) Handheld Trimmer View Diagrams & Manuals
XT700 (952711798) (2009-03) Handheld Trimmer View Diagrams & Manuals
PP258TP (Type 2) (2008-12) Pole Pruner View Diagrams & Manuals
PP446E (Type 1) (2009-01) Pole Pruner View Diagrams & Manuals
PP446E (Type 2) (2009-01) Pole Pruner View Diagrams & Manuals
PP446ET (Type 1) (2009-02) Pole Pruner View Diagrams & Manuals
PP446ET (Type 2) (2009-02) Pole Pruner View Diagrams & Manuals
PP446ET (Type 3) (2009-02) Pole Pruner View Diagrams & Manuals
SM446E (Type 1) (2009-01) Pole Pruner View Diagrams & Manuals
SM446E (Type 2) (2009-01) Pole Pruner View Diagrams & Manuals
Show More Compatible Models
This item works with the following types of products:
- Trimmer Parts
- Hedge Trimmer Parts
- Blower Parts
- Pruner Parts
This part replaces obsolete part #: 530039229, 545081826, 530039214, 530039217, 530039211, 530039234, 545158001
Repair Videos ?
Watch the Repair Video for
Ignition Module

Articles:
|
Step-by-step instructions for removing and installing the ignition module on your Weed Eater blower....
March 08, 2018
|

Customer Part Reviews ?
Average Rating (out of 5):
Click to filter by ratings:
5 stars
21
4 stars
4
3 stars
0
2 stars
0
1 stars
0
< PREV
- 1
- 2
- 3
part was just what i needed
now i got my blower back in working
Guest -
April 25, 2023
Verified Purchase
Craftsman ignition module
Perfect fit and arrived quickly
Guest -
January 11, 2023
Verified Purchase
I like this place.
You get the correct part at a great price and fast shipping.
Francis -
July 27, 2022
Verified Purchase
Haven’t used it yet
Haven’t use it yet
JAMES -
December 20, 2021
Verified Purchase
Great Service Site for all kinds of parts.
I ordered an ignition module for a Poulan gas leaf blower and it arrived in perfect condition.
Guest -
December 14, 2021
Verified Purchase
It was exactly what I ordered.
Perfect fit.
Robert -
October 27, 2021
Verified Purchase
Easy fit as expected.
Fast delivery, fit perfect, 2nd pull leaf blower started. Thanks.
Ron -
October 5, 2021
Verified Purchase
Easy fix
Part arrived in good condition fits perfectly leaf blower back in business runs like new
Guest -
August 1, 2021
Verified Purchase
Easy to find
Easy to find needed part. Fast delivery.
Guest -
June 14, 2021
Verified Purchase
Leaf Blower ignition (coil)
Fair price, fit right, did the job.
The blower would not start when hot, now starts all the time.
Charles -
March 29, 2021
Verified Purchase
t
t
t -
t days ago
Verified Purchase
eReplacementParts Team
t
Questions & Answers ?
Our customer Service team is at the ready daily to answer your part and product questions.

Ask our Team
We have a dedicated staff with decades of collective experience in helping customers just like you purchase parts to repair their products.
Does this fit my product?Questions & Answers for Ignition Module
Ignition coil wire is too short I received
Victor
for model number pt46bt
asked on 2023-04-05
Hello Victor, Thank you for contacting us. We have researched the model you have provided and have found the part you are looking for is Part Number: 501424329. We hope this helps, good luck with the repair!
eReplacementParts Team April 05, 2023
Customer Repair Instructions ?
All our customer repair instructions are solicited directly from other customers just like you who have purchased and replaced this exact part.
Blower would start with ease when cold and ran with no problem however when the unit was shut down, it would not restart until the unit was cold.
Kenneth - November 20, 2015
👍 9 of 14 people found this instruction helpful
Tool Type
Blower
Difficulty
Easy
Time
1-2 hours
Tools Used
Socket set, Torx drivers
Separate the casing halves and replace the impeller. remove the engine from the right casing half and replace the coil set the air gap on the coil with brass tappet gauges. Reassembled the casing halves and engine installing the switch before I buttoned it up.
Did you find this story helpful?
Thanks for voting and helping fellow customers!
Kept dying & wouldnt idle smoothly.
robert - April 3, 2019
👍 1 of 1 people found this instruction helpful
Tool Type
Blower
Difficulty
Medium
Time
1-2 hours
Tools Used
Screwdriver, Socket set, Wrench Set, Nutdriver, paper, thread locker, sandpaper, pick
1. Disconnected spark plug.
2. Removed both side housings (impeller must be removed too).
3. Removed ignition module & flywheel.
4. Removed carbuerator & muffler.
5. Removed cylinder wall housing.
6. Removed PISTON RING and gently scraped RinG groove clean.
7. Installed NEW PISTON RING into groove.
8. Oil piston & cylinder wall (2 cycle) then gently compress back into cylinder.
9. Install cylinder bolts (use thread locker BLUE) if not new bolts.
10. Install muffler & carbuerator.
11. Install NEW FLYWHEEL (my key groove was worn).
12. Put NEW IGNITION MODULE (my plug wire was shorted out) in place *with folded piece printer paper as approximate ignition gap*.
13. Verified flywheel turned full revolution without magnet sticking to module & that the paper was able to slide thru fully FREELY.
14. PERFORMED CLOSE INSPECTION of all bolts tight and secure, all seals & gaskets good & reinstalled.
15. Installed both sides of housing, be sure "fingers" on flywheel engage to recoil rope & spacer put back.
16. Reconnected Spark Plug wire to spark plug.
17. Verified FRESH 40:1 2 cycle mix, air filter clean and approximately 1-2 drops 2 cycle oil squeezed thoroughly within air filter sponge.
18. Turned on choke, pressed primer bulb 3-5 times until fuel mix present.
19. Without touching trigger pulled starter & started after 3 pulls.
20. Let idle about 30 seconds then squeezed trigger, choke automatically shifted to OFF position & continued to run smoothly.
21. Went outside began blowing leaves & ran perfect until out of fuel (did on purpose).
22. Refueled and no prime or choke started after 5 pulls!
(Was testing - Poulan has some problems unable to restart after warmed up).
-replaced flywheel, ignition module, piston ring-
--poulan pro pb200vs
--40:1 fuel/oil mix
Did you find this story helpful?
Thanks for voting and helping fellow customers!
no fire
Thomas - November 20, 2022
Tool Type
Blower
Difficulty
Easy
Time
15-30 minutes
Tools Used
Nutdriver
Parts Used
changed module
Did you find this story helpful?
Thanks for voting and helping fellow customers!
Faulty ignition module
Michael - October 9, 2022
Tool Type
Blower
Difficulty
Easy
Time
15-30 minutes
Tools Used
, Long reach straight allen on 3/8 drive socket
Parts Used
Reassembled after replacing faulty ignition module
Did you find this story helpful?
Thanks for voting and helping fellow customers!
Ignition module cable wore out. Crack and shorted out.
Melvin - May 12, 2022
Tool Type
Trimmer
Difficulty
Hard
Time
1-2 hours
Tools Used
Screwdriver, Pliers, Wrench Set
Parts Used
Put the trimmer on work table. Took one piece at a time and them in order as I took the parts off. Installed new part. Then put parts back on in their place. I took my time. New part works great. Trimmer run good.
Did you find this story helpful?
Thanks for voting and helping fellow customers!
No spark
Thomas - October 29, 2021
Tool Type
Blower
Difficulty
Medium
Time
1-2 hours
Tools Used
Screwdriver, Drill press
Parts Used
Removing the old ignition module required taking apart the outer casing of the blower, but it wasn't difficult. Once I removed the old module and tried to install the new module I found that the mounting holes of the new module did not line up! I confirmed I had the correct part per the parts diagram. After fussing with it for a while I finally just drilled out the holes on my drill press to fit. Also, to set the air gap I used three layers of paper to achieve the required 0.012" gap.
Did you find this story helpful?
Thanks for voting and helping fellow customers!
no spark or weak spark
Clinton - September 27, 2021
Tool Type
Blower
Difficulty
Easy
Time
15-30 minutes
Tools Used
Screwdriver, Wrench Set, Adjustable Wrench, allens and hex set
Disassemble. Remove spark plug and coil. Installed new coil and set air gap with a business card.
To set the air gap make sure piston is at dead top center. With the coil loose allow the magnets on the flywheel to pull the coil against the business card and carefully tighten the coil. Reassemble Install spark plug and admire successful repair.
To set the air gap make sure piston is at dead top center. With the coil loose allow the magnets on the flywheel to pull the coil against the business card and carefully tighten the coil. Reassemble Install spark plug and admire successful repair.
Did you find this story helpful?
Thanks for voting and helping fellow customers!
No ignition spark
Gail - July 18, 2021
Tool Type
Trimmer
Difficulty
Medium
Time
More than 2 hours
Tools Used
Screwdriver, Wrench Set, Torx, Allen
Parts Used
Checked ignition, no spark ordered part and got a bad one, returned with full refund and ordered another one, worked! No special instruction, except air gap for magnetic fields is at .012!
Did you find this story helpful?
Thanks for voting and helping fellow customers!
no spark
Wallace - July 10, 2020
Tool Type
Trimmer
Difficulty
Easy
Time
15-30 minutes
Tools Used
Screwdriver, Socket set, torx bit driver
Parts Used
I already had it apart, I've done this kind of repairs on small engine for about 60 years.
I set the flywheel clearance at .010 between the coil and the flywheel. the rest was assemble in reverse order
I set the flywheel clearance at .010 between the coil and the flywheel. the rest was assemble in reverse order
Did you find this story helpful?
Thanks for voting and helping fellow customers!
no spark
anthony - May 16, 2020
Tool Type
Trimmer
Difficulty
Medium
Time
30-60 minutes
Tools Used
, hex set
Parts Used
New ignition module tested fine but had no spark.
Cleaned old one and got good spark.
Cleaned old one and got good spark.
Did you find this story helpful?
Thanks for voting and helping fellow customers!
Load More Install Stories
OEM stands for Original Equipment Manufacturer and means the part you’re buying is sourced directly from the manufacturer who made your product. At eReplacementParts, we sell only genuine OEM parts, guaranteeing the part you’re purchasing is of better design and of higher quality than aftermarket parts.
Our product descriptions are a combination of data sourced directly from the manufacturers who made your product as well as content researched and curated by our content & customer service teams. This content is edited and reviewed internally before being made public to customers.
Our customer service team are at the ready daily to answer your part and product questions. We have a dedicated staff with decades of collective experience in helping customers just like you purchase parts to repair their products.
All our part reviews are solicited directly from other customers who have purchased this exact part. While we moderate these reviews for profanity, offensive language or personally identifiable information, these reviews are posted exactly as submitted and no alterations are made by our team.
All our customer repair instructions are solicited directly from other customers just like you who have purchased and replaced this exact part. While we moderate these reviews for profanity, offensive language or personally identifiable information, these reviews are posted exactly as submitted and no alterations are made by our team.
Based on data from past customer purchasing behaviors, these parts are most commonly purchased together along with the part you are viewing. These parts may be necessary or helpful to replace to complete your current repair.
All our installation videos are created and produced in collaboration with our in-house repair technician, Mark Sodja, who has helped millions of eReplacementParts customers over the last 13 years repair their products. Mark has years of experience in selling and repairing both commercial and residential products with a specialty in gas-powered equipment.
This data is collected from customers who submitted a repair instruction after replacing this exact part. Customers can rate how easy the repair was to complete and how long it took. We aggregate this data to provide a repair rating that allows customers to quickly determine the difficulty and time needed to perform their own repair.