
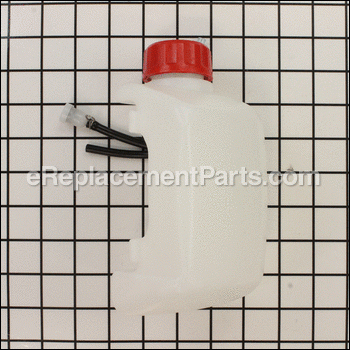
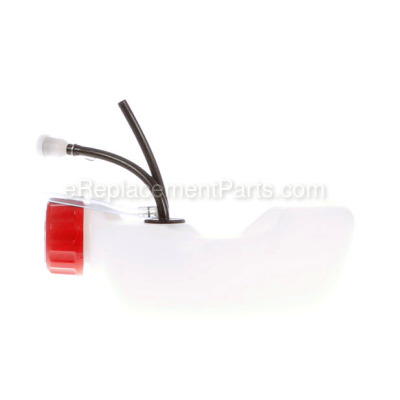


This replacement fuel tank assembly is a high quality item that is specially produced for Shindaiwa lawn and garden equipment. It is designed to hold the fuel that is needed for the internal combustion engine. It is made from durable plastic and it includes the fuel tank, fuel lines with a fuel filter and the cap. Please note hardware to secure this fuel tank is not included it is sold separately.
Fuel Tank Assembly A038000431
OEM part for: Shindaiwa
Part Number: A038000431
$45.22
In Stock
Jump To:
Frequently Purchased Together ?


Compatibility
This Fuel Tank Assembly will fit the following 19 machines. Confirm this part works with your model, and view the detailed model diagrams and repair help we have to offer.
Shindaiwa
Show More Compatible ModelsThis item works with the following types of products:
- Hedge Trimmer Parts
- Trimmer Parts
- Edger Parts
- Pruner Parts
- Multi-Tool Parts
This part replaces obsolete part #: A038000430, 20016-85001, 20016-85003, 20016-85002
Repair Videos ?
Articles:
|
Filthy Filters? This article will show you how to install a filter kit on an Echo SRM-225 trimmer....
May 27, 2015
|

Customer Part Reviews ?
Average Rating (out of 5):
Click to filter by ratings:
5 stars
4
4 stars
0
3 stars
1
2 stars
0
1 stars
0
< PREV
- 1
Easy repair and oem parts!
Good parts! We're in good condition and was quick delivery. Worked as they should which is nice these days!
Guest -
August 26, 2022
Verified Purchase
simple process, received the exact part in a matter of a few days
The otherwise daunting task of fixing a complex machine becomes an easy process through this website. Thank you ereplacementparts!
jeff -
September 30, 2019
Verified Purchase
Fuel tank assembly.
The fuel tank assembly I purchased arrived on Time and fit perfectly!
Doug -
August 23, 2019
Verified Purchase
Great replacement part, quick fit excellent result saved £££££s
Replacement fuel tank for edge cutter.
iGlobal -
July 25, 2019
Verified Purchase
Fuel Tank Assembly
Ordering was easy. Easily able to search for part by equipment type, model, and parts diagram callouts. I have not received Order 16875815 which was shipped on August 25, 2021. USPS seems slow.
Guest -
September 8, 2021
Verified Purchase
eReplacementParts Team
Hi Steven,
Thank you for your review. Please accept our apologies that you have not received your order. We will be in touch with you shortly regarding this.
Questions & Answers ?
Our customer Service team is at the ready daily to answer your part and product questions.

Ask our Team
We have a dedicated staff with decades of collective experience in helping customers just like you purchase parts to repair their products.
Does this fit my product?Questions & Answers for Fuel Tank Assembly
No questions have been asked yet
Customer Repair Instructions ?
All our customer repair instructions are solicited directly from other customers just like you who have purchased and replaced this exact part.
Fuel tank was leaking
jeffrey - August 3, 2016
👍 12 of 14 people found this instruction helpful
Tool Type
Trimmer
Difficulty
Medium
Time
15-30 minutes
Tools Used
Screwdriver, Pliers, Wrench Set
Parts Used
Removed 6 bolts and hoses. Replaced tank assembly that included new hoses.
Did you find this story helpful?
Thanks for voting and helping fellow customers!
Leaking fuel
Billy - August 22, 2018
👍 2 of 2 people found this instruction helpful
Tool Type
Trimmer
Difficulty
Medium
Time
30-60 minutes
Tools Used
Screwdriver, Socket set, Allen wrench
Cleaned unit as much as possible before disassembling it. Removed the old gas tank & hoses Reinstalled the new unit & connected the hoses. Removed old purge bulb & air purge body & replaced. Just took a little time ,patience & a few simple tools. This shindaiwa trimmer was purchased in 1992 & has just been 1 excellent machine. Got it back together & is now running fine again. 26yrs of operation.....what can ya say if it needs a few replacement parts.
Did you find this story helpful?
Thanks for voting and helping fellow customers!
It was leaking fuel and the unit just would not stay running
Dale - February 23, 2018
👍 1 of 1 people found this instruction helpful
Tool Type
Trimmer
Difficulty
Medium
Time
30-60 minutes
Tools Used
Screwdriver, Pliers, Socket set, Wrench Set
1. Replaced fuel tank with a package tank complete with all three fuel an vent lines.
2. Replaced the carburetor gasket.
3. Added fuel and ran great.
2. Replaced the carburetor gasket.
3. Added fuel and ran great.
Did you find this story helpful?
Thanks for voting and helping fellow customers!
Gas tank crack and filter dirty
Ralph - June 26, 2017
👍 2 of 3 people found this instruction helpful
Tool Type
Trimmer
Difficulty
Hard
Time
30-60 minutes
Tools Used
Screwdriver, Pliers, Nutdriver
Parts Used
Removed gas tank guard. Install rubber mount on all four male flat hinge. Slide new tank in place slowly using a flat screwdriver slide it in place. You will need a little force. Done!
Did you find this story helpful?
Thanks for voting and helping fellow customers!
Fuel tank was leaking
Jay - August 6, 2022
Tool Type
Trimmer
Difficulty
Medium
Time
30-60 minutes
Tools Used
Screwdriver, Pliers, Power Drill, Nutdriver
Parts Used
TANK IS SLIGHTLY MORE DIFFICULT TO INSTALL THAN TO REMOVE. TAKE CARE NOT TO PUNCTURE THE TANK.
1. Disconnected fuel lines from carb using needle nose pokers.
2. Removed 4 T25 bolts that hold metal tank guard on and removed guard.
3. Using long flat blade screwdriver, I pried the back side of the tank out of frame notches and removed tank from trimmer.
4. Make sure 4 rubber vibration mounts stay on trimmer.
5. Used clamp to slightly pinch sides of tank. Inserted tank into rear frame notches and using long flat blade screwdriver pried tank notches back into front of frame. Ensure that the rubber vibration mounts are seated flush, oriented the the right way and not pinched. If they are pinched use a flat screwdriver to move and press rubber mount to seat correctly.
6. Reconnect all fuel lines, fill tank and check for leaks. Test run trimmer making sure rubber vibration mounts are seated and not causing excess tank vibration. You should feel excess vibration if they aren’t seated correctly.
7 Reinstall metal tank guard and any other items previously removed.
Did you find this story helpful?
Thanks for voting and helping fellow customers!
OEM stands for Original Equipment Manufacturer and means the part you’re buying is sourced directly from the manufacturer who made your product. At eReplacementParts, we sell only genuine OEM parts, guaranteeing the part you’re purchasing is of better design and of higher quality than aftermarket parts.
Our product descriptions are a combination of data sourced directly from the manufacturers who made your product as well as content researched and curated by our content & customer service teams. This content is edited and reviewed internally before being made public to customers.
Our customer service team are at the ready daily to answer your part and product questions. We have a dedicated staff with decades of collective experience in helping customers just like you purchase parts to repair their products.
All our part reviews are solicited directly from other customers who have purchased this exact part. While we moderate these reviews for profanity, offensive language or personally identifiable information, these reviews are posted exactly as submitted and no alterations are made by our team.
All our customer repair instructions are solicited directly from other customers just like you who have purchased and replaced this exact part. While we moderate these reviews for profanity, offensive language or personally identifiable information, these reviews are posted exactly as submitted and no alterations are made by our team.
Based on data from past customer purchasing behaviors, these parts are most commonly purchased together along with the part you are viewing. These parts may be necessary or helpful to replace to complete your current repair.
All our installation videos are created and produced in collaboration with our in-house repair technician, Mark Sodja, who has helped millions of eReplacementParts customers over the last 13 years repair their products. Mark has years of experience in selling and repairing both commercial and residential products with a specialty in gas-powered equipment.
This data is collected from customers who submitted a repair instruction after replacing this exact part. Customers can rate how easy the repair was to complete and how long it took. We aggregate this data to provide a repair rating that allows customers to quickly determine the difficulty and time needed to perform their own repair.