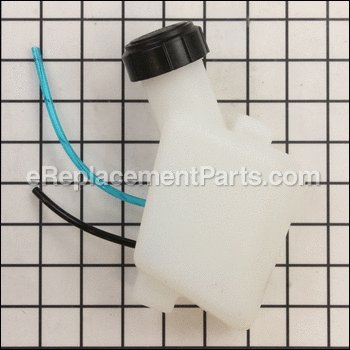

This replacement fuel tank assembly is an authentic item that is sourced directly from original equipment manufacturer for use with Troy-Bilt string trimmers. It is made from high quality plastic and it includes the fuel tank, fuel lines, fuel cap and the screws to secure it. Over time the material may deteriorate or crack eventually requiring replacement. Make sure to drain the gas tank before starting a repair.
Fuel Tank Asm Ac8 941-031506S
OEM part for: Troy-Bilt, Cub Cadet, MTD
Part Number: 941-031506S
$17.95
In Stock
Compatibility
This part will fit the following 19 machines
Troy-Bilt
TB625EC (41ADZ62C766) Trimmer View Diagrams & Manuals
TB6044XP (41ADF6PC766) Straight Shaft Gas String Trimmer View Diagrams & Manuals
TB675EC (41ADZ67C766) Trimmer View Diagrams & Manuals
TB675EC (41BDZ67C766) Trimmer View Diagrams & Manuals
TB6044XP (41ADZ6PC766) Trimmer View Diagrams & Manuals
TB6044XP (41ADZ6PC866) Trimmer View Diagrams & Manuals
TB6044XP (41BDZ6PC766) Trimmer View Diagrams & Manuals
Cub Cadet
CC310 (41ADZ31C912) (2013) 41ADZ31C912 Gas String Trimmer View Diagrams & Manuals
CC330 (41ADZ33C912) (2013) 41ADZ33C912 Gas String Trimmer View Diagrams & Manuals
CC350 (41ADZ35C912) (2013) 41ADZ35C912 Gas String Trimmer View Diagrams & Manuals
CC350 (41BDZ35C912) (2014) 41BDZ35C912 Gas String Trimmer View Diagrams & Manuals
CC330 (41ADZ33C912) (2014) 41ADZ33C912 Gas String Trimmer View Diagrams & Manuals
CC370 (41ADZ37C912) (2014) Gas String Trimmer View Diagrams & Manuals
MTD
41ADZ45C799 Trimmer View Diagrams & Manuals
41ADZ45C799 (316.731701)(2014) Trimmer View Diagrams & Manuals
41ADZ46C799 Trimmer View Diagrams & Manuals
41ADZ47C799 Trimmer View Diagrams & Manuals
41BDZ46C799 Trimmer View Diagrams & Manuals
41BDZ47C799 Trimmer View Diagrams & Manuals
Show More Compatible Models
This item works with the following types of products:
- Trimmer Parts
Customer Part Reviews ?
Average Rating (out of 5):
Click to filter by ratings:
5 stars
3
4 stars
0
3 stars
0
2 stars
0
1 stars
0
< PREV
- 1
Always the right part when needed
I would like to recommend you include the other piece of tubing for the EC 625 model
Guest -
April 28, 2021
Verified Purchase
Easy fix
Needed just the cap but its not sold separately so this also Comes with filter and easy to swap out.
Jason -
June 18, 2019
Verified Purchase
Troy Bilt Trimmer fuel tank
I purchased a fuel tank for my trimmer because it was leaking and the replacement tank was a perfect match and it was the same as the original one
Guest -
April 25, 2019
Verified Purchase
t
t
t -
t days ago
Verified Purchase
eReplacementParts Team
t
Questions & Answers ?
Our customer Service team is at the ready daily to answer your part and product questions.

Ask our Team
We have a dedicated staff with decades of collective experience in helping customers just like you purchase parts to repair their products.
Does this fit my product?Questions & Answers for Fuel Tank Asm Ac8
No questions have been asked yet
Customer Repair Instructions ?
All our customer repair instructions are solicited directly from other customers just like you who have purchased and replaced this exact part.
I had a pinched fuel line, and since I had my trimmer tore apart I wanted to tune it all up. I didn't want to rebuild the carburetor so I just replaced it with a new one.
James - August 19, 2017
👍 5 of 5 people found this instruction helpful
Tool Type
Trimmer
Difficulty
Easy
Time
15-30 minutes
Tools Used
Screwdriver
1. Removed the cover to the air filter
2. Removed the 3 screws holding on the outer cover
3. Loosened the bottom two screws on the lower outer cover.
4. Slide the bottom cover back, and pulled the gas tank out.
5. Removed the two screws behind the air filter, pulled them out and slid the carburetor up.
6. Hooked the new gas tank line to the new carburetor. Ran the line from the carburetor to the primer. Then ran the primer overflow line back to the gas tank.
7. I slid the carburetor in replaced the two screws, then slid the new gas tank in. Tightened the bottom two screws that were just loosened to hold the gas tank in place. Replaced the top cover put the final three screws back in. Then changed the spark plug. It fired up on the second or third pull and ran better than when I purchased it new.
Did you find this story helpful?
Thanks for voting and helping fellow customers!
Crack in tank
Richard - May 31, 2017
👍 2 of 2 people found this instruction helpful
Tool Type
Trimmer
Difficulty
Easy
Time
15-30 minutes
Tools Used
Screwdriver
Parts Used
Removed the screws holding the tank on, remove the gas lines. Install the new gas tank on the machine and push the fuel lines on
Did you find this story helpful?
Thanks for voting and helping fellow customers!
Air purge primer dry rotted and fuel lines pulled out of gas tank.
Robert - June 9, 2016
👍 3 of 4 people found this instruction helpful
Tool Type
Trimmer
Difficulty
Easy
Time
15-30 minutes
Tools Used
Screwdriver
I had not used my trimmer for a while, and when I tried to prime it the bulb cracked, then the lines snapped when I tried to take off the bulb. I used a screwdriver to dismount the fuel tank. To install the new tank I had to make sure the fuel lines when in the right spot on the carb, and I put in the new primer bulb, and bingo everything works great now!
Did you find this story helpful?
Thanks for voting and helping fellow customers!
FUEL LINES (OLD) BROKE
MIKE - July 20, 2022
Tool Type
Trimmer
Difficulty
Medium
Time
30-60 minutes
Tools Used
Screwdriver, Pliers, Power Drill
Parts Used
1) REMOVE THE TOP COVER OF THE TRIMMER THAT HAS THE AIR PURGE BULB ON IT.
2) REMOVE THE SCREWS THAT HOLD THE REAR CASE ON THE MOTOR SO THE FUEL TANK COULD BE REMOVED.
3) INSTALL NEW TANK AND RECONNECT FUEL LINES.
4) REPLACE TOP CVER AND SCREWS TO REAR COVER.
NOTE: THE PROBLEM IS THAT THIS FUEL TANK ASSEMBLY ONLY HAS TWO FUEL HOSES INCLUDED. THE FUEL TANK ASSEMBLY SHOULD INCLUDE THE AIR PURGE BULB TO CARB. FUEL LINE.
Did you find this story helpful?
Thanks for voting and helping fellow customers!
Fuel return hose became brittle and broke when conducting other repair
Luke - March 18, 2021
Tool Type
Trimmer
Difficulty
Easy
Time
Less than 15 minutes
Tools Used
Screwdriver, Pliers, Impact driver with bit set speeds things up
Parts Used
When replacing the throttle cable on my trimmer (which is a more medium to hard level repair), I had to pivot the cover with the primer bulb out of the way, and the fuel return hose, which had become brittle, broke into halves. It was actually around the same price to buy the whole fuel tank assembly with all tank hoses than it was to buy just the replacement hose that broke, so I replaced the whole tank. You can save a few minutes by using an impact driver on it's low setting instead of hand screwdrivers, and I needed to use a pair of needle nose pliers to remove/reinstall the fuel sender line on the carburetor.
1. Drain any residual fuel from the tank.
2. Unscrew two torx coarse-thread screws from the rear of the red top cover by the pull cord, and three torx machine screws from the front, then lift the cover straight up to remove. You may need to pivot it around the spark plug boot if it gets in the way. Use caution, as the fuel lines are still connected to the primer bulb in the cover.
3. Remove the blue fuel line (primer to tank) from the primer bulb - it just pulls off. Be sure to not remove the yellow line (carb to primer), or else mark the outlet side of the primer where the blue line was in case both lines get removed - they need to go back the same way.
4. Remove the black fuel line on the front side of the carburetor at the carburetor (tank to carb). It just twists/pulls off, but the carb has aggressive flanges - you may have to cut a slit in it to remove, or use needle nose pliers (careful not to damage the carburetor flange).
5. The tank is held in by two large rectangular index holes in the front and rear black plastic clamshell body that houses the engine. These holes have a rubber gasket in them, and basically just pinch around ears on the tank to hold it in place. Remove the two large pocketed torx screws on the bottom of the black engine clamshell and it should allow you to spread open the bottom of the case enough to give you the clearance needed to slide one of the tank ears out of the index hole, then pull the tank out.
6. Put the new tank in the index holes, ensuring the rubber gaskets are in place. Connect the black and blue hoses to the carb and primer bulb, respectively. The black hose may require some effort to slide over the carburetor flanges - I was able to get the hose on the nipple by hand, but had to use pliers to twist/push it over the flanged part. Put a small amount of fuel in the tank, and press the primer bulb a few times and make sure there is good vacuum, and suction is pulling fuel from the black line into the carb, out through the yellow line into the bulb, and out of the bulb through the blue line back into the tank, and that there are no leaks.
7. Assemble in reverse order - screw in two large torx screws into the pocketed holes at the bottom of the black clamshell case, then fit the red cover over the engine, carburetor and exhaust (use care that the exhaust port in the cover slots into place in the black engine clamshell), and re-install the five torx screws.
Did you find this story helpful?
Thanks for voting and helping fellow customers!
Broken fuel lines, gaskets torn on carburetor and cracked purge bulb
Pamela - May 29, 2020
Tool Type
Trimmer
Difficulty
Medium
Time
More than 2 hours
Tools Used
Screwdriver
Removed carburetor and fuel tank. Installed new fuel tank and new carburetor using two new gaskets. Watched a ereplacement YouTube video regarding proper fuel line placement on the purge bulb and carburetor. Successful repair.
Did you find this story helpful?
Thanks for voting and helping fellow customers!
Return fuel line broke at tank
Terry - May 4, 2020
Tool Type
Trimmer
Difficulty
Medium
Time
30-60 minutes
Tools Used
Screwdriver, Pliers
Parts Used
1. Removed cowling screws.
2. Removed carburetor fuel line with pliers.
3. Removed old fuel tank assembly.
4. Placed new fuel tank assembly into rubber grommets in housing.
5. Reconnected black fuel line to carburetor and green return fuel line to priming bulb.
6. Replaced cowling with screws and made sure all were securely tighted.
7. Operation followed normal instructions.
Did you find this story helpful?
Thanks for voting and helping fellow customers!
Pawls for the starter rope broke
Lee - March 31, 2020
Tool Type
Trimmer
Difficulty
Medium
Time
30-60 minutes
Tools Used
Screwdriver, Pliers, None
Parts Used
Removed the starter rope mechanism,
Replaced the pawls on the fan blade
Put the starter rope mechanism back
Replaced the pawls on the fan blade
Put the starter rope mechanism back
Did you find this story helpful?
Thanks for voting and helping fellow customers!
Bad carburator and gas tank.
Sandy - June 5, 2018
Tool Type
Trimmer
Difficulty
Medium
Time
30-60 minutes
Tools Used
Screwdriver
I installed the new gas tank which had the tubes that go to the primer ball and carburetor. Then installed the new carburetor with the new gaskets. Put in new gas and it runs like a champ.
Did you find this story helpful?
Thanks for voting and helping fellow customers!
OEM stands for Original Equipment Manufacturer and means the part you’re buying is sourced directly from the manufacturer who made your product. At eReplacementParts, we sell only genuine OEM parts, guaranteeing the part you’re purchasing is of better design and of higher quality than aftermarket parts.
Our product descriptions are a combination of data sourced directly from the manufacturers who made your product as well as content researched and curated by our content & customer service teams. This content is edited and reviewed internally before being made public to customers.
Our customer service team are at the ready daily to answer your part and product questions. We have a dedicated staff with decades of collective experience in helping customers just like you purchase parts to repair their products.
All our part reviews are solicited directly from other customers who have purchased this exact part. While we moderate these reviews for profanity, offensive language or personally identifiable information, these reviews are posted exactly as submitted and no alterations are made by our team.
All our customer repair instructions are solicited directly from other customers just like you who have purchased and replaced this exact part. While we moderate these reviews for profanity, offensive language or personally identifiable information, these reviews are posted exactly as submitted and no alterations are made by our team.
Based on data from past customer purchasing behaviors, these parts are most commonly purchased together along with the part you are viewing. These parts may be necessary or helpful to replace to complete your current repair.
All our installation videos are created and produced in collaboration with our in-house repair technician, Mark Sodja, who has helped millions of eReplacementParts customers over the last 13 years repair their products. Mark has years of experience in selling and repairing both commercial and residential products with a specialty in gas-powered equipment.
This data is collected from customers who submitted a repair instruction after replacing this exact part. Customers can rate how easy the repair was to complete and how long it took. We aggregate this data to provide a repair rating that allows customers to quickly determine the difficulty and time needed to perform their own repair.