Fuel Line And Filter 791-682039 - OEM Ryobi - eReplacementParts.com
eReplacementParts.com
877-346-4814
Ryobi Parts
Repair Parts Home
  
Lawn Equipment Parts
  
Ryobi Parts
  791-682039 Fuel Line And Filter

Fuel Line And Filter 791-682039

OEM part for: Ryobi, Troy-Bilt, Bolens, Yard Man, MTD, Yard Machines

Part Number: 791-682039


Install
Videos!
Grid squares measure 1x1 inch
In Stock
Ships within 1 business day
Medium 15-30 minutes (75 rated repairs)?
OEM: Original Equipment Manufacturer ?
RyobiTroy-BiltBolensYard ManMTDYard Machines
Does this fit my product?

Product Description ?

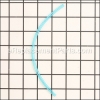
The 791-682039 Fuel Filter and Line, filters the fuel in the tank as it is forced into the carburetor up by means of the primer bulb.

To install.
Remove retainer ring from fuel line.
Insert fuel line thru gas cap opening.
Thread fuel line thru hole in bottom of the fuel tank.
Pull fuel line thru to firmly seat against inside tank wall.
Put retainer ring on fuel line,hold line and press ring firmly against the out side of the fuel tank wall.
Then attach fuel line to correct line on the carburetor.

The filter will at sometime get clogged with dirt and debris that has collected in the fuel tank, and will have to be replaced.

  • Classification: Part
  • Weight: 0.01 lbs.
  • Also Known As: Fuel Tube, Pick-Up Tube, Fuel Hose
  • Shipping: Ships Worldwide

Compatibility

This Fuel Line And Filter will fit the following 419 machines. Confirm this part works with your model, and view the detailed model diagrams and repair help we have to offer.

Ryobi

Troy-Bilt

Bolens

Yard Man

MTD

Yard Machines

Show More Compatible Models
Don't see yours? Try searching our site for :

This item works with the following types of products:

  • Cultivator Parts
  • Blower Parts
  • Vacuum Parts
  • Trimmer Parts
  • Edger Parts
  • Pruner Parts

Repair Videos ?

Watch the Repair Video for Fuel Line And Filter
Articles:
Filthy Filter? Step-by-step guide shows you how to quickly remove and install the fuel filter and fuel line on a Ryobi s...
September 03, 2015

Customer Part Reviews ?

4.4
Average Rating (out of 5):
20 Reviews
Click to filter by ratings:
5 stars
15
4 stars
2
3 stars
0
2 stars
1
1 stars
2
  • Highest Rating
  • Most Recent
< PREV
  • 1
  • 2
NEXT >
  • Just what I ordered
    I worked fine
    Guest - May 23, 2022 Verified Purchase
    Right Parts, Quick Fix
    Using the parts you sent I was able to fix my Ryobi trimmer much better than the shop at HomeDepot did. Also, your Youtube videos were very good and instructive. Thanks!
    Guest - September 21, 2021 Verified Purchase
    Correct part delivered rapido!
    Guest - August 23, 2021 Verified Purchase
    Parts fit and worked as expected
    The parts ordered took a little longer to arrive due to the Covid 19, however they were the parts I needed to clean up my equipment. The video on how to replace the fuel line was very helpful.
    Guest - August 21, 2020 Verified Purchase
    easy repair
    had a trimmer with a cracked hose, got a replacement from you and now works like new!!!
    Guest - August 17, 2020 Verified Purchase
    great part thanks
    came in good condition
    Guest - June 25, 2020 Verified Purchase
    weed eater parts
    Parts fit like the ones I removed
    Guest - April 12, 2020 Verified Purchase
    part arrived quickly
    Just what I needed to repair weed trimmer
    Guest - August 16, 2019 Verified Purchase
    As it should be!
    I had purchased a fuel filter and (bulk) fuel line (not OEM style) from a local repair/dealer. After 3 days of off and on attempts, I crushed the filter trying to get it in place. Received this one and within 5 minutes it was installed.
    Guest - August 12, 2019 Verified Purchase
    Quick fix
    The parts arrived when they told me and it fit perfectly.
    Guest - July 23, 2019 Verified Purchase

    Questions & Answers ?

    Our customer Service team is at the ready daily to answer your part and product questions.

    photo of team member
    Ask our Team

    We have a dedicated staff with decades of collective experience in helping customers just like you purchase parts to repair their products.

    Does this fit my product?

    Questions & Answers for Fuel Line And Filter


    Hole in tank is small
    Wayne asked on 2023-05-27
    Hello Wayne, thank you for writing. The inner diameter measures approximately 3/32 inches and the outer diameter measures approximately 3/16 inches. We are pleased to have been able to help.
    eReplacementParts Team May 27, 2023

    Customer Repair Instructions ?

    All our customer repair instructions are solicited directly from other customers just like you who have purchased and replaced this exact part.

    Medium 15-30 minutes (75 rated repairs)?

    Fuel Leak

    Chris - March 5, 2016
    👍 28 of 32 people found this instruction helpful
    Tool Type

    Cultivator

    Difficulty

    Easy

    Time

    15-30 minutes

    Tools Used

    Screwdriver

    The fuel line and filter, primer and hose assembly, and the fuel return line had deteriorated over time and were leaking fuel. I found the parts here and ordered them. When the parts arrived, I removed four screws from the rear cover on the engine, pulled off the old hoses and put the new ones on. I screwed the rear cover in place and was done in about 30 minutes or less.
    Did you find this story helpful?
    Thanks for voting and helping fellow customers!

    Replaced fuel filter and small section of line..

    Phillip - May 14, 2016
    👍 22 of 25 people found this instruction helpful
    Tool Type

    Trimmer

    Difficulty

    Easy

    Time

    15-30 minutes

    Tools Used

    Screwdriver, Pliers

    Removed the old line and filter by just pushing back up in the tank. I use a large needle with 15lb. fishing line and thread through the end of the fuel line then tie a knot. Run the fishing line through the hole,then I pull the fuel line with the filter already inserted in the line through the hole in the fuel tank. When the filter gets to the hole I pull on the line while pressing on the filter with a plastic pry tool until the stem of the filter is all the way through the hole. Once in place I slide the plastic washer over the fuel line and the filter stem locking it in place. Put everything back together, fill with fuel and check for leaks, then run.
    Did you find this story helpful?
    Thanks for voting and helping fellow customers!

    Hoses were brittle and primer was cracked

    Brandon - September 1, 2016
    👍 11 of 12 people found this instruction helpful
    Tool Type

    Cultivator

    Difficulty

    Medium

    Time

    15-30 minutes

    Tools Used

    Screwdriver, Pliers

    Remove cover, loosen carburetor, pull up to get gas tank out, put new hoses in, ran from gas tank to carburetor. Needed 3 new hoses and primer, reconnected them, snapped new primer in place and put back together.
    Did you find this story helpful?
    Thanks for voting and helping fellow customers!

    Fuel lines rotten

    Tim - December 5, 2016
    👍 3 of 4 people found this instruction helpful
    1. Remove engine cover
    2. Remove old lines
    3. Install new lines
    4. Replace air filter
    5. Replace engine cover
    Did you find this story helpful?
    Thanks for voting and helping fellow customers!

    Fuel lines cracked.

    Ricky - June 14, 2017
    👍 2 of 3 people found this instruction helpful
    Tool Type

    Trimmer

    Difficulty

    Medium

    Time

    15-30 minutes

    Tools Used

    Screwdriver, Pliers, Nutdriver

    1. Removed carb mount to remove gas tank.
    2. Removed muffler to inspect for carbine.
    3. Put return lin in gas tank.
    4. Put filter and fuel line in gas tank (goes from the inside out) had hard time getting the filter pulled thru the tank very tight fit.
    5. Put gas in and started it up.
    Did you find this story helpful?
    Thanks for voting and helping fellow customers!

    Fuel hoses were fell apart.

    Lloyd - October 10, 2018
    👍 0 of 1 people found this instruction helpful
    Tool Type

    Cultivator

    Difficulty

    Easy

    Time

    30-60 minutes

    Tools Used

    Screwdriver, Pliers, Socket set, Nutdriver

    1. Removed cover over carburetor, four screws.
    2. Removed carburetor, two screws.
    3.Inserted hoses and primer. Used sockets and a nut driver to get filter and fuel line into tank. This was the innovative part if the installation.
    4 .Reassembled carburetor and cover.
    5. Gassed it up and it ran..
    Did you find this story helpful?
    Thanks for voting and helping fellow customers!

    Daniel - September 4, 2018
    I had a Ryobi weed trimmer that i took to two shops for a tune and replace old fuel lines...both shops recommended i buy a new one as the cost of repairing the item was going to likely run $90-$120 and it was pointed out to me that i could buy a new one for $120...after figuring what parts i needed it cost under $50 and my time (1 hour).

    Watched a YouTube video on replacing fuel lines and general tune up...looked up my brand/model on ereplacementParts.com and they had all the parts listed for any repair i might have...i selected the parts mentioned in the video and paid for them in the easy check out... they were delivered within a couple days...I watched the video again and re-assembled my parts and the trimmer started right up...the next day i was trimming about an acre of weeds n grass..

    This was my first time using ereplacementParts.com. For me everything went great..i highly recommend them to anyone trying to repair your own equipment...
    Did you find this story helpful?
    Thanks for voting and helping fellow customers!

    Gas line broke, came out of gas tank

    SCOTT - August 18, 2018
    Tool Type

    Trimmer

    Difficulty

    Medium

    Time

    15-30 minutes

    Tools Used

    Pliers, Power Drill

    Found that the existing hole in the gas tank was a little too small for the new line and filter. Drilled the hole with a slightly larger drill bit to enlarge it.

    Threaded the new line and filter through the top of the tank through the hole in the bottom. Pulled line and filter down to the bottom of the tank to produce a good seal with the tank. Put on the retaining clip.
    Did you find this story helpful?
    Thanks for voting and helping fellow customers!

    Unit had sat idle for several years

    Roger - July 25, 2018
    Tool Type

    Trimmer

    Difficulty

    Medium

    Time

    30-60 minutes

    Tools Used

    Screwdriver, Pliers, Nutdriver

    Replaced all fuel lines, fuel filter and all gaskets and diaphragms in carburetor. Filled with fresh fuel and turned over on 6th pull.
    Did you find this story helpful?
    Thanks for voting and helping fellow customers!

    Fuel line leaked at the tank

    Michael - July 1, 2018
    Tool Type

    Cultivator

    Difficulty

    Easy

    Time

    Less than 15 minutes

    Tools Used

    Screwdriver, Pliers, Torx driver & sidecutter

    1. Removed the cover over the carburator
    2. Removed 2 screws securing the carburator
    3. Removed fuel line from carburator
    4. Cut the fuel filter nozzle at the back of the tank & removed filter
    5. Pushed new filter into the opening in the tank
    6. Slid securing ring over the fuel line and pushed it snug to the back of the tank
    7. Connected fuel line to the carburator
    8. Reassembled the machine in reverse order from above.

    I watched the video online on this repair. Even though the video shows a string trimmer, the process is exactly the same.
    Did you find this story helpful?
    Thanks for voting and helping fellow customers!

    OEM stands for Original Equipment Manufacturer and means the part you’re buying is sourced directly from the manufacturer who made your product. At eReplacementParts, we sell only genuine OEM parts, guaranteeing the part you’re purchasing is of better design and of higher quality than aftermarket parts.

    Our product descriptions are a combination of data sourced directly from the manufacturers who made your product as well as content researched and curated by our content & customer service teams. This content is edited and reviewed internally before being made public to customers.

    Our customer service team are at the ready daily to answer your part and product questions. We have a dedicated staff with decades of collective experience in helping customers just like you purchase parts to repair their products.

    All our part reviews are solicited directly from other customers who have purchased this exact part. While we moderate these reviews for profanity, offensive language or personally identifiable information, these reviews are posted exactly as submitted and no alterations are made by our team.

    All our customer repair instructions are solicited directly from other customers just like you who have purchased and replaced this exact part. While we moderate these reviews for profanity, offensive language or personally identifiable information, these reviews are posted exactly as submitted and no alterations are made by our team.

    Based on data from past customer purchasing behaviors, these parts are most commonly purchased together along with the part you are viewing. These parts may be necessary or helpful to replace to complete your current repair.

    All our installation videos are created and produced in collaboration with our in-house repair technician, Mark Sodja, who has helped millions of eReplacementParts customers over the last 13 years repair their products. Mark has years of experience in selling and repairing both commercial and residential products with a specialty in gas-powered equipment.

    This data is collected from customers who submitted a repair instruction after replacing this exact part. Customers can rate how easy the repair was to complete and how long it took. We aggregate this data to provide a repair rating that allows customers to quickly determine the difficulty and time needed to perform their own repair.

    eReplacementParts.com
    7174 South 400 West
    Suite 5
    Midvale, UT 84047
    visa mastercard discover american express PayPal