
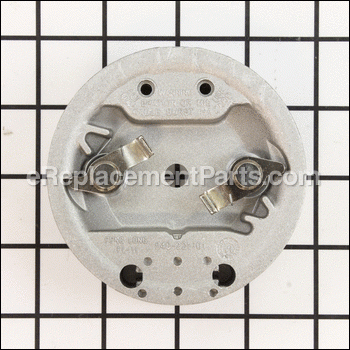
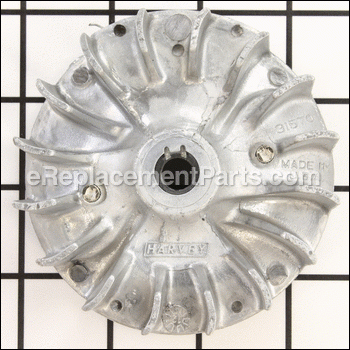
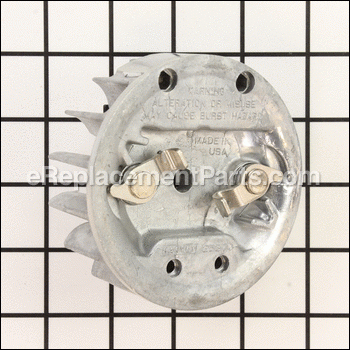
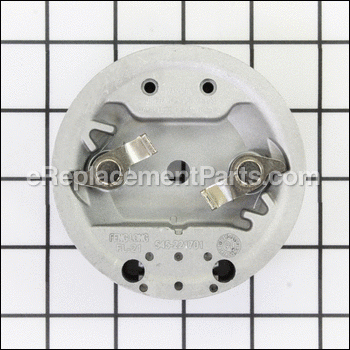
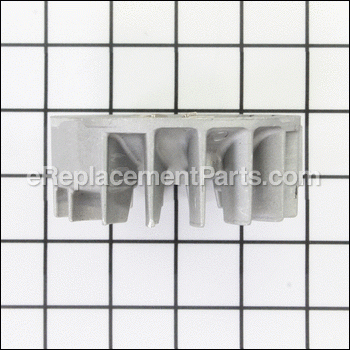
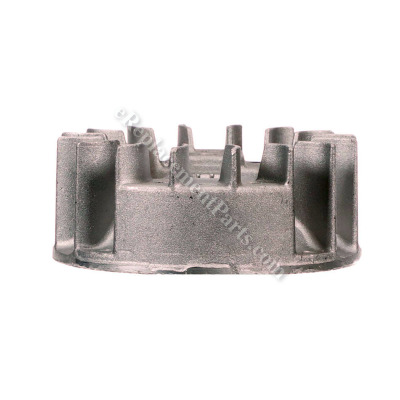

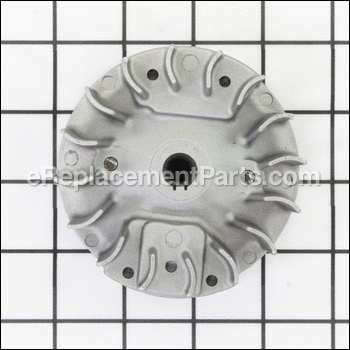
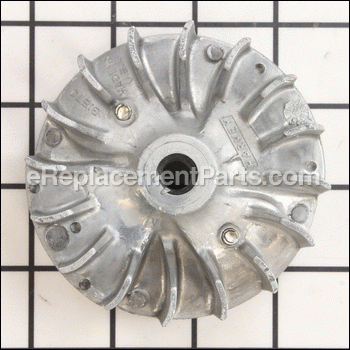

This is an original replacement part manufactured for use with handheld leaf blowers. The flywheel has magnets on its side that create an electric charge as the magnets pass the ignition module. The electric charge is sent to the spark plug to fire the air-fuel mix in the cylinder. The flywheel fits on the crankshaft by a key that aligns with a keyway on the crankshaft, this allows for proper firing timing. If the key on the flywheel is broken it can cause misfires or will not start at all. This flywheel is sold as an individual replacement part.
Flywheel Assembly 545221701
OEM part for: Poulan, Paramount, Weed Eater, Husqvarna, Craftsman, Jonsered
Part Number: 545221701
$13.69
In Stock
Compatibility
This Flywheel Assembly will fit the following 482 machines. Confirm this part works with your model, and view the detailed model diagrams and repair help we have to offer.
Paramount
Poulan
Weed Eater
Husqvarna
Craftsman
Jonsered
Show More Compatible ModelsThis item works with the following types of products:
- Hedge Trimmer Parts
- Trimmer Parts
- Edger Parts
- Blower Parts
This part replaces obsolete part #: 530054115, 545005101, 545197301, 530039149, 530039148, 530069886, 530071487
Customer Part Reviews ?
Average Rating (out of 5):
Click to filter by ratings:
5 stars
6
4 stars
0
3 stars
0
2 stars
0
1 stars
0
< PREV
- 1
Replacement
New part took care of the problem, thank you for your quick response.
Guest -
February 24, 2023
Verified Purchase
Flywheel Purchase
This arrived on time in good condition and fit perfectly. Thank you!
Guest -
May 25, 2021
Verified Purchase
Exact replacement
It took 19 days to receive .
Guest -
September 25, 2020
Verified Purchase
Worked as expected.
My blower is working again.
Guest -
June 25, 2020
Verified Purchase
Worked great
Did exactly what it was suppose to do!!
Guest -
May 8, 2020
Verified Purchase
FIXED POULAN LEAF BLOWER
Great service, and fast.
Guest -
May 9, 2019
Verified Purchase
Questions & Answers ?
Our customer Service team is at the ready daily to answer your part and product questions.

Ask our Team
We have a dedicated staff with decades of collective experience in helping customers just like you purchase parts to repair their products.
Does this fit my product?Questions & Answers for Flywheel Assembly
I have a Poulan pp258tp will this flywheel fit
James
for model number PP258TP
asked on 2023-03-27
Hello James, Thank you for contacting us. We have researched the model you have provided and have found the part you are looking for is Part Number: 577235901. Thank you for the inquiry, good luck with the repair!
eReplacementParts Team March 27, 2023
Hello, I am looking to purchase the flywheel replacement for my Poulan blower / Vac unit and wanted to confirm that your part number 545221701 will fit? thank you!
Pete
for model number Poulan P200C
asked on 2022-03-03
Hello Pete, thank you for writing. Yes, the part 545221701 you had chosen is compatible. We hope this helps.
eReplacementParts Team March 03, 2022
Customer Repair Instructions ?
All our customer repair instructions are solicited directly from other customers just like you who have purchased and replaced this exact part.
Key on flywheel sheered, causing a no start situation
dave - January 13, 2017
👍 8 of 8 people found this instruction helpful
Tool Type
Blower
Difficulty
Easy
Time
15-30 minutes
Tools Used
Screwdriver, Wrench Set, Nutdriver, Torx driver
Parts Used
1. Remove outer casing and housing.
2. Remove impeller
3. Remove engine assembly from last of casing
4. Remove flywheel and replace
5. Reassemble in reverse as to assembly
2. Remove impeller
3. Remove engine assembly from last of casing
4. Remove flywheel and replace
5. Reassemble in reverse as to assembly
Did you find this story helpful?
Thanks for voting and helping fellow customers!
Flywheel alignment key broke off
William - October 26, 2016
👍 6 of 6 people found this instruction helpful
Tool Type
Blower
Difficulty
Easy
Time
30-60 minutes
Tools Used
Screwdriver, Wrench Set, Allen wrench
Parts Used
Removed the fan housing, then used a puller to remove the flywheel. lines up the key in the new flywheel with the keyway in the driver shaft and tapped it on with a mallet. It is a tapered fit. Then put the housing back on.
Did you find this story helpful?
Thanks for voting and helping fellow customers!
Flywheel key broke
Levy - May 25, 2017
👍 3 of 3 people found this instruction helpful
Tool Type
Blower
Difficulty
Medium
Time
15-30 minutes
Tools Used
Socket set, Wrench Set, Hexagon tools
Parts Used
1. Use hexagon wrench to remove screws.
2. Use rachet set remove fan bolt from shaft.
3. Remove top with starter rope.
4. Remove flywheel and replace with new one.
5. Assemble in reverse order.
2. Use rachet set remove fan bolt from shaft.
3. Remove top with starter rope.
4. Remove flywheel and replace with new one.
5. Assemble in reverse order.
Did you find this story helpful?
Thanks for voting and helping fellow customers!
No start.......no attempt to start even with starting fluid. Compression was at minimums when I checked it.
Jerry - July 12, 2018
👍 1 of 1 people found this instruction helpful
Tool Type
Blower
Difficulty
Medium
Time
1-2 hours
Tools Used
Screwdriver, Pliers, Socket set, Torx bits and allen wrenches
Unit will have to be completely disassembled so remember (i.e. take pictures) as you go. Remove carb. and fuel tank at the same time and leave hose hooked to carb. Got to the other side and remove plastic cover over exhaust muffler and remove muffler, gasket and metal deflector. Remove carrying handle (2 screws) and the top plastic cover. At this time you can remove spark plug if you desire...........or you can wait until later.
Bottom side of unit............remove 3 screws covering and protecting fan and set cover and screw aside. Hold fan and remove nut, lock washer and large flat washer. Set this aside also. Remove fan duct and nozzle (4 screws) and set it aside. Now all that is left is the lower housing (4 screws) Remove screws and housing and set aside.
Flywheel is exposed at this point and (in this order) you will find a space and washer (washer is next to flywheel. Remove them and set aside. Gently work flywheel back and forth.......a little lubricant between shaft and flywheel will help. Shaft is tapered so it will come off with a little effort.
Next I took the two allen head bolts holding the cylinder head on. Set them aside and remove head. I removed the piston and rod assembly due to over-heating and or lack of proper lubricant in fuel. To remove the assembly the "black" cover (2 screws) on rear if engine block will have to be removed.
To reassemble everything is reverse from disassembly. I used RED Loctite on the cylinder bolts and BLUE Loctite on the Fan Nut and shaft.
Main culprit I found was the piston ring was frozen to the piston and the cylinder was scored. Compression was dismal and what I suspected was proven once the unit was disassemble.
Make sure you have a good supply or Torx screwdrivers and bits (various sizes) along with a good Allen Wrench set
Don't forget to watch for the gasket behind carb. It will come lose and may wind up on the floor when you remove the carb. Same goes for the exhaust.
Did you find this story helpful?
Thanks for voting and helping fellow customers!
Leaf blower would not run
Michael - September 16, 2017
👍 1 of 1 people found this instruction helpful
Tool Type
Blower
Difficulty
Medium
Time
1-2 hours
Tools Used
Screwdriver, Pliers, Socket set, Wrench Set, Adjustable Wrench
1.). One of the screws holding the cylinder down sheared off at the head. The head was caught up in the flywheel and took out two blades and nicked several others. The gasket was torn as well.
2.). I had to completely disassemble the entire blower because the screw was in the back.
3.). With everything apart, I went ahead and replaced all the gaskets from the kit.
4.). I sprayed WD-40 on the post going through the flywheel and let it set for a couple of hours. Using a bench vise and a rubber mallet, I was able to easily take the fly wheel off.
5.). I had to use some needle nose vise grips to grab hold of the remainder of the broken screw and eventually worked it loose.
6.). Reassembled all the hardware. I made sure, while taking it apart, to take detailed pictures with my phone. I used those pictures and the diagrams from replacements to make sure that I put everything back together properly. I had also placed the each part or associated screw in their own containers to help keep them organized.
7.). Leaf blower works great now. $20 in parts, a couple of hours of disassemble and reassemble and I am back in business.
Did you find this story helpful?
Thanks for voting and helping fellow customers!
flywheek key was stripped.
Lewis - January 14, 2022
Tool Type
Blower
Difficulty
Easy
Time
30-60 minutes
Tools Used
Screwdriver, Power Drill, Socket set, Wrench Set
Parts Used
Dismantled engine and removed old flywheel and replaced with new one. put the leaf blower back together and the blower started after a few pulls on the starter rope.
Did you find this story helpful?
Thanks for voting and helping fellow customers!
Flywheel key was damaged.
David - May 28, 2021
Tool Type
Trimmer
Difficulty
Easy
Time
1-2 hours
Tools Used
Screwdriver, Nutdriver
Parts Used
Removed old flywheel and installed new one.
Did you find this story helpful?
Thanks for voting and helping fellow customers!
Flywheel
James - April 24, 2020
Tool Type
Blower
Difficulty
Easy
Time
15-30 minutes
Tools Used
Screwdriver, Power Drill, Socket set, Nutdriver, None
Parts Used
Dissemble, replace parts, assemble,crankand run it. Done in 30 minutes complete.
Did you find this story helpful?
Thanks for voting and helping fellow customers!
Coil and flywheel were both damaged due to debris
Norman - December 3, 2019
Tool Type
Blower
Difficulty
Medium
Time
1-2 hours
Tools Used
Screwdriver, Socket set, Nutdriver, Star Bits required
Parts Used
I followed manufacturers disassemble and reassembly instructions
Did you find this story helpful?
Thanks for voting and helping fellow customers!
Damaged coil and cracked housing
Randall - October 20, 2019
Tool Type
Edger
Difficulty
Medium
Time
1-2 hours
Tools Used
Screwdriver, Socket set, Wrench Set, Nutdriver
Completely rebuilt motor.
Did you find this story helpful?
Thanks for voting and helping fellow customers!
Load More Install Stories
OEM stands for Original Equipment Manufacturer and means the part you’re buying is sourced directly from the manufacturer who made your product. At eReplacementParts, we sell only genuine OEM parts, guaranteeing the part you’re purchasing is of better design and of higher quality than aftermarket parts.
Our product descriptions are a combination of data sourced directly from the manufacturers who made your product as well as content researched and curated by our content & customer service teams. This content is edited and reviewed internally before being made public to customers.
Our customer service team are at the ready daily to answer your part and product questions. We have a dedicated staff with decades of collective experience in helping customers just like you purchase parts to repair their products.
All our part reviews are solicited directly from other customers who have purchased this exact part. While we moderate these reviews for profanity, offensive language or personally identifiable information, these reviews are posted exactly as submitted and no alterations are made by our team.
All our customer repair instructions are solicited directly from other customers just like you who have purchased and replaced this exact part. While we moderate these reviews for profanity, offensive language or personally identifiable information, these reviews are posted exactly as submitted and no alterations are made by our team.
Based on data from past customer purchasing behaviors, these parts are most commonly purchased together along with the part you are viewing. These parts may be necessary or helpful to replace to complete your current repair.
All our installation videos are created and produced in collaboration with our in-house repair technician, Mark Sodja, who has helped millions of eReplacementParts customers over the last 13 years repair their products. Mark has years of experience in selling and repairing both commercial and residential products with a specialty in gas-powered equipment.
This data is collected from customers who submitted a repair instruction after replacing this exact part. Customers can rate how easy the repair was to complete and how long it took. We aggregate this data to provide a repair rating that allows customers to quickly determine the difficulty and time needed to perform their own repair.