eReplacementParts.com
877-346-4814
Char-Broil Parts
Repair Parts Home
  
Grill Parts
  
Char-Broil Parts
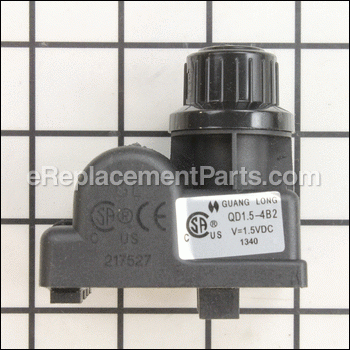
  G511-0055-W1 Electronic Ignition Module

Electronic Ignition Module G511-0055-W1

OEM part for: Char-Broil

Part Number: G511-0055-W1


Install
Videos!
Grid squares measure 1x1 inch
In Stock
Order within the next 57 minutes and your part ships today!
Easy Less than 15 minutes (27 rated repairs)?
OEM: Original Equipment Manufacturer ?
Char-Broil
Does this d-block d-md-none fit my product?

Product Description ?

This is an Authentic OEM replacement part designed for Char-Broil Grills. This part has a Plastic Body and it is Sold Individually. Ignition Module produces the spark to ignite the burner. It has Two (2) Inputs and Four (4) output connectors. Requires an AA battery (not included).

Replacing this Electronic Ignition Module is easy and does not require any additional tools

• Unplug the wires from the old Ignition Module
• Unscrew the Button that holds it to the unit
• Place a New Module in place
• Install a AA Battery and Secure the Module with the Button
• Connect the wires

  • Classification: Part
  • Weight: 0.27 lbs.
  • Shipping: Ships Worldwide

Compatibility

This part will fit the following 69 machines

Char-Broil

463257111 3-Burner Infrared Grill View Diagrams & Manuals
463269411 Tru-Infrared IR Gas Grill With Flex Cart View Diagrams & Manuals
463269111 Tru-Infrared Black Porcelain Gas Grill View Diagrams & Manuals
463270909 Infrared 3-Burner Dual Fuel Grill View Diagrams & Manuals
463272509 Heatwave Infrared 3-Burner Porcelain Grill View Diagrams & Manuals
463250511 RED 3-Burner Infrared Grill View Diagrams & Manuals
463247109 Commercial Series 500 Three-Burner Infrared Grill View Diagrams & Manuals
463250509 CharBroil RED Three-Burner with Side Burner Grill View Diagrams & Manuals
463261709 PrecisionFlame Infrared Three-Burner Grill View Diagrams & Manuals
464222209 Three Burner Gas Grill View Diagrams & Manuals
463250512 Tru-Infrared Gas Grill View Diagrams & Manuals
463247412 Tru-Infrared Gas Grill View Diagrams & Manuals
463250510 Outdoor Grill View Diagrams & Manuals
463436813 (T-35G4) Outdoor Grill View Diagrams & Manuals
463257110 Three-Burner Infared Grill View Diagrams & Manuals
463449914 Commercial 4-Burner Grill C-45D View Diagrams & Manuals
463241314 3-Burner Commercial T-36D Grill View Diagrams & Manuals
463241313 3-Burner T-36D Gas Grill View Diagrams & Manuals
463251713 Gourmet 3-Burner Tru-Infrared T-36D Grill View Diagrams & Manuals
463335014 3-Burner Performance T-35G4 View Diagrams & Manuals
463436814 Tru-Infrared 3-Burner Performance Gas Grill View Diagrams & Manuals
463270914 Performance 3-Burner Tru-Infrared Gas Grill View Diagrams & Manuals
463436514 3-Burner Performance Tru-Infrared Gas Grill View Diagrams & Manuals
463250109 RED Intrared Three Burner Gas Grill View Diagrams & Manuals
463322613 Performance T35G4 Gas Grill View Diagrams & Manuals
463251714 Gas BBQ View Diagrams & Manuals
463270912 Gas BBQ View Diagrams & Manuals
466257110 Commercial Series Three-Burner Infrared Grill View Diagrams & Manuals
466257111 Commercial Series View Diagrams & Manuals
466270909 Quantum Three-Burner Dual Fuel Grill View Diagrams & Manuals
463270910 Quantum Infrared Three-Burner Dual Fuel Grill View Diagrams & Manuals
463222209 Three-Burner Infrared Dual Fuel Grill View Diagrams & Manuals
463270911 3-Burner Grill with Sideburner View Diagrams & Manuals
463348017 Signature Series 3-Burner Gas Grill View Diagrams & Manuals
463372017 Signature Series 3-Burner Gas Grill View Diagrams & Manuals
463367016 Signature Series Tru-Infrared 3-Burner Gas Grill View Diagrams & Manuals
463242516 Commercial Series Tru-Infrared 3-Burner Gas Grill View Diagrams & Manuals
463367016 Signature Series Tru-Infrared 3-Burner Gas Grill Tru Infrared Gas Grill View Diagrams & Manuals
415.16657900 3-Burner Lp Gas Grill With Side Burner View Diagrams & Manuals
461262409 Thermos Heatwave Four-Burner Gas Grill View Diagrams & Manuals
463434313 Performance Gas Grill View Diagrams & Manuals
463435115 Performance 3 Burner Gas Grill View Diagrams & Manuals
463436813 Performance Gas Grill View Diagrams & Manuals
463436815 Performance 3 Burner Gas Grill View Diagrams & Manuals
466250509 Red Three-Burner With Sideburner And Gauge View Diagrams & Manuals
466250512 Gourmet Bbq Grill View Diagrams & Manuals
466251713 Gourmet Bbq Grill View Diagrams & Manuals
466270911 Magnum Quantum Grill View Diagrams & Manuals
466270912 Performance Bbq Grill View Diagrams & Manuals
466270913 Performance Bbq Grill View Diagrams & Manuals
466434315 Bbq Grill View Diagrams & Manuals
466436513 Performance Grill View Diagrams & Manuals
466242515 Infrared Dual Fuel With Side Burner View Diagrams & Manuals
466242615 Infrared Ng Gas Grill With Side Burner View Diagrams & Manuals
466250511 3-Burner Infrared Grill View Diagrams & Manuals
466251714 Infrared Dual Fuel Gourmet Lidded Sideburners View Diagrams & Manuals
466252314 Infrared Ng Gas Grill Gourmet Lidded Sideburn View Diagrams & Manuals
466335015 Performance Infrared Gas Grill View Diagrams & Manuals
469234815 Performance 3-Burner Infrared Dual Fuel Grill View Diagrams & Manuals
469335115 Performance 3-Burner Infrared Gas Grill View Diagrams & Manuals
469435115 Performance Infrared Grill With Sideburner View Diagrams & Manuals
466241313 Commercial Grill View Diagrams & Manuals
466241314 Commercial Series Infrared Dual Fuel Lidded Side View Diagrams & Manuals
466242314 Commercial Series Infrared Ng Gas Grill Lidded Sideburners View Diagrams & Manuals
466242516 Commercial Series Tru-Infrared 3-Burner Gas Grill View Diagrams & Manuals
466242616 Commercial Series Tru-Infrared 3-Burner Gas Grill View Diagrams & Manuals
466243219 Commercial Series Tru-Infrared 3-Burner Gas Gril View Diagrams & Manuals
466247109 Commercial Series Infrared Three-Burner Gas Grill View Diagrams & Manuals
466247412 Commercial Bbq View Diagrams & Manuals
Show More Compatible Models
Don't see yours? Try searching our site for :

This item works with the following types of products:

  • Outdoor Grill Parts

This part replaces obsolete part #: 80018343

Repair Videos ?

Articles:
Having trouble getting your grill to light up? A common cause of this issue is a defective ignition switch. We'll sho...
November 08, 2012

Customer Part Reviews ?

4.8
Average Rating (out of 5):
16 Reviews
Click to filter by ratings:
5 stars
14
4 stars
1
3 stars
0
2 stars
1
1 stars
0
  • Highest Rating
  • Most Recent
< PREV
  • 1
  • 2
NEXT >
  • Perfect
    Perfect
    Guest - August 26, 2023 Verified Purchase
    Easy repair
    I fixed my grill, great part,
    Dangiro - April 25, 2023 Verified Purchase
    Perfect ...
    I loved the website being so easy to find the part I needed and appreciated the photos of each part to visually confirm the replacement. Delivery was fast and the part was a perfect OEM fit. Thanks .....
    Guest - July 22, 2021 Verified Purchase
    Exact part
    Website helpful in identifying part; arrived promptly.
    Guest - June 14, 2021 Verified Purchase
    char Broil grill
    I will order again the new ignition switch worked great
    Guest - May 20, 2021 Verified Purchase
    gas grille starter
    Arrived fast - easy to install
    Guest - January 5, 2021 Verified Purchase
    Part works perfectly. Arrived when promised.
    My grill fired up - first try. Glad the part was available and got here so quickly.
    Guest - August 12, 2020 Verified Purchase
    Grill Starter
    E Replacement parts were so fast and easy to work with from the time I order my part until the time it was delivered to my house. I would highly recommend ordering from them in the future.
    Guest - July 29, 2020 Verified Purchase
    Quick turmaround
    I was pleased with the response and quick delivery of the part. However, I realized that this does not solve my problem. A critter chewed through the wires that feed the ignition box. Do you sell replacement wires? I really enjoy my grill and would love to be able to use it again. Please help!
    Guest - June 23, 2020 Verified Purchase
    Great replacement
    Good replacement part,easy to install and works great
    Guest - June 6, 2020 Verified Purchase
    t
    t
    t - t days ago Verified Purchase
    eReplacementParts Team
    t

    Questions & Answers ?

    Our customer Service team is at the ready daily to answer your part and product questions.

    photo of team member
    Ask our Team

    We have a dedicated staff with decades of collective experience in helping customers just like you purchase parts to repair their products.

    Does this fit my product?

    Questions & Answers for Electronic Ignition Module


    Will the ignitor switch model #g511-0055-w1 work on char-broil grill#463344015
    Dennis asked on 2023-03-28
    Hello Dennis, thank you for your question. The correct Ignition Module is part 470-5503-W1. We are pleased to have been able to help.
    eReplacementParts Team March 28, 2023
    Will the ignitor switch work for char broil 463251414
    Marc for model number 463251414 asked on 2022-05-01
    Hello Marc, thank you for writing. No, the part you had chosen is not compatible. The correct part is G350-0017-W1. If you need help placing an order, customer service is open 7 days a week. Please feel free to give us a call. We look forward to hearing from you.
    eReplacementParts Team May 01, 2022

    Customer Repair Instructions ?

    All our customer repair instructions are solicited directly from other customers just like you who have purchased and replaced this exact part.

    Easy Less than 15 minutes (27 rated repairs)?

    Thought it was igniter, but the starter button was bad as well.

    Karla - March 26, 2017
    👍 11 of 11 people found this instruction helpful
    Tool Type

    Outdoor Grill

    Difficulty

    Easy

    Time

    Less than 15 minutes

    Tools Used

    Pliers, Can get leads off by hand but pliers could make it easier

    I used original wires because there was no need to replace them.
    Remove wires one by one
    As you remove wires from old starter plug them into new starter before removing another one in same order you removed them.
    Once all wires are on new starter let it hang, it will not fall. (Unless connectors are very loose in that case GENTLY squeeze connecters with pliers before attaching to new one).
    Now remove old starter unscrewing battery cap and plastic nut.
    Reinstall new one in opposite order nut battery,then cap.
    Test
    If it doesn't work you need the starter button which is what I had to go back and order so just order them both at the same time and save on shipping.

    Did you find this story helpful?
    Thanks for voting and helping fellow customers!

    Ignition module became defective. It would no longer spark.

    Bruce - January 28, 2017
    👍 6 of 6 people found this instruction helpful
    Tool Type

    Outdoor Grill

    Difficulty

    Easy

    Time

    Less than 15 minutes

    Tools Used

    Pliers, You might need pliers, but mine unthreaded by hand.

    Unthread the plastic nut holding the ignition module (the part where you change the battery) where it is attached to the face of grille. Reach behind to gently pull the module (with a separate metal locating plate) from the mounting hole in the grille. Keep the plate and the module together if possible. Bring this module out where you can see the six wires attached by male/female connectors. Place the new module next to this module and pull off one wire at a time. You might need to "wiggle" the connector to free it up and pull it straight out. (You could use pliers if pulling the connectors off by hand is too difficult.) Place each wire connector onto the closest cooresponding location in the new module until all six wires are relocated to the new module. Place the module and plate back behind the grille and through the mounting hole. Thread and (hand) tighten the plastic nut to hold the module firmly in place. Insert a new battery as shown in the directions and you will be good to go.
    Did you find this story helpful?
    Thanks for voting and helping fellow customers!

    Replaced ignition module

    George - November 11, 2015
    👍 6 of 7 people found this instruction helpful
    Tool Type

    Outdoor Grill

    Difficulty

    Easy

    Time

    Less than 15 minutes

    Tools Used

    Pliers

    Remove the old module by unscrewing the captive nut. Note the location of the wires on the back of the module and remove them. Secure the new module and reattach the wires to the back.
    Did you find this story helpful?
    Thanks for voting and helping fellow customers!

    Electronic ignition failed

    Roger - April 24, 2017
    👍 3 of 3 people found this instruction helpful
    Tool Type

    Outdoor Grill

    Difficulty

    Medium

    Time

    15-30 minutes

    Tools Used

    Pliers, Adjustable Wrench

    1. Removed the bad ignition module.
    2. Disconnected the wires.
    3. Connected the wires to the new electronic ignition module.
    4. Installed the new ignition module.
    5. Put in the new AA battery.
    6. Checked for burner sparks in the grill.
    7. Fired the grill up and cooked hamburgers.
    Did you find this story helpful?
    Thanks for voting and helping fellow customers!

    No spark to light grill

    john - April 2, 2016
    👍 3 of 3 people found this instruction helpful
    Tool Type

    Outdoor Grill

    Difficulty

    Easy

    Time

    Less than 15 minutes

    Tools Used

    Pliers

    Remove the wires from the old electronic module, note where the wires are located. Remove the old module, then attach the wires to the new module and install it on the grill.
    Did you find this story helpful?
    Thanks for voting and helping fellow customers!

    Igniter was bad

    James - April 17, 2017
    👍 1 of 1 people found this instruction helpful
    Tool Type

    Outdoor Grill

    Difficulty

    Easy

    Time

    Less than 15 minutes

    Tools Used

    Removed the igniter and installed the new after testing. Easy fix.
    Did you find this story helpful?
    Thanks for voting and helping fellow customers!

    Igniter did not work.

    Frank - September 7, 2016
    👍 1 of 1 people found this instruction helpful
    Tool Type

    Outdoor Grill

    Difficulty

    Easy

    Time

    Less than 15 minutes

    Tools Used

    , None

    Replaced igniter and switch.
    Did you find this story helpful?
    Thanks for voting and helping fellow customers!

    Electronic ignition module failed.

    Brian - September 2, 2016
    👍 1 of 1 people found this instruction helpful
    Tool Type

    Outdoor Grill

    Difficulty

    Easy

    Time

    Less than 15 minutes

    Tools Used

    Installed a new electronic ignition module. Works great. No tools necessary.
    Did you find this story helpful?
    Thanks for voting and helping fellow customers!

    Starter on grill did not work.

    Gary - June 19, 2016
    👍 1 of 1 people found this instruction helpful
    Tool Type

    Outdoor Grill

    Difficulty

    Medium

    Time

    15-30 minutes

    Tools Used

    Screwdriver, Pliers

    1. Removed old ignition module.
    2. Put wires into new ignition module in same order as old module.
    3. Installed new ignition module.
    4. Removed old switch. I needed a screw driver to to press against the retaining nut to start loosening it.
    5. Put new switch into mounting hole.
    6. Put new retaining nut on new switch.
    7. Put wires on new switch.
    Did you find this story helpful?
    Thanks for voting and helping fellow customers!

    After about 5 years, the grille needed some replacement parts.

    Rod - June 4, 2016
    👍 1 of 1 people found this instruction helpful
    Tool Type

    Outdoor Grill

    Difficulty

    Medium

    Time

    15-30 minutes

    Tools Used

    , Wire brush & my hands

    Lifted out old upper & lower grates, brushed & cleaned around the edges & bottom of firebox and vacuumed out all the debris. Then I quickly wiped out what didn't lift with the vacuum. Dropped in new grates. Installed new ignition module, it was easy enough to remove the retaining nut on the module by hand, unplugged the wires for the igniters, and installed the new module, by hand. Reconnecting the wires was very straightforward, so long as you keep the leads for the switch separate from the wires for the igniters (my grille has 4)
    Did you find this story helpful?
    Thanks for voting and helping fellow customers!

    OEM stands for Original Equipment Manufacturer and means the part you’re buying is sourced directly from the manufacturer who made your product. At eReplacementParts, we sell only genuine OEM parts, guaranteeing the part you’re purchasing is of better design and of higher quality than aftermarket parts.

    Our product descriptions are a combination of data sourced directly from the manufacturers who made your product as well as content researched and curated by our content & customer service teams. This content is edited and reviewed internally before being made public to customers.

    Our customer service team are at the ready daily to answer your part and product questions. We have a dedicated staff with decades of collective experience in helping customers just like you purchase parts to repair their products.

    All our part reviews are solicited directly from other customers who have purchased this exact part. While we moderate these reviews for profanity, offensive language or personally identifiable information, these reviews are posted exactly as submitted and no alterations are made by our team.

    All our customer repair instructions are solicited directly from other customers just like you who have purchased and replaced this exact part. While we moderate these reviews for profanity, offensive language or personally identifiable information, these reviews are posted exactly as submitted and no alterations are made by our team.

    Based on data from past customer purchasing behaviors, these parts are most commonly purchased together along with the part you are viewing. These parts may be necessary or helpful to replace to complete your current repair.

    All our installation videos are created and produced in collaboration with our in-house repair technician, Mark Sodja, who has helped millions of eReplacementParts customers over the last 13 years repair their products. Mark has years of experience in selling and repairing both commercial and residential products with a specialty in gas-powered equipment.

    This data is collected from customers who submitted a repair instruction after replacing this exact part. Customers can rate how easy the repair was to complete and how long it took. We aggregate this data to provide a repair rating that allows customers to quickly determine the difficulty and time needed to perform their own repair.

    eReplacementParts.com
    7174 South 400 West
    Suite 5
    Midvale, UT 84047
    visa mastercard discover american express PayPal