eReplacementParts.com
877-346-4814
Poulan Parts
Repair Parts Home  Lawn Equipment Parts  Poulan Parts  530069842 Carburetor Repair Kit

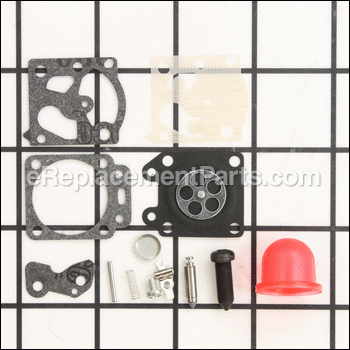
Carburetor Repair Kit 530069842

OEM part for: Poulan, Weed Eater, Husqvarna, Jonsered

Part Number: 530069842


Install
Videos!
Grid squares measure 1x1 inch
In Stock
Order within the next 11 hours and your part ships today!
Medium 30-60 minutes (7 rated repairs)?
OEM: Original Equipment Manufacturer ?
PoulanWeed EaterHusqvarnaJonsered
Does this d-block d-md-none fit my product?

Product Description ?

This is a genuine OEM sourced rebuild kit is designed for gas trimmers/blowers. This kit contains all the necessary parts to rebuild your carburetor. It includes: primer bulb, the float, needle, gaskets, seals needed to repair or refurbish a carburetor.

Replacing these items you would need a screwdriver and pliers.

  • Classification: Part
  • Weight: 0.01 lbs.
  • Shipping: Ships Worldwide

Frequently Purchased Together ?

Compatibility

This part will fit the following 74 machines

Poulan

PT17 Gas Trimmer View Diagrams & Manuals
PT3000 Gas Trimmer View Diagrams & Manuals
TE450CXL Type 1 Gas Trimmer View Diagrams & Manuals
TE450CXL Type 2 Gas Trimmer View Diagrams & Manuals
TE450CXL Type 3 Gas Trimmer View Diagrams & Manuals
TE450CXL Type 4 Gas Trimmer View Diagrams & Manuals
PP110 Gas Trimmer View Diagrams & Manuals
BVM210 (Type 1) Gas Blower View Diagrams & Manuals
PPBVM200 (Type 1) Gas Blower View Diagrams & Manuals
BVM 200 (Type 1) Blower Vacuum View Diagrams & Manuals
S17DE Trimmers And Edgers View Diagrams & Manuals
TK2145 Trimmers And Edgers View Diagrams & Manuals

Weed Eater

25HO Gas Trimmer View Diagrams & Manuals
Featherlite Type 1 Gas Trimmer View Diagrams & Manuals
Featherlite Type 4 Gas Trimmer View Diagrams & Manuals
Featherlite Type 5 Gas Trimmer View Diagrams & Manuals
PL200 (Type 1) Gas Trimmer View Diagrams & Manuals
PL500 Type 1 Gas Trimmer View Diagrams & Manuals
PL500 Type 2 Gas Trimmer View Diagrams & Manuals
PL500 Type 3 Gas Trimmer View Diagrams & Manuals
PL500 Type 4 Gas Trimmer View Diagrams & Manuals
TE400 Gas Trimmer View Diagrams & Manuals
TE400CXL Type 1 Gas Trimmer View Diagrams & Manuals
TE400CXL Type 2 Gas Trimmer View Diagrams & Manuals
TE400CXL Type 3 Gas Trimmer View Diagrams & Manuals
TE400CXL Type 4 Gas Trimmer View Diagrams & Manuals
TE400CXL Type 5 Gas Trimmer View Diagrams & Manuals
TE500CXL Type 1 Gas Trimmer View Diagrams & Manuals
TE500CXL Type 2 Gas Trimmer View Diagrams & Manuals
TE500CXL Type 3 Gas Trimmer View Diagrams & Manuals
TE500CXL Type 4 Gas Trimmer View Diagrams & Manuals
Twist n Edge Type 1 Gas Trimmer View Diagrams & Manuals
Twist n Edge Type 2 Gas Trimmer View Diagrams & Manuals
Twist n Edge Type 3 Gas Trimmer View Diagrams & Manuals
ULTRATRIM Gas Trimmer View Diagrams & Manuals
XT200 Type 1 Gas Trimmer View Diagrams & Manuals
XT200 Type 2 Gas Trimmer View Diagrams & Manuals
XT200 Type 3 Gas Trimmer View Diagrams & Manuals
XT25 Gas Trimmer View Diagrams & Manuals
XT300 Type 1 Gas Trimmer View Diagrams & Manuals
XT300 Type 2 Gas Trimmer View Diagrams & Manuals
XT300 Type 3 Gas Trimmer View Diagrams & Manuals
XT300 Type 4 Gas Trimmer View Diagrams & Manuals
XT35 Gas Trimmer View Diagrams & Manuals
XT400 Type 1 Gas Trimmer View Diagrams & Manuals
XT400 Type 2 Gas Trimmer View Diagrams & Manuals
XT400 Type 3 Gas Trimmer View Diagrams & Manuals
XT400 Type 4 Gas Trimmer View Diagrams & Manuals
XT55 Gas Trimmer View Diagrams & Manuals
XT600 Type 1 Gas Trimmer View Diagrams & Manuals
XT600 Type 2 Gas Trimmer View Diagrams & Manuals
XT600 Type 3 Gas Trimmer View Diagrams & Manuals
XT600 Type 4 Gas Trimmer View Diagrams & Manuals
XT600 Type 5 Gas Trimmer View Diagrams & Manuals
XT600 Type 6 Gas Trimmer View Diagrams & Manuals
PL200 (Type 2) Gas Trimmer View Diagrams & Manuals
BV1650 (Type 1) Gas Blower View Diagrams & Manuals
BV1650 Handheld Blower View Diagrams & Manuals
BV1800 Handheld Blower View Diagrams & Manuals
BV1850 (2000-2004) Handheld Blower View Diagrams & Manuals
BV2000 (2000-2004) Handheld Blower View Diagrams & Manuals
BV1850 (2005-2009) Handheld Blower View Diagrams & Manuals
BV2000 (2005-2009) Handheld Blower View Diagrams & Manuals
Featherlite Plus Gas Trimmer View Diagrams & Manuals

Husqvarna

Mondo (1995-03) Line Trimmer View Diagrams & Manuals
TE400CXL (Type 1) (2007-07) Handheld Trimmer View Diagrams & Manuals
TE400CXL (Type 2) (2007-07) Handheld Trimmer View Diagrams & Manuals
TE400CXL (Type 3) (2007-07) Handheld Trimmer View Diagrams & Manuals
TE400CXL (Type 4) (2007-07) Handheld Trimmer View Diagrams & Manuals
TE400CXL (Type 5) (2007-07) Handheld Trimmer View Diagrams & Manuals

Jonsered

GT22 L TYPE I TYPE II (1994-01) Trimmer View Diagrams & Manuals
GT21 L (1993-01) Trimmer View Diagrams & Manuals
GT21 L (1994-01) Trimmer View Diagrams & Manuals
GT24L TYPE I TYPE II (1994-01) Trimmer View Diagrams & Manuals
Show More Compatible Models
Don't see yours? Try searching our site for :

This item works with the following types of products:

  • Trimmer Parts
  • Edger Parts
  • Blower Parts

This part replaces obsolete part #: 530069460

Customer Part Reviews ?

1
Average Rating (out of 5):
1 Review
Click to filter by ratings:
5 stars
0
4 stars
0
3 stars
0
2 stars
0
1 stars
1
  • Highest Rating
  • Most Recent
< PREV
  • 1
NEXT >
  • incomplete set of gaskets
    The one gasket that is needed here is the one between the carburetor and the mount onto the frame of my weed trimmer. I did need the throttle body gasket and screen though.
    Guest - June 7, 2019 Verified Purchase
    t
    t
    t - t days ago Verified Purchase
    eReplacementParts Team
    t

    Questions & Answers ?

    Our customer Service team is at the ready daily to answer your part and product questions.

    photo of team member
    Ask our Team

    We have a dedicated staff with decades of collective experience in helping customers just like you purchase parts to repair their products.

    Does this fit my product?

    Questions & Answers for Carburetor Repair Kit


    No questions have been asked yet

    Customer Repair Instructions ?

    All our customer repair instructions are solicited directly from other customers just like you who have purchased and replaced this exact part.

    Medium 30-60 minutes (7 rated repairs)?

    Did not start.

    Marlowe - July 3, 2016
    👍 5 of 5 people found this instruction helpful
    Tool Type

    Trimmer

    Difficulty

    Medium

    Time

    1-2 hours

    Tools Used

    Screwdriver, Allen wrench

    Removed the carburetor, fuel tank and crankcase cover. Removed all the old components from the carb, diaphragms, needle, gaskets. Blew out all the passages with carb spray and compressed air, inspected for carbon, Replace all the gaskets, set the needle to spec included with kit and replaced fuel hoses to tank. It starts right away, has the power it hasn't had for years. Everything fit like it should, there were no hassles or difficulties. I rated this "medium", but I am an ASE Certified Master technician. I've overhauled many carburetors over the years. Essentially, take one piece off at a time keeping track of where it came from and note the order you take it apart. Record it on your cell phone if that will help you remember where a certain screw goes or which way a gasket is supposed to go. Look at all instructions and pictures carefully. Cleaning is key.
    Did you find this story helpful?
    Thanks for voting and helping fellow customers!

    No high speed.

    Paul - February 21, 2017
    👍 1 of 1 people found this instruction helpful
    Tool Type

    Blower

    Difficulty

    Medium

    Time

    30-60 minutes

    Tools Used

    Screwdriver, Pliers

    1. Removed carburetor.
    2. Replaced all parts supplied
    3. Re-attached carburetor.
    Did you find this story helpful?
    Thanks for voting and helping fellow customers!

    Blower not running

    Tad - June 1, 2016
    👍 1 of 1 people found this instruction helpful
    Tool Type

    Blower

    Difficulty

    Medium

    Time

    30-60 minutes

    Tools Used

    Screwdriver, Socket set

    I found your you tube video on how to rebuild a two cycle carburetor. It was very helpful. Thank you. Here is the link for the video. https://www.youtube.com/watch?v=RfzzTilqwo0
    To replace the air filter, I just removed the air filter cover, then replaced the old filter with the new one.
    Did you find this story helpful?
    Thanks for voting and helping fellow customers!

    Would not start sat idle for years. Prime bulb and rubber carb parts deteriorated.

    Karl - July 31, 2018
    Tool Type

    Trimmer

    Difficulty

    Medium

    Time

    30-60 minutes

    Tools Used

    Screwdriver, Pliers, Allen Wrench

    Rebuilt Carb - job easier than I thought it would be. Take your time.
    Replaced Fuel and purge (primer bulb line) lines and in tank fuel filter. Job Easier than carb.
    Replaced Spark Plug. Job easier than Fuel lines.

    Videos online great, worth 3000 words.

    Runs like new!
    Did you find this story helpful?
    Thanks for voting and helping fellow customers!

    Plastic parts, fuel cap, fuel lines were deteriorated. Trimmer would not start

    Melvin - July 27, 2016
    Tool Type

    Trimmer

    Difficulty

    Medium

    Time

    30-60 minutes

    Tools Used

    Screwdriver, Hex wrench

    1. Replaced fuel hoses
    2. Replaced fuel tank cap
    3. Rebuilt carb
    Did you find this story helpful?
    Thanks for voting and helping fellow customers!

    Fuel and primer lines were old and hard along with primer botton.

    Vernon - June 28, 2016
    Tool Type

    Trimmer

    Difficulty

    Medium

    Time

    15-30 minutes

    Tools Used

    Screwdriver, Torx allens

    1. Removed fuel tank, fuel lines, and rear cover.
    2. Cleaned parts and made list of what was needed.
    3. Found ereplacements.com and had parts ordered in matter of minutes. When I received the parts reassembled and tested.
    4. Back to using it today.
    Did you find this story helpful?
    Thanks for voting and helping fellow customers!

    Hard to start blower

    James - July 26, 2016
    👍 0 of 1 people found this instruction helpful
    Tool Type

    Blower

    Difficulty

    Medium

    Time

    30-60 minutes

    Tools Used

    Screwdriver, Nutdriver, Air compressor and tweezers.

    1. Removed the air cleaner.
    2. Removed two Allen wrench screws then removed cover two wires (engine kill switch) and throttle rod along with two fuel lines.
    3. Removed carburetor from the engine.
    4. Removed 4 screws from the bottom of the carb and removed the bottom section of the carb.
    5 . Removed two screws from top of the carb and removed the upper section.
    6. Removed gas inlet valve using tweezers.
    7. Used air compressor to blow out all holes in the body of carb and both ends.
    8. Reassemble carb in reverse order of removal with new parts from the kit.
    9. Reassemble blower in reverse order of disassemble.
    Did you find this story helpful?
    Thanks for voting and helping fellow customers!

    OEM stands for Original Equipment Manufacturer and means the part you’re buying is sourced directly from the manufacturer who made your product. At eReplacementParts, we sell only genuine OEM parts, guaranteeing the part you’re purchasing is of better design and of higher quality than aftermarket parts.

    Our product descriptions are a combination of data sourced directly from the manufacturers who made your product as well as content researched and curated by our content & customer service teams. This content is edited and reviewed internally before being made public to customers.

    Our customer service team are at the ready daily to answer your part and product questions. We have a dedicated staff with decades of collective experience in helping customers just like you purchase parts to repair their products.

    All our part reviews are solicited directly from other customers who have purchased this exact part. While we moderate these reviews for profanity, offensive language or personally identifiable information, these reviews are posted exactly as submitted and no alterations are made by our team.

    All our customer repair instructions are solicited directly from other customers just like you who have purchased and replaced this exact part. While we moderate these reviews for profanity, offensive language or personally identifiable information, these reviews are posted exactly as submitted and no alterations are made by our team.

    Based on data from past customer purchasing behaviors, these parts are most commonly purchased together along with the part you are viewing. These parts may be necessary or helpful to replace to complete your current repair.

    All our installation videos are created and produced in collaboration with our in-house repair technician, Mark Sodja, who has helped millions of eReplacementParts customers over the last 13 years repair their products. Mark has years of experience in selling and repairing both commercial and residential products with a specialty in gas-powered equipment.

    This data is collected from customers who submitted a repair instruction after replacing this exact part. Customers can rate how easy the repair was to complete and how long it took. We aggregate this data to provide a repair rating that allows customers to quickly determine the difficulty and time needed to perform their own repair.

    eReplacementParts.com
    7174 South 400 West
    Suite 5
    Midvale, UT 84047
    visa mastercard discover american express PayPal