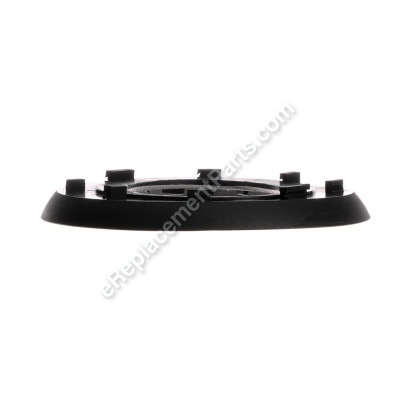


This brake is a genuine Ryobi replacement part. It is commonly used in random orbit sanders. It is made of rubber and sold individually. A screwdriver is needed for replacement. To replace this part:
1. Remove the backing pad by removing the four screws.
2. Remove the top cap by extracting the retaining screws.
3. Remove the switch trigger by lifting it out of the unit.
4. Remove the retaining screws from the motor housing. Then separate the two halves and top of the housing with a screwdriver.
5. Remove the old break pad from the unit and replace it with the new pad by aligning the tabs with the grooves.
6. Reassemble the unit.
Brake 030157001017
OEM part for: Ryobi
Part Number: 030157001017
$4.99
In Stock
Jump To:
Product Description ?
- Classification: Part
- Weight: 0.05 lbs.
- Shipping: Ships Worldwide
Frequently Purchased Together ?


Compatibility
This part will fit the following 3 machines
Ryobi
RS290 Random Orbit Sander View Diagrams & Manuals
RS290G Random Orbit Sander View Diagrams & Manuals
P411 Random Orbit Sander View Diagrams & Manuals
This item works with the following types of products:
- Sander Parts
Repair Videos ?
Watch the Repair Video for
Brake

Articles:
|
If your random orbital sander has been spinning out of control, this article will guide you through the steps required t...
October 15, 2014
|

Customer Part Reviews ?
Average Rating (out of 5):
Click to filter by ratings:
5 stars
10
4 stars
0
3 stars
0
2 stars
0
1 stars
0
< PREV
- 1
Easy fix
Worked great , like original
Guest -
May 20, 2022
Verified Purchase
Perfect Fit
The parts were the perfect fit for my grinder. The instructions online were great, especially for someone whose never repaired a tool before. Ordering was a breeze! The follow up was greatly appreciated- my new “go to” spot for parts and repairs.
Guest -
November 30, 2021
Verified Purchase
The exact part required
This, and every part I have ordered and received from eReplacment Parts, was shipped quickly and was precisely what I ordered and needed.
Guest -
November 19, 2021
Verified Purchase
Easy repair
Arrived as scheduled. Installation was easy. Thanks.
Guest -
August 19, 2021
Verified Purchase
Guest -
April 27, 2021
Verified Purchase
easy repair
learned what part of the sander was. definitely a lot cheaper than buying a new one!
Guest -
April 20, 2021
Verified Purchase
Very easy repair. Took about 20 mins and that only because I had one stubborn screw taking the old part off.
These are my go to folks for parts. They always have what I need to repair my equipment. Every item I have purchased has always been great quality and has always fit perfectly.
Ron -
December 22, 2020
Verified Purchase
Easy Repaire
Part was easy to fix after the pad broke, resulting in the brake cracking.
Guest -
October 24, 2020
Verified Purchase
Easy repair works get and my sander is back to working again
The part was new great condition but still waiting for my chip clip to arrive it's been about 3months that I ordered it still haven't heard a word or gotten an email from you all on that part please look into it let me know what is going on thank you for this that I did get tony e
Guest -
July 24, 2020
Verified Purchase
easy replacement
The old rubber part was literally falling apart . new one was delivered in a timely manner and saved me from buying a new sander. The manufacturer didn't even have the part in stock.
Guest -
April 23, 2019
Verified Purchase
t
t
t -
t days ago
Verified Purchase
eReplacementParts Team
t
Questions & Answers ?
Our customer Service team is at the ready daily to answer your part and product questions.

Ask our Team
We have a dedicated staff with decades of collective experience in helping customers just like you purchase parts to repair their products.
Does this fit my product?Questions & Answers for Brake
No questions have been asked yet
Customer Repair Instructions ?
All our customer repair instructions are solicited directly from other customers just like you who have purchased and replaced this exact part.
Replace Sander Backing Pad & Brake
VINCENT - May 22, 2016
👍 3 of 5 people found this instruction helpful
Tool Type
Sander
Difficulty
Easy
Time
15-30 minutes
Tools Used
Screwdriver
This was a very easy repair to replace worn-out parts. All that it involved was removing 4 screws to take the hook and loop backing pad off and twisting the old brake off from the slots. Installed the new brake and hook and loop pad in approximately 20 minutes if even that.
Did you find this story helpful?
Thanks for voting and helping fellow customers!
Bearing failed,
David - February 24, 2023
Tool Type
Sander
Difficulty
Easy
Time
Less than 15 minutes
Tools Used
Screwdriver, Power Drill
Used suggested procedure and split the sander, was quick.
Did you find this story helpful?
Thanks for voting and helping fellow customers!
dust collection not working
Raymond - November 13, 2022
Tool Type
Sander
Difficulty
Easy
Time
15-30 minutes
Tools Used
Screwdriver
Parts Used
1. Removed hook and Loop Backing Pad by removing three T7 or philips screws.
2. Remove old brake by pulling it off.
3. Install new break. ( small screw driver is very helpful when putting new brake in the slots. )
2. Remove old brake by pulling it off.
3. Install new break. ( small screw driver is very helpful when putting new brake in the slots. )
Did you find this story helpful?
Thanks for voting and helping fellow customers!
Parts wore out
Gregory - September 13, 2022
Tool Type
Sander
Difficulty
Easy
Time
Less than 15 minutes
Tools Used
Screwdriver, Pliers
Parts Used
Got parts and easily put them back together. Your company has the best replacement parts
Did you find this story helpful?
Thanks for voting and helping fellow customers!
Mounting tabs for "brake" (shroud) broke/wore off
Rich - August 2, 2022
Tool Type
Sander
Difficulty
Medium
Time
Less than 15 minutes
Tools Used
Screwdriver
Parts Used
1. Remove the hook-and-loop pad by removing 4 screws;
2. Since the old "brake" fell off I didn't have to remove it;
3. You would think the 8 tabs in the new brake just fit into the 8 slots on the tool and then slide over to lock, but in fact you kind of have to use a flat-head screwdriver to convince them to seat;
4. Replace the hook-and-loop pad with the four screw;
5. The new part will feel tight, as if it's binding against the velcro pad, but when you turn it on it will quickly seat itself.
Did you find this story helpful?
Thanks for voting and helping fellow customers!
Sander needed a new brake
Anita - February 21, 2019
Tool Type
Sander
Difficulty
Easy
Time
Less than 15 minutes
Tools Used
Screwdriver
Parts Used
Unscrewed 4 screws - removed the entire brake part
Put the new brake parts
Lined up the screw holes
Screwed it back together
Ready to used
Put the new brake parts
Lined up the screw holes
Screwed it back together
Ready to used
Did you find this story helpful?
Thanks for voting and helping fellow customers!
Brake had broken previously; backing pad fell apart over time.
Donald - June 12, 2016
Tool Type
Sander
Difficulty
Easy
Time
Less than 15 minutes
Tools Used
Screwdriver
Snapped in the brake - took a straight-edged screwdriver to work the brake into the slots, then four Phillips head screws to secured the backing pad.
Did you find this story helpful?
Thanks for voting and helping fellow customers!
Brake and hook pad woreout
michael - May 23, 2016
Tool Type
Sander
Difficulty
Easy
Time
Less than 15 minutes
Tools Used
Screwdriver
Take the four screws out of the old pad and take it off. Then take off the old brake and put the new one on. Then put on the new pad using the four screws.
Did you find this story helpful?
Thanks for voting and helping fellow customers!
Orbital Sander Brake had worn out
Anthony - May 18, 2018
👍 0 of 1 people found this instruction helpful
Tool Type
Sander
Difficulty
Easy
Time
15-30 minutes
Tools Used
Screwdriver
Parts Used
1. Watch Repair Video on website
2. Follow very simple directions
3. Use magnetic #2 Philips Screwdriver
https://www.youtube.com/watch?v=UI-nPd6zVJM
2. Follow very simple directions
3. Use magnetic #2 Philips Screwdriver
https://www.youtube.com/watch?v=UI-nPd6zVJM
Did you find this story helpful?
Thanks for voting and helping fellow customers!
Brake and sanding pad disintegrated.
Lamont - January 30, 2018
👍 0 of 1 people found this instruction helpful
Tool Type
Sander
Difficulty
Medium
Time
15-30 minutes
Tools Used
Screwdriver
Followed all the steps of online instructional video no surprises.
Did you find this story helpful?
Thanks for voting and helping fellow customers!
Load More Install Stories
OEM stands for Original Equipment Manufacturer and means the part you’re buying is sourced directly from the manufacturer who made your product. At eReplacementParts, we sell only genuine OEM parts, guaranteeing the part you’re purchasing is of better design and of higher quality than aftermarket parts.
Our product descriptions are a combination of data sourced directly from the manufacturers who made your product as well as content researched and curated by our content & customer service teams. This content is edited and reviewed internally before being made public to customers.
Our customer service team are at the ready daily to answer your part and product questions. We have a dedicated staff with decades of collective experience in helping customers just like you purchase parts to repair their products.
All our part reviews are solicited directly from other customers who have purchased this exact part. While we moderate these reviews for profanity, offensive language or personally identifiable information, these reviews are posted exactly as submitted and no alterations are made by our team.
All our customer repair instructions are solicited directly from other customers just like you who have purchased and replaced this exact part. While we moderate these reviews for profanity, offensive language or personally identifiable information, these reviews are posted exactly as submitted and no alterations are made by our team.
Based on data from past customer purchasing behaviors, these parts are most commonly purchased together along with the part you are viewing. These parts may be necessary or helpful to replace to complete your current repair.
All our installation videos are created and produced in collaboration with our in-house repair technician, Mark Sodja, who has helped millions of eReplacementParts customers over the last 13 years repair their products. Mark has years of experience in selling and repairing both commercial and residential products with a specialty in gas-powered equipment.
This data is collected from customers who submitted a repair instruction after replacing this exact part. Customers can rate how easy the repair was to complete and how long it took. We aggregate this data to provide a repair rating that allows customers to quickly determine the difficulty and time needed to perform their own repair.