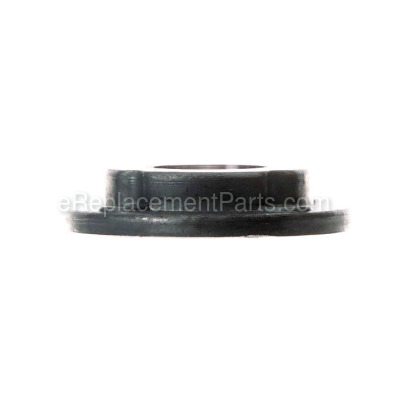


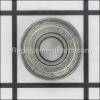
This is an authentic OEM part. The Ryobi bearing cap assembly is composed of metal and plastic, and has been designed for use with RS290 Random Orbit Sander and the RS290G Random Orbit Sander. This sealed bearing component helps to secure the fan and the brake. The bearing cap assembly helps devices to run smooth and cut down on internal friction. A screwdriver is needed in the removal and replacement. This part is sold individually.
Bearing Cap Assembly 030157001013
OEM part for: Ryobi
Part Number: 030157001013
$4.99
In Stock
Jump To:
Frequently Purchased Together ?


Compatibility
This part will fit the following 2 machines
Ryobi
RS290 Random Orbit Sander View Diagrams & Manuals
RS290G Random Orbit Sander View Diagrams & Manuals
This item works with the following types of products:
- Sander Parts
Repair Videos ?
Watch the Repair Video for
Bearing Cap Assembly

Articles:
|
If a damaged sander has been grinding at your nerves, this article will show you how to quickly remove and install a new...
October 16, 2014
|

Customer Part Reviews ?
Average Rating (out of 5):
Click to filter by ratings:
5 stars
7
4 stars
0
3 stars
0
2 stars
0
1 stars
1
< PREV
- 1
Ryobi bearing cap replacement
Thanks to you folks, my Ryobi sander is back up and running smoothly. I am a lady in my late 60's and this was an easy repair. Thank you for your service.
Donna J -
May 24, 2023
Verified Purchase
Always use these guy!
Excellent service and fast delivery!
Guest -
December 6, 2022
Verified Purchase
High quality part!
Very affordable part that fixed my orbital sander - much cheaper than buying a new tool and with the videos available, replacement was easy!
Guest -
June 4, 2021
Verified Purchase
I wish everything were this easy
After going to your website, finding the part, and viewing the instructional video I was seamlessly able to order the part and repair my orbital sander (which had temporarily turned into a disc sander). Thank you.
Guest -
March 31, 2021
Verified Purchase
Bearing cap assembly
Arrived earlier than targeted, fit well. Would have preferred just the bearing as the aluminum race was still usable. Happy to have my sander back up and running.
Guest -
April 4, 2020
Verified Purchase
great value and service.
They were the exact parts I was looking for and fit like the original. Ordering was made easier with the detailed schematic. I will look here first if the need arises in the future.
Guest -
August 20, 2019
Verified Purchase
Easy repair
The part was better than the original! The sander is back together and working perfectly.
Guest -
August 8, 2019
Verified Purchase
2 weeks to arrive. Not worth it.
Not recommended.
Guest -
March 17, 2020
Verified Purchase
t
t
t -
t days ago
Verified Purchase
eReplacementParts Team
t
Questions & Answers ?
Our customer Service team is at the ready daily to answer your part and product questions.

Ask our Team
We have a dedicated staff with decades of collective experience in helping customers just like you purchase parts to repair their products.
Does this fit my product?Questions & Answers for Bearing Cap Assembly
No questions have been asked yet
Customer Repair Instructions ?
All our customer repair instructions are solicited directly from other customers just like you who have purchased and replaced this exact part.
Good sander, but disc suddenly started running double-speed, and would bog down when I tried to sand something.
Paul - February 4, 2016
👍 2 of 2 people found this instruction helpful
Tool Type
Sander
Difficulty
Easy
Time
Less than 15 minutes
Tools Used
Screwdriver, Two Torx bits were required for the newer-model sander.
Parts Used
Four screws fasten the hook & loop sanding disk to the bearing cap assembly, then a single screw (with wide washer) holds that assembly to the central shaft.
(I have two of these Ryobi sanders -- the older one has cross-head "Phillips" screws, while the newer one has Torx screws.)
The original bearing cap assembly was noticeably seized.
Replace with new bearing, then screw on the single central screw with washer, followed by the sanding disk and its four screws.
Really, a very simple repair. (I bought an extra bearing cap assembly, as my sander's motor looks to be still going strong and may last another five years.)
Did you find this story helpful?
Thanks for voting and helping fellow customers!
Orbital Sander spun too fast, stopped vibrating and began to spin out of control
Gary - December 21, 2015
👍 1 of 1 people found this instruction helpful
Tool Type
Sander
Difficulty
Easy
Time
Less than 15 minutes
Tools Used
Screwdriver
Parts Used
Removed pad using a Phillips screwdriver. Removed bearing head assembly from sander shaft. Replaced with new head assembly.....works like new.
Did you find this story helpful?
Thanks for voting and helping fellow customers!
orbital sander
frank - October 11, 2021
Tool Type
Sander
Difficulty
Easy
Time
Less than 15 minutes
Tools Used
Screwdriver
Parts Used
used
screwdriver to lift old bearing out and drop in the new one very easy
screwdriver to lift old bearing out and drop in the new one very easy
Did you find this story helpful?
Thanks for voting and helping fellow customers!
Applying pressure to sander slowed it down
Joseph - January 7, 2019
Tool Type
Sander
Difficulty
Easy
Time
Less than 15 minutes
Tools Used
Screwdriver
Parts Used
Removed the 4 Philips screws holding the hook-and-loop pad to the sander. Then removed the single screw holding the old bearing cap assembly in place. Threw that old thing away (of course kept the screw and washer). Cleaned the sander with a bristle brush while it was partially disassembled, put this new piece on, an wah-lah! Sands like new again.
Did you find this story helpful?
Thanks for voting and helping fellow customers!
The sander spun at same speed as the motor. The bearing was frozen, so replacing it brought the sander back to performing properly.
Scott - July 5, 2018
Tool Type
Sander
Difficulty
Easy
Time
Less than 15 minutes
Tools Used
Screwdriver
Parts Used
1. Remove sanding pad.
2. Remove 4 Phillips screws for the sanding pad mount.
3. Remove the 1 Phillips screw that holds bearing on.
4. Remove old bearing.
5. Install replacement bearing.
6. Reinstall 1 Phillips screw to secure bearing.
7. Reinstall sanding pad mount.
8. Reinstall 4 Phillips screwed to secure mount.
9. Install new sanding pad.
10. Done.
Did you find this story helpful?
Thanks for voting and helping fellow customers!
Orbital Sander started spinning too fast and not orbiting
Tim - October 23, 2017
Tool Type
Sander
Difficulty
Easy
Time
Less than 15 minutes
Tools Used
Screwdriver
Parts Used
Used the instructions found on this site!
Did you find this story helpful?
Thanks for voting and helping fellow customers!
Screws stripped and pad worn.
charles - June 17, 2017
Tool Type
Sander
Difficulty
Easy
Time
Less than 15 minutes
Tools Used
Screwdriver, Allen wrenches
All self-explanatory easy fix.
Did you find this story helpful?
Thanks for voting and helping fellow customers!
Sander head was spinning but not "orbiting" making it impossible to control.
Jason - June 17, 2016
Tool Type
Sander
Difficulty
Easy
Time
Less than 15 minutes
Tools Used
Screwdriver
Parts Used
1. Remove sanding paper
2. Remove 4 screws holding sanding pad.
3. Remove center screw holding orbital bearing cap assembly
4. Replace bearing cap assembly and replace screws in reverse order.
2. Remove 4 screws holding sanding pad.
3. Remove center screw holding orbital bearing cap assembly
4. Replace bearing cap assembly and replace screws in reverse order.
Did you find this story helpful?
Thanks for voting and helping fellow customers!
OEM stands for Original Equipment Manufacturer and means the part you’re buying is sourced directly from the manufacturer who made your product. At eReplacementParts, we sell only genuine OEM parts, guaranteeing the part you’re purchasing is of better design and of higher quality than aftermarket parts.
Our product descriptions are a combination of data sourced directly from the manufacturers who made your product as well as content researched and curated by our content & customer service teams. This content is edited and reviewed internally before being made public to customers.
Our customer service team are at the ready daily to answer your part and product questions. We have a dedicated staff with decades of collective experience in helping customers just like you purchase parts to repair their products.
All our part reviews are solicited directly from other customers who have purchased this exact part. While we moderate these reviews for profanity, offensive language or personally identifiable information, these reviews are posted exactly as submitted and no alterations are made by our team.
All our customer repair instructions are solicited directly from other customers just like you who have purchased and replaced this exact part. While we moderate these reviews for profanity, offensive language or personally identifiable information, these reviews are posted exactly as submitted and no alterations are made by our team.
Based on data from past customer purchasing behaviors, these parts are most commonly purchased together along with the part you are viewing. These parts may be necessary or helpful to replace to complete your current repair.
All our installation videos are created and produced in collaboration with our in-house repair technician, Mark Sodja, who has helped millions of eReplacementParts customers over the last 13 years repair their products. Mark has years of experience in selling and repairing both commercial and residential products with a specialty in gas-powered equipment.
This data is collected from customers who submitted a repair instruction after replacing this exact part. Customers can rate how easy the repair was to complete and how long it took. We aggregate this data to provide a repair rating that allows customers to quickly determine the difficulty and time needed to perform their own repair.