eReplacementParts.com
877-346-4814
Poulan Parts

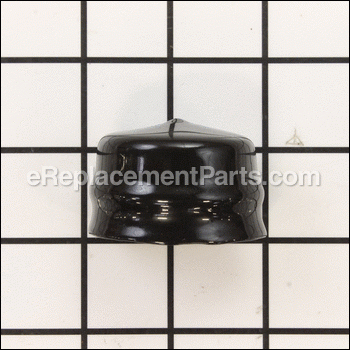
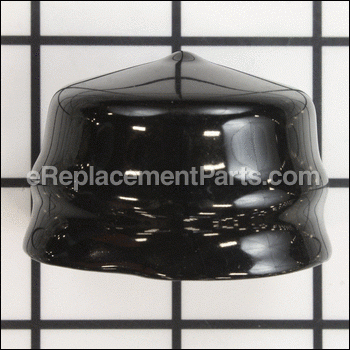
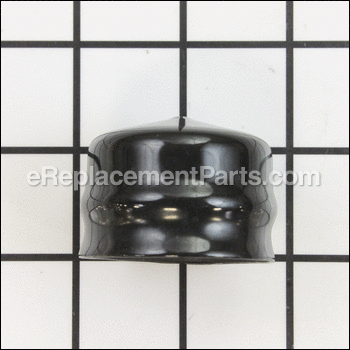
Axle Hub Cap 532104757

OEM part for: Husqvarna, Poulan

Part Number: 532104757


Install
Videos!
Grid squares measure 1x1 inch
Axle Hub Cap - 532104757:HusqvarnaAxle Hub Cap - 532104757:HusqvarnaAxle Hub Cap - 532104757:Husqvarna
In Stock
Ships within 1 business day
Easy 15-30 minutes (44 rated repairs)?
OEM: Original Equipment Manufacturer ?
HusqvarnaPoulan

Product Description ?

This is a genuine manufacturer-sourced component which is specially made for use with Craftsman lawn mowers and garden tractors. The purpose of this part is to the hub and the axle from dirt and other debris. Please make sure to check the appropriate diagrams of your model for the correct location and application of this hardware. Keep in mind this high-quality item is made of durable plastic and is sold individually.

  • Classification: Part
  • Weight: 0.02 lbs.
  • Shipping: Ships Worldwide

Frequently Purchased Together ?

Compatibility

This Axle Hub Cap will fit the following 3631 machines. Confirm this part works with your model, and view the detailed model diagrams and repair help we have to offer.

Don't see yours? Try searching our site for :

This item works with the following types of products:

  • Lawn Tractor Parts

This part replaces obsolete part #: 532175039, 5321750-39, 104757X428, 104757X

Customer Part Reviews ?

4.9
Average Rating (out of 5):
28 Reviews
Click to filter by ratings:
5 stars
26
4 stars
1
3 stars
1
2 stars
0
1 stars
0
  • Highest Rating
  • Most Recent
< PREV
  • 1
  • 2
  • 3
NEXT >
  • Wheel caps
    They fit perfectly and stayed on!
    Guest - October 27, 2023 Verified Purchase
    Easy site to order from. Was very happy with the service and was shipped quickly!
    Part fit perfectly!
    Guest - August 18, 2023 Verified Purchase
    Fall cleanup
    Easy search to find parts arrived quickly installed easy and was back to fall cleanup thanks
    Guest - October 31, 2022 Verified Purchase
    easy repair and easy access to parts
    came in on time and in great shape
    Guest - September 8, 2022 Verified Purchase
    Happy to find the Part
    Glad I found your website - easy to order what you need and fast delivery, I look forward to coming back when I need something else!
    Guest - August 26, 2022 Verified Purchase
    Great part
    Replacement worked well
    Guest - July 26, 2022 Verified Purchase
    Great Paris
    I was surprised how easy it was, to get the parts I needed for my Husqvarna tractor mower.
    Guest - June 4, 2022 Verified Purchase
    Order 17842677 (2) washers 532121749 not the same as the original washers & will not keep the wheel attached. Have photo of the two washers & can email
    The parts were shipped & received nicely but the washers are not the same as the originals. Have photo & can submit
    Guest - April 27, 2022 Verified Purchase
    repeat customer
    I have ordered several parts from you, I am able to look up the part needed without backtracking. The service has always been pleasant and very fast.
    Guest - December 23, 2021 Verified Purchase
    Repair
    Ok
    Guest - August 24, 2021 Verified Purchase

    Questions & Answers ?

    Our customer Service team is at the ready daily to answer your part and product questions.

    photo of team member
    Ask our Team

    We have a dedicated staff with decades of collective experience in helping customers just like you purchase parts to repair their products.

    Does this fit my product?

    Questions & Answers for Axle Hub Cap


    I have a 2006 Craftsman Deluxe Edition, 24HP V-Twin. The wheels appear to be held on with lug nuts that don't have flats. rather, they have three (3) small holes on their faces, similar to the nut one would find on an angle grinder. I need that tool.
    Mark for model number 917.276600 asked on 2023-03-29
    Hi Mark, Thank you for your question. Before removing the wheels, make sure that the mower is on a level surface and then remove the ignition key and engage the parking brake. Make sure that the axels are securely blocked up. Use a pair of adjustable pliers to pull the axle cover off and then remove the washer and retaining ring from the axel. The rear wheels will have a square key in them. To remove the key, you will need to use a pair of needle nose pliers. Make sure to place the keys in a secure spot as they are needed for the rear wheels to work correctly. Once you have completed your repair reassemble the wheel and place it back on the mower. If you have any questions, please let us know. We look forward to hearing from you!
    eReplacementParts Team March 29, 2023

    Customer Repair Instructions ?

    All our customer repair instructions are solicited directly from other customers just like you who have purchased and replaced this exact part.

    Easy 15-30 minutes (44 rated repairs)?

    Front wheel bearing was severely worn.

    Scott - May 3, 2017
    👍 6 of 7 people found this instruction helpful
    Tool Type

    Lawn Tractor

    Difficulty

    Easy

    Time

    30-60 minutes

    Tools Used

    Screwdriver, Pliers, Socket set, Adjustable Wrench, hammer

    1. Watched YouTube video on how to change a front wheel bearing.
    2. Removed locking ring.
    3. Removed washers and wheel.
    4. knocked out bearing with screwdriver and hammer.
    5. The old bearing was severely worn and cracked!
    6. Cleaned spindle and inside of wheel.
    7. Coated all part with grease.
    8. Tapped new bearing into pace with large socket and hammer.
    9. Filled voids inside wheel with bearing grease.
    10. Replaced wheel. Replaced washers. Replaced locking ring.
    11. Installed new plastic hub cover.
    12. Works great.
    Did you find this story helpful?
    Thanks for voting and helping fellow customers!

    Steering bushing worn out. Hub axle cap was missing.

    Timothy - July 13, 2017
    👍 3 of 3 people found this instruction helpful
    Tool Type

    Lawn Tractor

    Difficulty

    Easy

    Time

    Less than 15 minutes

    Tools Used

    Screwdriver, Socket set, Hammer

    1. Took off the steering wheel and slipped the old bushing off the top of the steering shaft.
    2. Pushed the new one down the steering shaft and into place. Ez peezy.
    3. The hub axle cap just pushes on, no tools needed.
    4. The biggest problem was getting the parts, it took almost a month.
    Did you find this story helpful?
    Thanks for voting and helping fellow customers!

    Replace hub cover

    thaddeus - March 26, 2019
    👍 1 of 1 people found this instruction helpful
    Tool Type

    Lawn Tractor

    Difficulty

    Easy

    Time

    Less than 15 minutes

    Tools Used

    Pliers, Silicone spray

    Removed old cover with pliers. Being hardened with age it was difficult to remove and subsequently was damaged. Lubricated new cover with silicone spray to ease installation.
    Did you find this story helpful?
    Thanks for voting and helping fellow customers!

    tore the old caps off and discarded them ,they were 8yrs old

    oscar - January 24, 2019
    👍 2 of 3 people found this instruction helpful
    Tool Type

    Lawn Tractor

    Difficulty

    Easy

    Time

    Less than 15 minutes

    Tools Used

    , pushed caps on by hand

    pushed the new caps on by hand, two minutes job was done. no skill required
    Did you find this story helpful?
    Thanks for voting and helping fellow customers!

    Replace hub cover after replacing new wheels assembly.

    James - November 12, 2022
    Tool Type

    Lawn Tractor

    Difficulty

    Medium

    Time

    30-60 minutes

    Tools Used

    Screwdriver, Pliers

    Removed old (25 year old tires/wheels) and hub covers.
    Replaced new bearings with larger diameter to fit the old shaft.
    Reassembled and replaced covers with new covers.
    Did you find this story helpful?
    Thanks for voting and helping fellow customers!

    Flange bearing came put due to e clip broke both front wheels cap missing

    Danny - August 7, 2022
    Tool Type

    Lawn Tractor

    Difficulty

    Easy

    Time

    15-30 minutes

    Tools Used

    Screwdriver, Pliers, Hammer

    Clean inner wheel drive in bearing install e clip and washer install cap
    Did you find this story helpful?
    Thanks for voting and helping fellow customers!

    Spring kept popping off, thus belt would come loose.

    george - July 19, 2021
    Tool Type

    Lawn Tractor

    Difficulty

    Hard

    Time

    More than 2 hours

    Tools Used

    Screwdriver, Pliers, Socket set, Wrench Set, Hand file

    1 removed old parts from deck.
    2 modified bolt since shoulder is too high on the stove bolt that I bought.
    3 reattached spring to belt connector and deck bolt
    Did you find this story helpful?
    Thanks for voting and helping fellow customers!

    Front right wheel fell off while cutting the grass.

    Doug - July 2, 2021
    Tool Type

    Lawn Tractor

    Difficulty

    Easy

    Time

    15-30 minutes

    Tools Used

    Screwdriver

    The local repair shop is my normal first stop but they only had some of the parts. I ordered what they had. After waiting a couple days I decided to look for another source. eReplacementParts.com was found during an internet search. They had the parts the local guys didn't. I ordered what I needed and they arrived within 3 days. The parts I ordered from the local guy still had not arrived and it was 4 more days before they got here. After 2 weeks and two sourced for parts my repair was completed.
    What did I learn? The next time I have a repair job and the local guy does not have the parts IN STOCK I will definitely call eReplacementParts.com. Their parts diagram made sure I got the right parts and their team made sure I got what I needed within a couple of days. Had I done this at first my project would have been done 7 to 10 days faster.
    Did you find this story helpful?
    Thanks for voting and helping fellow customers!

    Bad bearings

    Ed - July 1, 2021
    Tool Type

    Lawn Tractor

    Difficulty

    Easy

    Time

    Less than 15 minutes

    Tools Used

    Screwdriver, Pliers

    Pulled off wheels pushed out bearings cleaned out old grease installed new parts and
    greased wheels.
    Did you find this story helpful?
    Thanks for voting and helping fellow customers!

    Front left outside wheel bearing was bad

    Hilton - May 19, 2021
    Tool Type

    Lawn Mower

    Difficulty

    Easy

    Time

    Less than 15 minutes

    Tools Used

    Screwdriver, Hammer, grease gun, floor jack

    After pulling the mower onto a flat level surface and chocking a rear wheel. I jacked up the front of lawnmower high enough to lift the front wheels off the ground. There was no bearing cap on the mower. So I proceeded to remove the snap ring holding the wheel in place by taking a screwdriver and prying outward from the center of the axle. That enabled me to slide the entire wheel off the axle. By laying the wheel outside facing down on two pieces of scrap wood. I was free to remove the outside wheel bearing by taking a flat blunt screwdriver and taping the old wheel bearing out. Then I was able to clean the wheel up and inspect for any unforseen problems. Not finding any other damage to the wheel I removed the old grease fitting and replaced it with a new one. I applied a small amount of grease to the inside of the wheel where the new bearing was to be installed. That allowed the new bearing to be easily taped in place. Before sliding the wheel back onto the axle I injected grease into the void between the inside and outside bearings. Then pushing the wheel back onto the axle and removing any excess grease that was pushed out at that time. I then replaced the snap ring holding everything in place where it belongs. At that time I injected more grease into the new grease fitting until I saw grease coming out from in between the axle and the wheel bearing. Last but not least filling the axle cap about half way with grease before installing it on the end of the axle. Then by lowering the jack I was able to test drive the mower.
    Did you find this story helpful?
    Thanks for voting and helping fellow customers!

    OEM stands for Original Equipment Manufacturer and means the part you’re buying is sourced directly from the manufacturer who made your product. At eReplacementParts, we sell only genuine OEM parts, guaranteeing the part you’re purchasing is of better design and of higher quality than aftermarket parts.

    Our product descriptions are a combination of data sourced directly from the manufacturers who made your product as well as content researched and curated by our content & customer service teams. This content is edited and reviewed internally before being made public to customers.

    Our customer service team are at the ready daily to answer your part and product questions. We have a dedicated staff with decades of collective experience in helping customers just like you purchase parts to repair their products.

    All our part reviews are solicited directly from other customers who have purchased this exact part. While we moderate these reviews for profanity, offensive language or personally identifiable information, these reviews are posted exactly as submitted and no alterations are made by our team.

    All our customer repair instructions are solicited directly from other customers just like you who have purchased and replaced this exact part. While we moderate these reviews for profanity, offensive language or personally identifiable information, these reviews are posted exactly as submitted and no alterations are made by our team.

    Based on data from past customer purchasing behaviors, these parts are most commonly purchased together along with the part you are viewing. These parts may be necessary or helpful to replace to complete your current repair.

    All our installation videos are created and produced in collaboration with our in-house repair technician, Mark Sodja, who has helped millions of eReplacementParts customers over the last 13 years repair their products. Mark has years of experience in selling and repairing both commercial and residential products with a specialty in gas-powered equipment.

    This data is collected from customers who submitted a repair instruction after replacing this exact part. Customers can rate how easy the repair was to complete and how long it took. We aggregate this data to provide a repair rating that allows customers to quickly determine the difficulty and time needed to perform their own repair.

    eReplacementParts.com
    7174 South 400 West
    Suite 5
    Midvale, UT 84047
    visa mastercard discover american express PayPal
    Recent searches:
    Suggested searches:
    Models:
    Manufacturers:
    Need help finding your model number?