
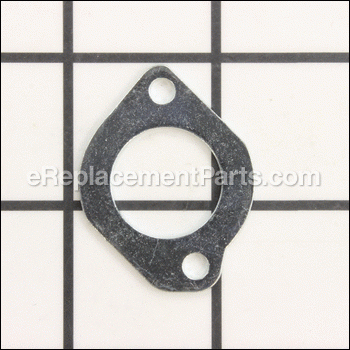
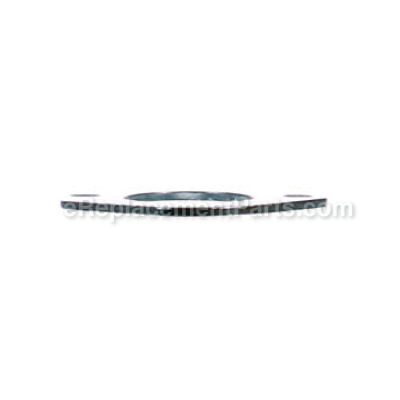


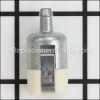
This is an OEM sourced part that is intended to be used with edgers, trimmers, pruners, blowers, hedge clippers, and water pumps from Shindaiwa and Echo. The primer cover attaches to the body of the engine's carburetor and is used to secure the primer bulb to the fuel pump. This part is priced as a single item.
Primer Cover 12536311610
OEM part for: Echo, Shindaiwa, Little Wonder
Part Number: 12536311610
$5.19
In Stock
Jump To:
Frequently Purchased Together ?
Compatibility
This Primer Cover will fit the following 231 machines. Confirm this part works with your model, and view the detailed model diagrams and repair help we have to offer.
Shindaiwa
Echo
Little Wonder
Show More Compatible ModelsThis item works with the following types of products:
- Blower Parts
- Edger Parts
- Grass Trimmer Parts
- Trimmer Parts
- Paint Sprayer Parts
- Pruner Parts
- Reciprocating Saw Parts
- Saw Parts
- Pump Parts
- Vacuum Parts
- Hedge Trimmer Parts
Repair Videos ?
Articles:
|
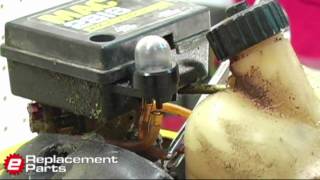
Replacing primer bulbs in small engines is one of the most common types of tool repairs, and this article explains profe...
June 25, 2010
|

|
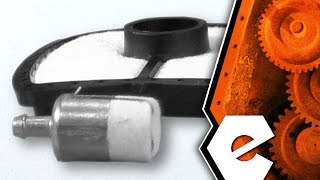
Filthy Filters? This article will show you how to install a filter kit on an Echo SRM-225 trimmer....
May 27, 2015
|

Customer Part Reviews ?
Average Rating (out of 5):
Click to filter by ratings:
5 stars
2
4 stars
0
3 stars
0
2 stars
0
1 stars
0
< PREV
- 1
Great and prompt service
I have ordered parts here two times .Parts were exactly what I needed and delivered quickly.
Guest -
April 17, 2021
Verified Purchase
If you need parts, this is the place to come to..
Almost impossible to find what I needed but Replacement parts had it all. Convenient ordering and reliable delivery.
Rocco -
September 28, 2020
Verified Purchase
Questions & Answers ?
Our customer Service team is at the ready daily to answer your part and product questions.

Ask our Team
We have a dedicated staff with decades of collective experience in helping customers just like you purchase parts to repair their products.
Does this fit my product?Questions & Answers for Primer Cover
No questions have been asked yet
Customer Repair Instructions ?
All our customer repair instructions are solicited directly from other customers just like you who have purchased and replaced this exact part.
General maintenance
Gerald - June 8, 2016
👍 2 of 2 people found this instruction helpful
Tool Type
Trimmer
Difficulty
Easy
Time
15-30 minutes
Tools Used
Screwdriver, Socket set, Wrench Set
Remove the old fuel line grommet along with the fuel return line, fuel line and vent line. Make a diagram of where they hooked up to. Remove the fuel filter from the fuel line and remove the fuel tank vent from the vent line. Install the three lines into the grommet leaving the same amount of line coming in and out of the grommet as was on the old one. Install the fuel and tank vent on their lines. Insert the fuel filter into the tank, then put some oil on the grommet and install it on the tank. Place the fuel and return lines back on the carburetor. And place the fuel tank vent on the vent line Remove the screws from the primer cover and remove the old primer and and cover install the new primer, then the new cover. Remove the air filter cover and remove the old air filter, then place the new one in and replace the filter cover. Remove the old spark plug, gap the new one at 0.026 and torque it to 130 in. lb. Now you're done, get to work
Did you find this story helpful?
Thanks for voting and helping fellow customers!
Gas leaking
Paula - June 15, 2016
👍 1 of 1 people found this instruction helpful
Tool Type
Trimmer
Difficulty
Medium
Time
15-30 minutes
Tools Used
Screwdriver, Pliers
Started by emptying the fuel, then took off the cover, and removed the tank. Ran the new lines into the tank, and connected them to the carb, then reassembled everything.
Did you find this story helpful?
Thanks for voting and helping fellow customers!
Primer leaked gas
Willard - July 11, 2016
👍 1 of 1 people found this instruction helpful
Tool Type
Trimmer
Difficulty
Easy
Time
Less than 15 minutes
Tools Used
Screwdriver
Removed two screws holding cover and primer. Replaced with new ones. Very straight forward replacement.
Did you find this story helpful?
Thanks for voting and helping fellow customers!
Carb was leaking and making a gas oil mess, wanted to clean it up and restore it to new
Brian - December 8, 2017
Tool Type
Blower
Difficulty
Easy
Time
1-2 hours
Tools Used
Screwdriver, Pliers, Allen wrench
Simple ran it dry
Removed filter
Removed carb
Removed carb seals
Removed bulb primer
Cleaned
Rebuilt in reverse order
Removed filter
Removed carb
Removed carb seals
Removed bulb primer
Cleaned
Rebuilt in reverse order
Did you find this story helpful?
Thanks for voting and helping fellow customers!
Carburetor was sucking air and would not start.
Lonne - October 25, 2017
Tool Type
Blower
Difficulty
Easy
Time
Less than 15 minutes
Tools Used
Screwdriver
Removed the screws and installed the new bulb. Reinstalled the screws.
Did you find this story helpful?
Thanks for voting and helping fellow customers!
Purge bulb cracked
Dave - September 8, 2017
Tool Type
Trimmer
Difficulty
Easy
Time
Less than 15 minutes
Tools Used
Screwdriver
Removed the screws from the purge bulb cover
Removed the old purge bulb from the cover
Installed the new purge bulb in the new bulb cover
Screwed the cover onto the carburetor
Removed the old purge bulb from the cover
Installed the new purge bulb in the new bulb cover
Screwed the cover onto the carburetor
Did you find this story helpful?
Thanks for voting and helping fellow customers!
Primer became brittle and caused gas to leak into the filter
RICHARD - May 4, 2017
Tool Type
Blower
Difficulty
Easy
Time
Less than 15 minutes
Tools Used
Screwdriver
1. Removed the filter cover and discarded the filter and replaced it with the new filter.
2. Removed the Primer cover and Primer and replaced it with a new Primer cover and Primer.
2. Removed the Primer cover and Primer and replaced it with a new Primer cover and Primer.
Did you find this story helpful?
Thanks for voting and helping fellow customers!
Broken primer
Phillip - August 21, 2016
Tool Type
Trimmer
Difficulty
Easy
Time
Less than 15 minutes
Tools Used
Screwdriver
1. Removed the old primer & primer cover
2. Cleaned around the area.
3. Installed the new parts.
Job done! All told, less than 15 minutes.
2. Cleaned around the area.
3. Installed the new parts.
Job done! All told, less than 15 minutes.
Did you find this story helpful?
Thanks for voting and helping fellow customers!
Fuel leaking from somewhere on fuel tank.
ROBERT - June 22, 2016
Tool Type
Hedge Trimmer
Difficulty
Medium
Time
15-30 minutes
Tools Used
Screwdriver, Pliers
1. Emptied fuel.
2. Removed engine cover - four screws.
3. Removed fuel line and fuel return line along with grommet.
4. Removed fuel tank vent and grommet.
5. Disconnected fuel line and fuel return line from carb.
6. Replaced everything with new components.
7. Fueled up and started the machine.
8. Spent ~$60 and saved ~$600 over buying a comparable new machine.
Did you find this story helpful?
Thanks for voting and helping fellow customers!
Echo GT-2400 trimmer. Rebuild carb & other parts
thomas - May 31, 2016
Tool Type
Trimmer
Difficulty
Easy
Time
30-60 minutes
Tools Used
Screwdriver, Pliers, Socket set, Wrench Set, My Garage\\\\\\\'s Air Compresser
Echo GT-2400 grass trimmer.
A trimmer I've used for well over 30 years in my yard.. This Spring upon its start up . It ran lousy. I first removed the primer cover and primer. I put them back on after I worked on the carburetor. I did the same thing with the cap and gasket.
A carb re-build can be tricky to accomplish. So here's how I made it easy for> me.
Took pix's with my cell through-out its dismantling. Carb cleaner purchased for internal passage cleaning. Then blew out the sprayed passages with compressed air. The carburetors reassembly was a piece of cake.{all my cell pix's did garner a great resolve} Reinstalled using all new internal parts from E replacement parts. (the only internet business to buy small engine parts from) Re-set its air/ fuel mixture needles to Echo specs. Trimmer fired right up. Tweaked its low & high speed needle's a second time. Re-Set its Idle screw a tad too. GT-2400 ran as good as new. What a difference in its power curve . Trimmer went from being a throw away to a heirloom. Immediately gave the trimmer to my daughter to use in her yard and went and bought me a brand new Echo curve shaft trimmer today. Don't know if the new echo will run as good as its predecessor. My new echo has a non-adjustable carb. I just may have made a mistake in giving my old yard pal away. Oh well . I know my daughter will enjoy her daddy's sweet running trimmer.
Did you find this story helpful?
Thanks for voting and helping fellow customers!
Load More Install Stories
OEM stands for Original Equipment Manufacturer and means the part you’re buying is sourced directly from the manufacturer who made your product. At eReplacementParts, we sell only genuine OEM parts, guaranteeing the part you’re purchasing is of better design and of higher quality than aftermarket parts.
Our product descriptions are a combination of data sourced directly from the manufacturers who made your product as well as content researched and curated by our content & customer service teams. This content is edited and reviewed internally before being made public to customers.
Our customer service team are at the ready daily to answer your part and product questions. We have a dedicated staff with decades of collective experience in helping customers just like you purchase parts to repair their products.
All our part reviews are solicited directly from other customers who have purchased this exact part. While we moderate these reviews for profanity, offensive language or personally identifiable information, these reviews are posted exactly as submitted and no alterations are made by our team.
All our customer repair instructions are solicited directly from other customers just like you who have purchased and replaced this exact part. While we moderate these reviews for profanity, offensive language or personally identifiable information, these reviews are posted exactly as submitted and no alterations are made by our team.
Based on data from past customer purchasing behaviors, these parts are most commonly purchased together along with the part you are viewing. These parts may be necessary or helpful to replace to complete your current repair.
All our installation videos are created and produced in collaboration with our in-house repair technician, Mark Sodja, who has helped millions of eReplacementParts customers over the last 13 years repair their products. Mark has years of experience in selling and repairing both commercial and residential products with a specialty in gas-powered equipment.
This data is collected from customers who submitted a repair instruction after replacing this exact part. Customers can rate how easy the repair was to complete and how long it took. We aggregate this data to provide a repair rating that allows customers to quickly determine the difficulty and time needed to perform their own repair.