


This authentic replacement part is specially designed for Briggs and Stratton generators. It is supplied from the original equipment manufacturer. This is an important component of the unit which regulates the voltage. Over time it may develop electrical or mechanical issues eventually requiring a replacement. This high-quality component is sold as an individual item. Make sure to refer to the owners manual and the diagrams of your model for the exact location and the correct application of this regulator. You will need a screwdriver and a wrench set to remove the housing in order to perform this repair.
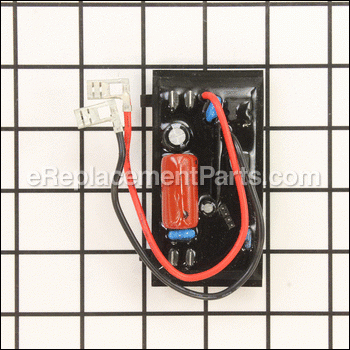
Voltage Regulator 205858GS
OEM part for: Briggs and Stratton, Snapper
Part Number: 205858GS
$107.95
In Stock
Jump To:
Frequently Purchased Together ?

Compatibility
This part will fit the following 66 machines
Briggs and Stratton
040243-0 Generator View Diagrams & Manuals
040243-1 Generator View Diagrams & Manuals
030210-1 Portable Generator View Diagrams & Manuals
030210-2 Portable Generator View Diagrams & Manuals
030211-0 Portable Generator View Diagrams & Manuals
030211-1 Portable Generator View Diagrams & Manuals
030213-0 Portable Generator View Diagrams & Manuals
030216-0 Portable Generator View Diagrams & Manuals
030216-1 Portable Generator View Diagrams & Manuals
030220-0 Portable Generator View Diagrams & Manuals
030221-0 Portable Generator View Diagrams & Manuals
030228-0 Portable Generator View Diagrams & Manuals
030231-0 Portable Generator View Diagrams & Manuals
030236-0 Portable Generator View Diagrams & Manuals
030237-0 Portable Generator View Diagrams & Manuals
030244-0 Portable Generator View Diagrams & Manuals
030201-0 Portable Generator View Diagrams & Manuals
030244-2 Portable Generator View Diagrams & Manuals
030247-0 Portable Generator View Diagrams & Manuals
030247-1 Portable Generator View Diagrams & Manuals
030247-2 Portable Generator View Diagrams & Manuals
030254-0 Portable Generator View Diagrams & Manuals
030297-0 Portable Generator View Diagrams & Manuals
030335-0 Portable Generator View Diagrams & Manuals
030336-0 Portable Generator View Diagrams & Manuals
030337-0 Portable Generator View Diagrams & Manuals
030338-0 Portable Generator View Diagrams & Manuals
030339-0 Portable Generator View Diagrams & Manuals
030340-0 Portable Generator View Diagrams & Manuals
030342-0 Portable Generator View Diagrams & Manuals
030344-0 Portable Generator View Diagrams & Manuals
030345-0 Portable Generator View Diagrams & Manuals
030358-0 Portable Generator View Diagrams & Manuals
030359-0 Portable Generator View Diagrams & Manuals
030373-0 Portable Generator View Diagrams & Manuals
030374-0 Portable Generator View Diagrams & Manuals
030375-0 Portable Generator View Diagrams & Manuals
030207-0 Portable Generator View Diagrams & Manuals
030381-0 Portable Generator View Diagrams & Manuals
030382-0 Portable Generator View Diagrams & Manuals
030383-0 Portable Generator View Diagrams & Manuals
030384-0 Portable Generator View Diagrams & Manuals
030385-0 Portable Generator View Diagrams & Manuals
030386-0 Portable Generator View Diagrams & Manuals
030387-0 Portable Generator View Diagrams & Manuals
030419-0 Portable Generator View Diagrams & Manuals
030426-0 Portable Generator View Diagrams & Manuals
030432-0 Portable Generator View Diagrams & Manuals
1893-0 Portable Generator View Diagrams & Manuals
1894-0 Portable Generator View Diagrams & Manuals
1894-1 Portable Generator View Diagrams & Manuals
1925-0 Portable Generator View Diagrams & Manuals
1925-1 Portable Generator View Diagrams & Manuals
1932-0 Portable Generator View Diagrams & Manuals
1932-1 Portable Generator View Diagrams & Manuals
1933-0 Portable Generator View Diagrams & Manuals
1933-1 Portable Generator View Diagrams & Manuals
1934-0 Portable Generator View Diagrams & Manuals
1934-1 Portable Generator View Diagrams & Manuals
1934-2 Portable Generator View Diagrams & Manuals
1935-0 Portable Generator View Diagrams & Manuals
1935-1 Portable Generator View Diagrams & Manuals
030242-0 6,200 Watt Generator View Diagrams & Manuals
030207-01 10,000 Watt Generator View Diagrams & Manuals
Snapper
G62000 30216 6200 Watt 11 Hp Generator View Diagrams & Manuals
G62000 (85907)(030216) 6200 Watt 11 Hp Generator View Diagrams & Manuals
Show More Compatible Models
This item works with the following types of products:
- Generator Parts
This part replaces obsolete part #: 202165GS, 195011GS, 200962GS, 189769GS, 198339GS
Customer Part Reviews ?
Average Rating (out of 5):
Click to filter by ratings:
5 stars
5
4 stars
1
3 stars
0
2 stars
0
1 stars
0
< PREV
- 1
Portable generator
Fit perfect.
Package arrived in reasonable time.
Price was a little bit more then expecting.
Over all I'm happy.
Fixed my generator.
Guest -
January 20, 2023
Verified Purchase
Easy repair great parts- works!!!
Excellent !!!!Generator Works!!!
Guest -
September 19, 2020
Verified Purchase
fast shipping, part is correct one.
Part fit correctly and had good instructions with pictures
Bob -
September 1, 2020
Verified Purchase
very easy repair and so far good part. Very good instructions.
arrived quickly, great part and instructions very precise. Would buy it again.
Guest -
June 25, 2020
Verified Purchase
Excellent service
Part was OEM and worked great.
Sales lady was excellent in helping me figure out what I needed and finding the part. I will definitely be back.
Guest -
November 9, 2019
Verified Purchase
Ram mirror.
Received on schedule, not damaged but poorly packaged the box was in rough shape.
john -
September 6, 2021
Verified Purchase
t
t
t -
t days ago
Verified Purchase
eReplacementParts Team
t
Questions & Answers ?
Our customer Service team is at the ready daily to answer your part and product questions.

Ask our Team
We have a dedicated staff with decades of collective experience in helping customers just like you purchase parts to repair their products.
Does this fit my product?Questions & Answers for Voltage Regulator
No questions have been asked yet
Customer Repair Instructions ?
All our customer repair instructions are solicited directly from other customers just like you who have purchased and replaced this exact part.
No power produced
stephen - April 27, 2016
👍 12 of 14 people found this instruction helpful
Tool Type
Generator
Difficulty
Easy
Time
Less than 15 minutes
Tools Used
Screwdriver, Socket set
Parts Used
Remove rear of generator by unscrewing four nuts, remove cover, remover controller, remove wires and reconnect to new controller once completed wrap wires around board as you found on the old board. Refit and replace covers. Have all the power I need now. Thank you.
Did you find this story helpful?
Thanks for voting and helping fellow customers!
No power output on customer's John Deere 6200 portable generator
David - November 30, 2016
👍 9 of 10 people found this instruction helpful
Tool Type
Generator
Difficulty
Medium
Time
1-2 hours
Tools Used
Pliers, Socket set, Nutdriver
Parts Used
1. Check for power output at receptacles (No go)
2. R&R end cover & generator end plate. Clean slip rings on rotor. Check brushes for proper contact.
3. Check for min. AC output from rotor and stator while running. (OK)
4. Replace AVR. Check for generator output. (No go)
5. Disconnect + and - leads from brush block. Start generator and flash rotor with 12vdc.
6. Re-connect brush leads and re-start. Check for output. (OK!)
NOTE: On this type of AVR *always* make sure all leads go to the proper terminals. The AC voltage sense and AC input to the AVR are different size terminals, but it is still possible to get the individual leads mixed up and the generator won't put out at governed speed. Be sure to follow the instruction sheet exactly on the positions of the voltage sense & AC input wires to the AVR! (The wires have numbers printed on the insulation)
Did you find this story helpful?
Thanks for voting and helping fellow customers!
Generator failed to output power
Earl - September 8, 2016
👍 5 of 6 people found this instruction helpful
Tool Type
Generator
Difficulty
Medium
Time
1-2 hours
Tools Used
Nutdriver, Lever for controlling height of generator relative to frame
Parts Used
1. Unbolted wired end of generator end housing from frame.
2. Removed four long screws holding the end housing to the rest of the generator assembly
3. Used lever to raise the generator housing (and generator up to clear the frame).
4. Removed housing from the stator/rotor assembly
5. Followed the attached instruction sheet for the voltage regulator
5a. Discarding the "booster" previously undefined by the manufacturer. Part of the sheet instructions.
6. Reassembled in the reverse order.
7. Tested = OK
Did you find this story helpful?
Thanks for voting and helping fellow customers!
Generator did not put out 120 volts
Abellino - August 17, 2016
👍 4 of 4 people found this instruction helpful
Tool Type
Generator
Difficulty
Easy
Time
15-30 minutes
Tools Used
Screwdriver, Nutdriver
I took cover of generator off replaced the avr and the brushes and put everything back on started the generator up and checked it ready to go
Did you find this story helpful?
Thanks for voting and helping fellow customers!
No voltage output
Robert - March 15, 2016
👍 3 of 3 people found this instruction helpful
Tool Type
Generator
Difficulty
Easy
Time
Less than 15 minutes
Tools Used
Nutdriver
Parts Used
Remove end cover on generator.
Unplug old PC board
Plug in new PC board
Slide PC board into locator slots
Reinstall end cover
Unplug old PC board
Plug in new PC board
Slide PC board into locator slots
Reinstall end cover
Did you find this story helpful?
Thanks for voting and helping fellow customers!
No power
Don - February 5, 2017
👍 2 of 2 people found this instruction helpful
Tool Type
Generator
Difficulty
Easy
Time
Less than 15 minutes
Tools Used
Screwdriver, Pliers
Replaced the old parts with the new ones followed instructions that came with the parts . All went well generator now puts out electricity problem fixed. Advice take photo of wiring so everything go's back the same way. Reair was very easy.
Did you find this story helpful?
Thanks for voting and helping fellow customers!
No voltage output
carl - October 31, 2016
👍 3 of 4 people found this instruction helpful
Tool Type
Generator
Difficulty
Easy
Time
15-30 minutes
Tools Used
Socket set, Voltmeter
Parts Used
1 Removed generator end cover.
2 Transfer wires one at a time to new AVR.
3 Slide AVR in slot.
4 Remove old brush leads .
5 Add new brush leads.
6 Put cover back on,
7 Test for voltage..
2 Transfer wires one at a time to new AVR.
3 Slide AVR in slot.
4 Remove old brush leads .
5 Add new brush leads.
6 Put cover back on,
7 Test for voltage..
Did you find this story helpful?
Thanks for voting and helping fellow customers!
No output from generator
Scott - July 7, 2016
👍 2 of 2 people found this instruction helpful
Tool Type
Generator
Difficulty
Medium
Time
30-60 minutes
Tools Used
Screwdriver, Socket set, Small alligator clip jumper cables
1. Removed generator cap using 8mm socket set
2. Removed and replaced old AVR and brush assembly
3. Followed included instructions to remagnetize brush assembly by using small alligator 4. Clip jumper cables (not included) to connect positive and negative leads of brushes to a positive and negative posts of a 12 V battery (not included).
5. Started and ran the generator for a few seconds.
6. Removed jumper cables.
7. Reconnected lead wires.
8. Re-installed the cap.
9. Started generator and now works as good as new!
Did you find this story helpful?
Thanks for voting and helping fellow customers!
Generator put out no power when running
Gregory - December 2, 2017
👍 1 of 1 people found this instruction helpful
Tool Type
Generator
Difficulty
Easy
Time
Less than 15 minutes
Tools Used
Screwdriver
1. Remove plastic cap/vent off the end of generator
2. Remove and replace brush assembly, being sure to connect wires correctly
3. Remove the old voltage regulator and booster (if equipped), replacing both items with the voltage regulator as described in the directions included with the new voltage regulator
4. Start generator and retest for proper function (electrical output)
Did you find this story helpful?
Thanks for voting and helping fellow customers!
Generator wouldn't produce power
Billy - October 15, 2017
👍 1 of 1 people found this instruction helpful
Tool Type
Generator
Difficulty
Easy
Time
Less than 15 minutes
Tools Used
Nutdriver
Parts Used
It took & 5 minutes to replace the part
I took the back cover off the generator, slid the old regulator out unplugged it, slid the new one in, plugged it up, put the cover back on, works good,
I took the back cover off the generator, slid the old regulator out unplugged it, slid the new one in, plugged it up, put the cover back on, works good,
Did you find this story helpful?
Thanks for voting and helping fellow customers!
Load More Install Stories
OEM stands for Original Equipment Manufacturer and means the part you’re buying is sourced directly from the manufacturer who made your product. At eReplacementParts, we sell only genuine OEM parts, guaranteeing the part you’re purchasing is of better design and of higher quality than aftermarket parts.
Our product descriptions are a combination of data sourced directly from the manufacturers who made your product as well as content researched and curated by our content & customer service teams. This content is edited and reviewed internally before being made public to customers.
Our customer service team are at the ready daily to answer your part and product questions. We have a dedicated staff with decades of collective experience in helping customers just like you purchase parts to repair their products.
All our part reviews are solicited directly from other customers who have purchased this exact part. While we moderate these reviews for profanity, offensive language or personally identifiable information, these reviews are posted exactly as submitted and no alterations are made by our team.
All our customer repair instructions are solicited directly from other customers just like you who have purchased and replaced this exact part. While we moderate these reviews for profanity, offensive language or personally identifiable information, these reviews are posted exactly as submitted and no alterations are made by our team.
Based on data from past customer purchasing behaviors, these parts are most commonly purchased together along with the part you are viewing. These parts may be necessary or helpful to replace to complete your current repair.
All our installation videos are created and produced in collaboration with our in-house repair technician, Mark Sodja, who has helped millions of eReplacementParts customers over the last 13 years repair their products. Mark has years of experience in selling and repairing both commercial and residential products with a specialty in gas-powered equipment.
This data is collected from customers who submitted a repair instruction after replacing this exact part. Customers can rate how easy the repair was to complete and how long it took. We aggregate this data to provide a repair rating that allows customers to quickly determine the difficulty and time needed to perform their own repair.