
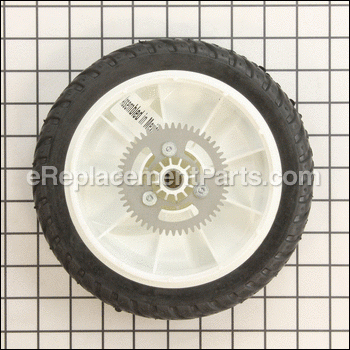
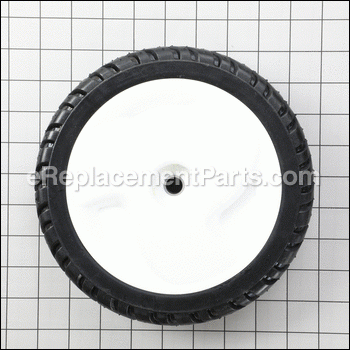
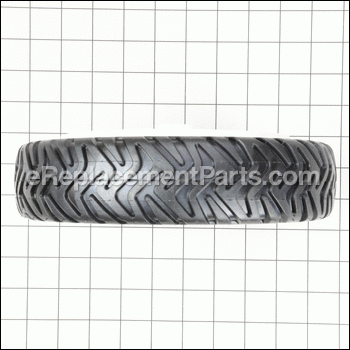

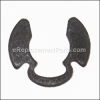
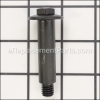
Genuine Manufacturer Sourced replacement part designed for use with Toro lawn mowers. This is the Drive wheel that moves the Mower. This part consists of Rubber Tire, Plastic Rim and a Metal Gear. This assembly includes One (1) Wheel.
Rear Wheel Gear Assembly 105-3036
OEM part for: Toro
Part Number: 105-3036
$63.51
In Stock
Jump To:
Frequently Purchased Together ?


Compatibility
This part will fit the following 58 machines
Toro
20013 (220000001-220300000)(2002) Lawn Mower View Diagrams & Manuals
20013 (220300001-220999999)(2002) Lawn Mower View Diagrams & Manuals
20013 (230000001-230999999)(2003) Lawn Mower View Diagrams & Manuals
20013 (240000001-240999999)(2004) Lawn Mower View Diagrams & Manuals
20013 (250000001-250999999)(2005) Lawn Mower View Diagrams & Manuals
20013 (260000001-260999999)(2006) Lawn Mower View Diagrams & Manuals
20014 (220000001-220300000)(2002) Lawn Mower View Diagrams & Manuals
20014 (220300001-220999999)(2002) Lawn Mower View Diagrams & Manuals
20014 (230000001-230999999)(2003) Lawn Mower View Diagrams & Manuals
20017 (220000001-220300000)(2002) Lawn Mower View Diagrams & Manuals
20017 (220300001-220999999)(2002) Lawn Mower View Diagrams & Manuals
20017 (230000001-230999999)(2003) Lawn Mower View Diagrams & Manuals
20017 (240000001-240999999)(2004) Lawn Mower View Diagrams & Manuals
20017 (250000001-250999999)(2005) Lawn Mower View Diagrams & Manuals
20017 (260000001-260999999)(2006) Lawn Mower View Diagrams & Manuals
20018 (220000001-220300000)(2002) Lawn Mower View Diagrams & Manuals
20018 (220300001-220999999)(2002) Lawn Mower View Diagrams & Manuals
20018 (230000001-230999999)(2003) Lawn Mower View Diagrams & Manuals
20031 (240000001-240999999)(2004) Lawn Mower View Diagrams & Manuals
20041 (250000001-250999999)(2005) Lawn Mower View Diagrams & Manuals
20047 (260000001-260999999)(2006) Lawn Mower View Diagrams & Manuals
20049 (250000001-250999999)(2005) Lawn Mower View Diagrams & Manuals
20051 (240000001-240999999)(2004) Lawn Mower View Diagrams & Manuals
20066 (270000001-270999999)(2007) Lawn Mower View Diagrams & Manuals
20066 (280000001-280999999)(2008) Lawn Mower View Diagrams & Manuals
20067 (270000001-270999999)(2007) Lawn Mower View Diagrams & Manuals
20067 (280000001-280999999)(2008) Lawn Mower View Diagrams & Manuals
20068 (280000001-280999999)(2008) Lawn Mower View Diagrams & Manuals
20070 (260000001-260999999)(2006) Lawn Mower View Diagrams & Manuals
20073 (270000001-270999999)(2007) Lawn Mower View Diagrams & Manuals
20073A (270000001-270999999)(2007) Lawn Mower View Diagrams & Manuals
20074 (270000001-270999999)(2007) Lawn Mower View Diagrams & Manuals
20074A (270000001-270999999)(2007) Lawn Mower View Diagrams & Manuals
20075 (270000001-270999999)(2007) Lawn Mower View Diagrams & Manuals
20076 (270000001-270999999)(2007) Lawn Mower View Diagrams & Manuals
20076A (270000001-270999999)(2007) Lawn Mower View Diagrams & Manuals
20079 (260000001-260999999)(2006) Lawn Mower View Diagrams & Manuals
20089 (280000001-280999999)(2008) Lawn Mower View Diagrams & Manuals
20096 (270000001-270999999)(2007) Lawn Mower View Diagrams & Manuals
20098 (270000001-270999999)(2007) Lawn Mower View Diagrams & Manuals
20112 (280000001-280999999)(2008) Lawn Mower View Diagrams & Manuals
20112 (290000001-290999999)(2009) Lawn Mower View Diagrams & Manuals
20113 (280000001-280999999)(2008) Lawn Mower View Diagrams & Manuals
20113 (290000001-290999999)(2009) Lawn Mower View Diagrams & Manuals
20655 (270000001-270999999)(2007) Lawn Mower View Diagrams & Manuals
20655 (280000001-280999999)(2008) Lawn Mower View Diagrams & Manuals
20655 (290000001-290999999)(2009) Lawn Mower View Diagrams & Manuals
20655 (240000001-240999999)(2004) Lawn Mower View Diagrams & Manuals
20655 (250000001-250999999)(2005) Lawn Mower View Diagrams & Manuals
20655 (260000001-260999999)(2006) Lawn Mower View Diagrams & Manuals
20656 (270000001-270999999)(2007) Lawn Mower View Diagrams & Manuals
20656 (280000001-280999999)(2008) Lawn Mower View Diagrams & Manuals
20656 (290000001-290999999)(2009) Lawn Mower View Diagrams & Manuals
20656 (240000001-240999999)(2004) Lawn Mower View Diagrams & Manuals
20656 (250000001-250999999)(2005) Lawn Mower View Diagrams & Manuals
20656 (260000001-260999999)(2006) Lawn Mower View Diagrams & Manuals
20658 (280000001-280999999)(2008) Lawn Mower View Diagrams & Manuals
20658 (290000001-290999999)(2009) Lawn Mower View Diagrams & Manuals
Show More Compatible Models
This item works with the following types of products:
- Lawn Mower Parts
Customer Part Reviews ?
Average Rating (out of 5):
Click to filter by ratings:
5 stars
5
4 stars
3
3 stars
0
2 stars
0
1 stars
0
< PREV
- 1
Easy repair and works great. Fast delivery
Hard to find part, but they had it. Shipped quickly. Good help from Rep. Works good. Thanks!
Guest -
September 10, 2023
Verified Purchase
New Wheel with broken inner gear.
Part came fast, perfect fit, reasonably priced!
I'm a happy camper!
Guest -
November 2, 2022
Verified Purchase
Worked as expected.
Took a little long to arrive, but was fine when it arrived.
Guest -
June 22, 2021
Verified Purchase
Goog service,professional.
Rigth Rear wheel
john -
October 16, 2019
Verified Purchase
Great part
The part came quickly and was brand new will order from here again as needed
Guest -
May 23, 2019
Verified Purchase
Great parts
Great to find the hard to find parts.
Warren -
May 25, 2020
Verified Purchase
Rear tire
Got the serial number for my Toro they found the tire right away shipped it out within four days back in business good service.
Guest -
April 20, 2020
Verified Purchase
Have to return
Unfortunately I have to return the part. I never opened it as it took too long to come and I had to buy a different mower.
Guest -
July 9, 2019
Verified Purchase
t
t
t -
t days ago
Verified Purchase
eReplacementParts Team
t
Questions & Answers ?
Our customer Service team is at the ready daily to answer your part and product questions.

Ask our Team
We have a dedicated staff with decades of collective experience in helping customers just like you purchase parts to repair their products.
Does this fit my product?Questions & Answers for Rear Wheel Gear Assembly
I need (2) rear wheel assemblies for my toro model# 20017. Serial # 250085596. Can you tell me exactly what parts to order? Thank you
Joe
for model number 20017
asked on 2022-07-16
Hello Joe, Thank you for your inquiry. We have researched the model number you have provided and show the rear wheel as part# 105-3036. This part consists of Rubber Tire, Plastic Rim and a Metal Gear. We hope this helps and if you need help placing an order, customer service is open 7 days a week. Please feel free to give us a call. We look forward to hearing from you!
eReplacementParts Team July 16, 2022
Customer Repair Instructions ?
All our customer repair instructions are solicited directly from other customers just like you who have purchased and replaced this exact part.
Gears on drive wheels wore out.
Donald - March 19, 2017
👍 13 of 14 people found this instruction helpful
Tool Type
Lawn Mower
Difficulty
Medium
Time
15-30 minutes
Tools Used
Socket set
Parts Used
Remove the bolts from the wheels and remove the wheels. Install the new wheels onto the shaft and tighten the bolts down.
Did you find this story helpful?
Thanks for voting and helping fellow customers!
Self propelled was not working due to worn down pinion gears.
Greg - September 13, 2017
👍 11 of 11 people found this instruction helpful
Tool Type
Lawn Mower
Difficulty
Easy
Time
15-30 minutes
Tools Used
Screwdriver, Pliers, Socket set, Gloves
1. Disconnected spark plug. Removed grass bag. Raised mower up on wooden 2x4s to access back wheels (did not tilt mower).
2. Removed left wheel with a socket set.
3. Removed ring clip with screw driver and needle nose pliers.
4. Removed pinion gear and thrust washer while holding down key on shaft. Quickly examined condition of key and didn't replace.
5. Replaced with new pinion gear, new thrust washer and new ring clip. Slid pinion gear on with L on outside (facing direction you would be standing to use mower), thrust washer and put on gloves to push ring clip onto shaft. The pinion gears have L and R engraved on them and are interchangeable.
6. Replaced old wheel with new wheel. Gears on old wheel were worn too. Used socket set to reinstall wheel.
7. Repeated for the right side.
8. Tested and self propelled worked. Although the left wheel would not move when I backed up. I had the tension too tight on the self propelled cable. Loosen nut near handle and eased back on the tension in the cable. Mower backs up and self propelled works like new. Mower is about 12-14 years old and is a Toro Personal Pace.
Did you find this story helpful?
Thanks for voting and helping fellow customers!
One lawn mower rear wheel fell off
Linda - March 16, 2016
👍 8 of 9 people found this instruction helpful
Tool Type
Lawn Mower
Difficulty
Easy
Time
15-30 minutes
Tools Used
Socket set
Parts Used
Jacked my lawn mower up on concrete blocks -enough to access wheel without touching the ground. Unbolt wheel with a socket set (ratchet). Both rear wheels fixed, good to go, lawn mower worked great!
Did you find this story helpful?
Thanks for voting and helping fellow customers!
Ease of removal and installation
Jim - March 9, 2016
👍 8 of 9 people found this instruction helpful
Tool Type
Lawn Mower
Difficulty
Easy
Time
Less than 15 minutes
Tools Used
Socket set
Parts Used
Support mower deck on 3 pieces of 2x4 and take socket wrench to remove bolt replace with new wheel secure with bolt.
Did you find this story helpful?
Thanks for voting and helping fellow customers!
Rear wheels rubber worn out and generally unattractive.
Roy - April 20, 2017
👍 4 of 4 people found this instruction helpful
Tool Type
Lawn Mower
Difficulty
Easy
Time
Less than 15 minutes
Tools Used
Socket set
Parts Used
1. Removed bolt holding the old right wheel on.
2. Installed new wheel using the same bolt and old washers (still in good shape).
3. Repeated step 1 & 2 for the left wheel.
4. Finished my coffee as it was still hot.
2. Installed new wheel using the same bolt and old washers (still in good shape).
3. Repeated step 1 & 2 for the left wheel.
4. Finished my coffee as it was still hot.
Did you find this story helpful?
Thanks for voting and helping fellow customers!
Rear wheel fell off.
Jeff - December 24, 2015
👍 5 of 6 people found this instruction helpful
Tool Type
Lawn Mower
Difficulty
Medium
Time
15-30 minutes
Tools Used
Screwdriver, Impact wrench
First I removed the shoulder bolt with the impact wrench. Then removed the wheel. Removed the clip ring, then the thrust washer. I then removed the pinion gear just by pulling it off. Replace the old thrust washer, clip ring, and thrust washer. To assemble just reverse the order of the tear down.
Did you find this story helpful?
Thanks for voting and helping fellow customers!
Tires were badly worn. Rear wheels lost traction.
Ernesto - March 29, 2017
👍 1 of 1 people found this instruction helpful
Tool Type
Lawn Mower
Difficulty
Easy
Time
15-30 minutes
Tools Used
Socket set
1. Selected the right size socket to remove center bolts from each wheel.
2. Sprayed lubricant on center wheel bolt to help break it loose.
3. Cribbed the rear end of mower off the floor with a stable step stool. Secure mower so that it does not roll off on you. Cribbing not required but helps minimize time spent bending over.
4. Break the center bolt on rear wheel with ratchet and socket. This will expose spline on shaft.
5. Inspect spline for wear ( may be a good idea to put one in the event it needs to be replaced).
6. Lubricate or replace spline if needed.
7. Reinstall wheel repeating same steps. Piece of cake.
Did you find this story helpful?
Thanks for voting and helping fellow customers!
Wheels bad
LARRY - March 15, 2017
👍 1 of 1 people found this instruction helpful
Tool Type
Lawn Mower
Difficulty
Easy
Time
Less than 15 minutes
Tools Used
Socket set
Removed the bolt from the rear wheel, then removed the wheels
Removed the wheel covers
Installed the new wheel covers
Cleaned the axle and lubed them a bit
Attached the wheels to the axle
Removed the wheel covers
Installed the new wheel covers
Cleaned the axle and lubed them a bit
Attached the wheels to the axle
Did you find this story helpful?
Thanks for voting and helping fellow customers!
weak v belt
Michael - August 13, 2019
Tool Type
Lawn Mower
Difficulty
Easy
Time
30-60 minutes
Tools Used
Socket set, Socket sets only
Remove blade cutter and loosen drive transmission rode then replace new v belt only.
Did you find this story helpful?
Thanks for voting and helping fellow customers!
Rear drive wheel worn out!
Leslie - July 31, 2019
Tool Type
Lawn Mower
Difficulty
Easy
Time
15-30 minutes
Tools Used
Socket set, None
Parts Used
Removed and replaced back drive wheels
Did you find this story helpful?
Thanks for voting and helping fellow customers!
Load More Install Stories
OEM stands for Original Equipment Manufacturer and means the part you’re buying is sourced directly from the manufacturer who made your product. At eReplacementParts, we sell only genuine OEM parts, guaranteeing the part you’re purchasing is of better design and of higher quality than aftermarket parts.
Our product descriptions are a combination of data sourced directly from the manufacturers who made your product as well as content researched and curated by our content & customer service teams. This content is edited and reviewed internally before being made public to customers.
Our customer service team are at the ready daily to answer your part and product questions. We have a dedicated staff with decades of collective experience in helping customers just like you purchase parts to repair their products.
All our part reviews are solicited directly from other customers who have purchased this exact part. While we moderate these reviews for profanity, offensive language or personally identifiable information, these reviews are posted exactly as submitted and no alterations are made by our team.
All our customer repair instructions are solicited directly from other customers just like you who have purchased and replaced this exact part. While we moderate these reviews for profanity, offensive language or personally identifiable information, these reviews are posted exactly as submitted and no alterations are made by our team.
Based on data from past customer purchasing behaviors, these parts are most commonly purchased together along with the part you are viewing. These parts may be necessary or helpful to replace to complete your current repair.
All our installation videos are created and produced in collaboration with our in-house repair technician, Mark Sodja, who has helped millions of eReplacementParts customers over the last 13 years repair their products. Mark has years of experience in selling and repairing both commercial and residential products with a specialty in gas-powered equipment.
This data is collected from customers who submitted a repair instruction after replacing this exact part. Customers can rate how easy the repair was to complete and how long it took. We aggregate this data to provide a repair rating that allows customers to quickly determine the difficulty and time needed to perform their own repair.