
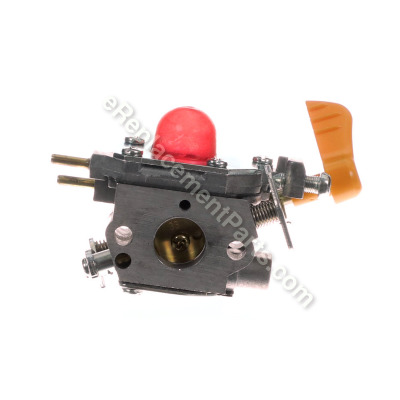


This is an authentic OEM sourced replacement part designed for use with Poulan gas powered blowers. Carburetor supplies a mixture of gas and air the engine. This kit includes a metal body carburetor, a rubber primer bulb and a plastic lever. Please note gaskets are sold separately.
If the engine won't start or dies soon after starting the carburetor is likely the issue. Test carburetor by removing air filter and pouring about a teaspoon of fuel into carburetor. Pull the starter rope. If the engine starts and then quickly dies, the carburetor is likely the problem.
You would need a torx screwdriver to replace this carburetor.
• Remove the air box cover, filter and base
• Remove the old carburetor and install the new one
• Re-assemble and test the unit
Carb. Assembly Kit C1u - W45 545180811
OEM part for: Poulan, Husqvarna
Part Number: 545180811
Product Description ?
- Classification: Part
- Weight: 0.28 lbs.
- Shipping: Ships Worldwide
Compatibility
This part will fit the following 7 machines
Poulan
Husqvarna
This item works with the following types of products:
- Blower Parts
Questions & Answers ?
Our customer Service team is at the ready daily to answer your part and product questions.

Ask our Team
We have a dedicated staff with decades of collective experience in helping customers just like you purchase parts to repair their products.
Does this fit my product?Questions & Answers for Carb. Assembly Kit C1u - W45
Customer Repair Instructions ?
All our customer repair instructions are solicited directly from other customers just like you who have purchased and replaced this exact part.
Replaced carburetor and spark plug
Tool Type
Blower
Difficulty
Medium
Time
30-60 minutes
Tools Used
Screwdriver, Socket set
2. Removed foam air filter
3 Removed carb mounting screws
4. Removed fuel lines from carb
5. Removed carb by removing from throttle linkage
6. Reversed above 5-1
7. Replaced spark plug and gapped it at 0.025
8. Stared blower and adjusted idle
Sporadic running
Tool Type
Blower
Difficulty
Easy
Time
15-30 minutes
Tools Used
, Allen wrench
Remove the filter
Remove the fuel lines and throttle from the carburetor
Remove the screws that hold the air box base and the carburetor
Remove the carburetor and gasket
Slide the screws from the air box base, through the new carburetor and gasket
Tighten up the screws
Install the fuel lines and throttle
Install the filter and filter cover
Carburetor needed changed
Tool Type
Blower
Difficulty
Easy
Time
15-30 minutes
Tools Used
Screwdriver, Pliers
Parts Used
Removed the two screws holding the old carburetor
Removed the fuel lines and the throttle, then the carburetor
Screwed the back plate of the air filter and the new carburetor on
Hooked up the throttle and fuel lines
Replace the air filter assembly
Tool Type
Blower
Difficulty
Easy
Time
30-60 minutes
Tools Used
Socket set, Wrench Set, None
Parts Used
Would not run.
Tool Type
Blower
Difficulty
Easy
Time
Less than 15 minutes
Tools Used
Pliers, Nutdriver
Parts Used
Would not prim with fuel
Tool Type
Blower
Difficulty
Easy
Time
15-30 minutes
Tools Used
Nutdriver
Parts Used
2. Remove throttle cable
3. Pull old carb
4. Replace new carb
5. Replace throttle cable
6. Replace fuel lines
7. Prime carb
8. Pull start
Leaf blower carb would not feed gas.
Tool Type
Blower
Difficulty
Easy
Time
Less than 15 minutes
Tools Used
Screwdriver
Parts Used
Would not run without holding choke closed
Tool Type
Blower
Difficulty
Easy
Time
15-30 minutes
Tools Used
Screwdriver
Parts Used
2. Removed 2 screws holding carburetor
3. Removed fuel lines
4. Put new carburetor on
5. Attached fuel lines
6. Attached carburetor with screws
7. Replaced air filter
Engine would not start
Tool Type
Trimmer
Difficulty
Easy
Time
Less than 15 minutes
Tools Used
, Torx bit
If the lines are the same color it may be beneficial to mark the lines to reinstall them in the correct location on the new carb.
It would not start unless you added fuel directly into the carburator
Tool Type
Blower
Difficulty
Easy
Time
15-30 minutes
Tools Used
Screwdriver, Socket set
Parts Used
2. Removed the fuel lines
3. Removed the old carburetor along with filter and idle arm
4. Replaced with new carburetor along with filter and idle arm
5. Replaced the fuel lines with new ones
6. Refilled the fuel tank, primed and it started right up!
OEM stands for Original Equipment Manufacturer and means the part you’re buying is sourced directly from the manufacturer who made your product. At eReplacementParts, we sell only genuine OEM parts, guaranteeing the part you’re purchasing is of better design and of higher quality than aftermarket parts.
Our product descriptions are a combination of data sourced directly from the manufacturers who made your product as well as content researched and curated by our content & customer service teams. This content is edited and reviewed internally before being made public to customers.
Our customer service team are at the ready daily to answer your part and product questions. We have a dedicated staff with decades of collective experience in helping customers just like you purchase parts to repair their products.
All our part reviews are solicited directly from other customers who have purchased this exact part. While we moderate these reviews for profanity, offensive language or personally identifiable information, these reviews are posted exactly as submitted and no alterations are made by our team.
All our customer repair instructions are solicited directly from other customers just like you who have purchased and replaced this exact part. While we moderate these reviews for profanity, offensive language or personally identifiable information, these reviews are posted exactly as submitted and no alterations are made by our team.
Based on data from past customer purchasing behaviors, these parts are most commonly purchased together along with the part you are viewing. These parts may be necessary or helpful to replace to complete your current repair.
All our installation videos are created and produced in collaboration with our in-house repair technician, Mark Sodja, who has helped millions of eReplacementParts customers over the last 13 years repair their products. Mark has years of experience in selling and repairing both commercial and residential products with a specialty in gas-powered equipment.
This data is collected from customers who submitted a repair instruction after replacing this exact part. Customers can rate how easy the repair was to complete and how long it took. We aggregate this data to provide a repair rating that allows customers to quickly determine the difficulty and time needed to perform their own repair.