Trigger Valve Assembly (not Th A08368 - OEM Porter Cable - eReplacementParts.com
eReplacementParts.com
877-346-4814
Porter Cable Parts
Repair Parts Home
  
Power Tool Parts
  
Porter Cable Parts
  A08368 Trigger Valve Assembly (not Th

Trigger Valve Assembly (not Th A08368

OEM part for: Porter Cable

Part Number: A08368


Install
Videos!
Trigger Valve Assembly (not Th - A08368:Porter Cable 360 View
Trigger Valve Assembly (not Th - A08368:Porter CableTrigger Valve Assembly (not Th - A08368:Porter CableTrigger Valve Assembly (not Th - A08368:Porter Cable 360 View
$54.42
In Stock
Ships within 1 business day
Easy 15-30 minutes (10 rated repairs)?
OEM: Original Equipment Manufacturer ?
Porter Cable
Does this d-block d-md-none fit my product?

Product Description ?

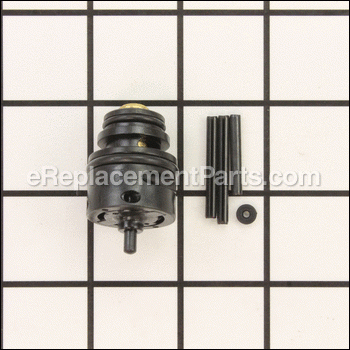
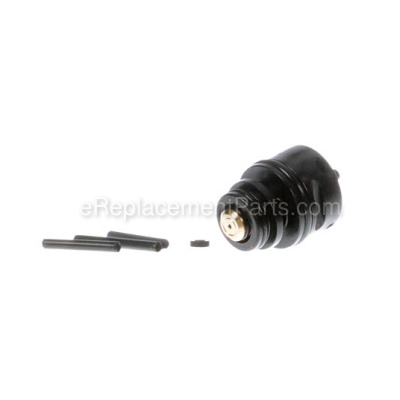
This unthreaded trigger valve assembly is a genuine OEM assembly used in nailers. It includes the trigger valve, 1 rubber washer, and 3 roll pins. The trigger valve controls the flow of air in the tool which drives the piston and creates the nailing action. If the valve becomes stuck, the seals wear down, or the trigger breaks the nailer will leak air, struggle to fire, or not fire at all. Begin the repair by switching off the tool and using a push pin to remove the trigger. Remove the roll pins that secure the trigger valve and pull the trigger valve out of the housing. Insert the new valve into the housing, install the pins to hold it in place, and secure the stay pin with the washer.

  • Classification: Part
  • Weight: 0.03 lbs.
  • Shipping: Ships Worldwide

Frequently Purchased Together ?

Compatibility

This part will fit the following 35 machines

Porter Cable

RN175 Type 1 Roofing Nailer View Diagrams & Manuals
RN175 Type 2 Roofing Nailer View Diagrams & Manuals
RN175A Roofing Nailer View Diagrams & Manuals
FN250A Finish Nailer View Diagrams & Manuals
FC350 Type 1 Clipped Head Framing Nailer View Diagrams & Manuals
FC350 Type 2 Clipped Head Framing Nailer View Diagrams & Manuals
FC350 Type 3 Clipped Head Framing Nailer View Diagrams & Manuals
COIL200 2" Coil Nailer View Diagrams & Manuals
COIL250 Type 1 2.5" Coil Nailer View Diagrams & Manuals
COIL250 Type 2 2.5" Coil Nailer View Diagrams & Manuals
COIL350 Type 1 3.5" Coil Nailer View Diagrams & Manuals
COIL350 Type 2 3.5" Coil Nailer View Diagrams & Manuals
DA250A 15 Gauge Angle Nailer View Diagrams & Manuals
DA250B 15 Gauge Angle Nailer View Diagrams & Manuals
FCP350 Clipped Head Framing Nailer View Diagrams & Manuals
FN250B 16 Gauge Finish Nailer View Diagrams & Manuals
FR350 Type 1 Round Head Framing Nailer View Diagrams & Manuals
FR350 Type 3 Round Head Framing Nailer View Diagrams & Manuals
FR350A Round Head Framing Nailer View Diagrams & Manuals
FR350MAG Type 1 Magnesium Round Head Framing Nailer View Diagrams & Manuals
FR350MAG Type 2 Magnesium Round Head Framing Nailer View Diagrams & Manuals
MS200 Type 1 16 Gauge Medium Crown Stapler View Diagrams & Manuals
MS200 Type 2 16 Gauge Medium Crown Stapler View Diagrams & Manuals
FR350 Type 2 Round Head Framer View Diagrams & Manuals
FRP350 Type 1 3-1/2" Round Head Framer View Diagrams & Manuals
FN251 (Type 1) Flooring Nailer View Diagrams & Manuals
COIL200 (Type 1) 2in Coil Nailer Kit Power Tool View Diagrams & Manuals
RN175A (Type 1) Coil Roofing Nailer Power Tool View Diagrams & Manuals
DA250A (Type 1) 2 1/2in Angle Nailer Power Tool View Diagrams & Manuals
DA250B (Type 1) Finish Nailer Power Tool View Diagrams & Manuals
FN250A (Type 1) 2 1/2in Finish Nailer Power Tool View Diagrams & Manuals
FN250B (Type 1) Finish Nailer Power Tool View Diagrams & Manuals
FCP350 (Type 1) 3-1/2in Hp Ch Framer Power Tool View Diagrams & Manuals
FM350A (Type 1) Framing Nailer Power Tool View Diagrams & Manuals
FR350A (Type 1) 3-1/2in Rh Framer Power Tool View Diagrams & Manuals
Show More Compatible Models
Don't see yours? Try searching our site for :

This item works with the following types of products:

  • Nailer Parts
  • Stapler Parts

This part replaces obsolete part #: 897458

Questions & Answers ?

Our customer Service team is at the ready daily to answer your part and product questions.

photo of team member
Ask our Team

We have a dedicated staff with decades of collective experience in helping customers just like you purchase parts to repair their products.

Does this fit my product?

Questions & Answers for Trigger Valve Assembly (not Th


Is this the right part for my porter cable FR350b gun?Also, mine fires once or twice then won't fire randomly. Will this part fix this type of problem?Thanks
John for model number Fr350b asked on 2023-11-06
Hi John, Thank you for reaching out. The Tigger Valve for this model is listed as Part Number: 9R202265-TW. If the Valve is leaking air, it can cause this issue. We hope this helps!
eReplacementParts Team November 06, 2023
The trigger valve assembly is NOT threaded. Mine is threaded and NO pins. Please confirm the trigger valve assembly only comes as a pin assembly and will NOT be compatible with my threaded unit.
Bill for model number FR350 type 2 round head framer asked on 2023-11-02
Hi Bill, Thank you for your question. The trigger valve assembly listed for nail gun model number FR350 Type 2 is unthreaded. The assembly includes the trigger valve, 1 rubber washer, and 3 roll pins. We hope this helps!
eReplacementParts Team November 02, 2023
My old trigger valve is threaded. This says not threaded. will this valve work in my nailer? If so how is it held in? Or do you have a recommendation?
Doug for model number FR350 type 2 asked on 2023-02-15
Hi Doug, Thank you for your question. Yes, this trigger valve is listed under your model number and it is designed to work on your framer. If you would like to place an order for it, please call our customer service line and anyone will be happy to assist you. We look forward to hearing from you!
eReplacementParts Team February 15, 2023

Customer Repair Instructions ?

All our customer repair instructions are solicited directly from other customers just like you who have purchased and replaced this exact part.

Easy 15-30 minutes (10 rated repairs)?

Leaking air

Bill - January 29, 2019
👍 2 of 2 people found this instruction helpful
Tool Type

Nailer

Difficulty

Easy

Time

15-30 minutes

Tools Used

Pliers, Ball peen hammer , punch , needle nose pliers

Removed split pin removed trigger and replaced new one
Did you find this story helpful?
Thanks for voting and helping fellow customers!

Air leak from trigger

ROBERT - February 21, 2018
👍 2 of 2 people found this instruction helpful
Tool Type

Nailer

Difficulty

Easy

Time

15-30 minutes

Tools Used

Took off small rubber keeper washer off stay pin, used drill bit to push pin out, replaced assembly and reassembled.
Did you find this story helpful?
Thanks for voting and helping fellow customers!

air leaking from trigger of air nail gun

Keith - December 9, 2021
👍 1 of 1 people found this instruction helpful
Tool Type

Nailer

Difficulty

Easy

Time

Less than 15 minutes

Tools Used

Pliers, hammer

I replaced the Trigger Valve Assembly, the part came with easy instructions, which I followed. On the Porter Cable nail gun I just had to remove the pin that held the actual trigger in place. Then I used that pin as a punch to remove one roll pin that secures the Trigger Valve Assembly. After driving out the roll pin I pulled out the Trigger Valve Assembly and re-installed the new one. Just align the grove in the assembly to match the position of the roll pin, which secures the assembly in place. Then re-position the trigger and install the pin.
Did you find this story helpful?
Thanks for voting and helping fellow customers!

could not control how far nails wouls sink

robert - December 29, 2021
Tool Type

Nailer

Difficulty

Easy

Time

30-60 minutes

Tools Used

, sllen wrench

part came with breakdown and instructions,
Did you find this story helpful?
Thanks for voting and helping fellow customers!

Air leak from the trigger

Michael - June 15, 2020
Tool Type

Nailer

Difficulty

Easy

Time

Less than 15 minutes

Tools Used

Screwdriver

pushed the pins out
removed the trigger
inserted the new trigger valve
works great
Did you find this story helpful?
Thanks for voting and helping fellow customers!

leaking air

William - January 3, 2020
Tool Type

Nailer

Difficulty

Easy

Time

Less than 15 minutes

Tools Used

, punch

removed two roll pins popped trigger assy out .Installed new assy and secured with new pins supplied by the manufacturer
Did you find this story helpful?
Thanks for voting and helping fellow customers!

Leaking air from trigger assembly

Steve - July 25, 2019
Tool Type

Nailer

Difficulty

Easy

Time

Less than 15 minutes

Tools Used

, small punch, hammer

1 - Removed 2 roll pins that held safety mechanism using a small punch and hammer
2 - Removed trigger pivot pin, releasing the trigger and the spring behind it
3 - Removed 2 roll pins holding trigger valve.
4 - Inserted new trigger valve, being to to fully seat it and align it according to the enclosed instructions
5 - Inserted new roll pins to hold trigger valve - gently tap in with small hammer
6 - Re-installed the trigger and spring behind it
7 - re-installed the safety mechanism using original roll pins
Problem Solved!
Did you find this story helpful?
Thanks for voting and helping fellow customers!

Leaked from trigger

Michael - January 27, 2018
Tool Type

Nailer

Difficulty

Easy

Time

Less than 15 minutes

Tools Used

Pliers, Small hammer & punch

Drive out pins, lube, insert trigger drive pins in.

Did you find this story helpful?
Thanks for voting and helping fellow customers!

Leaking air on trigger value

Arthur - January 26, 2018
Tool Type

Nailer

Difficulty

Medium

Time

Less than 15 minutes

Tools Used

, Punch, small hammer

Remove roll pins. Removed none threaded valve with paint can opener, and replaced with new one.....
Did you find this story helpful?
Thanks for voting and helping fellow customers!

Drive piston would not return.

CD - December 15, 2017
Tool Type

Nailer

Difficulty

Medium

Time

30-60 minutes

Tools Used

, allen wrenches

1. The trigger replacement was a separate issue. it is possible that the rubber grip had slid up on the handle and interfered with the trigger operation. it was very hard to pull the trigger fully to shoot. All good now. item came with basic instructions. 15 minutes.

2. The piston grip/bumper was the top percentage suggestion for the driver not returning.Make sure you enter your exact model number for recommended repairs. I didn't, the first time. It WAS cracked. after removing the rear housing to access the bumper I had to tap the cap for the stuff to come out. when reassembled there was a spring loaded tension on the cap. you have to push in about 1/2 inch to get the bolts started. I recommend you purchase a new rear cap gasket. a tiny flake of factory paint adjacent to the gasket come loose and there was a leak after reassembly. 45 minutes.
Did you find this story helpful?
Thanks for voting and helping fellow customers!

OEM stands for Original Equipment Manufacturer and means the part you’re buying is sourced directly from the manufacturer who made your product. At eReplacementParts, we sell only genuine OEM parts, guaranteeing the part you’re purchasing is of better design and of higher quality than aftermarket parts.

Our product descriptions are a combination of data sourced directly from the manufacturers who made your product as well as content researched and curated by our content & customer service teams. This content is edited and reviewed internally before being made public to customers.

Our customer service team are at the ready daily to answer your part and product questions. We have a dedicated staff with decades of collective experience in helping customers just like you purchase parts to repair their products.

All our part reviews are solicited directly from other customers who have purchased this exact part. While we moderate these reviews for profanity, offensive language or personally identifiable information, these reviews are posted exactly as submitted and no alterations are made by our team.

All our customer repair instructions are solicited directly from other customers just like you who have purchased and replaced this exact part. While we moderate these reviews for profanity, offensive language or personally identifiable information, these reviews are posted exactly as submitted and no alterations are made by our team.

Based on data from past customer purchasing behaviors, these parts are most commonly purchased together along with the part you are viewing. These parts may be necessary or helpful to replace to complete your current repair.

All our installation videos are created and produced in collaboration with our in-house repair technician, Mark Sodja, who has helped millions of eReplacementParts customers over the last 13 years repair their products. Mark has years of experience in selling and repairing both commercial and residential products with a specialty in gas-powered equipment.

This data is collected from customers who submitted a repair instruction after replacing this exact part. Customers can rate how easy the repair was to complete and how long it took. We aggregate this data to provide a repair rating that allows customers to quickly determine the difficulty and time needed to perform their own repair.

eReplacementParts.com
7174 South 400 West
Suite 5
Midvale, UT 84047
visa mastercard discover american express PayPal