
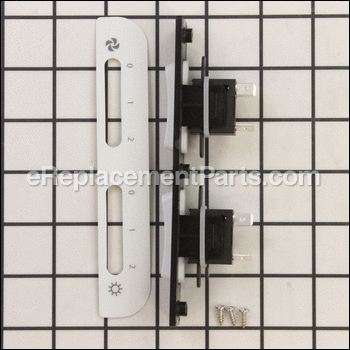
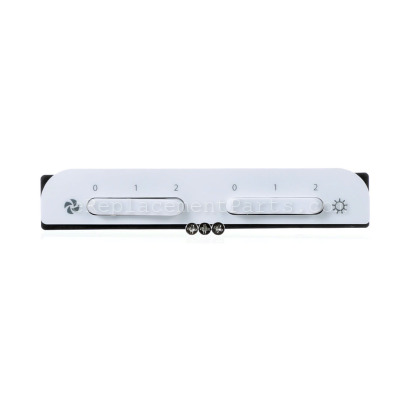


This genuine switch assembly is used to turn the fan and the light on or off. It is supplied by original equipment manufacturer as an authentic replacement for Broan range hoods. Includes two mechanical switches with a mounting plate, screws to attach it and the white nameplate.
Replacing it is a fairly easy task that should only require a screwdriver.
• Make sure the unit is unplugged
• Disconnect the wires from the old switch
• Remove screws that secure it to the frame
• Replace old switch with a new one
• Reassemble and test
Obe103130 Switch Assy White F/ S97017729
OEM part for: Broan
Part Number: S97017729
$49.83
In Stock
Product Description ?
- Two Speed
- Classification: Part
- Weight: 0.10 lbs.
- Shipping: Ships Worldwide
Compatibility
This part will fit the following 12 machines
Broan
QP130BL Range Hood View Diagrams & Manuals
QP130SS Range Hood View Diagrams & Manuals
QP130WW Range Hood View Diagrams & Manuals
QP136BL Range Hood View Diagrams & Manuals
QP136SS Range Hood View Diagrams & Manuals
QP136WW Range Hood View Diagrams & Manuals
QP142 Range Hood View Diagrams & Manuals
QP142SS Range Hood View Diagrams & Manuals
QP142BL Range Hood View Diagrams & Manuals
QP142WW Range Hood View Diagrams & Manuals
QP136 Under Cabinet Series 36" Wide Range Hood - 300 Cfm / 5.0 Sones View Diagrams & Manuals
QP130 Under Cabinet Series 30" Wide Range Hood - 300 Cfm / 5.0 Sones View Diagrams & Manuals
Show More Compatible Models
This item works with the following types of products:
- Range Parts
This part replaces obsolete part #: 97017729
Customer Part Reviews ?
Average Rating (out of 5):
Click to filter by ratings:
5 stars
13
4 stars
0
3 stars
0
2 stars
0
1 stars
0
< PREV
- 1
- 2
Just what I wanted.
Fast shipping, easy to replace, will use again if needed
Mary -
January 17, 2023
Verified Purchase
Easy repair
Arrived fast. Easy to install. Don’t lose the little screws from original - spares are not provided.
Guest -
June 8, 2021
Verified Purchase
smooth transaction
Smooth transaction, part got replaced easily, no complaints
Guest -
January 26, 2021
Verified Purchase
satisfied
The part was as described, arrived intact and on time.
Guest -
October 15, 2020
Verified Purchase
Fast delivery, perfect part.
Brand new part exactly matched the original replaced one, arrived right on time.
Guest -
October 4, 2020
Verified Purchase
Service was great! Part was correct!
The part was the correct model and serial number and worked perfect it arrived early and it was an easy install thanks for your help with this
Guest -
September 22, 2020
Verified Purchase
repair needs a little more info, to make install a bit easier.
parts were correct an install was relative easy
Guest -
September 8, 2020
Verified Purchase
An easy fix!
Part arrived quickly and was easy to replace. Our range hood is perfect again!
Guest -
July 21, 2020
Verified Purchase
Easy look up and ordering.
Perfect match.
Guest -
April 28, 2020
Verified Purchase
Excellent
Item arrived earlier than expected. Easy to replace. Works great. Thank You
Jennifer -
April 6, 2020
Verified Purchase
t
t
t -
t days ago
Verified Purchase
eReplacementParts Team
t
Questions & Answers ?
Our customer Service team is at the ready daily to answer your part and product questions.

Ask our Team
We have a dedicated staff with decades of collective experience in helping customers just like you purchase parts to repair their products.
Does this fit my product?Questions & Answers for Obe103130 Switch Assy White F/
Does the switch come in black?
Anita
asked on 2022-07-28
Hello Anita, thank you for writing. Yes, this is found in black as part S97017730. If you need help placing an order, customer service is open 7 days a week. Please feel free to give us a call. We look forward to hearing from you.
eReplacementParts Team July 28, 2022
Does it come in black
Anita
for model number QP130BL
asked on 2022-07-27
Hi Anita,
Thank you for your question. The part number listed under your model number for the black switch assembly is S97017730. If you need help placing an order for it, customer service is open 7 days a week and anyone will be happy to assist you. Please feel free to give us a call. We look forward to hearing from you!
eReplacementParts Team July 27, 2022
Customer Repair Instructions ?
All our customer repair instructions are solicited directly from other customers just like you who have purchased and replaced this exact part.
Light switch broke
Larry - April 20, 2018
👍 5 of 5 people found this instruction helpful
Tool Type
Range
Difficulty
Easy
Time
Less than 15 minutes
Tools Used
Screwdriver, Razor blade
Parts Used
Removed hood filters , removed plate under hood to access switch, removed decal on front of hood switch, removed screws, pulled out old switch, unplugged old switch, plugged in new, placed back in hood, installed with new screws, installed new decal. Should have ordered black got white instead looks great.
Did you find this story helpful?
Thanks for voting and helping fellow customers!
The light switch only work on high.
Anna - November 23, 2016
👍 4 of 4 people found this instruction helpful
Tool Type
Range
Difficulty
Easy
Time
Less than 15 minutes
Tools Used
Screwdriver, Pliers
Parts Used
1. Removed label from switch to exposed two screws.
2. Removed two screws that held switch.
3. Removed switch from appliance.
4. Disconnected cables, taking note of positions of cables.
5. Connected cables to new switch.
6. Pushed new switch into position.
7. Attached switch with two screws.
8. Applied new label to switch.
2. Removed two screws that held switch.
3. Removed switch from appliance.
4. Disconnected cables, taking note of positions of cables.
5. Connected cables to new switch.
6. Pushed new switch into position.
7. Attached switch with two screws.
8. Applied new label to switch.
Did you find this story helpful?
Thanks for voting and helping fellow customers!
The plastic piece holding the 2 switches, was broken.
James - September 30, 2016
👍 4 of 4 people found this instruction helpful
Tool Type
Range
Difficulty
Easy
Time
15-30 minutes
Tools Used
Screwdriver
Parts Used
Just removed the screws and the simply replaced the leads from the old switch to the new switch one at a time, then screwed it back on.
Did you find this story helpful?
Thanks for voting and helping fellow customers!
Plastic bracket holding the switches broke
James - June 4, 2018
👍 2 of 2 people found this instruction helpful
Tool Type
Range
Difficulty
Easy
Time
15-30 minutes
Tools Used
Screwdriver, Pliers, Knife to remove old sticker
Parts Used
1. Removed the sticker on front of range hood
2. Unscrewed the 3 fasteners
3. Unplugged the old switch
4. Plugged in the new switch, replaced fasteners and installed new sticker. Super easy
2. Unscrewed the 3 fasteners
3. Unplugged the old switch
4. Plugged in the new switch, replaced fasteners and installed new sticker. Super easy
Did you find this story helpful?
Thanks for voting and helping fellow customers!
Switch was broken
Les - September 11, 2017
👍 2 of 2 people found this instruction helpful
Tool Type
Range
Difficulty
Easy
Time
Less than 15 minutes
Tools Used
Screwdriver
Parts Used
1. Removed old switch.
2. Removed wires from old and reinstalled on new switch.
3. Installed new switch.
2. Removed wires from old and reinstalled on new switch.
3. Installed new switch.
Did you find this story helpful?
Thanks for voting and helping fellow customers!
Original switch did not allow low light selection
Walter - May 8, 2019
👍 1 of 1 people found this instruction helpful
Tool Type
Range
Difficulty
Easy
Time
15-30 minutes
Tools Used
Screwdriver
Parts Used
Turned off power
Using a pocket knife pried off label on Range vent This revealed three small philips screws.
Removed exhaust fan filters. Removed protective panel behind switches.
Removed front panel screws behind fan/light label.
Noted there is a up/down way to mount new switch.
Duplicated that orientation for replacement switch assembly. Use screwdriver blade to help remove the push-on connectors. remove and transfer each connector from the old to the new switch assembly.
Remount the new switch assembly. Replace access panel. Replace filters. Energize power.
Did you find this story helpful?
Thanks for voting and helping fellow customers!
The light switch clip that holds it in place, broke
dorothy - September 16, 2018
👍 1 of 1 people found this instruction helpful
Tool Type
Range
Difficulty
Easy
Time
15-30 minutes
Tools Used
Screwdriver
Parts Used
I read the reviews that said you only needed a screwdriver & how easy the part was to replace so being a widow ,when my part arrive, I told myself I can do this,I did, the switch for the light & fan work as it should. Very happy that it as made to be replace so easily
Did you find this story helpful?
Thanks for voting and helping fellow customers!
SWITCH WORE OUT. QUIT WORKING.
EDWARD - February 9, 2024
Tool Type
Range
Difficulty
Easy
Time
30-60 minutes
Tools Used
Screwdriver
Parts Used
TOOK OFF OLD SWITCH AND INSTALLED REPLACEMENT SWITCH.
INVOLVED TWO SCREWS.
INVOLVED TWO SCREWS.
Did you find this story helpful?
Thanks for voting and helping fellow customers!
The light switch would only go on low seting
Kevin - August 31, 2022
Tool Type
Range
Difficulty
Easy
Time
15-30 minutes
Tools Used
Screwdriver
Parts Used
Quite simply removed both of the filters and two screws holding an interior panel in place allowing access to the back of the switch. Had to remove the selector label and the three screws holding the switch in place. Pulled the switch out, unhooked the wiring harness and reversed the process to completion.
Did you find this story helpful?
Thanks for voting and helping fellow customers!
Switch panel plate broke
Greg - April 26, 2021
Tool Type
Range
Difficulty
Easy
Time
Less than 15 minutes
Tools Used
Screwdriver
Parts Used
Remove vent covers
Remove rear plate covering panel from the inside (Phillips head screws)
Remove front sticker cover on outside of range
Remove 3 Phillips screws that were beneath the sticker
Remove panel, unplug wires
Installation is the reverse
Remove rear plate covering panel from the inside (Phillips head screws)
Remove front sticker cover on outside of range
Remove 3 Phillips screws that were beneath the sticker
Remove panel, unplug wires
Installation is the reverse
Did you find this story helpful?
Thanks for voting and helping fellow customers!
Load More Install Stories
OEM stands for Original Equipment Manufacturer and means the part you’re buying is sourced directly from the manufacturer who made your product. At eReplacementParts, we sell only genuine OEM parts, guaranteeing the part you’re purchasing is of better design and of higher quality than aftermarket parts.
Our product descriptions are a combination of data sourced directly from the manufacturers who made your product as well as content researched and curated by our content & customer service teams. This content is edited and reviewed internally before being made public to customers.
Our customer service team are at the ready daily to answer your part and product questions. We have a dedicated staff with decades of collective experience in helping customers just like you purchase parts to repair their products.
All our part reviews are solicited directly from other customers who have purchased this exact part. While we moderate these reviews for profanity, offensive language or personally identifiable information, these reviews are posted exactly as submitted and no alterations are made by our team.
All our customer repair instructions are solicited directly from other customers just like you who have purchased and replaced this exact part. While we moderate these reviews for profanity, offensive language or personally identifiable information, these reviews are posted exactly as submitted and no alterations are made by our team.
Based on data from past customer purchasing behaviors, these parts are most commonly purchased together along with the part you are viewing. These parts may be necessary or helpful to replace to complete your current repair.
All our installation videos are created and produced in collaboration with our in-house repair technician, Mark Sodja, who has helped millions of eReplacementParts customers over the last 13 years repair their products. Mark has years of experience in selling and repairing both commercial and residential products with a specialty in gas-powered equipment.
This data is collected from customers who submitted a repair instruction after replacing this exact part. Customers can rate how easy the repair was to complete and how long it took. We aggregate this data to provide a repair rating that allows customers to quickly determine the difficulty and time needed to perform their own repair.