eReplacementParts.com
877-346-4814
Broan Parts
Repair Parts Home
  
Major Appliance Parts
  
Broan Parts
  S97017730 Black Assy Switch

Black Assy Switch S97017730

OEM part for: Broan

Part Number: S97017730


Install
Videos!
Black Assy Switch - S97017730:Broan 360 View
Black Assy Switch - S97017730:BroanBlack Assy Switch - S97017730:BroanBlack Assy Switch - S97017730:Broan 360 View
In Stock
Order within the next 3 hours and your part ships today!
Easy 15-30 minutes (37 rated repairs)?
OEM: Original Equipment Manufacturer ?
Broan
Does this d-block d-md-none fit my product?

Product Description ?

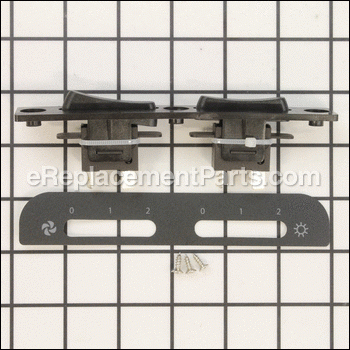
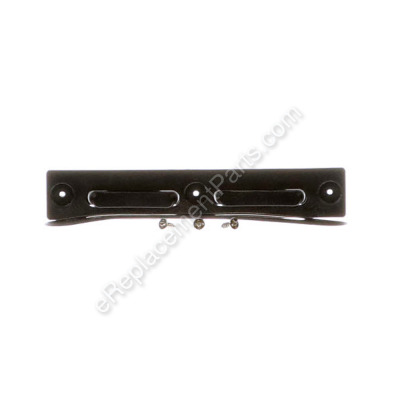
Genuine Broan OEM replacement switch kit is used on some Range Hoods. This part includes the Switch Assembly used to control the Fan and the Light, Screws to attach it and the Nameplate. The name plate is available separately, also supplied in White.

  • Two Speed Switch
  • Classification: Part
  • Weight: 0.06 lbs.
  • Shipping: Ships Worldwide

Compatibility

This part will fit the following 12 machines

Broan

QP130BL Range Hood View Diagrams & Manuals
QP130SS Range Hood View Diagrams & Manuals
QP130WW Range Hood View Diagrams & Manuals
QP136BL Range Hood View Diagrams & Manuals
QP136SS Range Hood View Diagrams & Manuals
QP136WW Range Hood View Diagrams & Manuals
QP142 Range Hood View Diagrams & Manuals
QP142SS Range Hood View Diagrams & Manuals
QP142BL Range Hood View Diagrams & Manuals
QP142WW Range Hood View Diagrams & Manuals
QP136 Under Cabinet Series 36" Wide Range Hood - 300 Cfm / 5.0 Sones View Diagrams & Manuals
QP130 Under Cabinet Series 30" Wide Range Hood - 300 Cfm / 5.0 Sones View Diagrams & Manuals
Show More Compatible Models
Don't see yours? Try searching our site for :

This item works with the following types of products:

  • Range Parts

This part replaces obsolete part #: 97017730

Customer Part Reviews ?

4.9
Average Rating (out of 5):
39 Reviews
Click to filter by ratings:
5 stars
37
4 stars
2
3 stars
0
2 stars
0
1 stars
0
  • Highest Rating
  • Most Recent
< PREV
  • 1
  • 2
  • 3
NEXT >
  • Fast Service
    Correct parts arrived quickly.
    Guest - February 7, 2023 Verified Purchase
    Great Customer Service. I called twice. Both persons were Excellent. They took the time to research installation and insured I was buying correct part.
    Part was delivered by USPS and took a couple of days longer to receive. The part worked fine. Removing the old part was tricky (tight space). Installing the new one was simple.
    Guest - August 15, 2022 Verified Purchase
    Quick arrival
    I was pleased with my replacement piece for my over the stove light switch and it arrived quickly. Thank you.
    Francine - July 31, 2022 Verified Purchase
    Exceptional customer service
    The part arrived quickly and was exactly what was needed. Installed easily
    Anonymous - July 6, 2022 Verified Purchase
    Made replacing switch assembly very easy
    ARRIVED QUICKLY, FIT PERFECTLY AND MADE IT VERY EASY TO REPLACE OLD RANGE HOOD ASSEMBLY. MADE WIFE HAPPY.
    Guest - January 30, 2022 Verified Purchase
    no problems
    don't require comments
    Guest - November 29, 2021 Verified Purchase
    Switch Replacement
    The parts arrived quickly and was a perfect match for the switch assembly. It came with easy to read instructions and pictures. Replacement was easy and was done in less than 20 minutes. Simply outstanding!
    Anonymous - November 10, 2021 Verified Purchase
    Quick, easy
    Included instructions made this a quick replacement
    Guest - October 11, 2021 Verified Purchase
    range hood repair
    light and blower switch kit very precise and super easy to replace thanx,Bob
    Guest - September 11, 2021 Verified Purchase
    DIY Parts
    Perfect fix for the issue. Easily installed and saved money by not having to replace entire unit.
    Guest - August 31, 2021 Verified Purchase
    t
    t
    t - t days ago Verified Purchase
    eReplacementParts Team
    t

    Questions & Answers ?

    Our customer Service team is at the ready daily to answer your part and product questions.

    photo of team member
    Ask our Team

    We have a dedicated staff with decades of collective experience in helping customers just like you purchase parts to repair their products.

    Does this fit my product?

    Questions & Answers for Black Assy Switch


    on the hood the light switch has been pushed back into the hood. I can get it out but how do I anchor it so it will not move back again?
    Tina for model number CH-01 1109 00904 asked on 2022-04-17
    Hello Trina, thank you for writing. The Switch Assembly S97017730 comes with the screws that are needed to install it. If you need help placing an order, customer service is open 7 days a week. Please feel free to give us a call. We look forward to hearing from you.
    eReplacementParts Team April 17, 2022

    Customer Repair Instructions ?

    All our customer repair instructions are solicited directly from other customers just like you who have purchased and replaced this exact part.

    Easy 15-30 minutes (37 rated repairs)?

    Switch housing failed, allowing the fan switch to fall into the hood.

    Charles - September 12, 2016
    👍 17 of 20 people found this instruction helpful
    Tool Type

    Range

    Difficulty

    Medium

    Time

    15-30 minutes

    Tools Used

    Screwdriver

    1. Turned off power to the range hood at breaker box.
    2. Peeled off switch faceplate sticker and cleaned off residual adhesive.
    3. Removed old filters.
    4. Removed metal plate between blower and switch housing.
    5. Removed the screws holding the switch housing.
    6. Pulled the old switch housing and switches free.
    7. Transferred the wires to the new switches one-by-one.
    8. Positioned the new unit and replaced the screws.
    9. Applied the new faceplate sticker.
    10. Replaced the metal plate and filters.
    11. Turned the power back on.
    Did you find this story helpful?
    Thanks for voting and helping fellow customers!

    Range hood vent fan switch would not turn off.

    Frederick - July 23, 2017
    👍 8 of 8 people found this instruction helpful
    Tool Type

    Range

    Difficulty

    Easy

    Time

    15-30 minutes

    Tools Used

    Screwdriver, Pliers

    1. Removed the grease filters.
    2. Removed the label.
    3. Removed 3 screws.
    4. Reached behind the hood and pulled out the switch.
    5. Pulled 1 wire at a time off the switch and plugged into the new switch.
    6. Placed the new switch into position.
    7. Screwed in the new screws.
    8. Applied the new label.
    9. Replaced the filters.
    10. Worked like new!
    Did you find this story helpful?
    Thanks for voting and helping fellow customers!

    Range hood light switch bracket broke

    Jeng - October 11, 2018
    👍 5 of 6 people found this instruction helpful
    Tool Type

    Range

    Difficulty

    Easy

    Time

    15-30 minutes

    Tools Used

    Screwdriver

    1. Turned off electrical breaker.
    2. Removed old switch assembly
    3. Disconnected switch wires one at a time and connected them to the new switch assembly one at a time.
    4.Reinstalled switch assembly into the hood.
    5. Turned breaker back on.
    6. Tested new switch function.
    Did you find this story helpful?
    Thanks for voting and helping fellow customers!

    The plastic around the buttons for the vent hood fan and lights broke and the buttons "disappeared" inside the hood.

    Per - March 26, 2018
    👍 4 of 4 people found this instruction helpful
    Tool Type

    Range

    Difficulty

    Easy

    Time

    15-30 minutes

    Tools Used

    Screwdriver

    The instructions in the enclosed manual were excellent.

    1) Removed the range hood filters
    2) Removed the protection plate under the range hood behind the buttons
    3) Removed the sticker indicator for the fan and lights on front of the hood
    4) Removed the screws holding the buttons to the range hood
    5) Pulled out the buttons on the back of the hood
    6) Removed connectors, put connectors on new button assembly
    7) Screwed buttons in place
    8) Taped new label over the screws
    9) Attached protection plate on back of button assembly
    10) Replaced filters
    Did you find this story helpful?
    Thanks for voting and helping fellow customers!

    Switch failed

    Trace - September 20, 2018
    Tool Type

    Range

    Difficulty

    Easy

    Time

    Less than 15 minutes

    Tools Used

    Screwdriver

    Easy to follow instructions
    Did you find this story helpful?
    Thanks for voting and helping fellow customers!

    Toggle switch broke loose from the retaining tabs

    Richard - June 27, 2018
    Tool Type

    Range

    Difficulty

    Easy

    Time

    Less than 15 minutes

    Tools Used

    Screwdriver

    Followed the easy instructions
    Did you find this story helpful?
    Thanks for voting and helping fellow customers!

    Light switch holder was cracked so switch would get pushed in

    Jermayne - May 23, 2018
    Tool Type

    Range

    Difficulty

    Easy

    Time

    Less than 15 minutes

    Tools Used

    Screwdriver, Pliers

    Simple repair, it's a couple screws under the label pull out and replace ,new sticker will need to be used adhesive don't restick
    Did you find this story helpful?
    Thanks for voting and helping fellow customers!

    Bad switch in range hood

    Clark - May 20, 2018
    Tool Type

    Range

    Difficulty

    Medium

    Time

    15-30 minutes

    Tools Used

    Screwdriver

    Followed directions for removal, installed new switch, test, completed assembly
    Did you find this story helpful?
    Thanks for voting and helping fellow customers!

    The switch broke

    Douglas - March 26, 2018
    Tool Type

    Range

    Difficulty

    Easy

    Time

    15-30 minutes

    Tools Used

    Screwdriver

    Read the instructions - which were great! Followed them step-by-step and replaced the part in no time at all. The pictures, accompanying the steps, were exact and looked just like what I needed to be looking at and doing.
    Did you find this story helpful?
    Thanks for voting and helping fellow customers!

    The light toggle switch plate broke. Toggle was hanging dangerously. Replaced plate and reset toggle on new plate. Good as new!

    Lee - February 15, 2018
    Tool Type

    Range

    Difficulty

    Easy

    Time

    15-30 minutes

    Tools Used

    Screwdriver

    Unscrew toggle housing plate
    Unplug wires from light switch
    Unplug wires from fan switch.
    Remove old plate
    Install new plate and screw into hood
    Attach plugs to new light and fan toggle switches
    Did you find this story helpful?
    Thanks for voting and helping fellow customers!

    OEM stands for Original Equipment Manufacturer and means the part you’re buying is sourced directly from the manufacturer who made your product. At eReplacementParts, we sell only genuine OEM parts, guaranteeing the part you’re purchasing is of better design and of higher quality than aftermarket parts.

    Our product descriptions are a combination of data sourced directly from the manufacturers who made your product as well as content researched and curated by our content & customer service teams. This content is edited and reviewed internally before being made public to customers.

    Our customer service team are at the ready daily to answer your part and product questions. We have a dedicated staff with decades of collective experience in helping customers just like you purchase parts to repair their products.

    All our part reviews are solicited directly from other customers who have purchased this exact part. While we moderate these reviews for profanity, offensive language or personally identifiable information, these reviews are posted exactly as submitted and no alterations are made by our team.

    All our customer repair instructions are solicited directly from other customers just like you who have purchased and replaced this exact part. While we moderate these reviews for profanity, offensive language or personally identifiable information, these reviews are posted exactly as submitted and no alterations are made by our team.

    Based on data from past customer purchasing behaviors, these parts are most commonly purchased together along with the part you are viewing. These parts may be necessary or helpful to replace to complete your current repair.

    All our installation videos are created and produced in collaboration with our in-house repair technician, Mark Sodja, who has helped millions of eReplacementParts customers over the last 13 years repair their products. Mark has years of experience in selling and repairing both commercial and residential products with a specialty in gas-powered equipment.

    This data is collected from customers who submitted a repair instruction after replacing this exact part. Customers can rate how easy the repair was to complete and how long it took. We aggregate this data to provide a repair rating that allows customers to quickly determine the difficulty and time needed to perform their own repair.

    eReplacementParts.com
    7174 South 400 West
    Suite 5
    Midvale, UT 84047
    visa mastercard discover american express PayPal