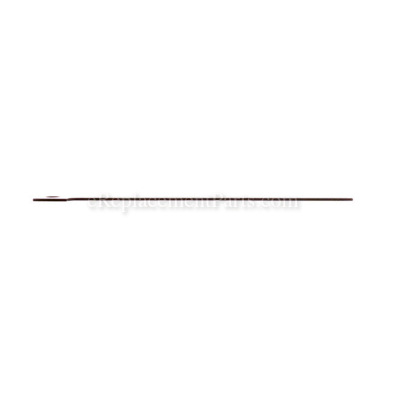
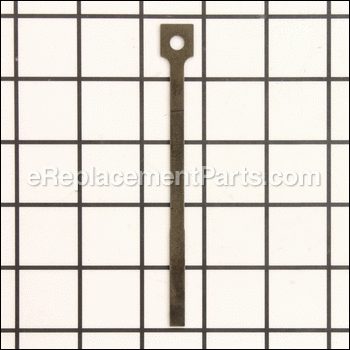


Genuine Manufacturer Sourced replacement part designed for use with some Senco Staplers. This part is made out of Metal and it is Sold Individually, it measures 3/16". It has a Piston attached to it and it is what drives the staples. A bent or damaged Driver should be replaced.
Staple Driver Blade EC0178
OEM part for: Senco
Part Number: EC0178
$35.29
In Stock
Jump To:
Frequently Purchased Together ?


Compatibility
This part will fit the following 2 machines
Senco
SKSXP Medium Wire Stapler View Diagrams & Manuals
SKS Stapler View Diagrams & Manuals
This item works with the following types of products:
- Stapler Parts
Repair Videos ?
Watch the Repair Video for
Staple Driver Blade

Questions & Answers ?
Our customer Service team is at the ready daily to answer your part and product questions.

Ask our Team
We have a dedicated staff with decades of collective experience in helping customers just like you purchase parts to repair their products.
Does this fit my product?Questions & Answers for Staple Driver Blade
What is the size of the punch needed to replace staple blade
Don
for model number Sksxp
asked on 2022-04-28
Hello Don, Thank you for the question. The Punch should be 3/16". If you need help placing an order, customer service is open 7 days a week. Please feel free to give us a call. We look forward to hearing from you!
eReplacementParts Team April 28, 2022
Customer Repair Instructions ?
All our customer repair instructions are solicited directly from other customers just like you who have purchased and replaced this exact part.
Driver broke piston wore out
JAMES - October 3, 2016
👍 3 of 3 people found this instruction helpful
Tool Type
Stapler
Difficulty
Easy
Time
15-30 minutes
Tools Used
Nutdriver, Adjustable Wrench, 2 Punches
Remove the top of the gun, remove the piston/driver. Remove the worn seals. Clean and lube the inside of the gun. Line up the hole in the driver and the hole in the piston, then with a punch drive the larger pin in first, then the small pin inside of the larger one. Install the piston and driver, and the new seals. Then replace the top.
Easy to get parts from you by going to your model break down of exact staple gun and order parts. Thanks, been using you for years...
Easy to get parts from you by going to your model break down of exact staple gun and order parts. Thanks, been using you for years...
Did you find this story helpful?
Thanks for voting and helping fellow customers!
Driver broken
Guy - February 12, 2016
👍 1 of 1 people found this instruction helpful
Tool Type
Stapler
Difficulty
Easy
Time
15-30 minutes
Tools Used
, allen wrench, punch
Parts Used
Remove 4 top allen screws and gun cover, pull out piston
Place driver head in vise
Punch out spring pin 90% remove broken driver head
Install new driver, punch in spring pin
Put parts back together
Place driver head in vise
Punch out spring pin 90% remove broken driver head
Install new driver, punch in spring pin
Put parts back together
Did you find this story helpful?
Thanks for voting and helping fellow customers!
The driver blade on my Senco SKS 1/4" crown stapler bent from hitting a hidden screw or nail in a floor I was working on.
Randy - January 24, 2016
👍 1 of 1 people found this instruction helpful
Tool Type
Stapler
Difficulty
Easy
Time
15-30 minutes
Tools Used
, Drift pin set, hammer, allen wrench
Parts Used
Repair was pretty straight forward. Remove the 4 screws from the top of the gun, then remove the plastic or aluminum cylinder sleeve in order to slide out piston/driver assembly. The driver blade is secured to the piston with two steel roll pins. Drive out the inner roll pin first, then the second larger one. You need a couple of the correct size punches for driving out each roll pin. After removing the two pins, pull out the old driver blade and insert the new one. Drive in the large roll pin and then the smaller one. I misaligned the roll pins 180 degrees. It might be easier with two people. One to hold the small piston, and the second person to drive out the roll pins.
I put a tiny film of lithium grease on the O-ring that's on the cylinder before inserting it back into the tool housing. Replace the piston/driver assembly into the cylinder and reassemble the gun in the order you took it apart. Don't over tighten the 4 screws when you put the top back on the gun.
Relatively easy fix if you are mechanically inclined and pay attention to the order of things when you took the gun apart.
If you see scoring in the cylinder or the piston has obvious damage, replace those to items also.
Did you find this story helpful?
Thanks for voting and helping fellow customers!
Broken driver blade
michael - October 4, 2018
Tool Type
Stapler
Difficulty
Easy
Time
15-30 minutes
Tools Used
, Allen wrench, pin punch, clean towel
1. Remove cylinder cap/muffler assembly
2. Remove piston/driver assembly
3. Remove both roll pins from piston/driver assembly
4. Install new driver with both new roll pins
5. Inspect cylinder for any debris from broken driver, remove any found pieces
6. Inspect for any damage to cylinder wall ie scratches/burrs
7. If none found reassemble using new seal on piston if existing is damaged
8. Tighten the 4 allen head screws on cap assembly evenly / being careful not to over tighten
Did you find this story helpful?
Thanks for voting and helping fellow customers!
Driver broke piston wore out
James - March 8, 2017
Tool Type
Stapler
Difficulty
Easy
Time
Less than 15 minutes
Tools Used
Screwdriver, Pliers, Power Drill, Nutdriver
Pull head off 4screws
Push piston out
Put new piston in vice and assemble driver bang in rivets with hammer and back side of nail punch there are 2 rivets big one 1st then 2nd
Install new seals
Slide in driver put head back the way it was tighten 4 machine screws
Take a break
Go back to making money
Push piston out
Put new piston in vice and assemble driver bang in rivets with hammer and back side of nail punch there are 2 rivets big one 1st then 2nd
Install new seals
Slide in driver put head back the way it was tighten 4 machine screws
Take a break
Go back to making money
Did you find this story helpful?
Thanks for voting and helping fellow customers!
OEM stands for Original Equipment Manufacturer and means the part you’re buying is sourced directly from the manufacturer who made your product. At eReplacementParts, we sell only genuine OEM parts, guaranteeing the part you’re purchasing is of better design and of higher quality than aftermarket parts.
Our product descriptions are a combination of data sourced directly from the manufacturers who made your product as well as content researched and curated by our content & customer service teams. This content is edited and reviewed internally before being made public to customers.
Our customer service team are at the ready daily to answer your part and product questions. We have a dedicated staff with decades of collective experience in helping customers just like you purchase parts to repair their products.
All our part reviews are solicited directly from other customers who have purchased this exact part. While we moderate these reviews for profanity, offensive language or personally identifiable information, these reviews are posted exactly as submitted and no alterations are made by our team.
All our customer repair instructions are solicited directly from other customers just like you who have purchased and replaced this exact part. While we moderate these reviews for profanity, offensive language or personally identifiable information, these reviews are posted exactly as submitted and no alterations are made by our team.
Based on data from past customer purchasing behaviors, these parts are most commonly purchased together along with the part you are viewing. These parts may be necessary or helpful to replace to complete your current repair.
All our installation videos are created and produced in collaboration with our in-house repair technician, Mark Sodja, who has helped millions of eReplacementParts customers over the last 13 years repair their products. Mark has years of experience in selling and repairing both commercial and residential products with a specialty in gas-powered equipment.
This data is collected from customers who submitted a repair instruction after replacing this exact part. Customers can rate how easy the repair was to complete and how long it took. We aggregate this data to provide a repair rating that allows customers to quickly determine the difficulty and time needed to perform their own repair.