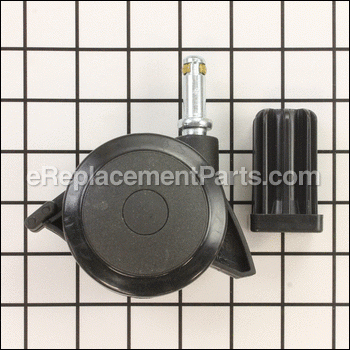

Genuine Manufacturer Sourced locking caster with insert to work with Weber Grills. This is a Plastic part with a Metal Shaft. Caster features the wheel locking mechanism. This caster wheel helps you keep your unit mobile for easy transportation and locking mechanism will keep it steady in place while in operation.
Locking Caster With Insert 70360
OEM part for: Weber
Part Number: 70360
$48.68
In Stock
Jump To:
Frequently Purchased Together ?

Compatibility
This Locking Caster With Insert will fit the following 208 machines. Confirm this part works with your model, and view the detailed model diagrams and repair help we have to offer.
Weber
Show More Compatible ModelsThis item works with the following types of products:
Repair Videos ?

Articles:
|
Having trouble getting your grill to light up? A common cause of this issue is a defective ignition switch. We'll sho...
November 08, 2012
|

Customer Part Reviews ?
Average Rating (out of 5):
Click to filter by ratings:
5 stars
4
4 stars
0
3 stars
0
2 stars
0
1 stars
0
< PREV
- 1
Exact replacement part
Replacement parts for a 15 year old Weber Summit grill. Exact parts and replacement instructions were very good.
Guest -
May 26, 2022
Verified Purchase
Weber Grill wheel casters
After noticing my Weber Grill wheels slowing breaking apart, u ordered these new ones. They are easy to install and well made.
Guest -
August 5, 2021
Verified Purchase
easy to install, perfect replacement.
Exactly what was needed to replace a broken insert.
Guest -
June 10, 2021
Verified Purchase
Rolling the way a grill shoud!
My parts arrived without delay, and the worn and torn wheels were out and the new ones in lickity split!
William -
June 17, 2020
Verified Purchase
Questions & Answers ?
Our customer Service team is at the ready daily to answer your part and product questions.

Ask our Team
We have a dedicated staff with decades of collective experience in helping customers just like you purchase parts to repair their products.
Does this fit my product?Questions & Answers for Locking Caster With Insert
what is the diameter of this wheel 70360?
Stephen
asked on 2023-05-12
Hi Stephen,
Thank you for your question. The wheel has a diameter of approximately 3-1/4 inches. We hope this helps!
eReplacementParts Team May 12, 2023
Customer Repair Instructions ?
All our customer repair instructions are solicited directly from other customers just like you who have purchased and replaced this exact part.
Rubber/plastic casters deteriorated.
Jimmie - August 26, 2016
👍 6 of 6 people found this instruction helpful
Tool Type
Outdoor Grill
Difficulty
Easy
Time
15-30 minutes
Tools Used
, Rubber mallet
The instructions say to block up the grill. However being I had everything removed from the grill ( propane tank, grate, tray, etc.) for a thorough cleaning, I just had my wife tilt the grill so that I could have access to the legs so as to replace the casters. With a rubber mallet gently hammered in the plastic inserts and then pushed in the casters by hand pressure.
Did you find this story helpful?
Thanks for voting and helping fellow customers!
Replacing caster wheels on a outdoor Weber gas grill.
Andre - July 16, 2017
👍 4 of 4 people found this instruction helpful
Tool Type
Outdoor Grill
Difficulty
Easy
Time
Less than 15 minutes
Tools Used
, No tools were needed for this
The easiest way is to lay your grill on its back, then you can easily access the caster wheels. First disconnect the propane tank and remove it from the grill. Then remove the grilles, dripping pan, and everything that might fall off when you lay it on its back.
Once it's laying down remove the old caster wheels by simply wiggling it while pulling out steady. you don't need any tools. They will slowly but surely come off one by one. Then just push the new caster wheels in until they snap in place. And that's all :).
Once it's laying down remove the old caster wheels by simply wiggling it while pulling out steady. you don't need any tools. They will slowly but surely come off one by one. Then just push the new caster wheels in until they snap in place. And that's all :).
Did you find this story helpful?
Thanks for voting and helping fellow customers!
Wheels worn and literally falling apart
Ivan - December 12, 2016
👍 3 of 3 people found this instruction helpful
Tool Type
Outdoor Grill
Difficulty
Medium
Time
15-30 minutes
Tools Used
Screwdriver, Hammer
Removed old casters and replaced them with the new ones.
First one was most difficult. Once I figured best method for removal( tap screwdriver into collar seam with hammer), the other three went quickly. Installing new ones very easy.
First one was most difficult. Once I figured best method for removal( tap screwdriver into collar seam with hammer), the other three went quickly. Installing new ones very easy.
Did you find this story helpful?
Thanks for voting and helping fellow customers!
Grill is 10 years old and the rubber on the wheels was shot.
Gary - September 16, 2017
👍 1 of 1 people found this instruction helpful
Tool Type
Outdoor Grill
Difficulty
Easy
Time
Less than 15 minutes
Tools Used
Screwdriver
Elevated one side of the grill at a time and knocked the old wheels off and replaced them with the new ones.
Did you find this story helpful?
Thanks for voting and helping fellow customers!
Wheels were broken, tires worn off.
Steve - May 28, 2016
👍 2 of 3 people found this instruction helpful
Tool Type
Outdoor Grill
Difficulty
Easy
Time
15-30 minutes
Tools Used
, Rubber Mallet
Parts Used
Put one end of the grill on a wooden block between the wheels. Grab the wheel from the underside so the wheel sticks out from the grill and hit it downwards with the rubber mallet to remove the old insert and wheel. Place the new insert in the frame and tap it into place. Insert the wheel and push till it clicks in place. Repeat for all wheels to be replaced.
Did you find this story helpful?
Thanks for voting and helping fellow customers!
Casters would not lock
JAMES - January 2, 2016
👍 1 of 1 people found this instruction helpful
Tool Type
Outdoor Grill
Difficulty
Easy
Time
Less than 15 minutes
Tools Used
, rubber malet
Parts Used
Remove old insert, install the new insert , then press caster in the insert.
Did you find this story helpful?
Thanks for voting and helping fellow customers!
not a thing
Jim - June 15, 2021
Tool Type
Outdoor Grill
Difficulty
Easy
Time
Less than 15 minutes
Tools Used
Screwdriver
Parts Used
Everything went together just right.
Did you find this story helpful?
Thanks for voting and helping fellow customers!
Original castors were 15yrs old and started to crack
Richard - April 28, 2021
Tool Type
Outdoor Grill
Difficulty
Easy
Time
Less than 15 minutes
Tools Used
Screwdriver, Rubber mallet
Followed your video
Did you find this story helpful?
Thanks for voting and helping fellow customers!
Old age, parts worn and deteriorated
Michael - May 13, 2020
Tool Type
Outdoor Grill
Difficulty
Medium
Time
30-60 minutes
Tools Used
Screwdriver, Pliers, Nutdriver
Removed the grates, drip pans, and trap. Removed the old flavorizer bars and dials. Removed the two manifold cover screws, removed the cover. Removed the manifold bolt, and pulled the manifold away. Removed the old burner tubes. Cleaned the drip areas, installed new burner tubes, reinstalled manifold, manifold cover, dials, installed new flavorizer bars, reinstalled grates.
Tested burners. Worked like new.
Placed one side of grill on milk crate, pulled old casters, reinstalled new, and repeated process for other side.
Tested burners. Worked like new.
Placed one side of grill on milk crate, pulled old casters, reinstalled new, and repeated process for other side.
Did you find this story helpful?
Thanks for voting and helping fellow customers!
Wheels and heat deflectors simply wore out after 12 years
Franklin - January 15, 2019
Tool Type
Outdoor Grill
Difficulty
Easy
Time
Less than 15 minutes
Tools Used
, Hammer or Mallot to bang out the old wheel inserts.
Parts Used
1. Removed all movable parts, grills, grease pan, heat deflectors, gas tank, etc. from the grill so that grill could be put on its side, without parts falling our or moving - and to reduce the weight of the grill. Recommend that the top of the grill also be removed to make the grill lighter and easier to tilt the grill over on its side. (Top is easily removed by using pliers to remove to cotter pins and then pull the two pins.)
2. Tilt the grill 90 degrees onto its side so that wheels to be replaced are exposed.
3. Use a hammer/mallot and flat bladed screw driver to (gently) push out the wheel inserts.
4. Push in the new wheel insert and seat the insert with ballot. Then - insert the new
wheels. Lock the wheels so that grill will not roll as it is uprighted.
5. Upright the grill and re-install all moveable parts. 15 minutes total repair time at most.
Did you find this story helpful?
Thanks for voting and helping fellow customers!
Load More Install Stories
OEM stands for Original Equipment Manufacturer and means the part you’re buying is sourced directly from the manufacturer who made your product. At eReplacementParts, we sell only genuine OEM parts, guaranteeing the part you’re purchasing is of better design and of higher quality than aftermarket parts.
Our product descriptions are a combination of data sourced directly from the manufacturers who made your product as well as content researched and curated by our content & customer service teams. This content is edited and reviewed internally before being made public to customers.
Our customer service team are at the ready daily to answer your part and product questions. We have a dedicated staff with decades of collective experience in helping customers just like you purchase parts to repair their products.
All our part reviews are solicited directly from other customers who have purchased this exact part. While we moderate these reviews for profanity, offensive language or personally identifiable information, these reviews are posted exactly as submitted and no alterations are made by our team.
All our customer repair instructions are solicited directly from other customers just like you who have purchased and replaced this exact part. While we moderate these reviews for profanity, offensive language or personally identifiable information, these reviews are posted exactly as submitted and no alterations are made by our team.
Based on data from past customer purchasing behaviors, these parts are most commonly purchased together along with the part you are viewing. These parts may be necessary or helpful to replace to complete your current repair.
All our installation videos are created and produced in collaboration with our in-house repair technician, Mark Sodja, who has helped millions of eReplacementParts customers over the last 13 years repair their products. Mark has years of experience in selling and repairing both commercial and residential products with a specialty in gas-powered equipment.
This data is collected from customers who submitted a repair instruction after replacing this exact part. Customers can rate how easy the repair was to complete and how long it took. We aggregate this data to provide a repair rating that allows customers to quickly determine the difficulty and time needed to perform their own repair.