
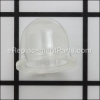
This intake adapter is an OEM direct from the Echo manufacturer. Compatible with many backpack blowers, this item is clamped onto the air cleaner bracket kit and the collar. This component sends the filtered air through the carburetor. The intake adapter is sold individually. A screwdriver and a wrench are often necessary for the replacement.
Intake Adapter 13071108260
OEM part for: Echo
Part Number: 13071108260
$22.09
In Stock
Jump To:
Frequently Purchased Together ?


Compatibility
This Intake Adapter will fit the following 46 machines. Confirm this part works with your model, and view the detailed model diagrams and repair help we have to offer.
This item works with the following types of products:
- Blower Parts
Customer Part Reviews ?
Average Rating (out of 5):
Click to filter by ratings:
5 stars
5
4 stars
0
3 stars
0
2 stars
0
1 stars
0
< PREV
- 1
Old back pack blower
This blower is 25 years old and needed some TLC which meant parts. You guys had it all, thanks.
Guest -
September 23, 2023
Verified Purchase
Highly recommend!!
All parts in great condition and fixed perfect. As promised. Highly recommend!!
Michael -
August 29, 2023
Verified Purchase
Easy repair
Exactly what i needed, fit perfectly.
Guest -
May 30, 2023
Verified Purchase
Great website, great service!
Great website, great service!
Anonymous -
June 26, 2021
Verified Purchase
Seemless swap
The part fit exactly as the OEM part. Very pleased and will buy another one!
Michael -
November 20, 2019
Verified Purchase
Questions & Answers ?
Our customer Service team is at the ready daily to answer your part and product questions.

Ask our Team
We have a dedicated staff with decades of collective experience in helping customers just like you purchase parts to repair their products.
Does this fit my product?Questions & Answers for Intake Adapter
No questions have been asked yet
Customer Repair Instructions ?
All our customer repair instructions are solicited directly from other customers just like you who have purchased and replaced this exact part.
Mounts were broken and intake adapter had holes in it.
Tom - November 17, 2016
👍 1 of 1 people found this instruction helpful
Tool Type
Blower
Difficulty
Medium
Time
15-30 minutes
Tools Used
Screwdriver, Nutdriver, Angle head screwdriver
1. Removed intake adapter clamps.
2. Removed all 3 broken cushions parts from frame.
3. Removed all 3 broken cushion parts from blower unit.
4. Reinstalled new parts and secured to blower first, then frame.
5. Reassembled intake adapter and tighten clamps.
6. The spacing between the frame and blower body is quite limited. To avoid having to separate the two, I used an angle head Phillips screwdriver. To separate the two, I believe the air filter assemble would have to be removed as well. When removing the nuts off the frame side of the cushions, watch for metal grommets. They will fall out after nuts are removed.
Did you find this story helpful?
Thanks for voting and helping fellow customers!
Intake Adapter was aged and cracked
Marc - May 6, 2024
Tool Type
Blower
Difficulty
Easy
Time
Less than 15 minutes
Tools Used
Screwdriver
Parts Used
Loosened two clamps, removed and replaced the adapter, and finished by tightening the clamps. Quick and easy.
Did you find this story helpful?
Thanks for voting and helping fellow customers!
Base gasket was blown out and handle assembly was in need of replacement
Michael - December 9, 2019
Tool Type
Blower
Difficulty
Easy
Time
30-60 minutes
Tools Used
Screwdriver, Socket set, Nutdriver, Allen set.
R&R assembly...
Did you find this story helpful?
Thanks for voting and helping fellow customers!
old rubber parts failing and needed a tune up
Grant - April 11, 2019
Tool Type
Blower
Difficulty
Easy
Time
30-60 minutes
Tools Used
Screwdriver, Pliers
I replaced the flex tube on the blower nozzle, replaced the cracked intake boot .New spark plug and a carburetor tune. It now runs great. I almost thru this away, so glad I was able to repair it for less than 75 dollars.
Did you find this story helpful?
Thanks for voting and helping fellow customers!
Intake adapter and and cushions were broken
Thomas - May 12, 2018
Tool Type
Blower
Difficulty
Easy
Time
15-30 minutes
Tools Used
Screwdriver, Nutdriver
Took of clamps hold intake adapter. removed old adapter and replaced with new and tightened clamps.
Cushions had to remove back of blower to access screws that held cushions. Replace cushions and reinstalled back of blower.
Cushions had to remove back of blower to access screws that held cushions. Replace cushions and reinstalled back of blower.
Did you find this story helpful?
Thanks for voting and helping fellow customers!
Blower losing it's power
Joe - April 19, 2018
Tool Type
Blower
Difficulty
Medium
Time
1-2 hours
Tools Used
Screwdriver, Socket set, Wrench Set, Hanger to get fuel filter out
Replaced the spark plug
Replaced the fuel filter
Replaced the air filter
Finally replaced the intake adapter
Replaced the fuel filter
Replaced the air filter
Finally replaced the intake adapter
Did you find this story helpful?
Thanks for voting and helping fellow customers!
Gas left in blower two years, lawn guy failed to use stabilizer 😡
Phillip - July 28, 2017
👍 0 of 1 people found this instruction helpful
Tool Type
Blower
Difficulty
Easy
Time
15-30 minutes
Tools Used
Screwdriver, Power Drill
Removed carb, two screws placed new gaskets placed gas lines hooked throttle linkage tightened new carb in place tight. Primed bulb pulled twice it fired.
Spent 15 min adjusting high speed and low speed jets.
Spent 15 min adjusting high speed and low speed jets.
Did you find this story helpful?
Thanks for voting and helping fellow customers!
OEM stands for Original Equipment Manufacturer and means the part you’re buying is sourced directly from the manufacturer who made your product. At eReplacementParts, we sell only genuine OEM parts, guaranteeing the part you’re purchasing is of better design and of higher quality than aftermarket parts.
Our product descriptions are a combination of data sourced directly from the manufacturers who made your product as well as content researched and curated by our content & customer service teams. This content is edited and reviewed internally before being made public to customers.
Our customer service team are at the ready daily to answer your part and product questions. We have a dedicated staff with decades of collective experience in helping customers just like you purchase parts to repair their products.
All our part reviews are solicited directly from other customers who have purchased this exact part. While we moderate these reviews for profanity, offensive language or personally identifiable information, these reviews are posted exactly as submitted and no alterations are made by our team.
All our customer repair instructions are solicited directly from other customers just like you who have purchased and replaced this exact part. While we moderate these reviews for profanity, offensive language or personally identifiable information, these reviews are posted exactly as submitted and no alterations are made by our team.
Based on data from past customer purchasing behaviors, these parts are most commonly purchased together along with the part you are viewing. These parts may be necessary or helpful to replace to complete your current repair.
All our installation videos are created and produced in collaboration with our in-house repair technician, Mark Sodja, who has helped millions of eReplacementParts customers over the last 13 years repair their products. Mark has years of experience in selling and repairing both commercial and residential products with a specialty in gas-powered equipment.
This data is collected from customers who submitted a repair instruction after replacing this exact part. Customers can rate how easy the repair was to complete and how long it took. We aggregate this data to provide a repair rating that allows customers to quickly determine the difficulty and time needed to perform their own repair.